A Feature Comparison of the OPNsense Plugin Zenarmor (formerly Sensei) by Sunny Valley Networks
Photo by Sunny Valley Networks from sunnyvalley.io
Table of Contents
Sunny Valley Networks is a company that has partnered with Deciso, the creators of OPNsense, to create a plugin called Zenarmor (formerly Sensei) which adds deep packet inspection and more to OPNsense. These features add greater visibility into your network. Zenarmor also has built-in cloud threat intelligence that can be used to block web/application traffic and to prevent known malware attacks. For users who wish to have a low cost option yet have advanced network monitoring and protection, OPNsense with Zenarmor is a great option to consider.
This review will focus on the features of Zenarmor and the differences between the Free Edition and the Home Edition to help you decide if you wish to subscribe to the Home Edition. Zenarmor’s Home Edition subscription is more affordable than options from other firewall manufacturers especially since many of them are focused more on small/medium-sized businesses or the enterprise.
Info
If you decide to subscribe to the Home Edition after reading through this review, please use my referral link for a 10% discount on the first month or year of your subscription! Note that you can only get the discount if you have not yet signed up for the Zenconsole Cloud Portal even if you are using only the Free Edition.
A Note about Installation
The installation process is pretty straightforward and well documented on Sunny Valley’s website so I do not wish to repeat the same information. However, there is one consideration worth mentioning since I had an issue with this when I first installed Zenarmor.
On the “Interface Selection” step during installation, you are prompted for the interfaces you wish to have Zenarmor monitor. If you have multiple VLANs associated to a single physical interface, you should only select the physical parent interface. Do not select each individual VLAN. This is similar to Suricata where you should only select the physical interface(s). Zenarmor will be able to analyze all of the VLAN traffic when monitoring the parent interface. If you do not select the physical interface(s), you may find that it will cause issues with your network.
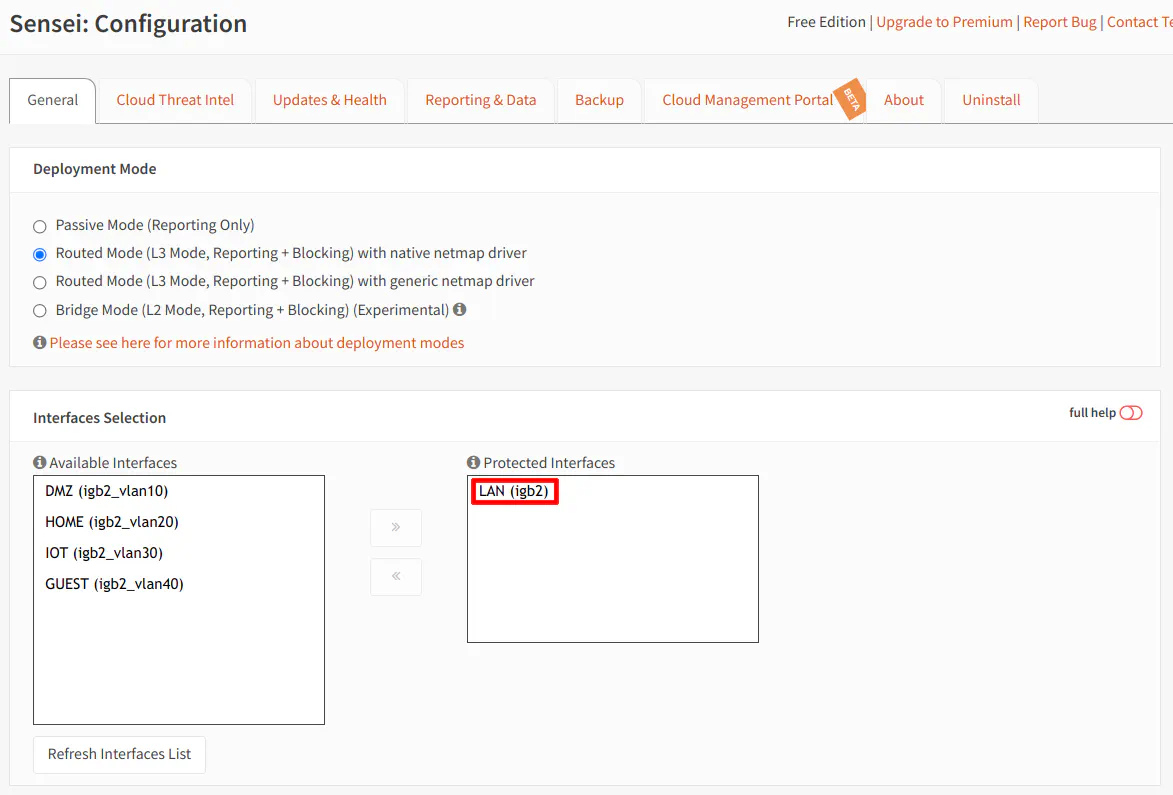
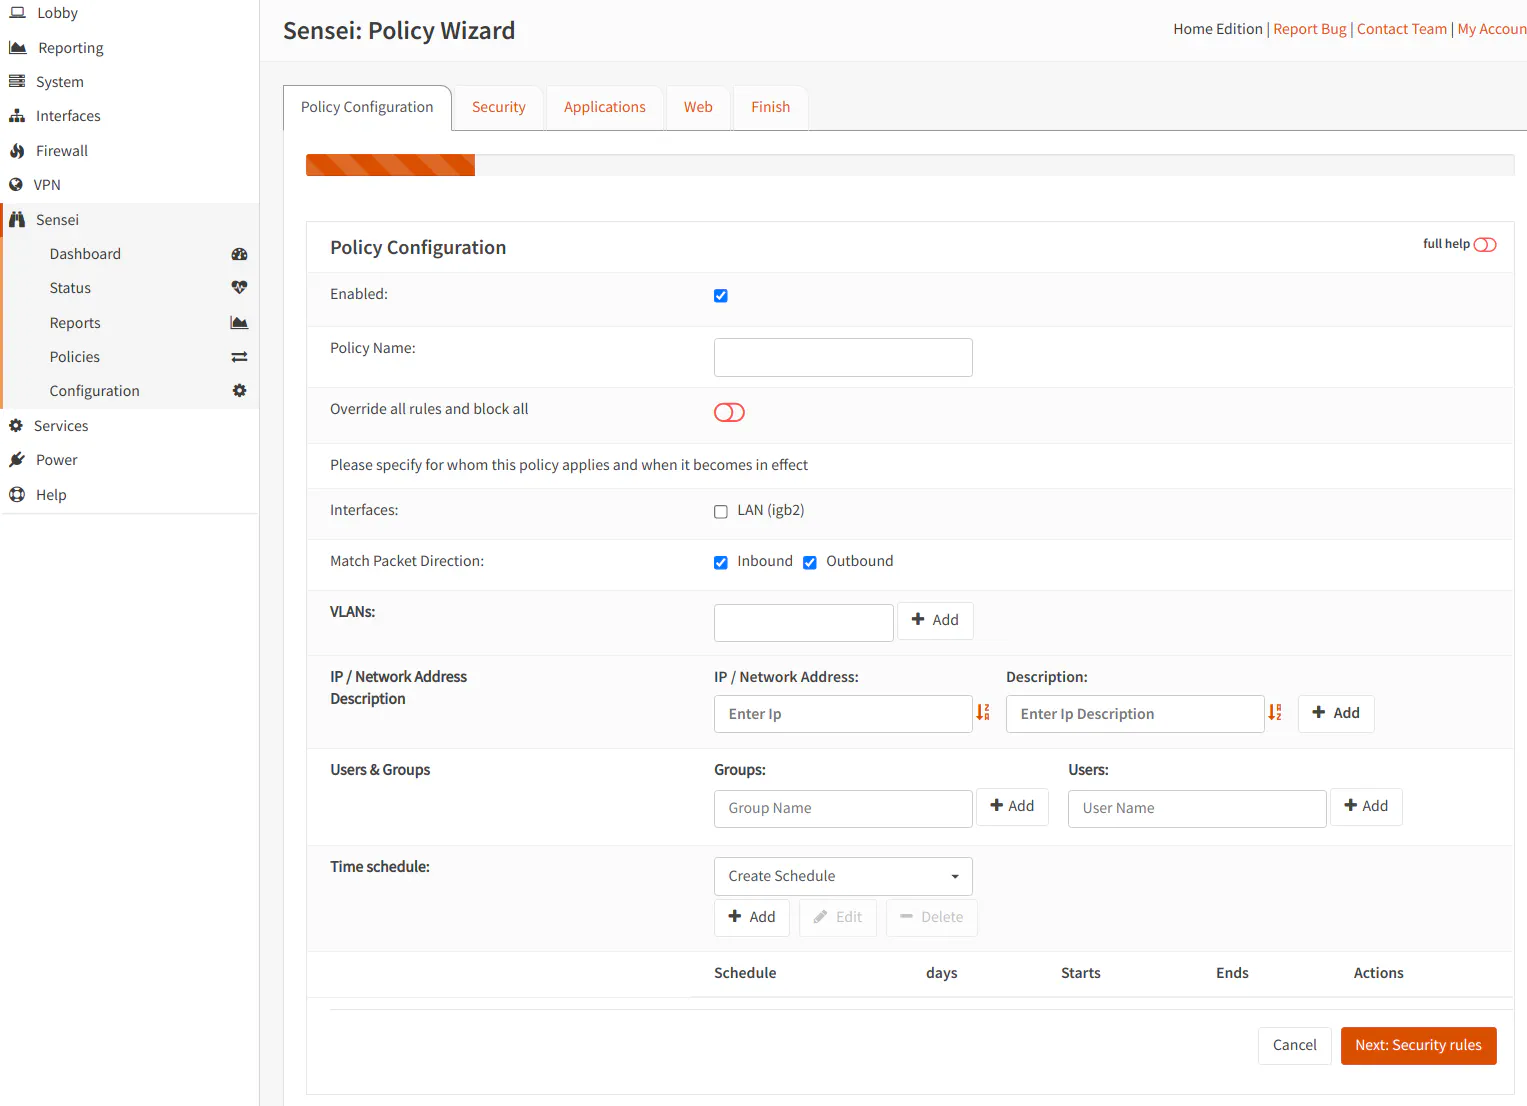
Notice in the screenshot that I am selecting LAN rather than all of the VLANs associated to the physical interface “igb2”.
Limitation of the Free Edition: When you monitor the parent interface, Zenarmor will monitor all VLANs associated to that interface. In the Free Edition, you cannot exclude VLANs from being monitored if multiple VLANs are assigned to a single parent interface. This may be an issue for you if you wish to run Zenarmor only on certain VLANs. If you still wish to use the Free Edition, you would have to ensure the VLANs you wish to monitor and the VLANs you do not wish to monitor are on separate physical interfaces. Then you could select the appropriate physical interface to monitor in the configuration options. As I will discuss later, the Home Edition allows you to exclude specific VLANs from being monitored when you have multiple VLANs associated to the same physical interface, which is very nice if your VLAN configuration is already established and you do not want to move them. That may be a time consuming process.
Basic Features of Free Edition
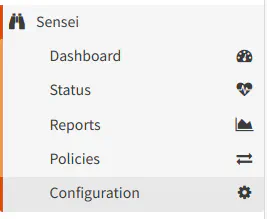
After installing Zenarmor, you will notice it has its own top-level menu called “Zenarmor”. When you click it, you should see the following menu links to the Zenarmor pages:
Dashboard
The Dashboard provides a default set of reports as you can see below:
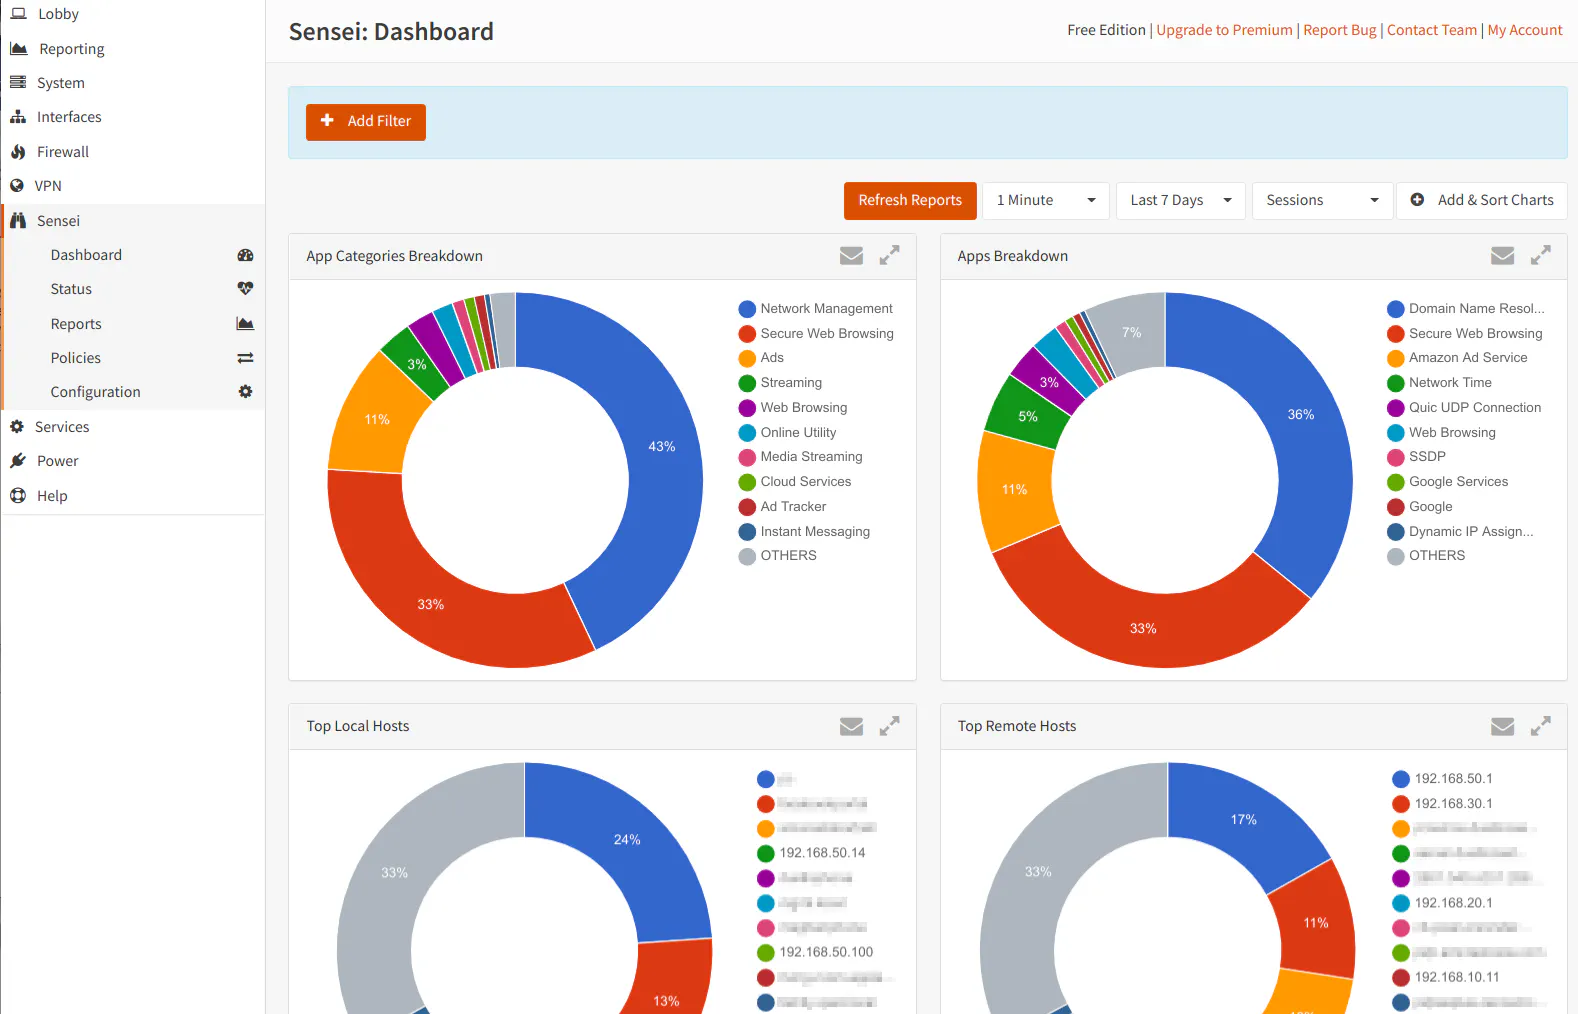
You can customize which reports are displayed by clicking the “Add Charts” button. There are nearly 70 charts to choose from. In addition, you can apply filters on the dashboard in order to drill down to the data you wish to see. The filters give you the ability to quickly filter on-the-fly to see a specific type of information within a few seconds. Currently, the filters are limited to 32 different data elements and two operators: “equals” and “not equals”.
By default, the charts are automatically refreshed every minute but you can set the intervals to be longer or shorter. The intervals are 15 seconds, 1 minute, 5 minutes, and 15 minutes. You can also set the number of days/hours/minutes of history. The intervals include last 15 minutes, 1 hour, 24 hours, 7 days, and 30 days. You may enter a custom time frame as well. If you do not have Zenarmor configured to store more than the selected timeframe, you will not see any information that exists outside of that timeframe.
Status
The “Status” page provides information about the version of the Zenarmor packet engine and app/rules database, the cloud node status used by the cloud threat intelligence feature, interface status, and the status of the Zenarmor services. You may start, restart, and stop the Zenarmor services at any point in time. You may also put Zenarmor in “bypass” mode which allows you to temporarily allow traffic through Zenarmor without processing the data packets. This may be useful if you are troubleshooting various network related issues. By default Zenarmor is set to start on boot during installation, but you have the option to boot up your system without starting Zenarmor.
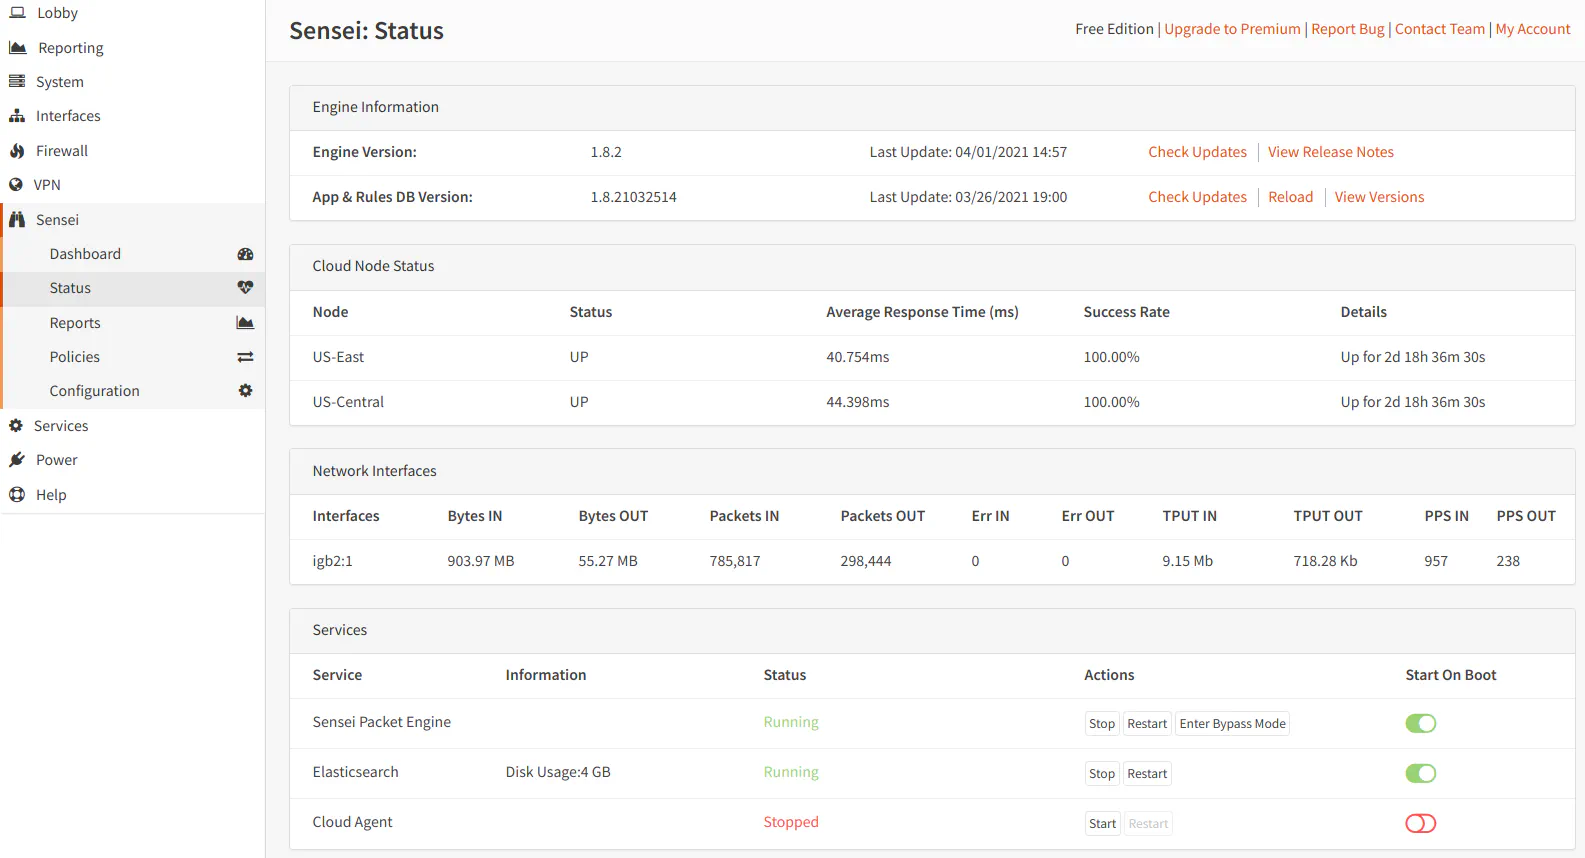
A newer feature of Zenarmor is cloud management. For most home users that have only 1 firewall device, the cloud management functionality may not be as useful so you will likely have this feature disabled.
Reports
As you can see, the “Reports” page looks similar to the “Dashboard” page.
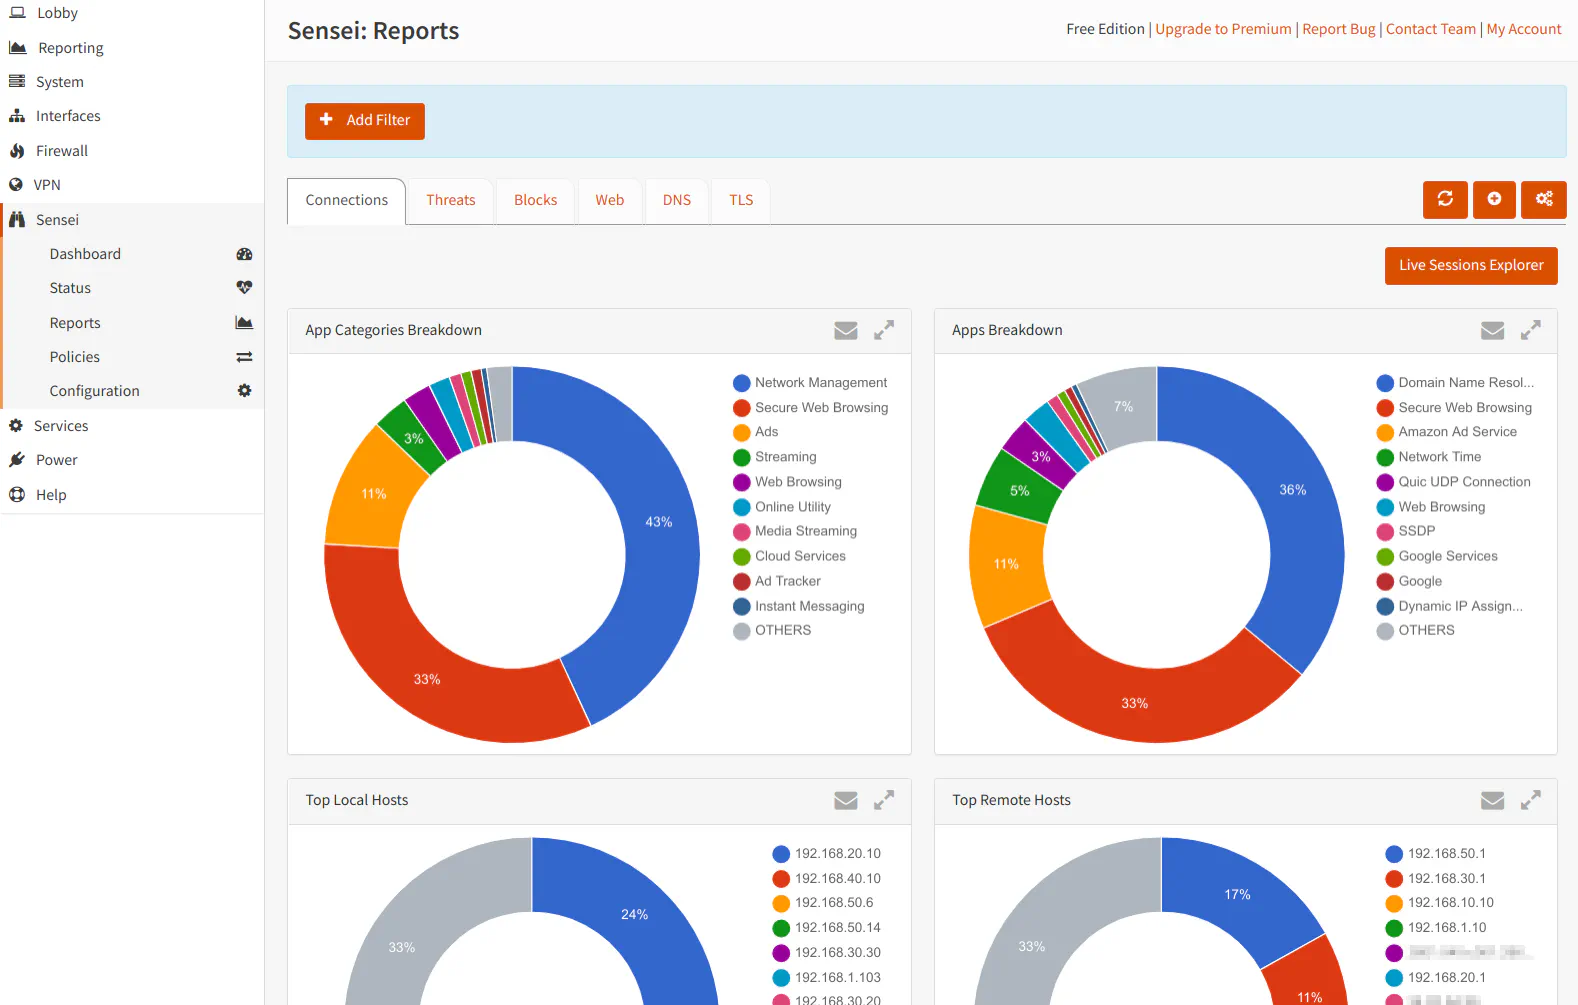
There are some notable differences such as tabs for the different types of reports, the addition of the “Live Sessions Explorer” button, and the consolidation of the report settings to a single button to minimize cluttering the interface. When you click the report settings button (the gear icon), you will see the following dialog box:
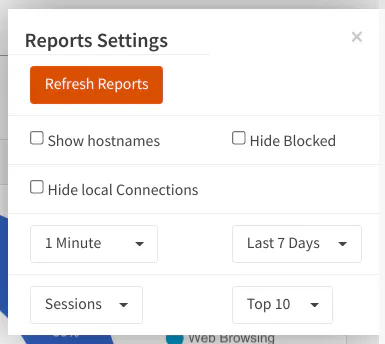
You will notice a dropdown box that has “Top 10” by default. This option lets you select how many items are displayed in the charts/graphs. If you change this option on the “Reports” page, it will also apply to the reports on the “Dashboard” page. If you wish to have hostnames rather than IP addresses displayed in the reports, you can select it in the settings box as well. I personally like having the hostnames since I do not always know the IP address of every device on my network especially if it not a static address. Like with the “Dashboard” page, you may set the refresh interval and number of days of history to display.
The “Reports” page is divided into tabs/sections for different types of reports.
The “Connections” tab shows the various applications in your network that are making connections both internally and externally on your network. These connections may be of any protocol and not just HTTP/HTTPS traffic. This tab shows the categories of applications, the protocol used for the connection, the duration of the connection, and other details.
The “Threats” tab shows everything that has been blocked based on your security settings defined by your policy(s). The reports are broken down by the various categories: malware, phishing, potentially dangerous sites, etc. You will want to check these reports if something legitimate is being blocked if you do not see it in the reports on the “Blocks” tab.
The “Blocks” tab shows everything that has been blocked based on your web/app controls policy(s). If you do not have any blocking enabled, there will be no data shown in the reports in this tab. If you find that some legitimate app or website is being blocked, you will want to look at these reports (usually before the threat reports).
The “Web” tab shows reports on web-based traffic generated by browsing websites or API calls that various applications perform. It lists the website category, the method used (GET, POST, etc), the hostname, and other information.
The “DNS” tab shows information on the most frequent DNS requests performed and other DNS related information. These reports are helpful to find devices that are performing lots of DNS requests. Sometimes you will find that if you block Internet access to certain devices that they perform a ton of DNS lookups trying to reach a DNS server. That is an unfortunate side effect of restricting access since it add extra unnecessary traffic on your network. It may not be enough to decrease the overall throughput of your network, but it is annoying to have your DNS logs spammed with a large number of DNS request that never get resolved.
The “TLS” tab shows TLS session information such as the hosts/IPs in which the most TLS sessions are created, the ports used, the general categories of the sessions, and other information. I do not personally find the TLS information as useful as the other reports since it seems like you can find most of that information in other reports. However, there may be some cases where seeing TLS-specific information is helpful, but I am not currently aware of when that may be.
Unlike the “Dashboard”, the “Reports” page provides a “Live Sessions Explorer”, which allows you to see the most recent connections, blocks, web sessions, DNS requests, and TLS sessions depending on which tab you are currently viewing. You can change the update interval so it updates more or less frequently. This view is useful to get insight of the current activity that is taking place on your network. I find it useful when something legitimate is being block because I can watch it show up in the live view so I can unblock it. The blocked items show up red while the green items are items that are not blocked.
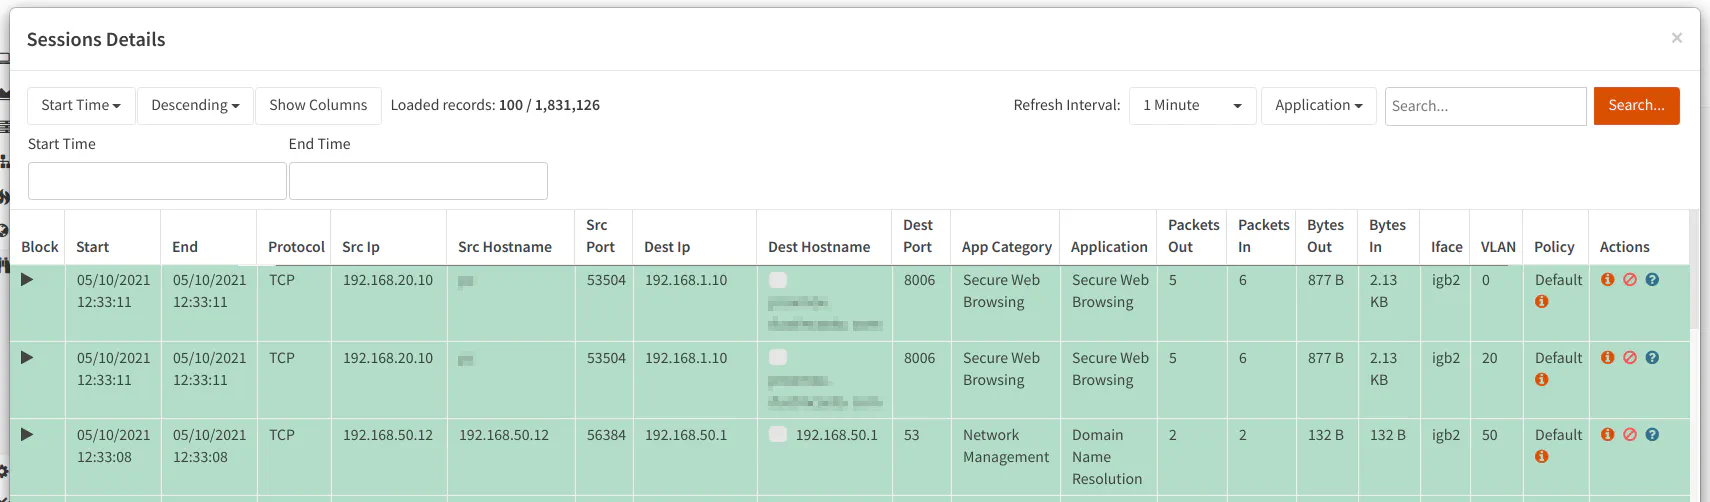
In the “Live Sessions Explorer”, you have the ability to block the various connections by clicking the circle with a slash icon in the “Actions” column. Conversely, you have the ability to allow connections that have been previously blocked by clicking on the checkmark icon in the “Actions” column. This is very useful when something you want to access is being actively blocked by Zenarmor. I occasionally have to unblock false positives for legitimate apps/websites. Sometimes blocking certain ads/trackers will cause things to break so you will have to resort to allowing it if you use a particular online service.
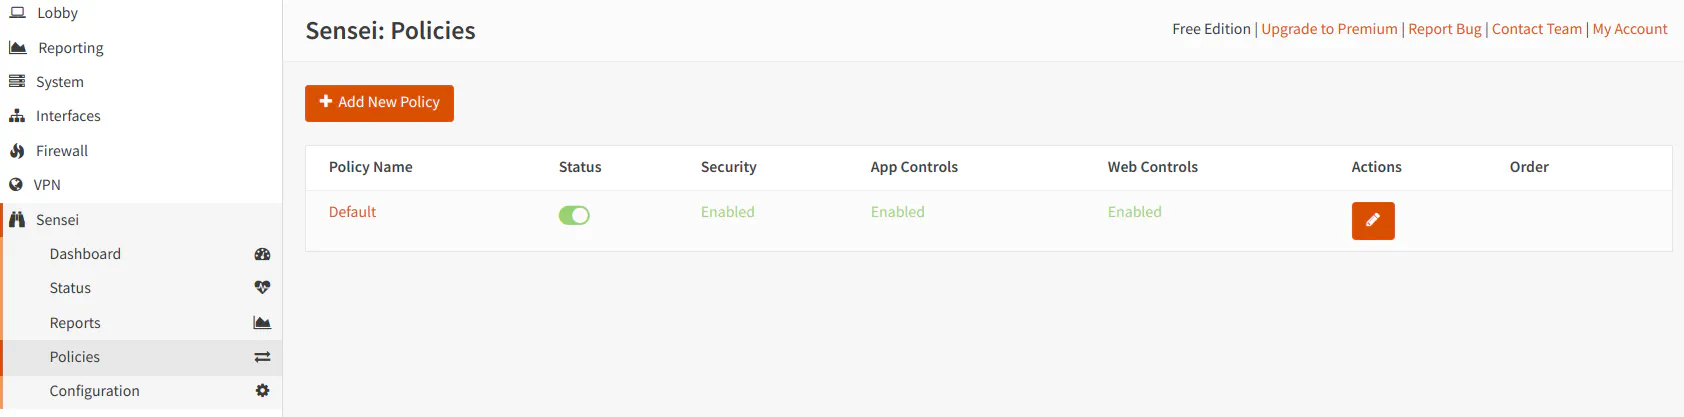
Policies
The Policies page lists all of the policies you have defined. In the Free Edition, you can only update the default catch-all policy. You are not able to add any policies even though there is a “Add New Policy” button. When you click that button, it displays a messaging saying you have discovered a premium feature.
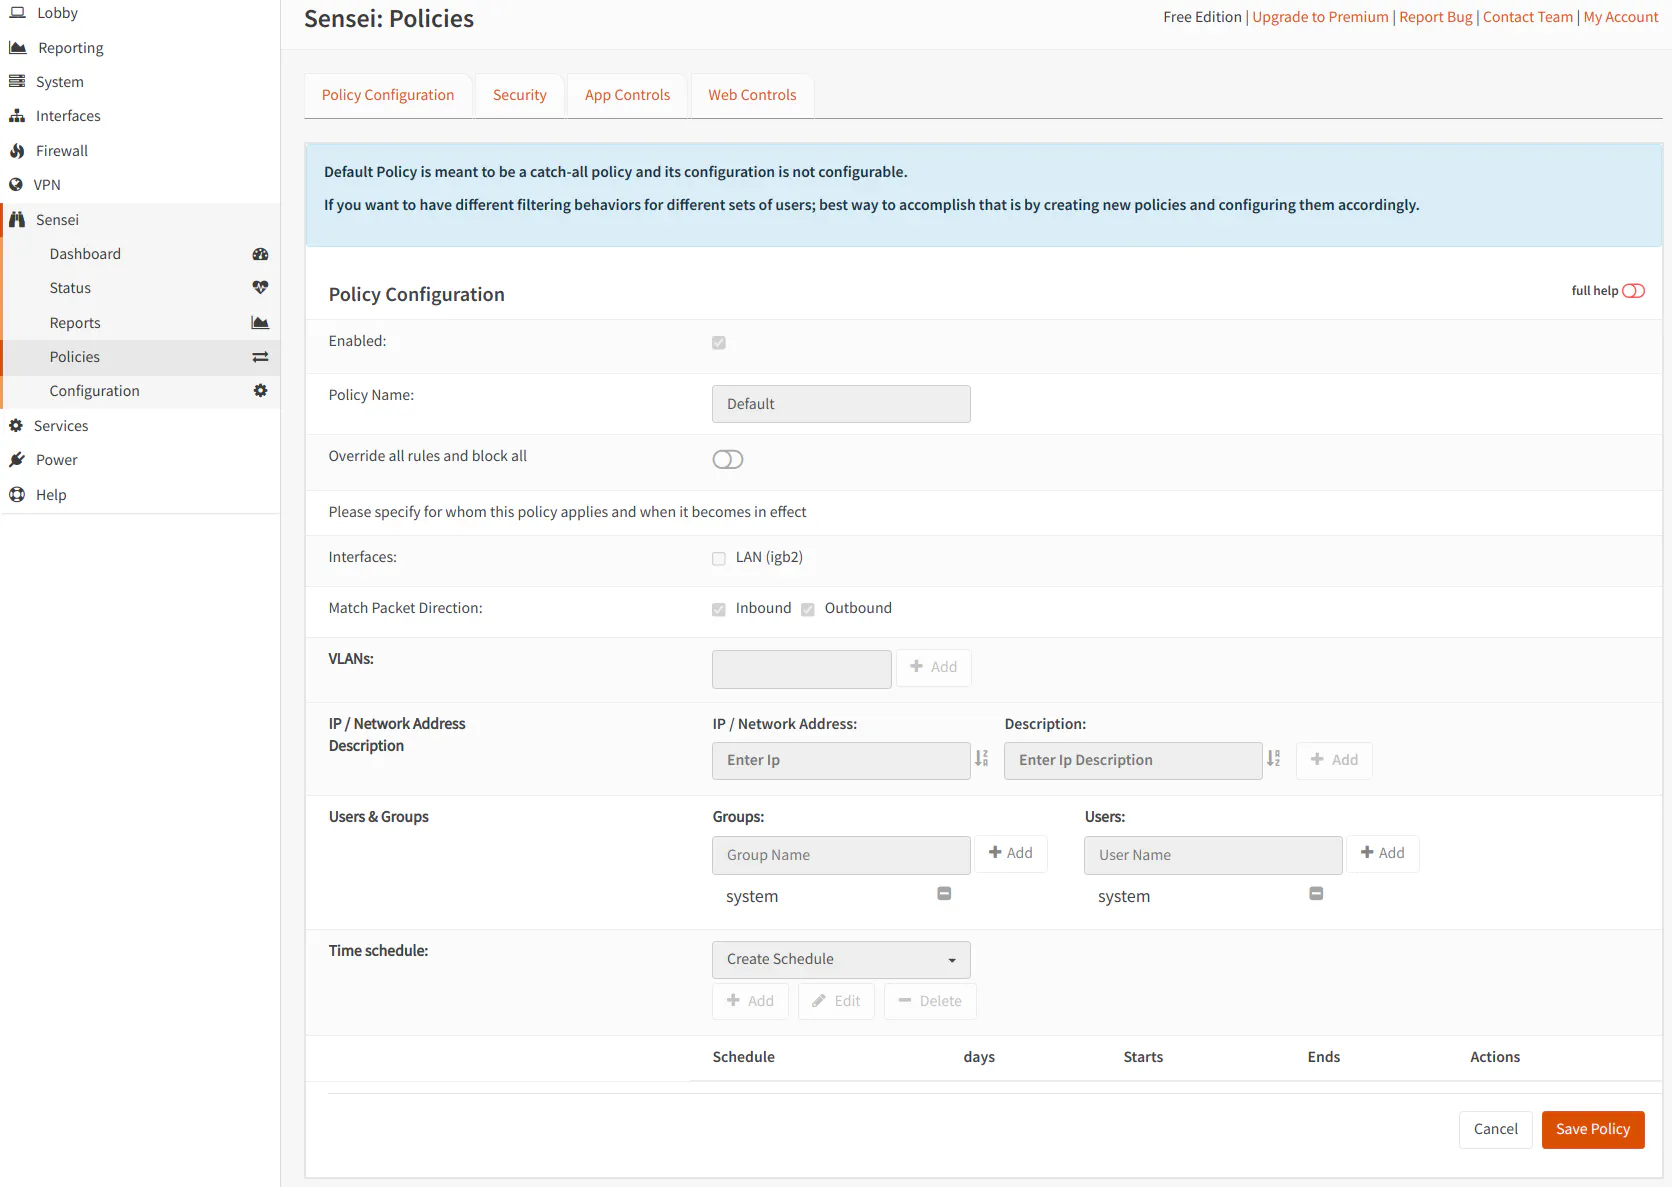
Policies: Policy Configuration
When you click the edit button and go to the “Policy Configuration” page, you will see all of the possible options that you may configure if you have a premium version of Zenarmor and create additional policies. None of the options are editable for the default policy even on premium versions since it is intended to be a catch-all policy.
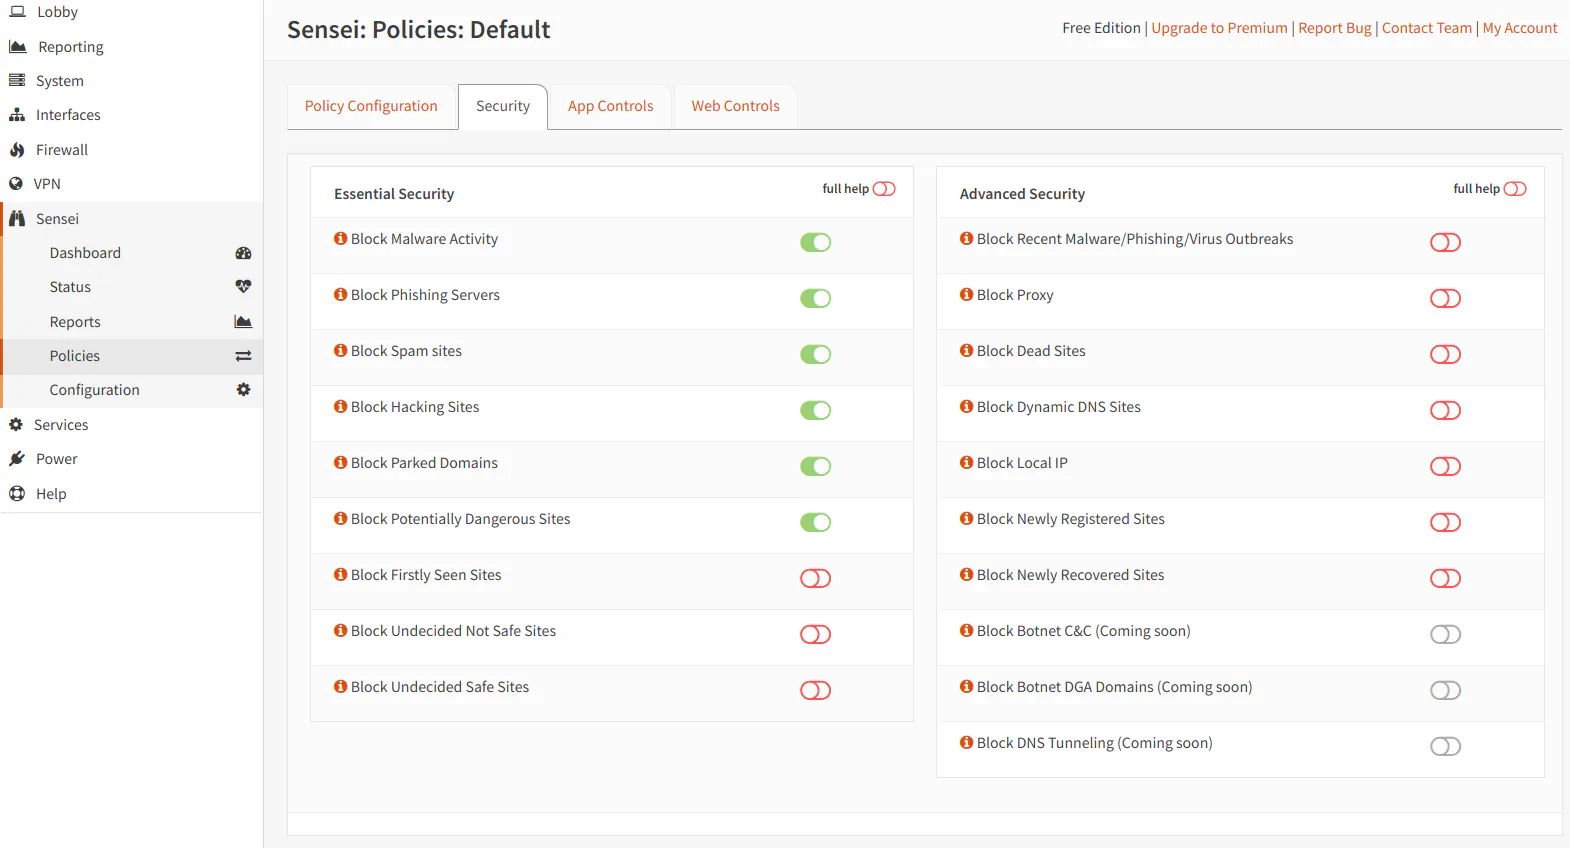
Policies: Security
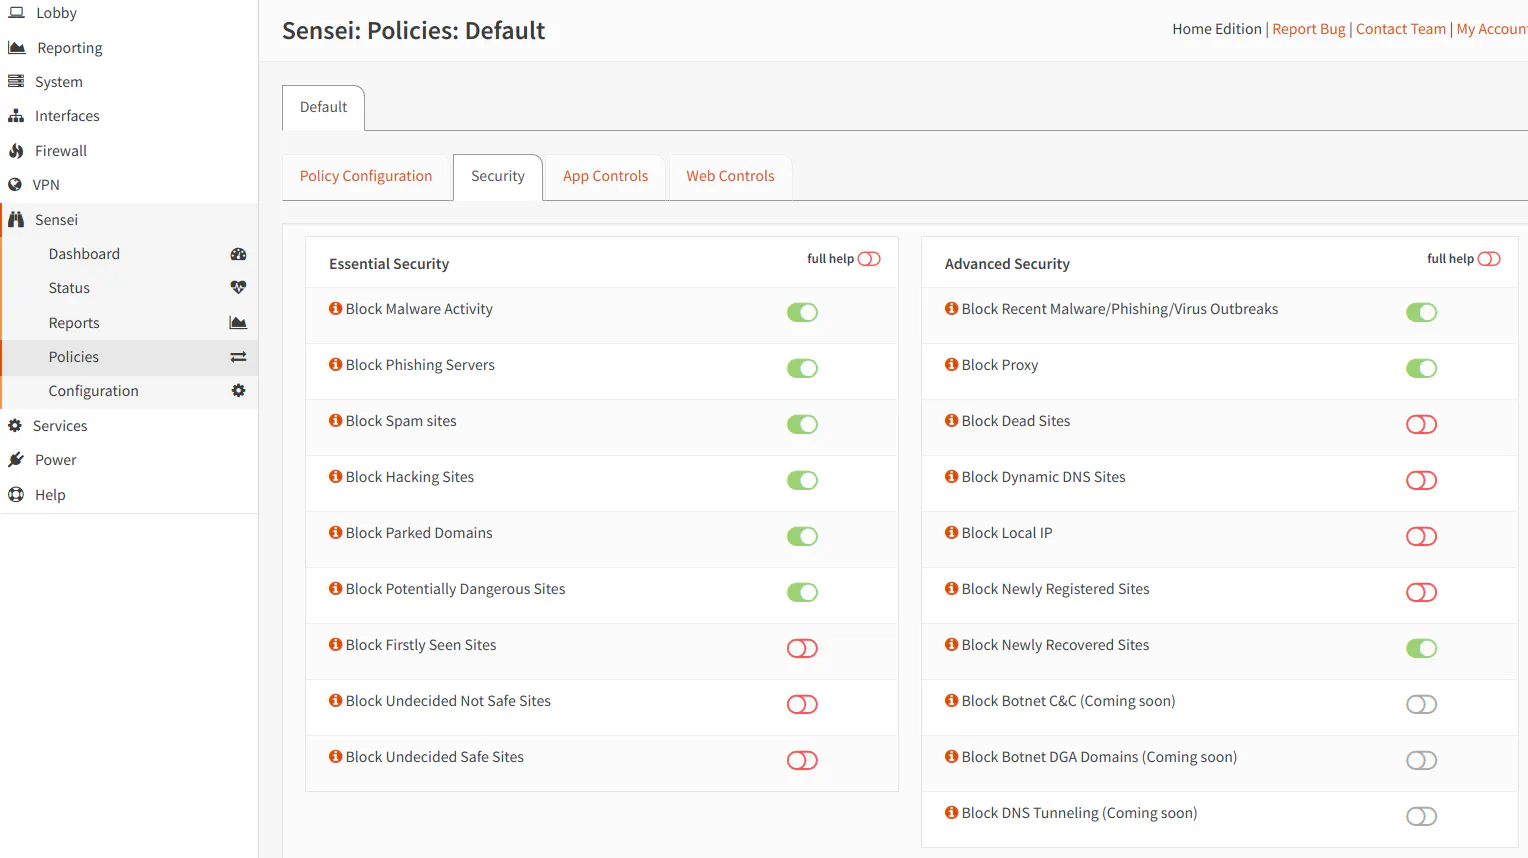
The “Security” page allows you to enable blocking for various types of malware activity and potentially dangerous websites. The Free Edition only allows you to choose options in the “Essential Security” section of the page. I do not recommend enabling every single option unless you are ok with potentially having a greater number of false positives. You may end up spending a lot of time (and frustration) unblocking legitimate traffic.
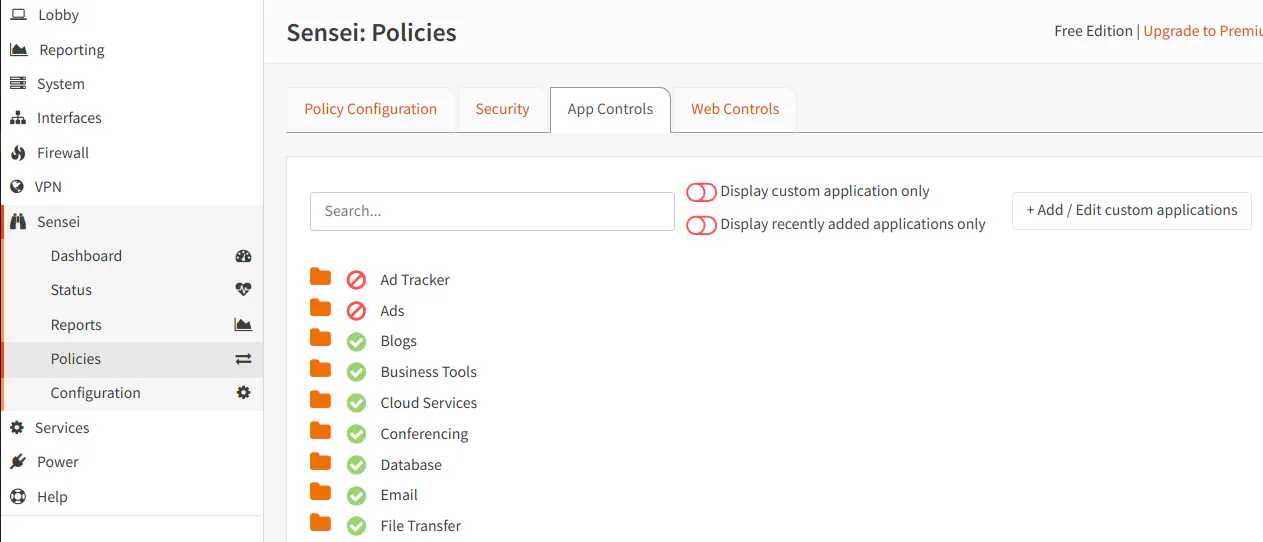
Policies: App Controls
The “App Controls” page is where you can block various types of applications on the network. There are a wide variety of categories you can select. The apps in the list are not necessarily malicious, but they may be apps that are unwanted on the network. For instance, you may not want users to use Tor to bypass security protections on your network. The app categories contain apps which are visible when you expand the folder icon. You may wish to only block specific apps within a category rather than the entire category.
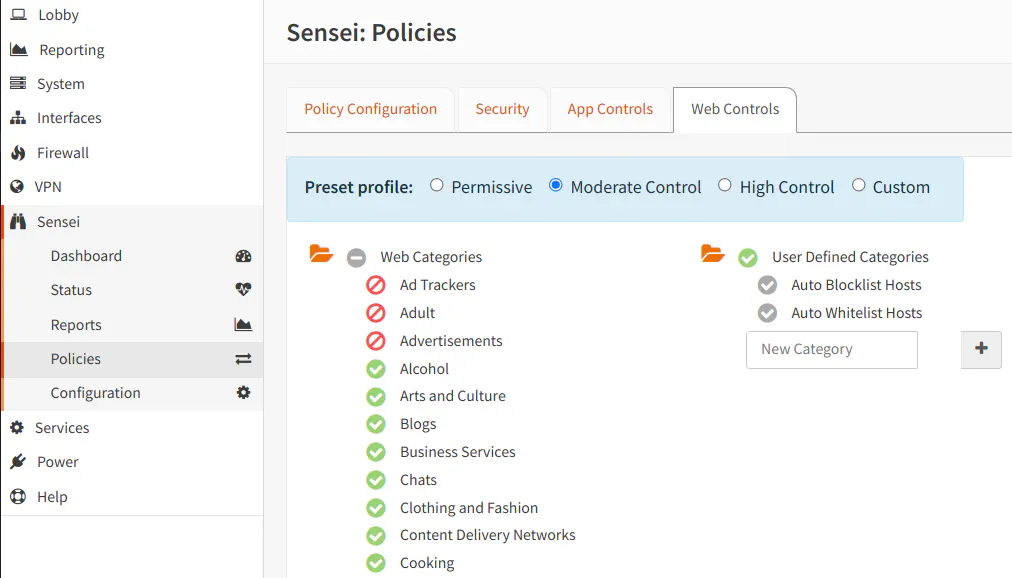
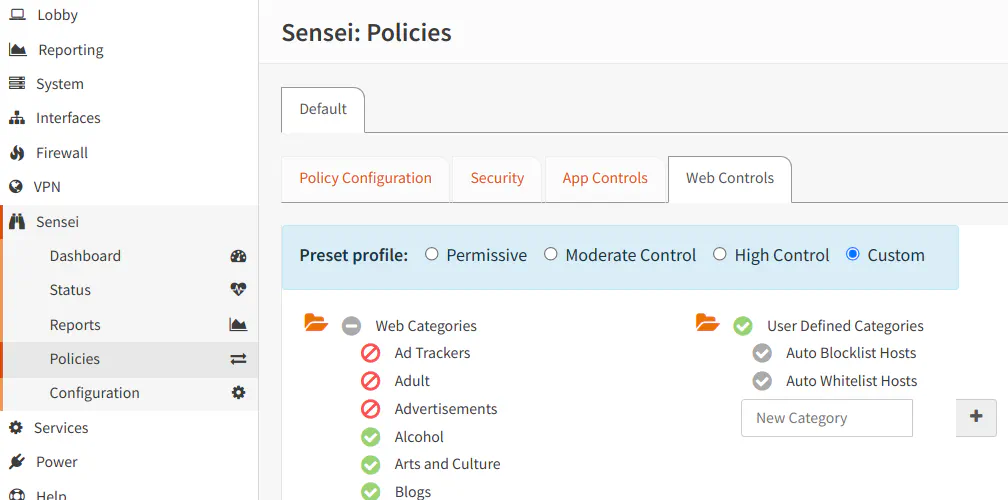
Policies: Web Controls
The “Web Controls” page is similar to the “App Controls” page. It has a list of categories of websites which may be blocked by Zenarmor. Unlike the app controls, you cannot filter more granular than the category level. However, you can allow certain sites to be accessed or blocked by editing the “Auto Blocklist Hosts” or the “Auto Whitelist Hosts”. You may also allow/block content using the “Live Sessions Explorer” on the “Reports” pages. Since blocking is done at a category level, you should be careful which categories you select because you may find that many sites you visit are being blocked.
You will notice that you may create your own categories below the “User Defined Categories” instead of using the default blocklist/whitelist. Creating new categories provides you the ability to group allowed/blocked sites to help ease maintenance if you have a large number of entries.
Configuration
The “Configuration” page displays many of the settings which you selected when you initially installed Zenarmor, and it also contains additional configuration options.
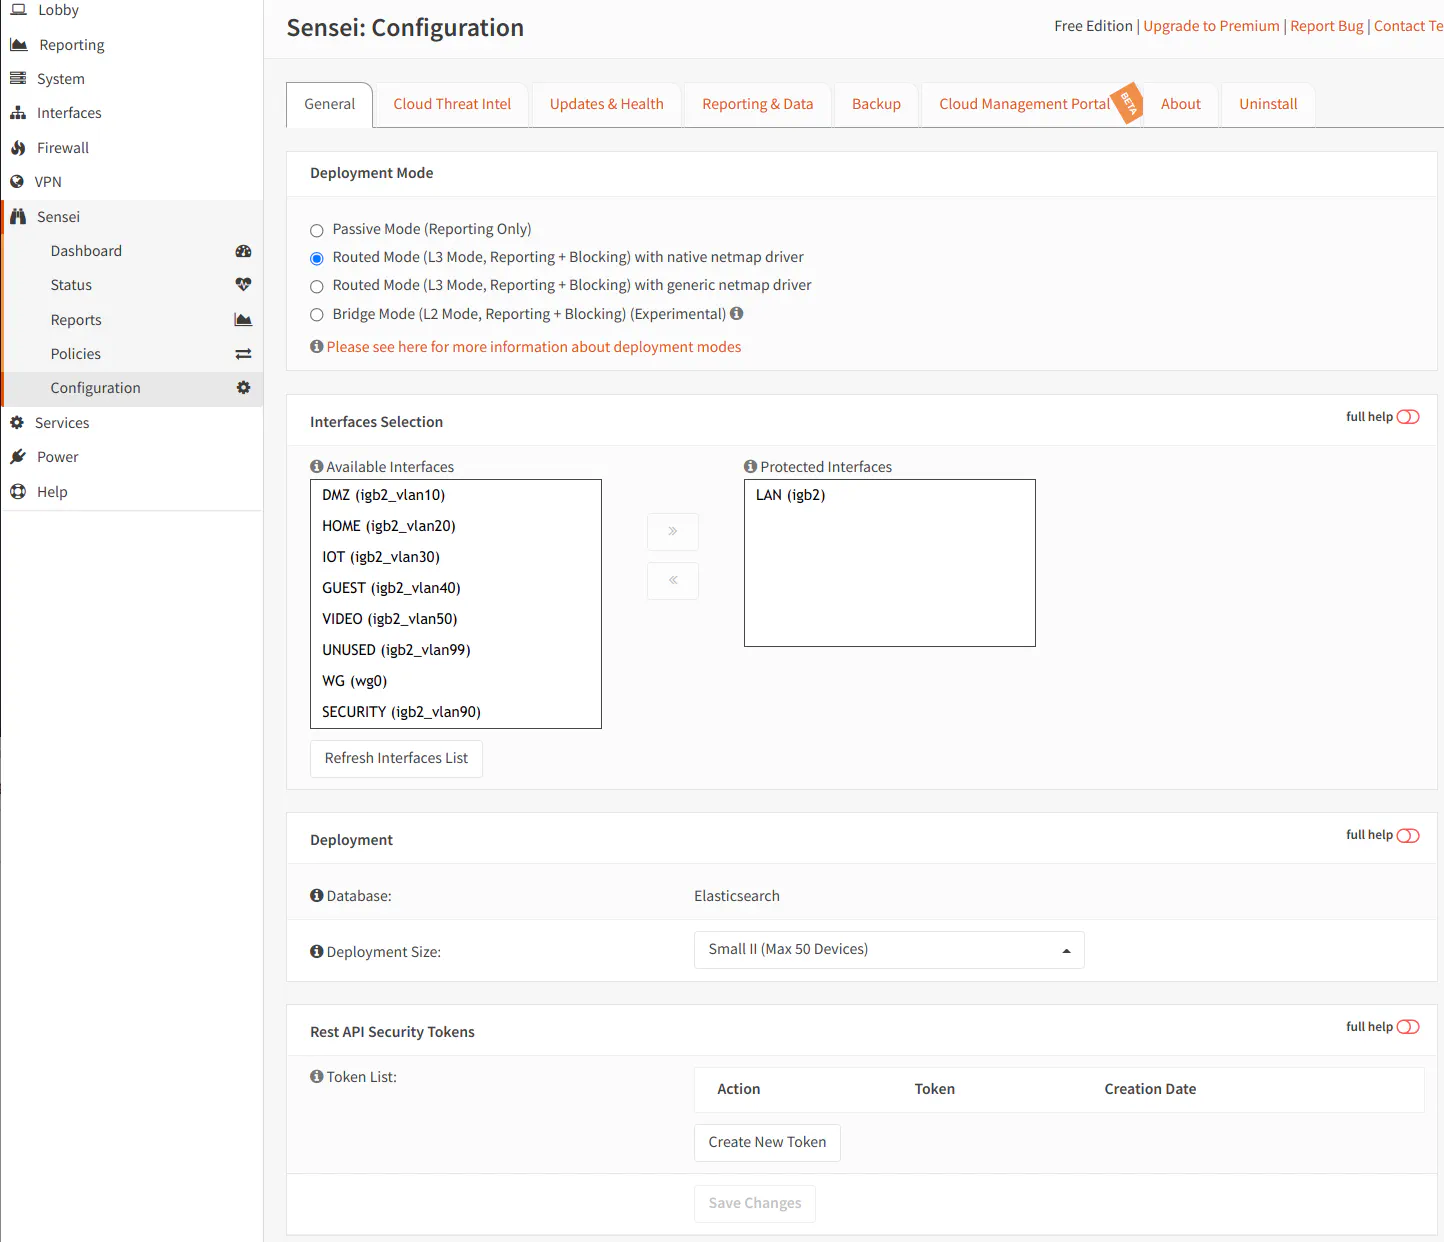
Configuration: General
On the “General” tab, Zenarmor originally had two deployment modes: “Routed Mode (L3)” and “Bridge Mode (L2)”. Since its initial release, there are now two additional modes: “Passive Mode” and “Routed Mode (L3, generic netmap driver)”. Also the original “Routed Mode (L3)” became “Routed Mode (L3, native netmap driver)”.
“Passive Mode” allows you to only use Zenarmor for reporting purposes without blocking any network traffic. This may be useful if you are only interested in information about your network traffic, and you have something else in your network providing protection against various threats. Because of longstanding issues with the netmap driver, SunnyValley has provided a “Routed Mode (L3, generic netmap driver)” option to use a generic netmap driver that may provide greater compatibility for hardware that does not function well with the native netmap driver. The tradeoff is reduced performance, but the tradeoff may be worth it for improved stability until the native driver can be improved.
If you wish to change the interfaces that Zenarmor is monitoring, you may do so in the “Interface Selection” section of the “General” tab. Keep in mind that interfaces that are not selected in the configuration will not be monitored by Zenarmor and will not show up in any reports.
You may change the “Deployment Size” as well. I am not sure how important it is to adjust the size properly based on the number of devices on your network.
API tokens may be generated but that feature may only be available for business users according to the feature comparison list. I would consider this to be an advanced feature that most home users would not need.
Configuration: Cloud Threat Intel
The “Cloud Threat Intel” tab lists the various cloud nodes in which you can receive updates and check for threats. You can enable all of the servers which are the closest to you locale. Since Zenarmor defaults to the fastest two servers, you may not need to change the nodes from the default selection.
If you are using a local domain name, you may want to enter that name in the “Local Domain Name to Exclude From Cloud Queries” box. This may help prevent any policies/configuration from blocking your own local assets.

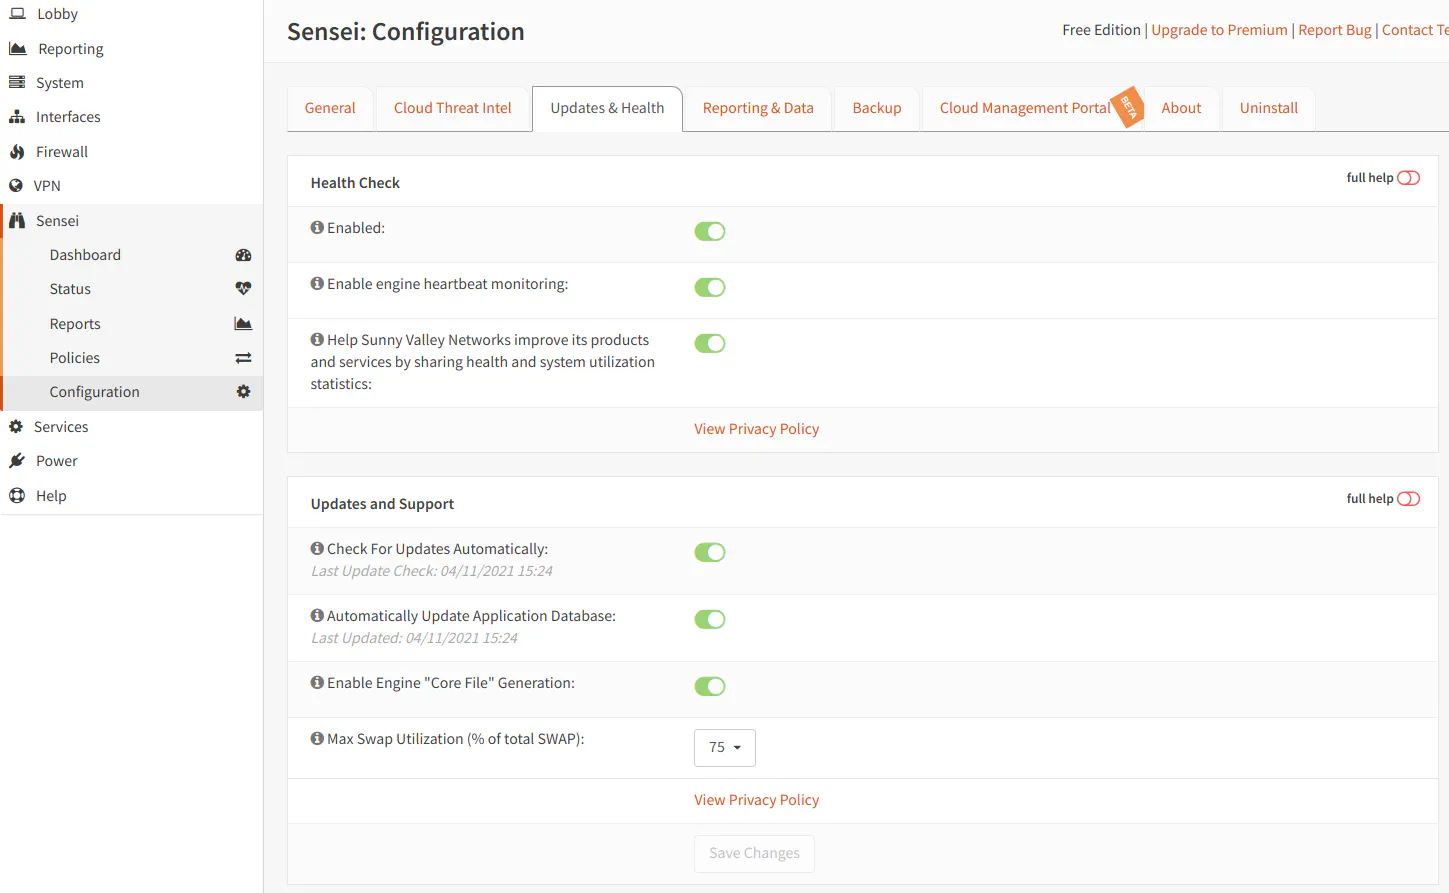
Configuration: Updates & Health
The “Updates & Health” tab has settings to enable health checks and automatic checking of updates. Many of these settings will likely be enabled by default, but you can disable any checks if you prefer to check for updates manually. If you toggle “Enable Engine Core File Generation”, it may help if you need to send information to Sunny Valley Networks for support. You may also configure the maximum amount of swap utilization to help with system performance.
Configuration: Reporting & Data
The “Reporting & Data” tab displays the location and temporary disk size used by the reporting database as well as allows you to configure DNS server(s) for domain name/host name lookups, the number of days to keep data in the reports, and the email information to send reports on a schedule. You also may run report database maintenance operations.
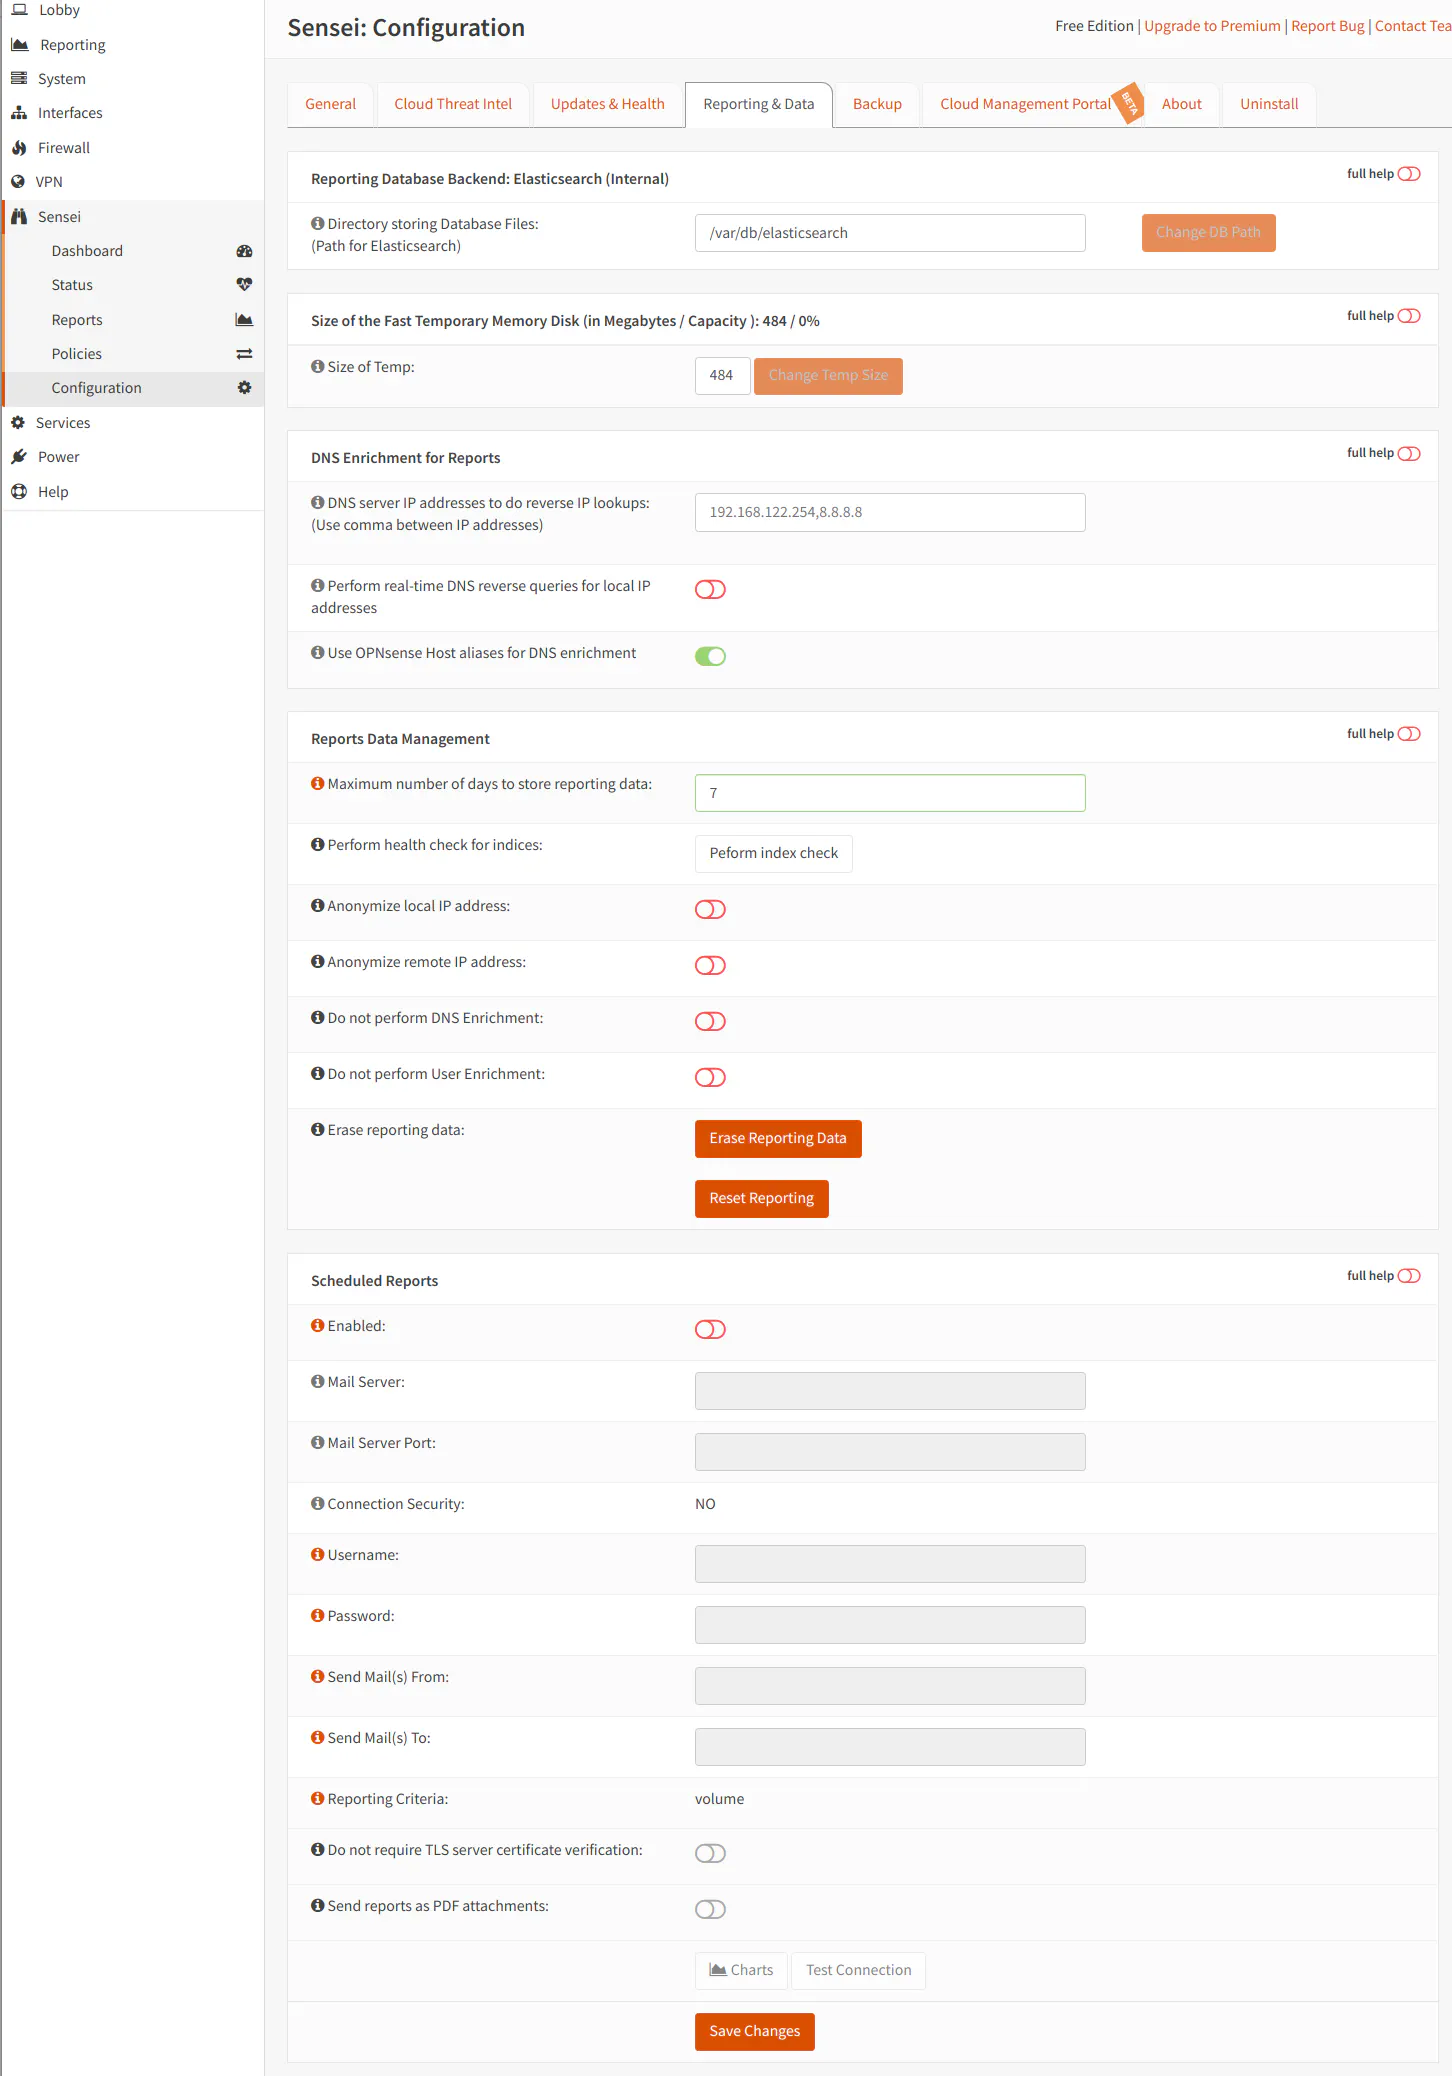
For the “DNS server IP address to do reverse IP lookups”, you would need to enter a value in this box if you are running a DNS server such as Pi-hole that does not run on the same box as OPNsense or if you prefer to use an external DNS server.
If you have Pi-hole set up to forward DNS requests upstream to OPNsense, you likely do not need to enter the Pi-hole DNS server for lookups since the DNS request will end up resolving local hostnames via Unbound DNS on the OPNsense box if the DNS request has not been cached by Pi-hole. However, if you are using Pi-hole for all of your DNS requests rather than Unbound DNS, you will need to enter the Pi-hole address to ensure that local hostnames can be resolved in your reports.
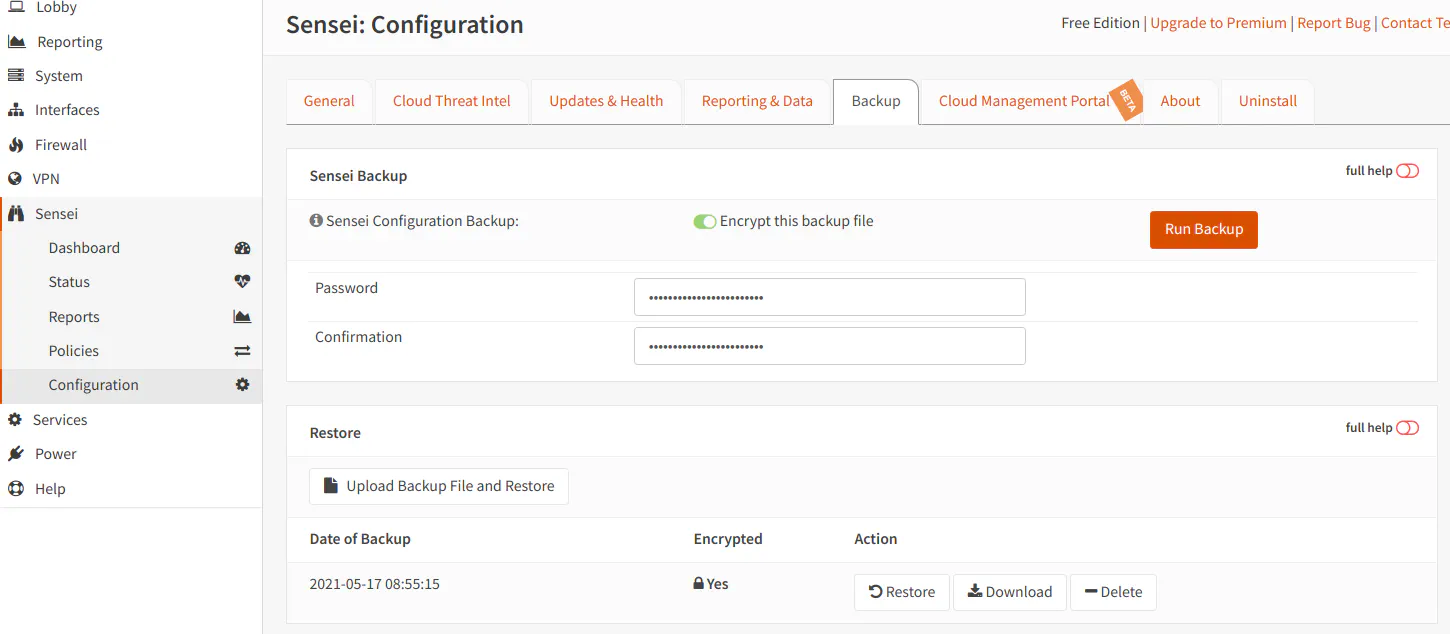
Configuration: Backup
In the “Backup” tab, you may back up your Zenarmor configuration data. I recommend creating backups of your configuration especially if it is more complex. In particular, when you have created several custom entries to the white/block lists and have changed many of the default settings. Also if you have the Home Edition and created custom policies, you would likely want to back up your configuration. It will help save you some time having to reconfigure everything if you need to move to a different firewall or reinstall OPNsense due to hardware changes or failure.
The only option on this page is to enable encryption for your configuration backup. If you choose encryption, simply enter a strong password for your backup.
Once you have created at least one backup, it will show up in a list so you may download it at any time. I recommend you download a copy immediately when you are prompted that the backup has successfully been created and store it in a location that has redundancy/backups so that your backup file is protected.
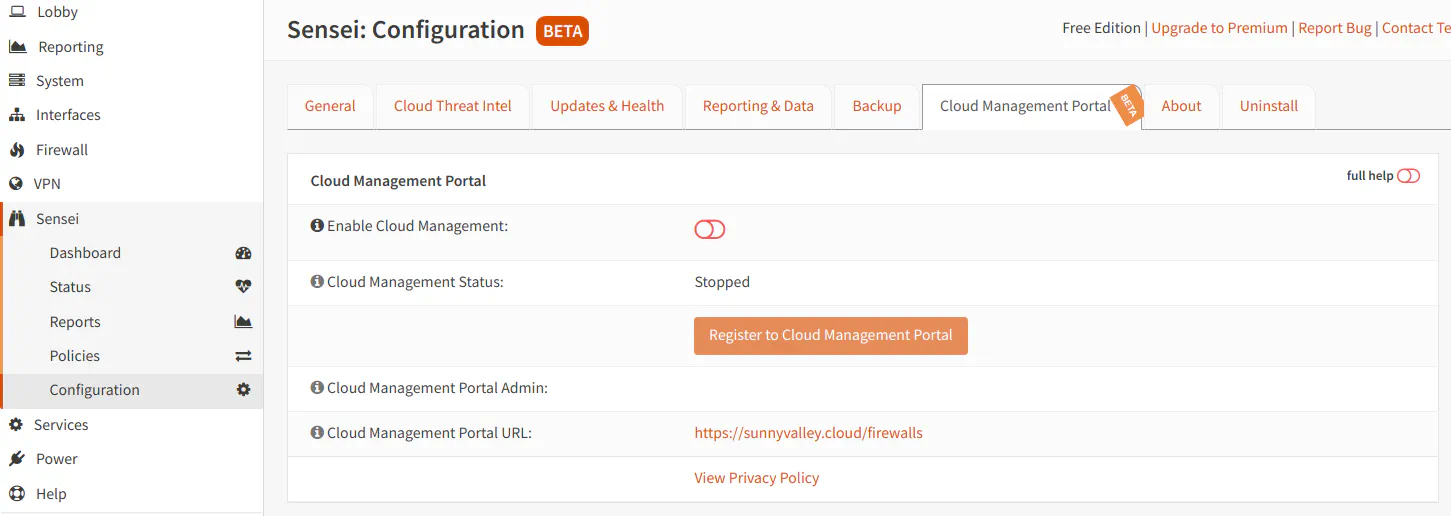
Configuration: Cloud Management Portal (Beta)
A newer feature that is still Beta at the time of this writing is the “Cloud Management Portal”. You may create an account with Sunny Valley Networks to be able to manage Zenarmor from the cloud. This feature is likely more useful for Business/Enterprise users that need to manage several firewalls, but there may be some home users that would like to manage Zenarmor on more than one device (perhaps managing other firewalls for family members). For Free and Home Editions, you can only manage up to 3 nodes/devices.
Differences Between the Free Edition and Home Edition
Now that you are aware of the features available in the Free Edition, I will compare the differences between the Free and Home Edition. You should be able to make a well-informed decision if the additional functionality will meet the needs of your home network.
The “Dashboard” and “Status” pages are identical in the Free and Home Edition so I will only be describing the differences on the other pages.
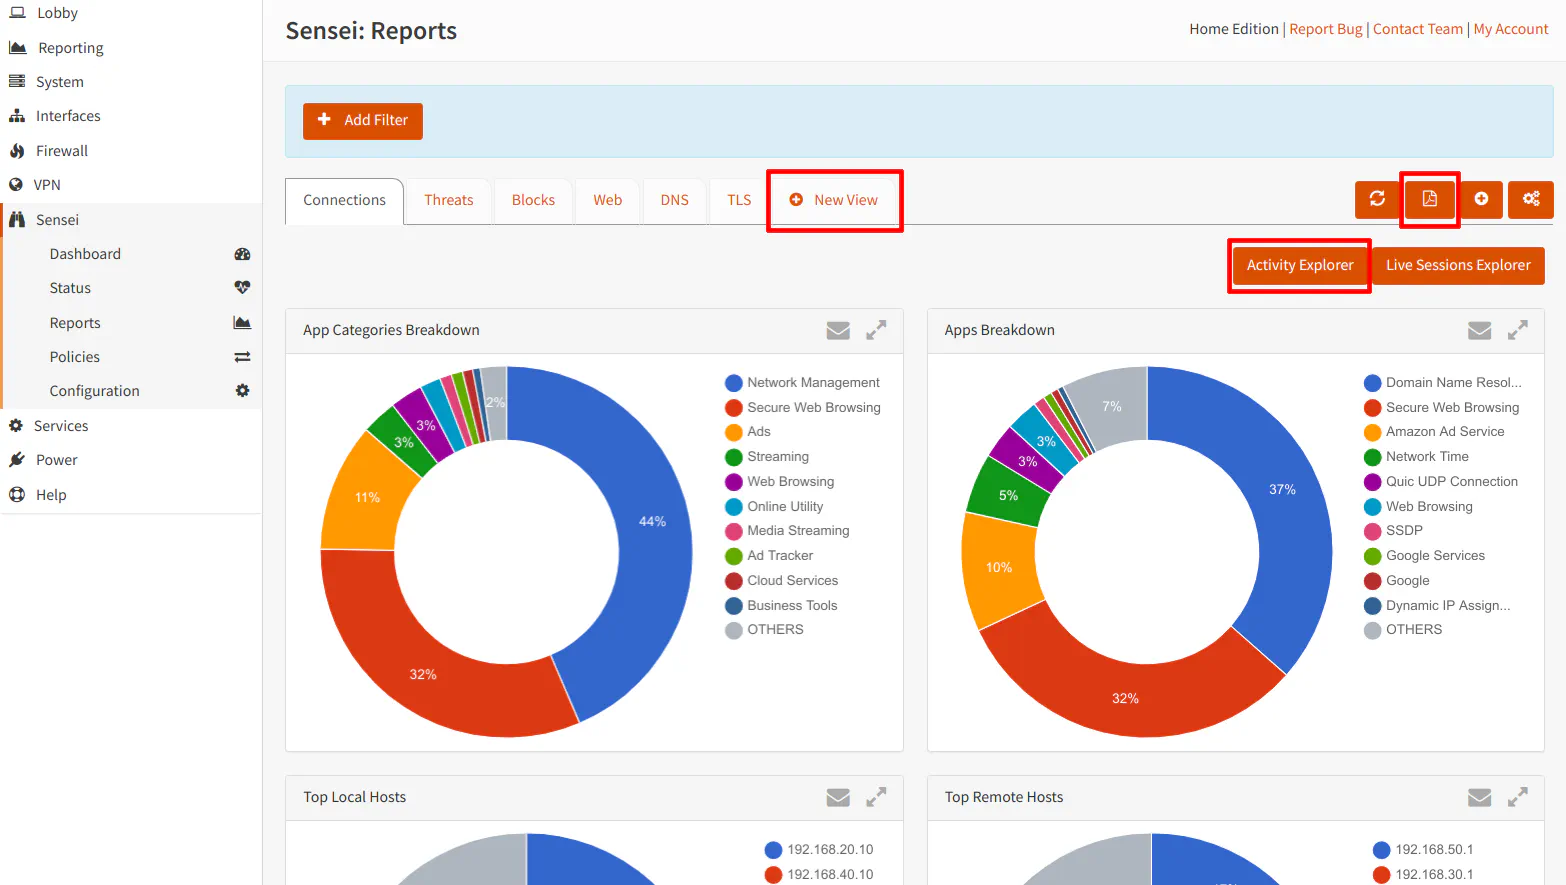
Reports
On the “Reports” page, you will finally see some additional features that is included in the Home Edition. There is a new tab to create custom views, a button to export reports to a PDF, and a button for the “Activity Explorer” page.
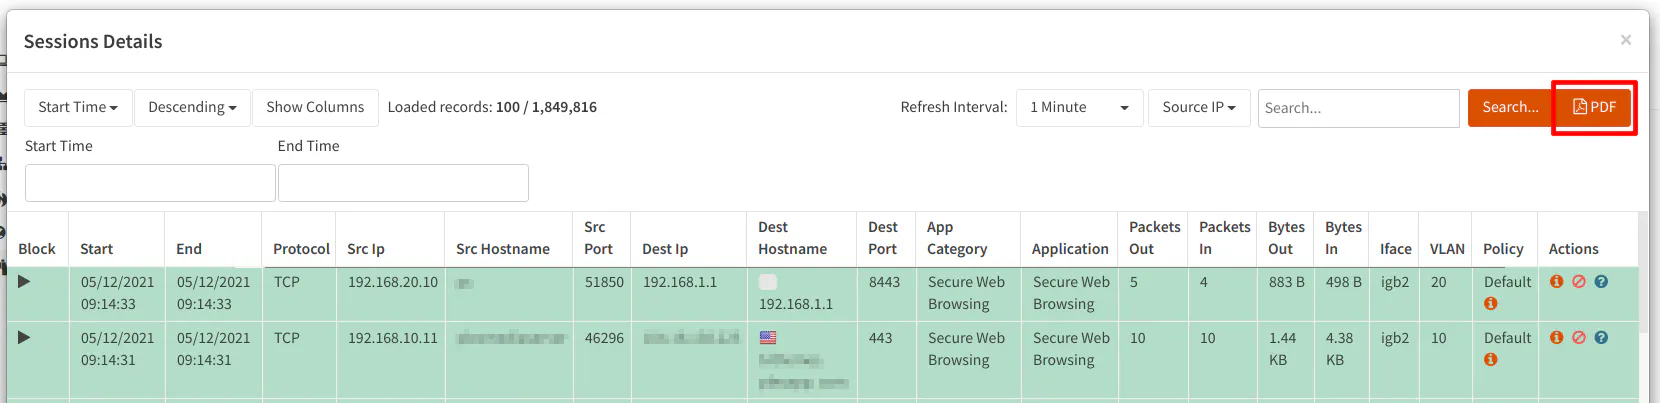
The “Live Sessions Explorer” in the Home Edition includes an additional button to export the session details to a PDF document. The rest of the page is the same as the Free Edition.
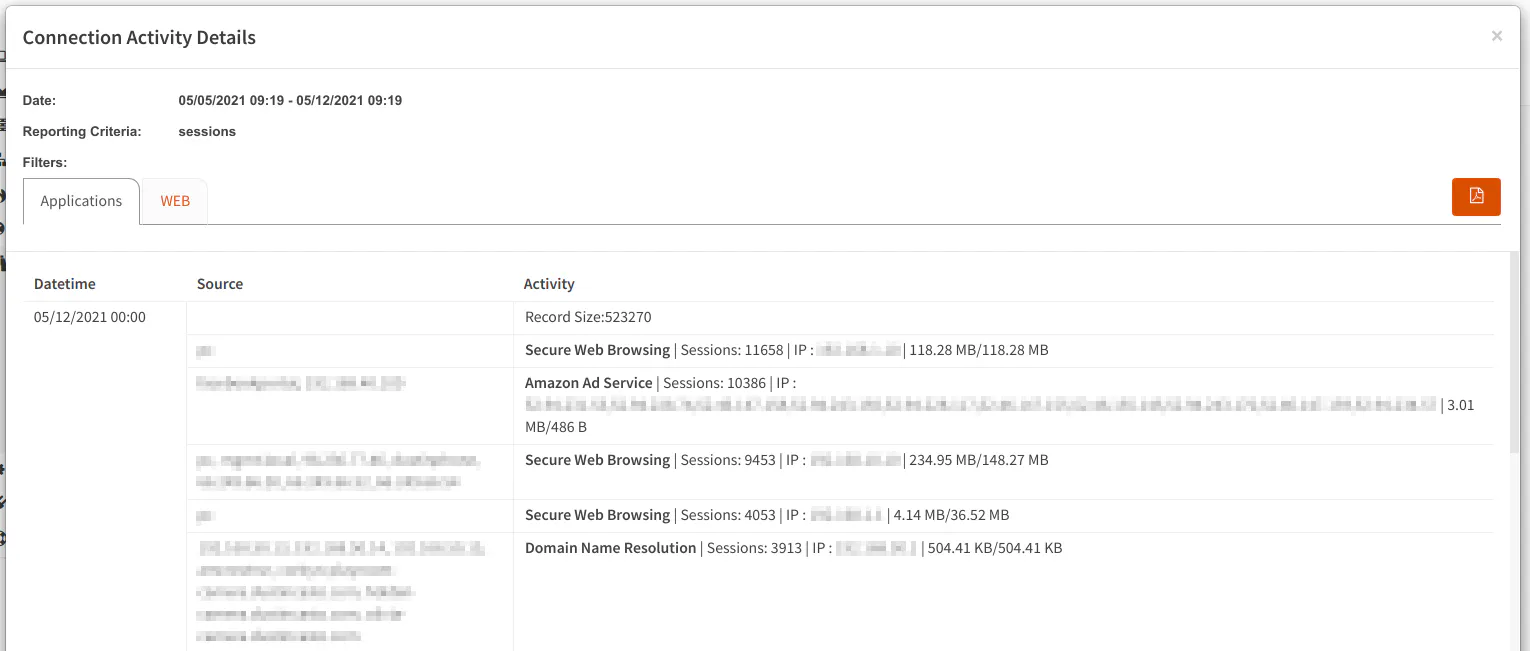
The Home Edition includes the “Activity Explorer” on the Connections tab. This feature shows more context about particular connections made by your devices such as the name of the application/website, number of sessions/visits, destination IP addresses, and the amount of data transferred during the sessions. One thing I really like about the “Activity Explorer” is the fact that it is a daily summary of the connections your apps/devices are making to various websites/services. So at a quick glance you can see if there is any usual activity occurring in your network. I do not know if it would help you notice all types of unusual activity so you may not want to rely on that report entirely, of course, but I think it is a good place to start.
The “Activity Explorer” has an applications tab:
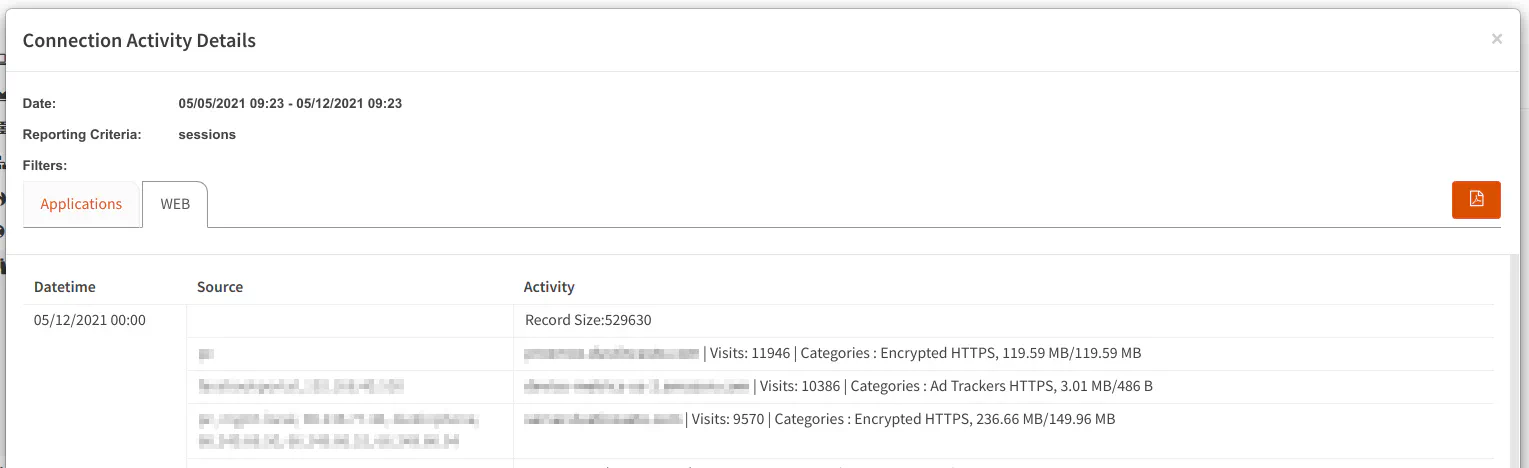
and one for web connections which shows slightly different types of information than the applications tab:
One nice Home Edition feature for many users is the ability to create your own custom report page. You have the ability to select from a number of predefined reports for this view. Your favorite reports from each of the report tab could be consolidated to a single page so you do not have to click through all of the tabs when looking for the information you view the most.

Policies
Unlike the Free Edition, the Home Edition allows creating more than one policy, which is nice if you wish for different users, VLANs, or specific IPs to have different policies. For home users you may want different policies for your children, for instance. If you work from home, perhaps you would like a different policy for your work devices.
To create a new policy, you simply click the “Add New Policy” button.

The options are similar to the default policy options which you are not allowed to edit. The Home Edition essentially unlocks those options so you can create up to 2 additional policies (3 total counting the default policy).
With the Home Edition, you can now enable any of the “Advanced Security” features. I would consider the blocking of known malware/phishing/virus outbreaks option to be the most valuable to protect home users especially with the automated vulnerability exploitation that occurs on a regular basis and is increasingly becoming a problem. However, a few of the other options are important for blocking sites which may be used to attack users if they are visited.
The greater number of options that you enable, the greater likelihood that certain legitimate sites may be blocked. For instance, blocking proxies might be a good idea because malicious users can hide bad things using proxies, but there are legitimate sites which use proxies. It is possible Zenarmor blocks only known bad proxies rather than all proxies since I would imagine blocking all proxies would kill access to many websites including this website! Homenetworkguy.com is proxied through Cloudflare to take advantage of caching data on its CDN, protect against DDoS attacks, and to gather better basic statistics on network traffic.
As you can see, there are a couple of advanced security features which are planned that will add further protection to your network. I look forward to when they are finally implemented because I consider such security features to be very valuable these days. It helps provide a warm and fuzzy feeling knowing that enhanced security protections are enabled on one’s home network (at least it does for me).
The “Web Controls” page is the same as the Free Edition. However, the Free Edition limits how many web filtering categories you may choose. You will notice after choosing more than a couple of categories that it will no longer allow you to select any more. It will display a message saying you need to upgrade to a premium edition to enable more blocking. The Home Edition allows blocking for as many categories as you like. As with the Free Edition, you may add or modify the default blocklist/whitelist categories.
Configuration
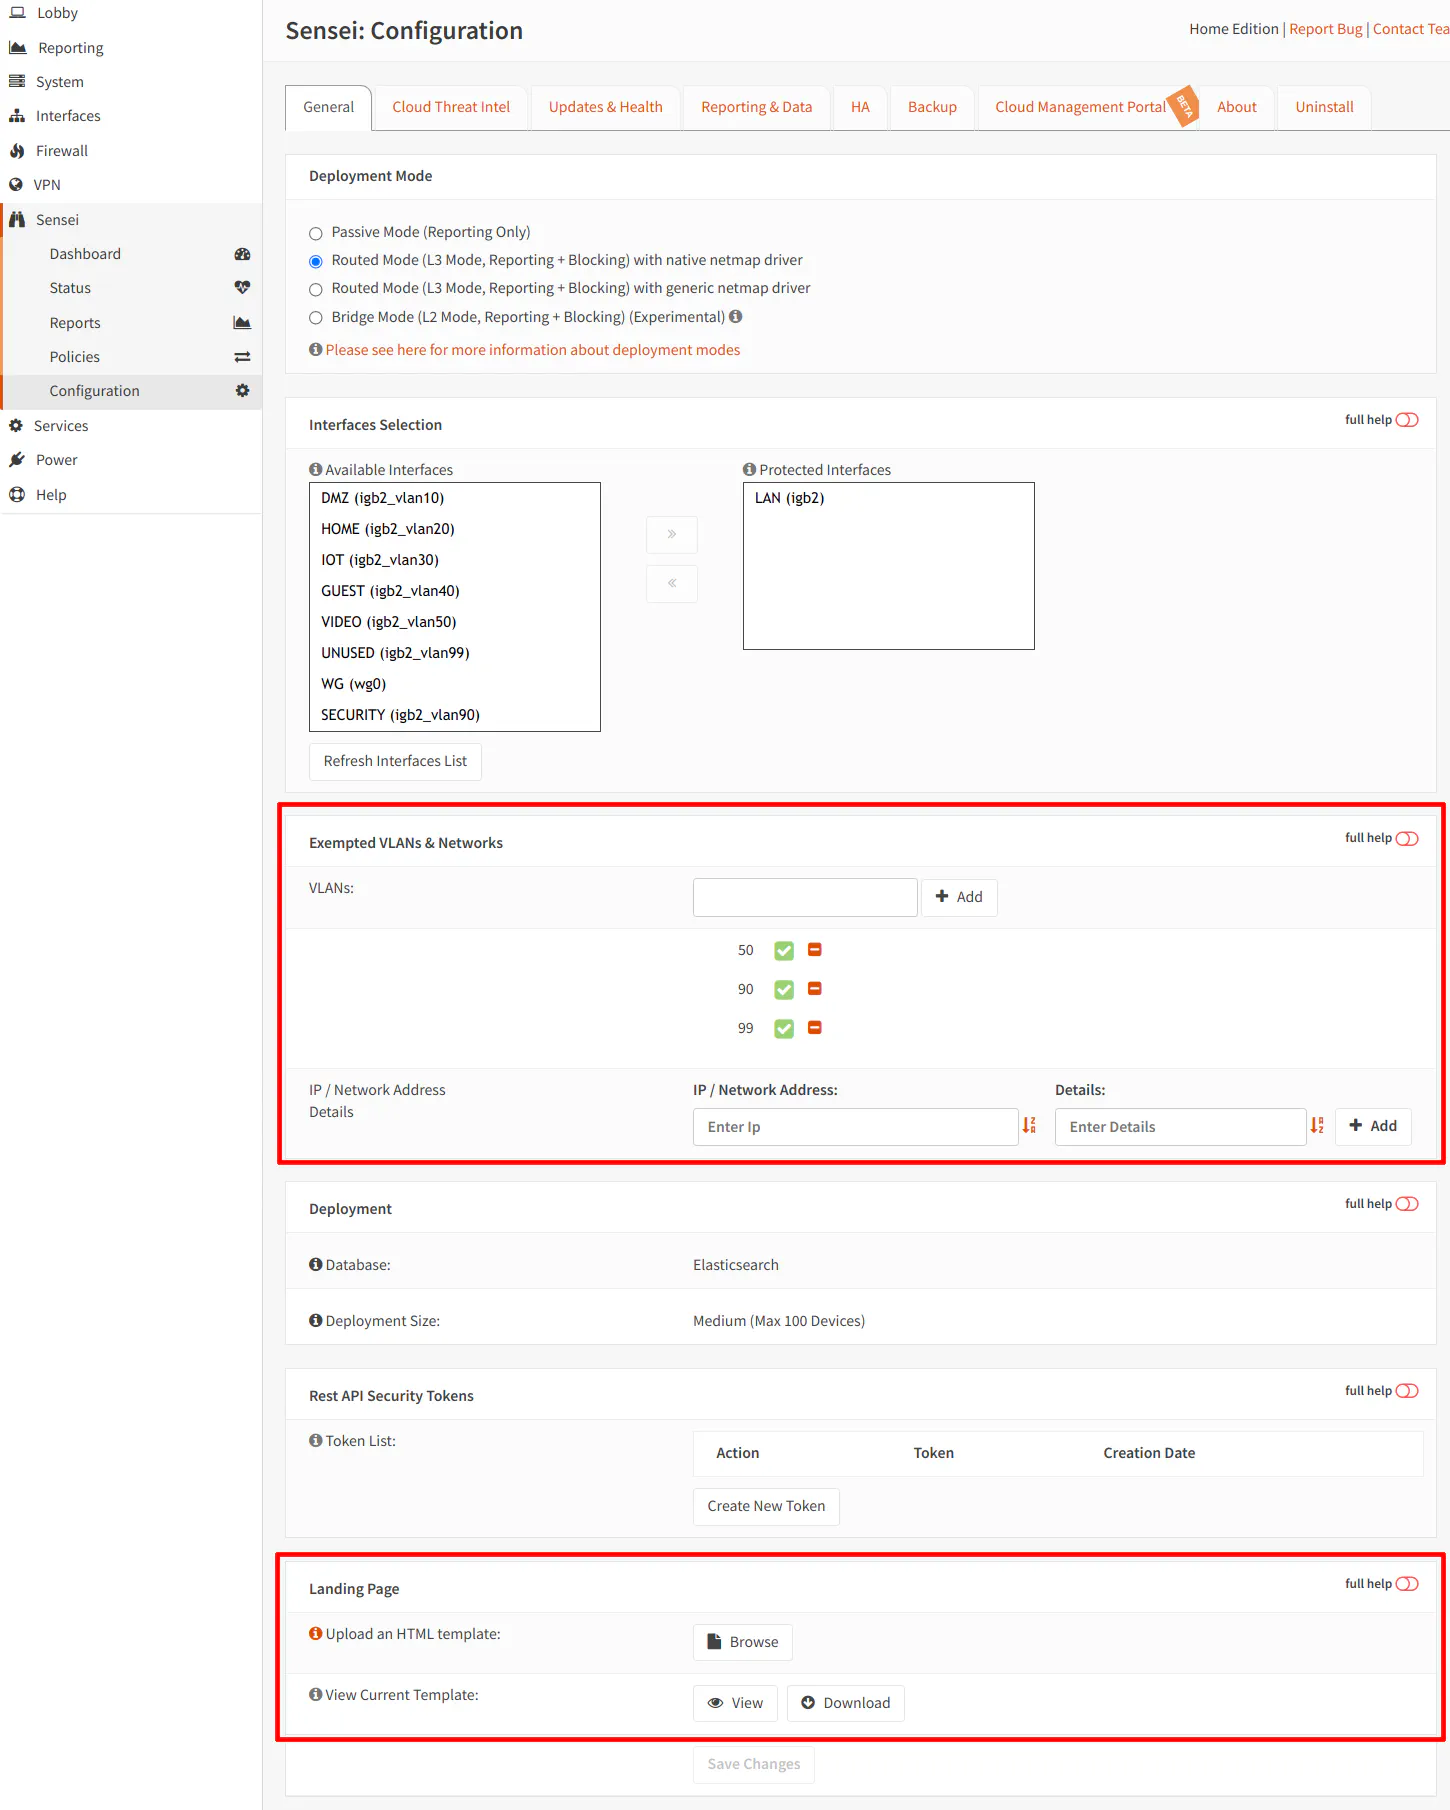
The Home Edition includes more configuration options to the “Configuration” page. The “Exempted VLANs & Networks” section of the page allows you to exclude specific VLANs/IPs/subnets from being processed by Zenarmor. This may be useful if you have a completely isolated network that you do not want monitored or for other specific scenarios.
Another extra feature is the ability to create a custom landing page for when Zenarmor blocks access to a website. How fancy would it be to have a nice, custom formatted block page for your network! I should work on creating a custom page at some point because when something is blocked it is not necessarily obvious at a quick glance that the page is being blocked by Zenarmor since the block page is very basic.
If you have your OPNsense firewall set up in HA (High Availability) mode to seamlessly fail over to a second OPNsense box, you can configure Zenarmor to also work in HA mode by visiting the “HA” tab. I would consider this a more advanced option for the home user, but if you like having HA, you may want to subscribe to the Home Edition version of Zenarmor so that you can have Zenarmor function properly in a HA configuration.
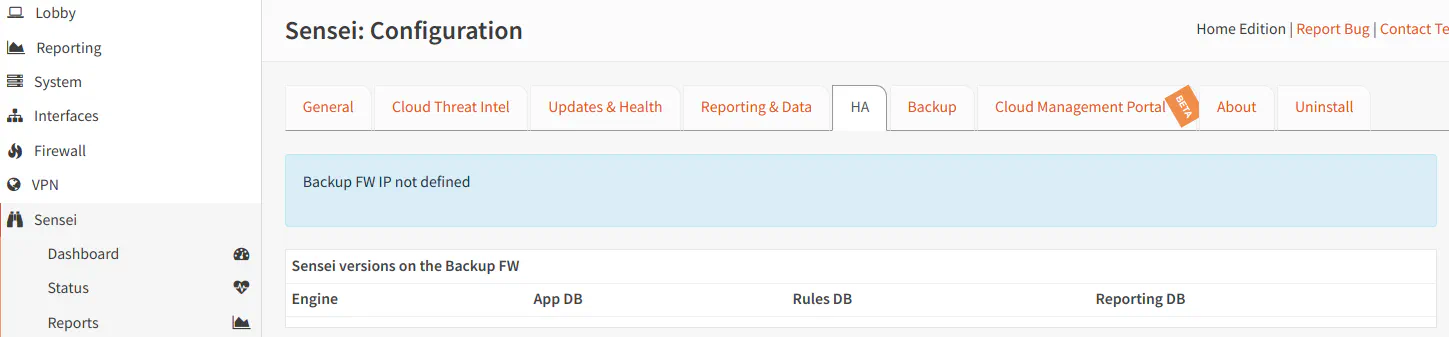
If you do not have HA configured for your firewall, you will see a message on the page stating that the backup firewall IP address is not defined as shown in the screenshot above.
Conclusion
Overall, Zenarmor is a great addition to the OPNsense platform, and it keeps getting better over time. In fact, I had a make a substantial overall to this review because enough has changed since I wrote the original over a year ago.
Zenarmor adds advanced next-gen functionality to OPNsense and offers an affordable solution for home, small office, and business users. Sunny Valley strikes a good balance between providing useful features in the Free Edition and enhanced security features in the Home Edition. The main standout features, in my opinion, for the Home Edition is the activity explorer to quickly view daily activity, ability to block a greater number of website categories, ability to block new malware outbreaks and other advanced security features, and the ability to create policies for specific users/devices on your network. The value of the Home Edition will further increase when additional security features such as botnet/DNS tunneling blocking become available.
If you are interested in a feature comparison of their plans, you may visit their website to see more: https://www.zenarmor.com/plans/.