How to Configure VLANs on TP-Link Switch for UniFi Access Points with VLAN per SSID

Table of Contents
When I initially created VLANs on my UniFi wireless access points, I was still new to VLANs in general, and I was not quite sure how to configure my network switch. I was wanting to join my wired and wireless devices together on several different VLANs for various purposes (IoT network, guest network, security camera network, etc.).
Setting up VLANs on a TP-Link switch is not too difficult once you understand how VLANs work. You create a new VLAN ID and select the tagged/untagged ports that belong to the VLAN. Tagged ports should be used between various network infrastructure devices such as routers/switches and untagged ports should be used for other network devices such as PCs, printers, etc.
Setting up VLANs on the UniFi APs is very simple. You only need to add the VLAN ID when creating a new or updating an existing SSID. The UniFi APs allow you to configure one VLAN per SSID. If you want to have multiple VLANs on your wireless network to segregate your devices, you just create a new SSID and specify the VLAN ID. You can create up to 4 SSIDs and therefore 4 different VLANs.
Configuring the VLANs
Once you have your VLANs defined on both your network switch and the UniFi APs, the question is, “How do you configure the VLANs on the switch so that both the wired and wireless devices on the same VLAN can communicate?” This, of course, assumes you wish to have wired and wireless devices on the same VLAN and not keep them completely segregated. A useful scenario would be to have wired and wireless IoT devices in the same VLAN to keep them isolated from the rest of your network.
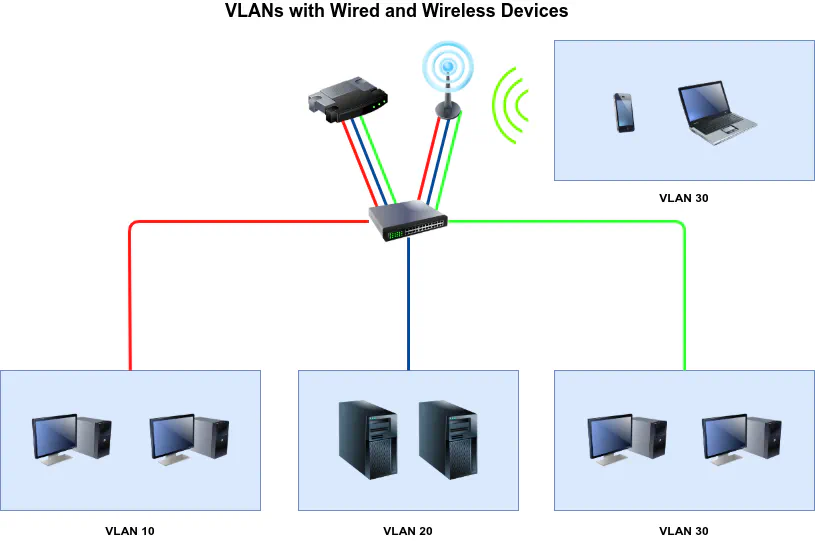
The answer to this question did not come to me immediately since I was still new at configuring VLANs. I made the port on the switch that is connected to the router a trunk/tagged port to allow tagged VLAN traffic on the switch to flow to the router but what about the ports that the UniFi APs are connected to? You need to treat them the same as connecting to another switch, router, or other VLAN aware device. Since the APs support VLANs, you need to make the port on the switch connected to your APs a trunk/tagged port also. That allows VLAN traffic to properly flow from your VLAN tagged SSIDs to your switch.
Examples
In the old TP-Link firmware, you would configure your VLAN similar to below (using your own ports, of course):
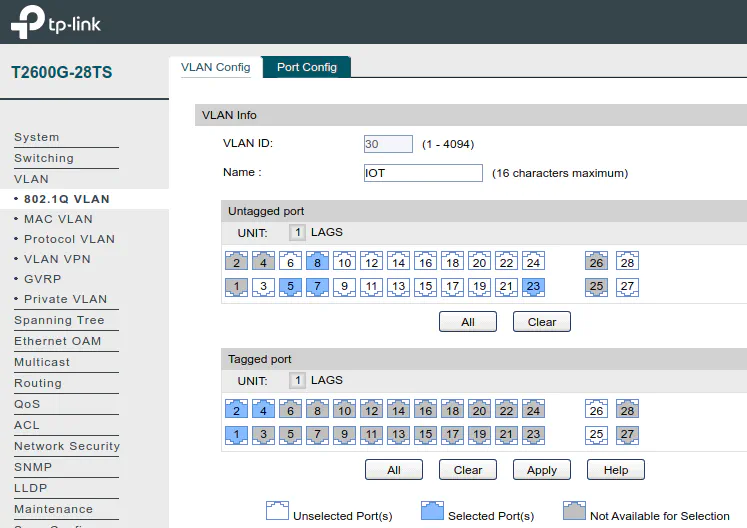
In the “Untagged Port” section, ports 5, 7, 8, and 23 would be the various networked devices (PCs, Laptops, printers, etc.) that are in the IOT VLAN.
For the “Tagged Port” section, port 1 could be connected to your router, and ports 2 and 4 could be connected to your UniFi APs. The tagged ports should be for all of the VLAN aware network infrastructure devices.
In the new TP-Link firmware, you would do something similar to the above:
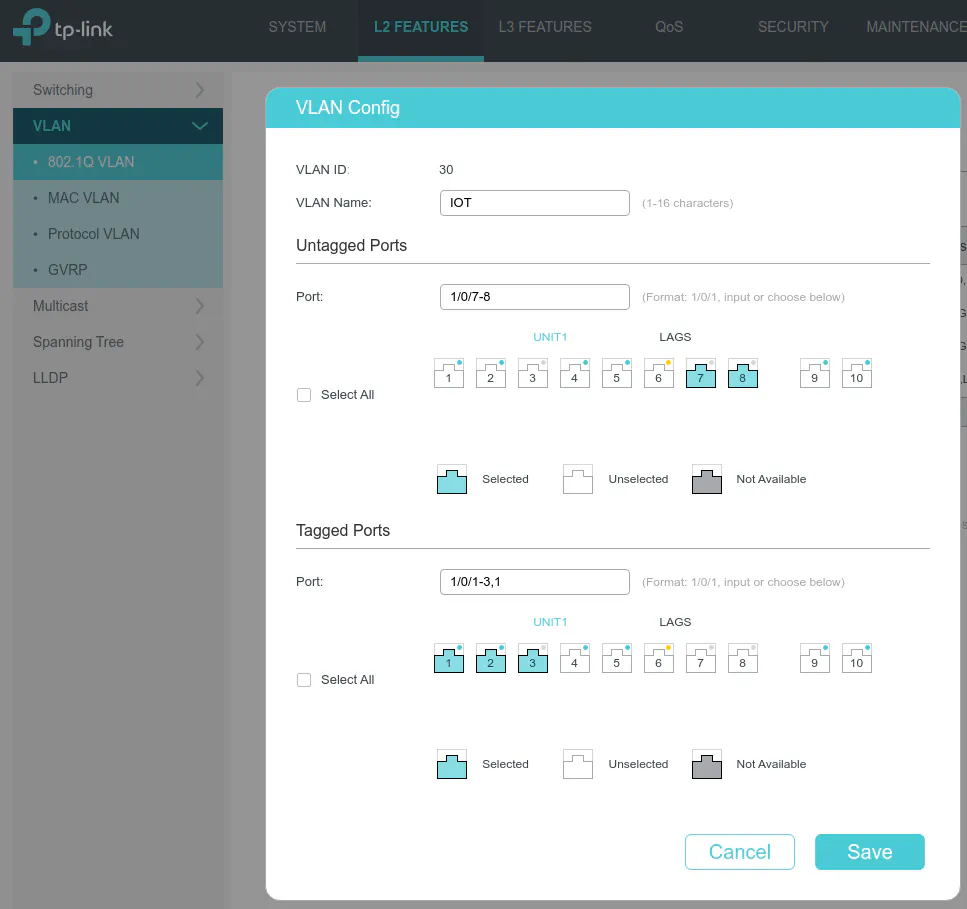
For the “Untagged Ports”, ports 7 and 8 are for devices in the IOT VLAN while in the “Tagged Ports” section, port 1 could be connected to your router while ports 2 and 3 could be connected to your UniFi APs.
While this information may be very trivial for the seasoned network administrator (in which case you probably do not need the information on this site since it is geared toward novice/intermediate users wishing to understand more advanced networking techniques that can be used at home), I think it is important to understand the concept since it may not be obvious to newbies of VLANs. I hope you find this information useful if you are trying to set up VLANs with your UniFi APs!