Set Up a Caddy Reverse Proxy with Let's Encrypt and CrowdSec Using OPNsense LAPI

Table of Contents
Ever since setting up CrowdSec in OPNsense, I have had the desire to set up a CrowdSec bouncer on my reverse proxy to enable extra protection for apps/services hosted behind the proxy.
Even though I have CrowdSec protecting my entire network from crowd sourced malicious IPs as well as protecting my OPNsense web UI and SSH service, CrowdSec is also able to protect various apps/services running on your network by parsing logs, etc.
I was using Nginx Proxy Manager for my reverse proxy because I enjoyed the simplicity of the web UI. However, there is no official way to add CrowdSec support. You have to use a community fork which has CrowdSec integrated.
On top of that, I seen concerns that NPM may be more vulnerable than simply using Nginx directly as a reverse proxy since the NPM project does not always keep up to date when there are vulnerabilities found in Nginx.
I decided that I would try Caddy as my new reverse proxy due to its simplistic configuration and automatic SSL provisioning. While the default usage of Caddy is pretty simple, the process in this guide will be more involved because it requires manually building Caddy to include additional functionality. Also, I do not plan to use Docker so that adds a few steps (some of which only need to be done once).
In this guide, I will be demonstrating how to set up a Caddy reverse proxy server using Let’s Encrypt with DNS challenges as well as how to set up a CrowdSec multi-server configuration. So there is a lot to cover!
Before Getting Started
To keep this guide on topic, there are a number of assumptions I will make for the example scenario I have described in the introduction:
-
You have an OPNsense installation with the CrowdSec plugin installed.
-
SSH is set up on OPNsense or you can log in via the console to run various commands for CrowdSec.
-
You have an existing service on your network with a static IP address that you can access successfully via HTTP (HTTPS may require some configuration changes to trust self-signed certificates in Caddy). This HTTP service will be placed behind the Caddy reverse proxy.
-
I will be using a LXC in Proxmox with a static IP address on the DMZ network for the Caddy installation (but you may install Caddy on a VM or a dedicated system), and I will not be using Docker.
-
I will be using Cloudflare as the domain registrar with an API key generated for “Edit DNS Zone” so certificates can be generated without needing to open up the firewall to allow ACME challenges, which is great when your reverse proxy instance is not directly connected to the Internet (if you are using the reverse proxy for internal network services but still desire valid certificates).
Prepare the OPNsense CrowdSec Configuration
Before setting up the Caddy reverse proxy, some settings for CrowdSec and firewall rules can be configured in OPNsense to prepare for a CrowdSec multi-server environment.
Update the Existing CrowdSec Plugin Configuration
The first thing you can do is change your CrowdSec plugin settings in OPNsense to allow other CrowdSec agents/bouncers to use the LAPI (Local API) on OPNsense. By default, the LAPI on OPNsense only listens on localhost (127.0.0.1).
In this example, I am setting the IP address to be on the LAN interface of 192.168.1.1. You may wish to put it on a different interface.
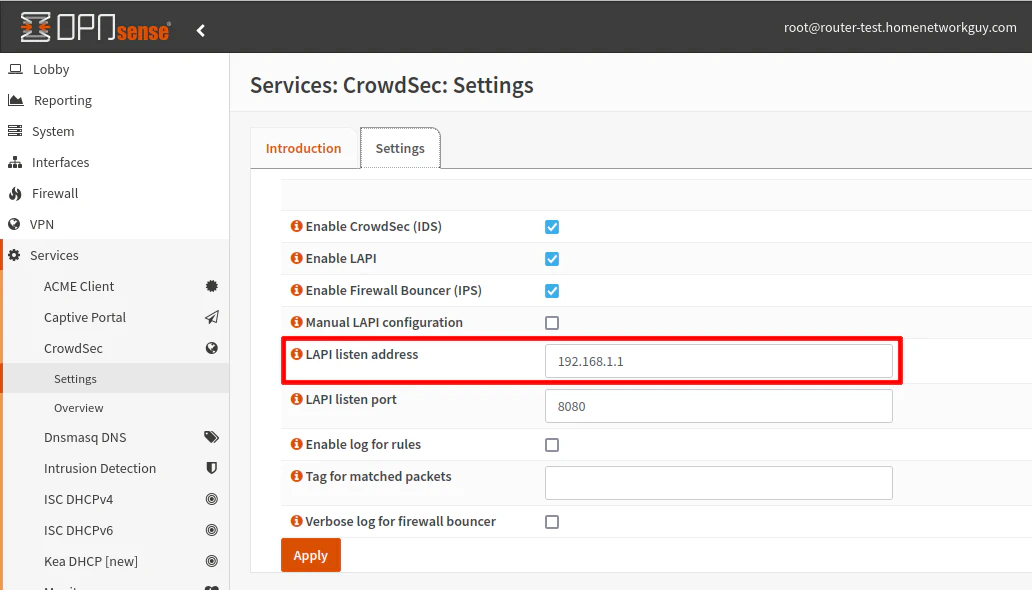
You will need to start/stop the CrowdSec plugin for changes to take effect.
Create API Key for Caddy CrowdSec Bouncer
To prepare for setting up the CrowdSec bouncer for Caddy in a later step, you will need an API key generated for the bouncer.
Log into your OPNsense system via SSH or the console and issue the following command to create an API key. You may use any name you wish in place of caddyDmz. I used that name since this will be for a Caddy instance on the DMZ network.
sudo cscli bouncers add caddyDmz
You should see the API key in the console output. Copy/paste this key until it is needed later.
API key for 'caddyDmz':

   kLI6ljt3B/zWsBvRxu68vP8rL/cNj3O0hgjJ6B2s7Yk

Please keep this key since you will not be able to retrieve it!
Add the Appropriate Firewall Rule(s)
You will need to add a couple of firewall rules if your OPNsense LAPI, Caddy server, and hosted apps/services are on different networks.
You may skip this entire section if they are all on the same network.
Allow Caddy Server Access to OPNsense LAPI
If Caddy is on another network/VLAN than the OPNsense LAPI which is on the LAN interface, such as the DMZ network for instance, you will need to create a firewall rule on that interface to allow access to 192.168.1.1 for TCP port 8080.
Go to the “Firewall > Rules > [DMZ]” page. In the example firewall rule below, a firewall alias called Caddy should contain the IP address of your Caddy reverse proxy such as 192.168.10.10.
| Action | TCP/IP Version | Protocol | Source | Destination | Dest Port | Description | |
|---|---|---|---|---|---|---|---|
| Pass | IPv4 | TCP | Caddy | 192.168.1.1 | 8080 | Allow access to CrowdSec LAPI on OPNsense |
Allow Caddy Server Access to App/Service
Additionally, if your hosted app or service is on a different network/VLAN, you will need a firewall rule to allow access. To potentially decrease the attack surface of hosting apps on a DMZ, you could expose only the reverse proxy directly on the DMZ while the app/service lives on another network protected by the OPNsense firewall. You will only need to open the port(s) required by the service.
For the example scenario, you may use the following firewall rule (while still on the “Firewall > Rules > [DMZ]” page) to allow access to the Homepage dashboard from the Caddy reverse proxy. Caddy is a firewall alias for the IP address of the Caddy reverse proxy such as 192.168.10.10 while HomepageServer is an alias for an IP address such as 192.168.20.10.
| Action | TCP/IP Version | Protocol | Source | Destination | Dest Port | Description | |
|---|---|---|---|---|---|---|---|
| Pass | IPv4 | TCP | Caddy | HomepageServer | 3000 | Allow access to Homepage dashboard server |
Allow Devices to Access the Caddy Server
Any devices which exist on other networks which need access to your apps/services behind the proxy will need to reach the Caddy reverse proxy via HTTPS. The rule below will allow devices in the USER network to access the apps/services to reach Caddy so you can access your apps/services.
| Action | TCP/IP Version | Protocol | Source | Destination | Dest Port | Description | |
|---|---|---|---|---|---|---|---|
| Pass | IPv4 | TCP | USER net | Caddy | 443 (HTTPS) | Allow access to Caddy reverse proxy |
If you have multiple networks which need access, you could create a firewall group and include multiple interfaces or you could make use of floating rules.
Unbound DNS Overrides
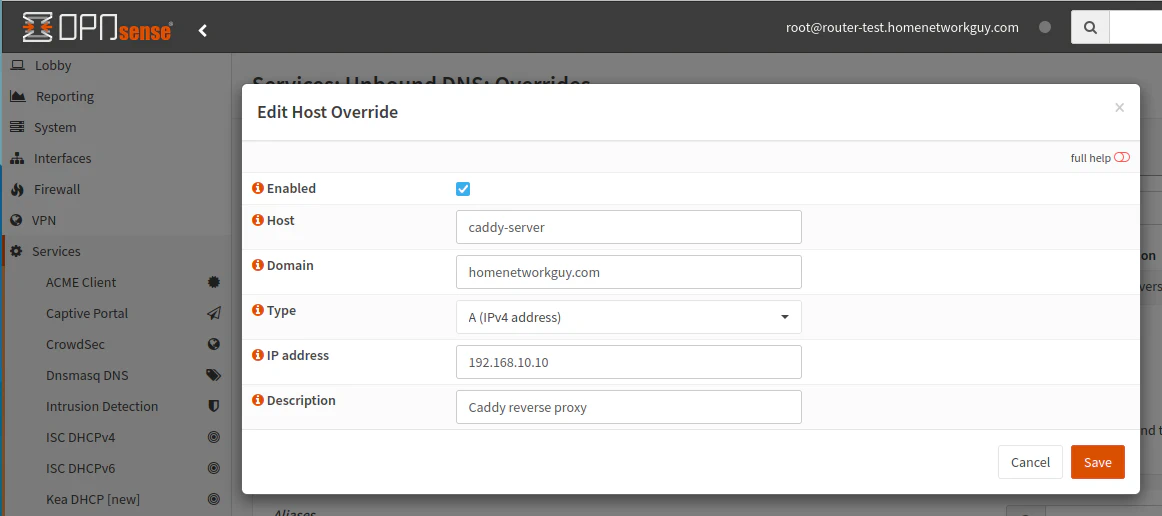
When using a reverse proxy, you will need to add Unbound DNS overrides. Unbound DNS overrides allow you to point all of your local hostnames to the IP address of the Caddy server so that you can access multiple apps/services behind the reverse proxy.
Normally you would want hostnames to uniquely refer to clients on your network but in the case of a reverse proxy, you will want all of the hostnames of the frontend of your apps/services to be using the reverse proxy IP address. The proxy will handle forwarding the requests to the proper backend server based on the hostnames.
Create an Unbound DNS override entry for the Caddy server hostname such as caddy-server for the appropriate domain name such as homenetworkguy.com.
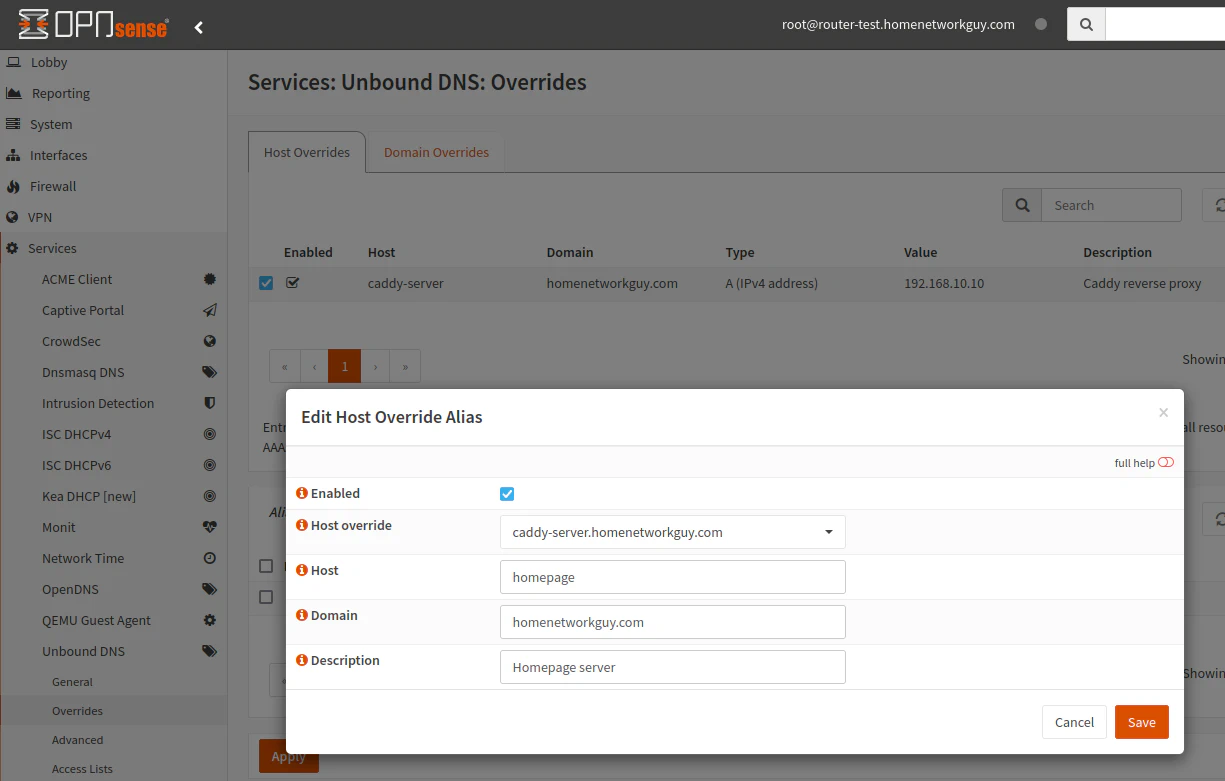
For the aliases you may add all of the hostnames you will use for the servers hosted behind the reverse proxy. You should use a different hostname than the actual backend app/server.
What I typically do is use a shorter, more generic hostname for the override alias and a more specific hostname for the actual app/service. For example, the Homepage dashboard app used in this example has the hostname homepage-server, but I plan to access the frontend which is behind the reverse proxy via the hostname homepage. If I need to SSH into my Homepage dashboard server, I would use the homepage-server hostname.
Click on the “+” button on the bottom portion of the page to create an alias for the Homepage dashboard app example that I am using. The frontend hostname will be homepage.
Set Up the Caddy Reverse Proxy
The main portion of this guide is setting up Caddy as a reverse proxy using Let’s Encrypt DNS challenges as well as setting up the CrowdSec agent and CrowdSec bouncer module. While the basic installation of Caddy is simple, the process I am demonstrating is going to require a manual installation so that additional modules can be built into the Caddy executable.
As mentioned earlier, I will be setting up Caddy in a LXC on Proxmox. Log in as the root user to complete the steps below. Note that I am including sudo in the commands even though it is not necessary for the root user in case you are using a different user with sudo privileges. You will have to ensure the files have the proper owner/group.
Install Go
Caddy was built with the Go programming language so you will need to install it in order to complete the steps in this guide.
On the Go download page, find the latest stable release and copy the URL for the download. You will want the Linux amd64 version of the file if you are using a LXC in Proxmox. Using the wget command, you can download it directly to the LXC.
wget https://go.dev/dl/go1.24.4.linux-amd64.tar.gz
The next command will extract the contents to the proper location on the system.
rm -rf /usr/local/go && tar -C /usr/local -xzf go1.24.4.linux-amd64.tar.gz
You will want the go executable on the PATH.
export PATH=$PATH:/usr/local/go/bin
For the export to take effect immediate, issue the following source command.
source $HOME/.profile
You may check the Go version using the go version command. If you have a version number displayed instead of an error, you have successfully installed Go.
go version
You may remove the Go download once you have it set up properly.
rm go1.24.4.linux-amd64.tar.gz
Install xcaddy
You will need to install xcaddy for the next step since a custom Caddy executable file needs to be built. The xcaddy tool helps with this process. You should be able to copy/paste this entire block of commands and hit enter to install xcaddy.
sudo apt install -y curl debian-keyring debian-archive-keyring apt-transport-https
curl -1sLf 'https://dl.cloudsmith.io/public/caddy/xcaddy/gpg.key' | sudo gpg --dearmor -o /usr/share/keyrings/caddy-xcaddy-archive-keyring.gpg
curl -1sLf 'https://dl.cloudsmith.io/public/caddy/xcaddy/debian.deb.txt' | sudo tee /etc/apt/sources.list.d/caddy-xcaddy.list
sudo apt update
sudo apt install xcaddy
Build Caddy with the Desired Modules
In order to use DNS challenges with Let’s Encrypt and to use a CrowdSec bouncer, you will need to a build a custom Caddy executable to extend the base functionality. Fortunately, the build process is easy with xcaddy since you can build a Caddy executable with a single command.
I will be using the Cloudflare module for Let’s Encrypt but you may use a different provider. Replace github.com/caddy-dns/cloudflare with a provider from the list found on GitHub.
xcaddy build \
    --with github.com/caddy-dns/cloudflare \
    --with github.com/hslatman/caddy-crowdsec-bouncer/http
Move the file to the /usr/bin/ folder:
sudo mv caddy /usr/bin/
You should be able to run the caddy executable to ensure it can be found on the path.
caddy version
Create User and Group for Caddy
Now is a good time to create a separate user and group for Caddy since the caddy executable has been built and moved to the proper location.
Create the caddy user group using the following command:
sudo groupadd --system caddy
Then create the caddy user and add it to the caddy group:
sudo useradd --system \
    --gid caddy \
    --create-home \
    --home-dir /var/lib/caddy \
    --shell /usr/sbin/nologin \
    --comment "Caddy web server" \
    caddy
Create Caddyfile
Caddy may be configured either by caddy.json or in a file called a Caddyfile, which is less verbose than using a JSON file. I will use the Caddyfile since for the purposes of this demonstration will suffice. If you need more advanced configuration, you can use the JSON configuration file instead.
mkdir /etc/caddy
touch /etc/caddy/Caddyfile
chown caddy:caddy /etc/caddy/Caddyfile
nano /etc/caddy/Caddyfile
In the configuration file, you will need to enter the Cloudflare API key used for editing DNS zones for the acme_dns cloudflare option.
In addition to the DNS API key, newer versions of Caddy (v2.8.0+) require you to enter an email address for ZeroSSL (Caddy uses both Let’s Encrypt and ZeroSSL for issuing certificates). I discovered I needed to add the email to the configuration when I tried upgrading Caddy.
Then in a crowdsec block, you will need to enter the API key what was generated from OPNsense earlier. The URL is for the CrowdSec LAPI on OPNsense which is 192.168.1.1:8080.
These first two settings should be contained in the global settings block as shown below.
Finally, you will need to include entries for your apps/services that will be behind your reverse proxy. I included one example of a Homepage dashboard app that I have running on my network. You simply include the URL next to the reverse_proxy option.
Please note that the Caddy server needs to have access to the apps/services if they live on a different network/VLAN so you will need to create the appropriate firewall rules.
Be sure to include the route section with crowdsec before the reverse_proxy line so that it will route the traffic through CrowdSec first. The log section is important because log files need to be generated for CrowdSec to parse for malicious activity.
{
        email [email protected]
        acme_dns cloudflare zNA25a5Wm8jxXesvShLP5U7kP2ENybNl7x8a9kxz

        crowdsec {
                api_key kLI6ljt3B/zWsBvRxu68vP8rL/cNj3O0hgjJ6B2s7Yk
                api_url http://192.168.1.1:8080/
        }
}

homepage.homenetworkguy.com {
        route {
                crowdsec
                reverse_proxy http://homepage-server.homenetworkguy.com:3000
        }
        log {
                output file /var/log/caddy/caddy.log
        }
}
There are 3 additional CrowdSec bouncer options you may include.
If you wish for the bouncer to check the LAPI each time instead of caching the decisions in memory and polling the LAPI every 10 seconds by default, you can disable streaming by adding the disable_streaming option to the crowdsec block. Streaming decision information is more efficient if you have a lot of requests, but it is possible there will be a slight increase in delay when decisions on the LAPI have changed.
...
        crowdsec {
            ...
            disable_streaming
...
If streaming is used (which is used by the default), then you may wan to tweak the ticker_interval option to control how many seconds to query the CrowdSec LAPI. The default is 10 seconds but you may check more or less frequently.
...
        crowdsec {
            ...
            ticker_interval 10s
...
Finally, there is an option to enable “hard fails” if there is an issue connecting to the CrowdSec LAPI. This feature might be nice if you wish to prevent your services from being accessed if something is wrong with the LAPI since they will be unprotected by CrowdSec. Of course, that would negatively affect uptime, but it would make it very apparent something bad has happened.
I noticed it takes about 30 seconds to fail after the CrowdSec service is stopped in OPNsense. I was starting to wonder if this option was working properly, but I simply was not patient enough during my testing.
...
        crowdsec {
            ...
            enable_hard_fails
...
Press “Ctrl + O”, “Enter”, and “Ctrl + X” to save and close the Caddyfile.
Create the Caddy Log File
Caddy will not automatically generate the initial file for logging so you will need to do that before starting the Caddy service.
In the Caddyfile example, the log file specified as /var/log/caddy/caddy.log.
Since the caddy folder does not exist under /var/log, it will need created.
sudo mkdir /var/log/caddy
Then you can create a blank file for Caddy to use by using the following command:
sudo touch /var/log/caddy/caddy.log
You will need to set the proper permissions so that the caddy user can access the log file instead of the root user.
sudo chown caddy:caddy /var/log/caddy/caddy.log
Update the Caddy Collection Acquisition Template
You will need to add the location of the Caddy log file(s) so that CrowdSec can parse the appropriate files to detect malicious activity.
In the example Caddyfile above, the log file /var/log/caddy/caddy.log was configured but if you put the log files in a different location, you will need to adjust the values used below.
Open a text editor for the acquis.yaml file.
sudo nano /etc/crowdsec/acquis.yaml
At the bottom of the file, add the following text. You find the example from CrowdSec’s caddy collection page.
filenames:
  - /var/log/caddy/*.log
labels:
  type: caddy
---
Caddy Systemd Service
Because Caddy was manually built, there is no systemd service installed so you will need to do it manually. Fortunately, it is not difficult to do since Caddy provides an example systemd service file. You only need to do this step once even if you build new versions of Caddy in the future.
Open a text editor for the caddy.service file.
sudo nano /etc/systemd/system/caddy.service
Enter the contents found on Caddy’s GitHub page:
# caddy.service
#
# For using Caddy with a config file.
#
# Make sure the ExecStart and ExecReload commands are correct
# for your installation.
#
# See https://caddyserver.com/docs/install for instructions.
#
# WARNING: This service does not use the --resume flag, so if you
# use the API to make changes, they will be overwritten by the
# Caddyfile next time the service is restarted. If you intend to
# use Caddy's API to configure it, add the --resume flag to the
# `caddy run` command or use the caddy-api.service file instead.

[Unit]
Description=Caddy
Documentation=https://caddyserver.com/docs/
After=network.target network-online.target
Requires=network-online.target

[Service]
Type=notify
User=caddy
Group=caddy
ExecStart=/usr/bin/caddy run --environ --config /etc/caddy/Caddyfile
ExecReload=/usr/bin/caddy reload --config /etc/caddy/Caddyfile --force
TimeoutStopSec=5s
LimitNOFILE=1048576
PrivateTmp=true
ProtectSystem=full
AmbientCapabilities=CAP_NET_ADMIN CAP_NET_BIND_SERVICE

[Install]
WantedBy=multi-user.target
Press “Ctrl + O”, “Enter”, and “Ctrl + X” to save and close the file.
You will now need to reload the Systemd daemon, enable, and start the Caddy service.
sudo systemctl daemon-reload
sudo systemctl enable --now caddy
At this point, you should verify Caddy is running without any errors:
sudo systemctl status caddy
If you see that it is running and not stopped, you should have a good Caddy server configuration with Let’s Encrypt and a CrowdSec bouncer enabled. You may check in the OPNsense CrowdSec interface on the “Overview > Bouncers” page if there has been any recent API pulls from the CrowdSec bouncer on Caddy. That is a good sanity check to ensure communication is successfully occurring between the bouncer and the LAPI on OPNsense.
Install CrowdSec Agent on Caddy Server
The CrowdSec bouncer is what will block connections to services behind the reverse proxy, but the Caddy server will need a CrowdSec agent installed so it can run the parsers and scenarios on the server. The agent sends the information to the LAPI on OPNsense to make decisions on blocking content. For a single CrowdSec instance, this usually occurs on the same system, but in a multi-server configuration, the CrowdSec agent and bouncer communicates with the LAPI on a different server (in this case, OPNsense).
Install CrowdSec using the following commands. Basically the next step is following the CrowdSec installation guide. It is very simple to install.
curl -s https://install.crowdsec.net | sudo sh
sudo apt install crowdsec
The CrowdSec agent needs to be registered with OPNsense CrowdSec LAPI using the command below.
sudo cscli lapi register -u http://192.168.1.1:8080 --machine caddyDmz
Note in the command above that you may provide a friendly name such as caddyDmz using the --machine parameter. Otherwise, it will generate a long random string. This is useful when you have multiple systems you are registering and you wish to provide a more descriptive name that shows up in the OPNsense web UI. Also, you can easily enter that descriptive name when validating the machine in a later step.
Next, copy the default CrowdSec systemd file from /lib/systemd/system to /etc/systemd/system so customizations can be made to the service file.
sudo cp /lib/systemd/system/crowdsec.service /etc/systemd/system/crowdsec.service
Edit the /etc/systemd/system/crowdsec.service to add the -no-api flag to the end of the ExecStart command. This disables the LAPI on the Caddy server since it is not needed because the LAPI on OPNsense will be used instead (see CrowdSec’s multi-server configuration example).
[Unit]
Description=Crowdsec agent
After=syslog.target network.target remote-fs.target nss-lookup.target

[Service]
Type=notify
Environment=LC_ALL=C LANG=C
ExecStartPre=/usr/bin/crowdsec -c /etc/crowdsec/config.yaml -t -error
ExecStart=/usr/bin/crowdsec -c /etc/crowdsec/config.yaml -no-api
#ExecStartPost=/bin/sleep 0.1
ExecReload=/bin/kill -HUP $MAINPID
Restart=always
RestartSec=60

[Install]
WantedBy=multi-user.target
You will need to reload the systemd service since changes to the service was made.
sudo systemctl daemon-reload
Do not reload the CrowdSec service just yet because with the LAPI on the Caddy server disabled, CrowdSec will error on startup until you have validated the Caddy machine on OPNsense. CrowdSec will be unable to connect to the LAPI on OPNsense until validation occurs. When there is no reachable LAPI, the CrowdSec agent will fail to load.
Validate the Caddy Machine in OPNsense
While logged into OPNsense via SSH or the console, list the machines which have been registered or requesting to be registered:
sudo cscli machines list
You should see similar output to below. Notice the status of the machine caddyDmz (if you defined a name, otherwise it will be something random such as 02a3nfadce4ez4b19zh582e0f68f72a4CX4EzFJ2Th4PNkj1). There will be a “No” symbol under “Status”.
──────────────────────────────────────────────────────────────────────────────────────────────────────────────────────────────────────────────────────────
 Name                                               IP Address       Last Update            Status   Version                   Auth Type   Last Heartbeat
──────────────────────────────────────────────────────────────────────────────────────────────────────────────────────────────────────────────────────────
 localhost                                          192.168.1.1      2024-03-11T14:11:50Z   ✔️        v1.6.0-freebsd-4b8e6cd7   password    21s
 caddyDmz   192.168.10.10    2024-03-11T13:55:29Z   🚫                                  password    ⚠️ 16m42s
──────────────────────────────────────────────────────────────────────────────────────────────────────────────────────────────────────────────────────────
To validate the machine, you can enter the following command.
sudo cscli machines validate caddyDmz
Add Collection(s) to CrowdSec Agent on the Caddy Server
To add extra Caddy-specific parsers, you can add the following collection to your CrowdSec installation on your Caddy server. The Caddy collection includes a Caddy log parser and basic HTTP protections.
While the Caddy log parser may only be beneficial if you are using Caddy as a web server instead of a reverse proxy, the included basic HTTP protections should be helpful to protect web apps that are behind the reverse proxy.
sudo cscli collections install crowdsecurity/caddy
If you are hosting a public service (which great care must be taken to address security), it may not be a bad idea to also include the HTTP DoS collection to help detect denial of service attacks.
Of course, you should test this does not interfere with the normal operation of your app/service. I also do not know if this would be beneficial if you are using a Cloudflare proxy which includes DDoS protection.
sudo cscli collections install crowdsecurity/http-dos
You may now finally restart the CrowdSec agent on the Caddy server.
sudo systemctl reload crowdsec
After reloading CrowdSec, you should check if it is running properly.
sudo systemctl status crowdsec
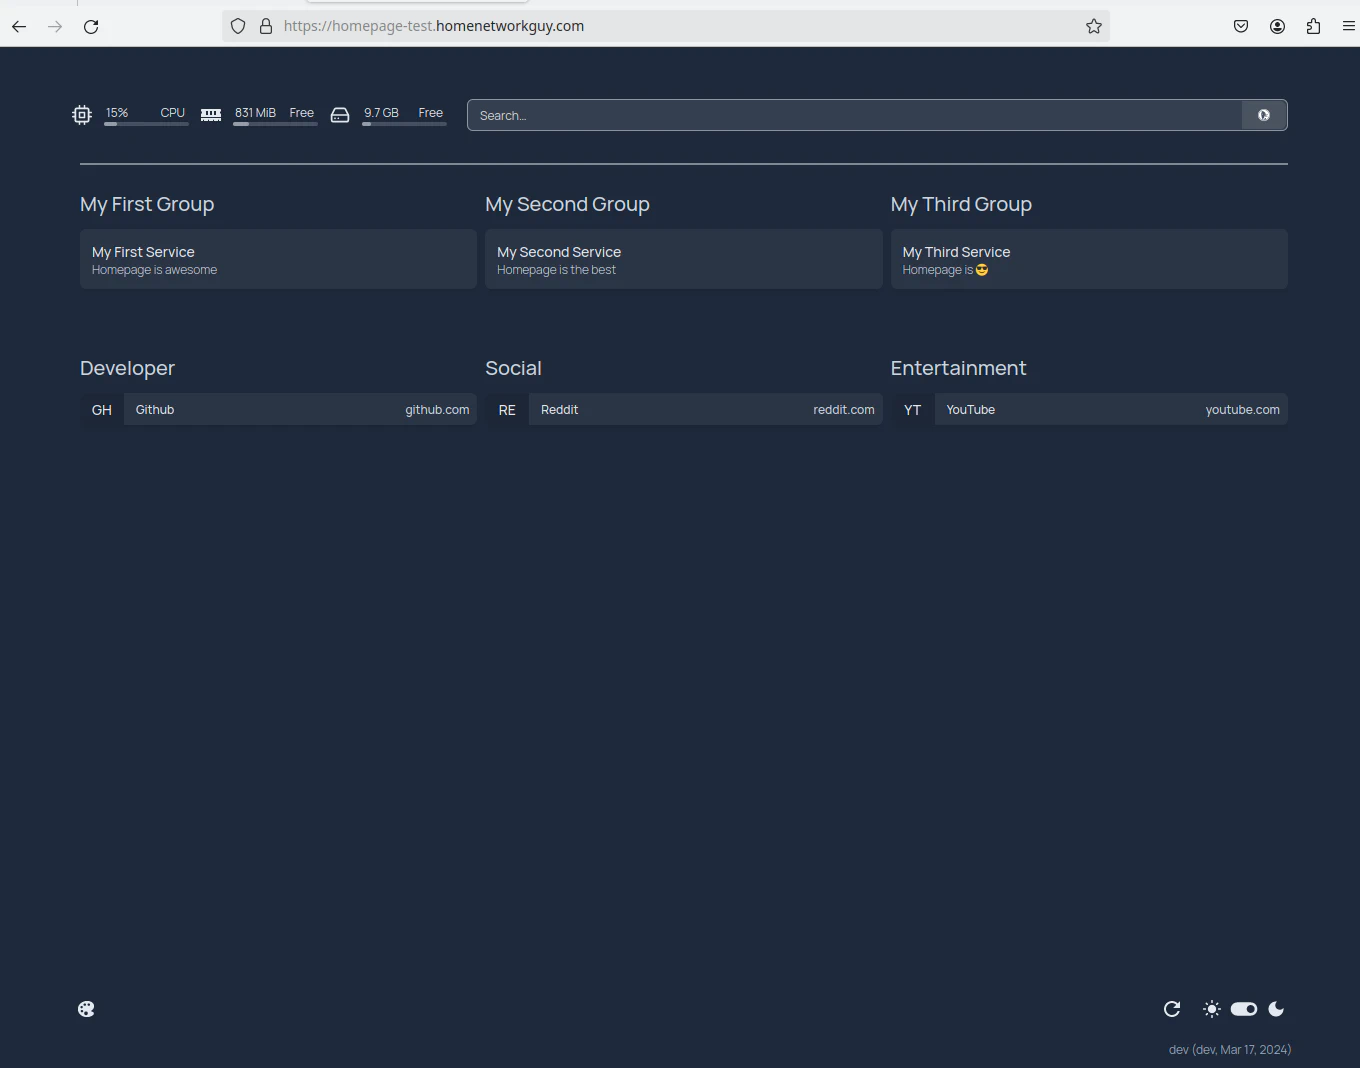
Test the Configuration
Assuming all was configured properly, you should be able to access the service that is behind the reverse proxy by visiting https://homepage.homenetworkguy.com.
Note
Keep in mind that certificate issuance by the Caddy reverse proxy may take a short while. I noticed such a delay in issuance when testing this guide on a virtual machine environment behind my main network. It seemed to take longer than when I deployed the reverse proxy on my primary network.
I am not sure why there seemed to be a delay in certificate issuance when trying to solve the DNS challenge in my virtualized lab environment, but I wanted to make you aware in case it happens to you as well.
For CrowdSec, you can test if it is blocking connections by manually initiating a ban. The CrowdSec bouncer on the Caddy installation should be aware of banned IPs from polling the LAPI periodically or on each HTTP invocation depending on how you configured the bouncer for Caddy.
Change the IP address in the following command to a system you wish to test a ban. The nice thing about this ban is that it is temporary (5 minutes in the example below) so you will not need to worry about getting locked out permanently. You may enter this command on the Caddy server:
sudo cscli decisions add --ip 192.168.10.50 --duration 5m --type ban
If you look at the OPNsense CrowdSec interface, you will notice the ban was sent to the LAPI on OPNsense. Any machines that are using the LAPI on OPNsense will apply the same ban. This is great because if something is bruteforcing the OPNsense web UI or SSH and gets banned, it will also be immediately banned on the Caddy reverse proxy and vice-versa!
Although this process was a bit lengthy, you only need to do this entire process once. You will be able to rebuild new versions of Caddy using xcaddy (stop the Caddy service first), and you may add more services behind the reverse proxy by updating the Caddyfile (and restarting the Caddy service).
I hope this guide saves you some time figuring out how to put all of the pieces together if you are trying to accomplish something similar on your home network!
Upgrading Caddy
When you want to upgrade to a new Caddy version, simply run the same xcaddy command as described earlier in this guide to build a new version.
xcaddy build \
    --with github.com/caddy-dns/cloudflare \
    --with github.com/hslatman/caddy-crowdsec-bouncer/http
Tip
I recommend making a backup before upgrading in case you encounter issues upgrading.
Stop the Caddy service using the following command:
sudo systemctl stop caddy
Delete the existing Caddy installation.
rm -rf /usr/bin/caddy
Or you could rename the folder so you can revert back if you have trouble.
mv /usr/bin/caddy /usr/bin/caddy-old
Then move the newly build Caddy application to the /usr/bin folder.
mv caddy /usr/bin/
Start the Caddy service again.
sudo systemctl start caddy
You may check the status to verify you do not see any error messages.
sudo systemctl status caddy
The final test of a successful upgrade will be to check if you can still access the sites you have set up behind the reverse proxy.