Protectli VP6650 2.5/10G Network Appliance

Photo by Protectli from protectli.com
Table of Contents
Protectli offers various mini-PCs with 2 to 6 network interfaces that support 1G or 2.5G Ethernet. These are great little boxes that can be used as a router/firewall or as a compact server for your network. One of the greatest features they offer is coreboot support on all of their mini-PCs.
Coreboot ensures the firmware of the system has not been modified to minimize the likelihood of the device having backdoors installed from the factory or from malicious activity.
Lacking in Protectli’s product line was 10G networking – until now! The VP6600 series models offers four 2.5GbE and two 10G SFP+ interfaces. The review unit that I received is the VP6650, which is the cheaper of the two models offered on Protectli’s website.
In addition to being Protectli’s first 10G model, it is also their first model which is not fanless. Unfortunately, SFP+ interfaces generate a lot of heat. Combine that with a faster CPU with a higher TDP and you will understand why fans are necessary on a compact system.
I have been looking forward to this hardware ever since I learned this box was being developed by Protectli. For many (enthusiast) home networks, having a router with both 2.5G/10G interfaces is the perfect combination of interfaces.
Unboxing
As always, the Protectli box comes wrapped in their branded packaging tape, which adds to the excitement when you receive your package.
Notice that it also has a “fragile” sticker on it unlike the other Protectli packages I have received. The contents of this package is certainly more expensive so it would be disappointing if it was damaged during shipping.
This box is larger than the box you would get if you just ordered the VP6650 since they also sent some Protectli branded swag.

There is a lot of foam packing material in the box which should help keep it nice and protected (no pun intended).

The box inside the box! The box containing the Protectli is always labeled nicely.

Inside the box containing the Protectli, you receive the VP6650 itself, the power brick which can be threaded onto the VP6650, the USB cable for console connections, the VESA mounting plate and screws, the SATA data/power cables (you will have 2 sets if you did not order a SATA drive with your Protectli), screws for the SATA plate, interface labels, and a quick start guide card.

You may purchase a number of accessories with the VP6650. Since Protectli now have products with SFP+ interfaces, they offer SFP+ cables and modules. I decided to get a SFP+ DAC cable so that I can test it out. I also used the cable so I could test 10 Gbps throughput on the VP6650.

Build Quality
The build quality of the VP6650 is excellent. I do not expect anything less with any of their Vault Pro models. I love the aggressive, sleek appearance. The chassis is heavy and feels solid.
You can tell this chassis was built to be a giant heat sink. Due to the amount of performance this system offers, the VP6650 needs every bit of that hefty heatsink since it generates much more heat than the 4 port models I have reviewed. The fans also help remove the heat as well.
On one side (that you could consider the “back” side, but I like having the network interfaces on the front for easy access in my rack), you will see the four 2.5GbE interfaces and the two 10G SFP+ interfaces as well as the power connection, a reset button, and locations where WiFi/cellular antennas may be attached.
The power connection is threaded which is a nice touch to ensure the power cord does not get yanked out of the VP6650. The downside is that if you tug the power cord, the VP6650 will come with it which could make for a bad situation!

For the “front” side, you will see locations for WiFi/cellular antennas (it is possible to have both at the same time), a nice quality power button, a DisplayPort, a HDMI port, a SIM card slot, 2 serial console ports (which is nice to have the flexibility of using 2 different cables), 3 USB 2.0 ports, a USB 3.1 port, and a USB-C port.

The top of the chassis looks quite nice. There is a plate on top with the Protectli logo. Notice the detail of the shape of the air holes for the fans: it is the shape of the Protectli logo!

Inside the VP6650, you will see all of the usual interfaces for RAM, storage, and more. Unlike some of the mini-PCs, this box supports 2 RAM modules (of DDR5 RAM). There are sockets to install WiFi/cellular adapters. If you get a TPM module, that will be pre-installed near the internal USB port.
One notable detail is the fact that the NVMe drive has a nice heatsink on top which is great to help dissipate heat by transferring it to the chassis.

On the left side on the bottom plate of the chassis, you will see that the bracket can support mounting 2 SSDs.

If you remove the top plate, you will see the 2 fans which help cool off the VP6650. When I measured them, they may be approximately 55mm so they may not be a very common size fan.

I noticed the design of the top plate seemed to be symmetrical so I tested if I could put the plate the other direction, and it works just fine! That is a nice design aesthetic because you can orient the top plate depending on which side of the VP6650 you wish to use as the front of the system. It is nice to have the logo facing the front if you are OCD or semi-OCD (like me).
Although I have in the past faced the network interfaces toward the back of my rack, I decided to change the orientation of all my boxes so the network interfaces are facing the front of my rack so that I have easy access.
In the picture below, note the power button in the bottom left corner which demonstrates the plate can be changed to face either direction.

As a size comparison, I sat the VP6650 on top of my VP2420. There is a significant difference is size! I would not say the overall size of the VP6650 is huge by any means, but in comparison to the 4 port VP models, it is definitely much larger.
I love the compactness and fanless aspect of the 4 port VP models, but I love the power and aesthetics of the 6 port VP models.

For the two 4 port models in my possession, I have dedicated one of them for Home Assistant and the other as a Proxmox Backup Server. Combined they use about 20-22 Watts of power, which is very good considering that is the same as the idle wattage of the VP6650.
Hardware Specifications
The specifications of the review unit I received is the following:
| Hardware | Option |
|---|---|
| CPU | Intel i5-1235U |
| Memory | 2 x 32 GB (64 GB) Crucial DDR5 RAM |
| Storage (m.2 NVMe) | 2 TB Kingston NV2 |
| Storage (2.5" SATA SSD) | 1 TB Samsung 870 EVO (supports 2 SATA SSDs) |
| WiFi Module | No WiFi Module |
| 4G LTE Modem | No Modem |
| TPM Module | Protectli TPM-02 |
| BIOS | AMI (coreboot not available at time of review) |
Coreboot
All of Protectli’s hardware supports coreboot, and the VP6650 is no exception. However, as with many of Protectli’s new product launches, coreboot is not available at launch, but it should be available shortly after.
Coreboot is an open source firmware which replaces the traditional BIOS firmware and UEFI implementations. Coreboot has the design philosophy of speed, security, and customization.
The code of coreboot is freely available for the public to view. The code may be audited for backdoors or other security flaws. Coreboot is the perfect compliment to a firewall appliance to maximize security especially when that device is on the edge of your network and/or protecting extremely important assets.
Protectli does publish their own contributions to coreboot but not everything is published yet. Not all of the Intel-based code is open source since it is proprietary to Intel but that is out of Protectli’s control.
The great thing about coreboot is if the boot process detects the firmware has been modified maliciously, a read-only copy of the firmware will boot so that your system is still secure without taking the system down. Then you will be able to restore the firmware back to a non-compromised state.
To take full advantage of all of the coreboot security features, you will need to have a TPM module installed since it is used by the “measured boot” process to ensure each stage loaded has not been modified.
Note
Please keep in mind that if you purchase Protectli systems on Amazon, they do not ship with the coreboot firmware by default. That means you will need to flash the firmware yourself. Otherwise, if you do not feel comfortable flashing the firmware, you may purchase directly from Protectli with the coreboot option selected.
I documented the process of installing coreboot on one of the Protectli boxes. The process is not as difficult as you might think it would be.
An Interesting Note about Coreboot
Ideally when you use coreboot, you should use it in conjunction with Secure Boot (when possible) so that when the coreboot firmware hands the system off to the Operating System (OS), the entire boot process is secure. Without using Secure Boot with coreboot, only the firmware boot process is deemed secure but not the loading of the OS.
Not all OS platforms support secure boot such as OPNsense. I noticed when testing the VP6650 that newer versions of Proxmox since November 2023 support Secure Boot. I asked Protectli if they think it would be possible to take advantage of the additional security benefits when using an OPNsense VM in Proxmox. In theory, you may gain some additional security during the the booting of Proxmox.
However, there are possible security risks of using a VM versus bare metal such as sandbox escape techniques so you have to weigh the benefits against the risks like with any architecture choice you make.
Performance
Whenever I receive mini-PC hardware to review, my primary focus is testing the network performance in OPNsense since many users will be using such systems as their router/firewall.
For the VP6650, I decided to go into more depth testing a variety of scenarios to see how enabling different services and using different network architectures would affect performance (routing over VLANs, NAT, etc). My hope is that this information will be useful since it certainly takes a bit more effort to get all the different scenarios and configuration set up.
I also like to include general storage performance even though, in general, the mini-PCs are generally able to saturate their respective interfaces (NVMe, SATA, etc).
Network
I tested a lot of different scenarios for network performance because ultimately if you plan to use the VP6650 as your main firewall, you will want to know the types of performance you would have for network. Obviously, I cannot test all scenarios, but I tried to cover the basics. The tables below should help you gauge how much of a performance hit you take by enabling certain features or how your network is architected (VLANs vs. no VLANs).
To clarify what the results below mean because I tried to compact the information into a tabular format, I will explain each item in the table.
Starting with the “Items” column, “Default” is essentially the default installation of OPNsense with no extra services enabled (Netflow, etc is disabled). The items “Netflow”, “Zenarmor”, and “Suricata” (aka “Intrusion Detection”) are all services which were enabled one a time with no additional services enabled to demonstrate the impact each service has to throughput.
For the column headings, the “No VLAN” heading refers to connecting 2 different clients directly to the interfaces in OPNsense configured in 2 separate physical networks. This should test the raw routing performance between the local interfaces. Since the interfaces on mini-PCs are not hardwired like a network switch, all of the traffic has to pass through the firewall.
The “VLAN” heading refers to connecting the interfaces of OPNsense to a network switch with VLANs configured on OPNsense and the switch. Like with the “No VLAN” tests for 2 separate networks, the traffic has to traverse the firewall. I tested 2 VLANs on the same interface since most likely that is how many users will implement VLANs. For a single stream of performance testing, you should still get essentially full throughput with no services enabled even though it goes through the firewall because interfaces are full duplex. That means you can send and receive at 2.5/10 Gbps (depending on the interface used on the VP6650). However, multiple streams from multiple clients will of course have to share the overall interface bandwidth among all of the VLANs if they are on the same interface.
The “VLAN RSS” heading refers to using RSS (Receive Side Scaling) tunables in OPNsense. This helps distribute some of the routing across multiple threads. RSS does seem to make a different in certain situations but not all situations which makes for some interesting testing. There is a note in OPNsense stating RSS does not help with IPS performance due to the current netmap implementation. Therefore, I did not test Suricata and Zenarmor performance with RSS since it has no impact. Hopefully in the future, there will be the necessary updates to how netmap is used so that it can take advantage of multiple threads.
For “NAT”, routing performance is tested for NAT by sending data packets through the WAN interface to the LAN interface (no VLANs) with NAT enabled. There is some overhead with NAT translation so it is worth testing how that affects performance.
“NAT RSS” is what you would expect: NAT traversal with RSS tunables enabled.
“VM BR” tests performance of using bridged interfaces in a Proxmox VM while “VM PT” tests performance using hardware passthrough. These tests highlight the impact bridges make to routing performance compared to directly using the hardware. In theory, the “VM PT” performance should be nearly the same as the bare metal performance.
As for the configuration of the services, Netflow was configured to listen on all interfaces.
Zenarmor was configured to protect each of the LAN interfaces. For the VLAN tests, the individual VLANs were configured for Zenarmor protection rather than the parent interfaces. I found performance was better using the VLANs instead of the parent interface (also for certain hardware, you have to use the VLANs such as the Mellanox Connect-X3. Otherwise, it will cause all of the VLANs on that interface to not function properly). In addition, emulated netmap mode was used. I did not notice any significant performance differences using the native mode. You may have better compatibility if you use the default emulated mode.
I configured Suricata with all of the free rulesets enabled to demonstrate worst-case performance. You may be able to boost performance by being more selective with the rulesets that are enabled. In general, I have noticed that Suricata has a bigger impact on throughput than Zenarmor (even when I used to use it on my network with a limited number of rulesets). Additionally, I used the “Hyperscan” algorithm. I only applied Suricata to one of the interfaces instead of both to simulate only having Suricata enabled on the WAN interface. When you enable Suricata on both interface where traffic is traversing, the performance will suffer even more since it is processing the same rules on both interfaces.
One thing I did not test is a LAG configuration. Since I am only testing a single stream between 2 devices, a LAG will not improve performance. Even if the traffic of 2 clients are on the same interface, full throughput is possible as I mentioned earlier because the interfaces are full duplex. If you plan to have multiple clients sending/receiving large amounts of data, you will likely benefit from having a LAG. I do not know the performance implications of LAGs for higher speed network interfaces since I do not currently have enough 10 Gbps clients on my lab network to test more than 2 devices simultaneously. Perhaps in the future I can explore that a bit more.
10G SFP+ Interfaces (MTU 1500)
First I will test the default MTU of 1500 on the 10 Gbps interfaces in OPNsense. The unit of the results in the tables below are in Gbps.
| Service | No VLAN | VLAN | VLAN RSS | NAT | NAT RSS | VM BR | VM PT |
|---|---|---|---|---|---|---|---|
| Default | 9.36 | 8.01 | 9.34 | 7.90 | 9.26 | 6.47 | 9.32 |
| Netflow | 6.50 | 4.83 | 5.09 | 5.38 | 6.58 | 4.43 | 6.65 |
| Zenarmor | 4.37 | 3.82 | – | 5.34 | – | 2.35 | 2.80 |
| Suricata | 1.63 | 1.55 | – | 1.49 | – | 0.99 | 0.70* |
* For some reason the “Hyperscan” algorithm did not work on the passthrough interface, so I used the “Default” algorithm. It is possible that negatively impacts performance since it performed worse than the VM bridged interface.
I also tested WireGuard and OpenVPN performance connecting a client on the same network as the WAN interface to a client on the LAN network on the VP6650. This test does not measure site-to-site performance of the VPNs (such as on Protectli’s website). The table below shows using iperf3 both directions (Client from WAN to client on LAN and client on LAN to client on WAN).
Note that I did not spend a lot of time determining why performance is lower than a site-to-site VPN test, but I wanted to include a quick out of the box test of WireGuard and OpenVPN. Perhaps some of the performance is due to using clients with weaker CPUs.
I also tried enabling RSS to see if that would boost performance or not. Enabling that feature seemed to slightly degrade VPN performance for some reason.
| VPN | WAN->LAN | LAN->WAN | WAN->LAN w/ RSS | WAN->LAN w/ RSS |
|---|---|---|---|---|
| WireGuard | 1.34 | 1.32 | 1.06 | 1.24 |
| OpenVPN | 0.92 | 0.75 | 1.26 | 0.74 |
10G SFP+ Interfaces (MTU 9000)
I like to test MTU of 9000 (aka jumbo frames) when testing 10 Gbps interfaces because you can get a decent performance increase. The results show a fully saturated interface when running iperf3.
Note that it is not possible to test jumbo frames with Zenarmor and Suricata due to limitations with how netmap is being utilized. Jumbo frames are best used on dedicated storage backends where all of the systems on the storage network can be set to MTU 9000. You likely would not (or should not) be routing that sort of traffic across the firewall when possible since that increased the load on the firewall especially if you have IDS/IPS enabled.
| Service | No VLAN | VLAN | VLAN RSS | VM BR | VM PT |
|---|---|---|---|---|---|
| Default | 9.89 | 9.87 | 9.87 | 9.80 | 9.89 |
| Netflow | 9.89 | 9.87 | 9.87 | 9.82 | 9.89 |
2.5 GbE Interfaces
For the 2.5 GbE interfaces, I am not going to test the same number of scenarios as the 10 Gbps interfaces because if the box is capable of routing greater than 2.5 Gbps on the faster interface, it most likely should saturate the 2.5G interfaces without issues.
| Item | No VLAN | VM BR | VM PT | |
|---|---|---|---|---|
| Default | 2.35 | 2.35 | 2.35 | |
| Netflow | 2.35 | 2.35 | 2.35 | |
| Zenarmor | 2.35 | 2.32 | 2.35 | |
| Suricata | 1.58 | 0.62* | 0.71* |
* The “Default” algorithm was used since I encountered an error using the “Hyperscan” algorithm in a VM.
Network Performance Conclusions
Below is a list of results which stood out to me:
-
Using the network interfaces on a bare metal install or PCIe passthrough unsurprisingly yields the best performance. For the 10G interfaces, jumbo frames (MTU 9000) allows for maximum performance but all devices on such networks should be set to the same MTU.
-
For some reason the performance of using VLANs on top of a physical interface reduced throughput of the 10G interfaces nearly 1.3 Gbps. If you know the reason why this may be the case, please share it in the comments below! This result was the most surprising to me.
-
While enabling RSS has no effect on IDS/IPS performance (the technical reason is stated in the OPNsense documentation), RSS does seem to improve the routing performance when you are using VLANs on the 10G interfaces. It even improves NAT throughput. RSS is supposed to make more use of the cores in your system, but I did not notice the overall CPU usage increase beyond 20-25% (which was the same as when RSS is disabled).
-
Netflow has a significant impact to performance on the 10G interfaces when using the default MTU of 1500. If you are using jumbo frames, Netflow does not seem to impact performance. This makes sense because Netflow has to process 6 times more data packets (6 * 1500 = 9000). This performance impact is important to keep in mind if you are wanting to maximize throughput.
-
Zenarmor performs significantly faster than Suricata (although you could likely improve Suricata performance by reducing the number of rules you have enabled), but it still drops the overall throughput in half for the 10G interfaces. Zenarmor’s website states up to 5 Gbps performance so the VP6650 is able to come very close to that mark when not using VLANs. I will mention too that the performance of Zenarmor with the NAT traversal test was the highest because Zenarmor was only protecting the LAN interface and not both the WAN and LAN interface. For the other tests, Zenarmor was protecting both LAN interfaces that were being tested. That likely adds some overhead since inbound and outbound traffic is examined on both of those interfaces.
-
Suricata and Zenarmor’s performance is negatively affected based on how
netmapis being utilized. I hope in the future, the usage ofnetmapwill become more efficient so the performance of both Suricata and Zenarmor will be greatly improved. Zenarmor has been sponsoring and helping with improvements tonetmapso it is getter over time. -
If you need to route 10 Gbps between internal networks, you may be better off creating a dedicated 10G backend network for all of your NAS or other traffic for bulk data transfers. This helps reduce unnecessary strain on the firewall, and you will be able to more easily achieve full 10 Gbps without needing a very fast, expensive, power hungry router/firewall. I have been doing this on my network, and it is so nice because I do not typically have to worry about as many bottlenecks of inter-VLAN traffic. Also, the number of firewall rules is reduced since I do not have to route NAS and other traffic across a couple of VLANs.
Storage
The VP6650 can support 1 NVMe device and 2 SATA SSDs. The 4 port VP models only support 2 storage devices (not counting the built-in eMMC module) while the VP6650 supports 3 storage devices. I like that it has additional capacity for 3 drives because you could make use of software RAID (via ZFS, etc) with the SSDs for the OS, and save the fast NVMe storage for your VMs/CTs, for example.
Unlike the VP4210 and VP2420 that I reviewed, the VP6650 does not come equipped with 8GB of eMMC storage. That is not really an issue for me personally since I never used that storage because it is too small to store most Operating Systems on it.
However, there is an internal USB port so you have the option to boot an OS off of the USB drive, which may work well for certain use cases. If you do this, I recommend only using an OS which boots the system into RAM to reduce wear and tear on the USB drive.
The storage performance below is more indicative of the characteristics of the drives themselves rather than testing the speed of the NVMe and SATA interfaces so keep that in mind for the results below.
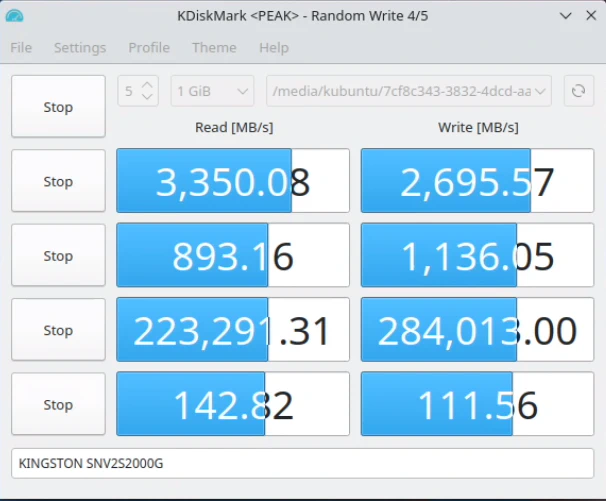
NVMe
According to Protectli’s spec sheet, the VP6650 supports PCIe 3.0 NVMe storage rather than PCIe 4.0, which is a bit confusing considering they have a Kingston NV2 NVMe that is technically a Gen 4 NVMe. However, the Kingston NV2 is only rated for Gen 3 speeds so at least you will not be losing Gen 4 performance on that NVMe device.
If you wish to have better Gen 3 performance, you will want to purchase a faster NVMe such as the Samsung 970 EVO Plus (affiliate link) or the Crucial P3 (affiliate link) since I noticed that the Kingston NV2 is not the fasted Gen 3 NVMe device. The Kingston is rated for 3,500/2,800 MB read/write.
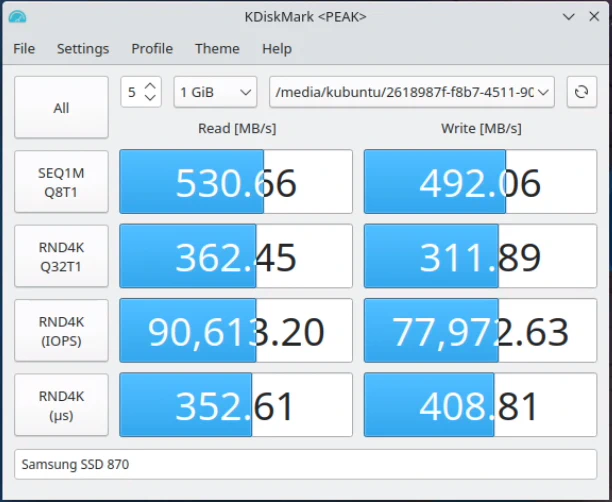
SATA
SATA performance of the Samsung 870 EVO SSD is what you might expect for a SDD rated at 550/530 MB read/write:
Boot Up Times
A rough estimation on the OPNsense boot up time (to reach the menu option screen) is about 43 seconds with the AMI BIOS. When compared to the VP2420 which I have reviewed previously, the VP6650 boots almost exactly twice as fast as the VP2420!
Power Consumption
The power consumption of the VP6650 at idle is around 21-26 Watts depending on the number of network interfaces that are connected as well as your storage configuration. I do have a SSD in addition to the NVMe drive so that would add a bit more to the overall power consumption.
When performing some testing on OPNsense, it peaked around 39 Watts. However, that was only using 20-25% of the CPU. To test for the maximum power used, I ran a stress test on the CPU. The peak was around 46 Watts.
Temperature
When observing the OPNsense “Dashboard”, the idle temperatures of the CPU core seemed to range 45-60C. The VP6650 was located in my server closet where it is a few degrees warmer than the rest of my house so your temperatures may be lower than that when idling. Overall that is pretty comparable to the fanless VP2420.
One thing that was interesting is when using a stress test utility on Linux, it showed the idle temperature of 37-39C, which was lower than OPNsense. I did not tweak any power settings on OPNsense when performing baseline testing. I am wondering if perhaps it was not ramping down the CPU frequencies when idling or perhaps it is because OPNsense may have more background activity than a standard Linux distro since it is running several networking based services on the box that would not be running on a Linux desktop.
The fans on the VP6650 are certainly critical in order to ensure temperatures do not get out of control. I have heard the fans ramp up a bit but since it was in my server closet during most of my testing, it gets drowned out by other noisier fans.
While idling, the CPU temperatures are comparable to the fanless models and in some cases might be lower when the fans are running. However, the temperature of the chassis is another story. The chassis of the VP6650 is much more substantial than the 4 port Vault Pro models. It works quite well as a giant heatsink. You can tell the chassis is doing a great job at dissipating a large amount of heat because the chassis is much hotter to the touch than the smaller fanless counterparts. Even though the chassis feels much hotter to the touch, there is no concern of burning your hands if you touch the chassis for too long.
However, I did try out a RJ45 to SFP+ adapter and that module gets very hot! You might actually feel uncomfortable touching it for too long. That is how hot it gets to the touch. It is not unusual for those types of modules to generate a lot of heat, which is why it is generally better to use DACs or fiber optic cables. Some users report their modules overheat and drop connections, but I have yet to notice that issue.
Noise Levels
Since the VP6650 is not fanless, there will be some noise. At idle, the fan is barely audible. In fact, I had to put my ear within 1-2 feet (0.3-0.6 meters) to hear it.
On the other hand, when booting up or under heavy load, the fan can be quite noticeable. You probably would not want to locate the VP6650 in an area you wish to be quiet unless your box will be idle enough or in a well ventilated, cool space.
Where to Purchase?
If you like to purchase the Protectli VP6650, you may purchase it on Protectli’s website or on Amazon (affiliate link) . While I do not earn any commissions if you purchase through Protectli’s store, purchasing the VP6650 on Amazon does help support my efforts since I earn Amazon affiliate commissions (which I greatly appreciate!). If you would like to customize the VP6650 to include other components and accessories, you may do so on Protectli’s store.
When I was customizing this review unit, I noticed that the prices of the accessories were fairly priced when I compared the costs to Amazon. For instance, the Samsung 980 1 TB NVMe is $84 on Protectli’s store but on Amazon (affiliate link) it is $84.49 (at the time of this writing). That means you can have all your components pre-installed for added convenience. You get to choose high quality RAM and storage rather than potentially getting cheap components from boxes you may find on Aliexpress or other brands on Amazon.