Protectli VP2420 2.5G Network Appliance

Photo by Protectli from protectli.com
Table of Contents
Around the time I reviewed the Protectli VP2410, I was hoping to review their 4 port Vault Pro model with 2.5G interfaces, but it was not ready yet. Since Protectli has released the VP2420, I wanted to take some time to review it.
The VP2420 is an evolution of the VP2410. All of the hardware has been upgraded to faster speeds, larger capacities, and higher throughput.
If you are planning to utilize IDS/IPS or VPNs, the extra performance will be beneficial to reduce some of the bottlenecks in network throughput. CPU intensive IDS/IPS will still impact performance, but less than the VP2410.
As with any low power system, there are limits to the amount of performance you can expect when performing CPU intensive tasks such as IDS/IPS services.
Unboxing
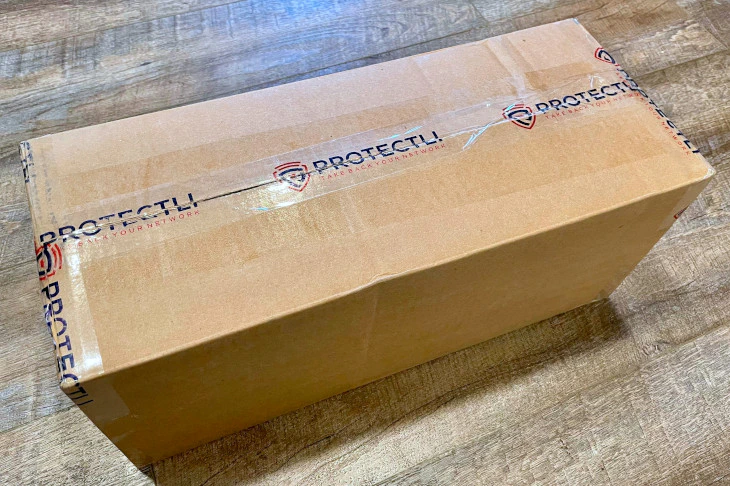
If you order through Protectli, you will receive a box which has Protectli branded tape on it. When you see that tape, you know something good has arrived! The box pictured below is wider than what you will receive if you order just the VP2420. I also received a rack mount shelf to try out (as shown in my Protectli accessories review).
The contents of the box are the following: the VP2420, the power adapter, VESA mount bracket, USB cable, SATA power cable, SATA data cable, 1 packets of screws/mounts, Ethernet interface labels, and a Quick Start Guide card.
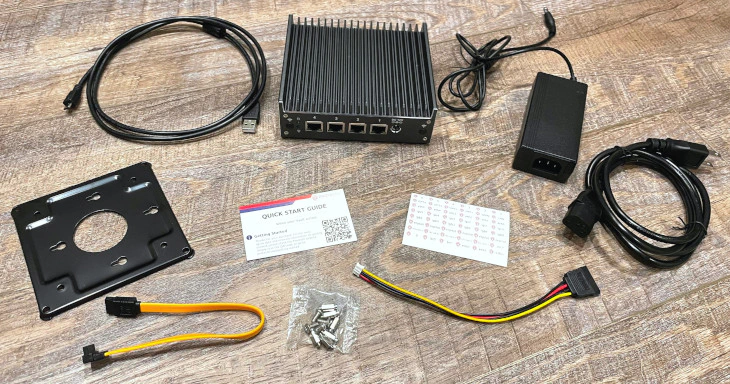
The inclusion of a VESA bracket is great if you wish to mount the VP2420 to your wall or any VESA compatible mount, for example. I know some of you love to wall mount all of your network devices so this bracket should be a welcome addition of included items.
The USB cable is useful if you wish to connect to the USB serial console, which I found is great if you do not want to connect a keyboard and monitor to set up an OS such as OPNsense. The VP2420 comes with SATA data and power cables because a SATA drive may be installed for additional secondary storage.
As I stated in my VP2410 review, the inclusion of Ethernet interface labels is great since you can label your system depending on how you plan to use your device.
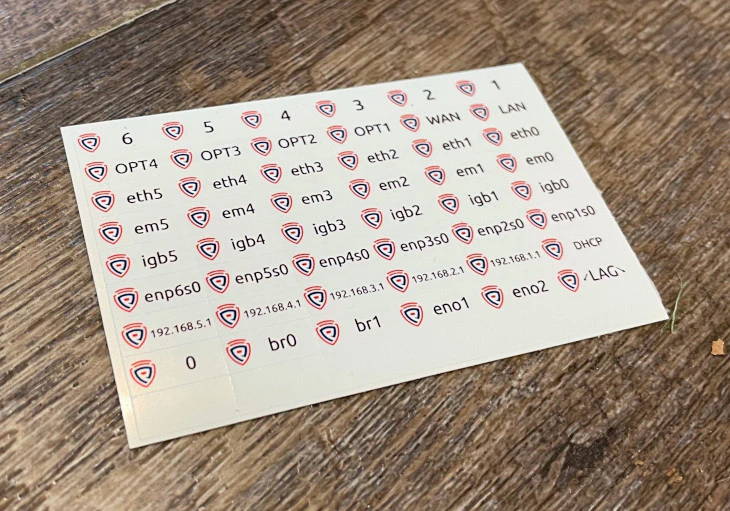
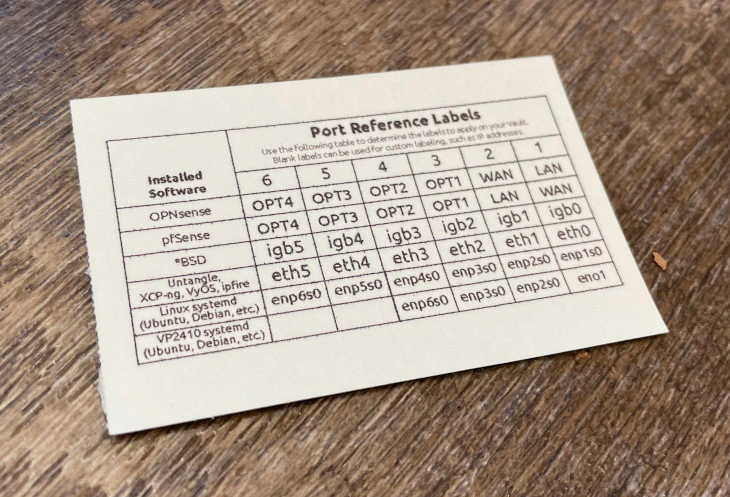
On the back side of the labels is a helpful table showing the default interface assignments based on your Operating System of choice. I think is very helpful because it is not always obvious how the hardware is assigned by the OS.
With my old Qotom box, this would have been helpful because the physical interface order was not the same order as how the OS such as OPNsense recognized the hardware (it was something like igb0, igb2, igb3, igb1, which was confusing to remember).
Build Quality
If you are familiar with my Protectli VP2410 review, you may quickly recognize that the VP2420 looks identical to the VP2410. Protectli reused the chassis for the VP2420 (except for one minor difference with the addition of a SIM card slot), which I am happy to see because I was impressed with the build quality of the VP2410.
The exterior has a powder coated texture with a very dark gray (nearly black) color. A few of the edges on the chassis have a beveled polished metal finish which gives the devices a distinctive appearance. In my opinion, the device looks even better in person than in photos.
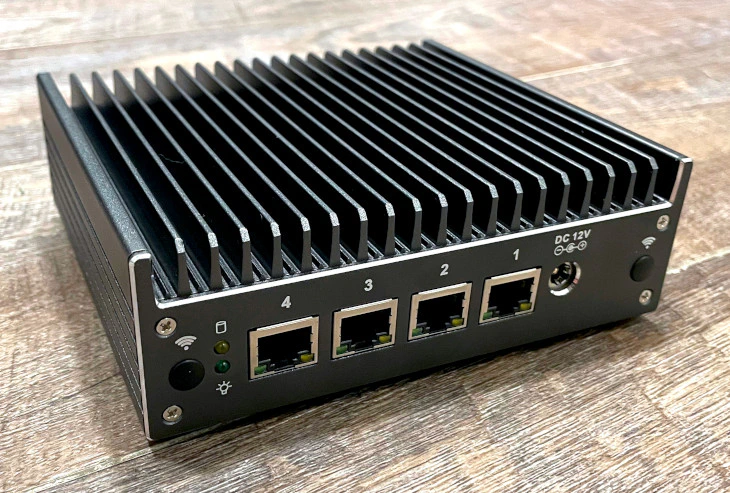
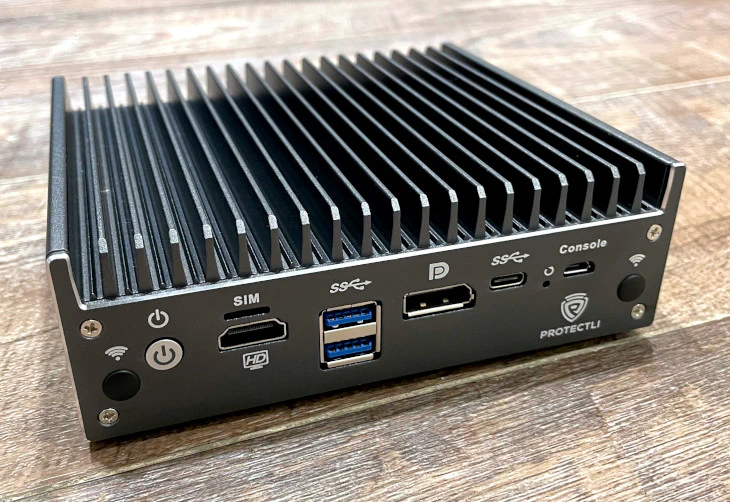
On the back side of the device, you can see all of the available interfaces. Everything is the same as the VP2420 with the exception of a SIM card slot. There are 2 display options with HDMI and DisplayPort and 2 USB options: 2 USB 3.0 ports and 1 USB-C port. It is nice that there are 3 USB ports since some ultra small form factor boxes do not have more than 2 USB ports, which is easy to utilize with simply a wired mouse/keyboard. Last but not least, there is a micro USB port that can be used as a USB serial console.
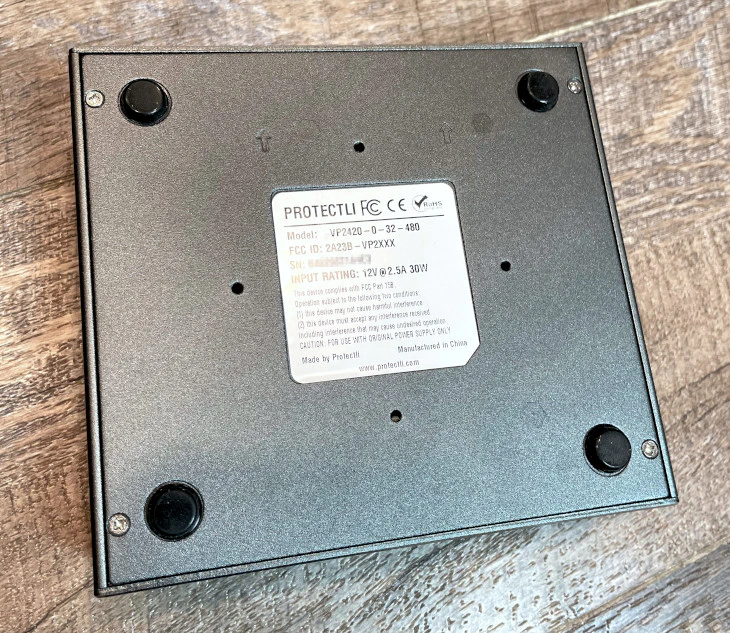
If you look at the bottom of the VP2420, you can see rubber feet, 4 screws to remove the bottom plate, and 4 screw holes where you can mount the VP2420 to the VESA bracket or Protectli’s rack shelf.
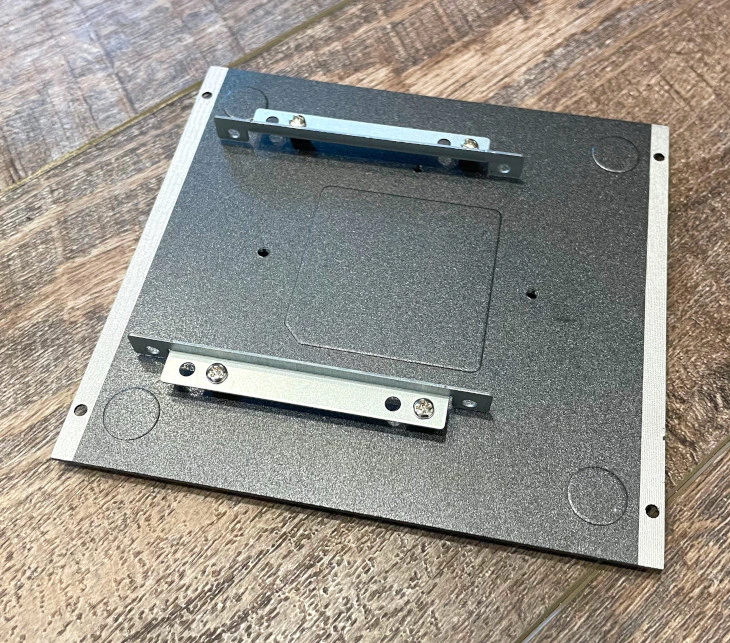
When you open the VP2420, you will see a number of interfaces where you can upgrade or add additional hardware of the VP2420. You will likely have a m.2 SATA and the DDR4 installed unless you bought a barebones version. As you can see, you can add a WiFi/4G LTE module, a TPM module, or a 2.5" SATA SSD. I think it is great that you can add 2 storage devices in such a compact system.
There is one notable difference in the layout of the interfaces when comparing to the VP2410. On the VP2410, the WiFi/4G LTE m.2 interface is actually located underneath the m.2 SATA so you have to pull out the m.2 SATA drive to install the WiFi/4G LTE module. The VP2420 has the m.2 WiFi/4G LTE interface next to the m.2 SATA interface which makes it much easier to access.
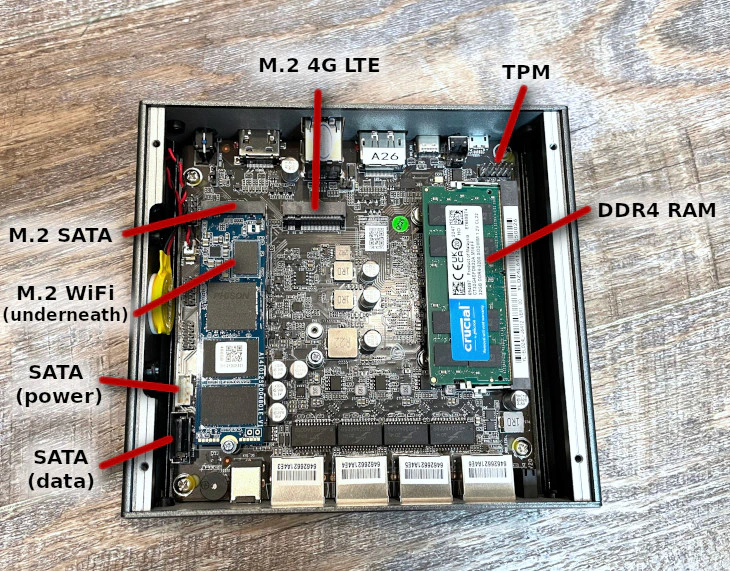
If you plan to add a 2.5" SSD, the SSD actually mounts to the removable bottom plate of the VP2420 so it can be secured nicely inside the system.
Hardware Specifications
If you purchase the VP2420 on Amazon (affiliate link) , you only have the choice for 8 GB of RAM with a 120 GB SSD or barebones. However, if you purchase through Protectli’s store, you have a lot more configuration options.
In the hardware specifications table below, I will list the possible range of hardware you may choose when customizing the VP2420 and inside the parenthesis I will include the hardware in the unit I am reviewing.
| Hardware | Option |
|---|---|
| CPU | Intel Celeron J6412 |
| Memory | 4-32 GB Crucial RAM (32 GB) |
| Storage (m.2 SATA SSD) | 120-480 GB Protectli M.2 SSD (480 GB) |
| Storage (2.5" SSD) | 1-4 TB Samsung SSD (No Additional Storage) |
| WiFi Module | m.2 WiFi Module (No WiFi Module) |
| 4G LTE Modem | 4G LTE Internal or External Modem (No Modem) |
| BIOS | AMI or coreboot (coreboot) |
I typically recommend a minimum of 8 GB of RAM if you plan to use IDS/IPS such as Suricata/Zenarmor in OPNsense. If you are not planning to use IDS/IPS, you would be fine with 4 GB of RAM. The price difference between 4 GB and 8 GB is $14 (at the time of this writing) so it is likely worth the price to get 8 GB even if you do not think you need it. If you find you need more RAM in the future, you can always upgrade the RAM later.
The minimum about of storage you can get with the VP2420 is 120 GB, which is plenty of storage for OPNsense unless you plan to do a lot of logging or utilize database such as Elasticsearch with Zenarmor. If you plan to use the VP2420 as a lightweight hypervisor/server, you should probably choose higher capacity options.
The VP2420 is equipped with an 8 GB eMMC module which you use for a light weight Operating System, but you are likely going to push the limits of that low capacity storage. If it was 16 or 32 GB, it would be usable for more operating systems such as Proxmox and TrueNAS. I checked the disk usage of those OS’s on my servers and found that they would use slightly more than 8 GB, which is a shame they would not quite fit on an 8 GB disk. For some home users, the VP2420 could be a nice little mini hypervisor/NAS if not a ton of apps/services or storage is required.
I noticed at the time of this writing that there is no option for a TPM module for the VP2420 like there is with the VP2410 when you order from Protectli. Protectli has stated that a new TPM module will be available in the future should you want to run an OS which uses TPM (such as Windows 11). Also you may want it to take advantage of the extra coreboot security (as described in more detail in the coreboot section).
Noteworthy Specs
Below is a list of hardware specs that I find interesting with the VP2420:
-
The CPU in the VP2420 is about 1.3 times faster (31% faster) then its predecessor, the VP2410, and about 2.7 times faster (267% faster) than the FW4C based on PassMark scores. The CPU scores are approximately on a linear scale but real world performance may vary, of course. Many 2.5G appliances use the Intel N5105 CPU and the J6412 is actually very close in performance to the N5105 when looking at the scores on cpubenchmark.net.
-
The Vault Pro series models support DDR4 RAM rather than the DDR3 RAM found on the Vault models so memory performance will be much greater than the non-VP series models.
-
The Vault models only support a single mSATA SSD, while the Vault Pro models come with 8 GB of built-in eMMC storage as well as m.2 SATA and SATA storage options. You have a lot more options when it comes to storage since you can add 2 storage devices in addition to the built-in storage.
-
It is important to note that the primary storage on the VP2420 uses a M.2 SATA and not a M.2 NVMe. This means the performance of the drive will be the same as a standard SATA interface – the drive is just in a m.2 style interface to save physical space within the device since there is no large SSD enclosure. If you want to use NVMe drives for better storage performance, you will need to purchase one of Protectli’s VP4600 series models.
-
The VP series models only use the UEFI BIOS instead of the legacy BIOS.
-
Protectli pointed out to me that the VP2420 series actually has extra coreboot security features that have traditionally only been available on their top tier VP4600 series models.
Coreboot
One of the biggest reasons for purchasing a Protectli system besides great customer service is coreboot. Coreboot is an open source firmware which replaces the traditional BIOS firmware and UEFI implementations. The design philosophy of coreboot is speed, security, and customization.
The code of coreboot is freely available for the world to examine so the code may be audited for backdoors or other security flaws. I think coreboot is the perfect compliment to a firewall appliance to maximize security in all areas. You certainly want the primary device protecting your network to be as secure as possible.
Protectli does publish their own contributions to coreboot but not everything is published yet. They also stated not all of the Intel based code is open source since it is proprietary to Intel.
As mentioned earlier when corresponding with Protectli, they mentioned that the VP2420 actually has extra coreboot security features that were originally only available on their VP4600 series models, which are their flagship 6 port models. I am glad the extra security features have made their way into the more budget friendly 4 port Vault Pro model.
The extra features include halting the boot process if coreboot detects the firmware has been modified maliciously. A read only copy of the firmware will then boot so that your system is still secure and available. Then you can work to repair the firmware back to a non-compromised state.
Because of the extra security features provided by coreboot in the VP2420, you will benefit by having a TPM module installed since it is used by the “measured boot” process to ensure each stage loaded has not been modified.
Note
Please note that if you purchase Protectli systems on Amazon, they do not ship with the coreboot firmware by default. You will have to flash the firmware yourself or if you do not feel comfortable flashing the firmware, you can purchase directly from Protectli.
Since flashing your system can potentially brick your system, it is safest to have to have it done by Protectli. However, I documented the process for the VP2420 since I had to do it for my review unit because I received it before coreboot was ready for release. The process is actually not overly difficult.
Warning
If you bought a barebones system with coreboot installed or you decide you want to swap out the RAM on a system which has coreboot installed to a large capacity, you will likely encounter system instability with the initially released coreboot firmware for the VP2420. Swapping RAM works fine with the AMI BIOS, but there is an issue with coreboot which prevents the BIOS from training to the new RAM that is installed.
Protectli will have this issue resolved eventually so you either need to wait for a RAM upgrade or revert back to the AMI BIOS. It is possible you may be able to revert back to the AMI BIOS, swap or install the new RAM, and then go back to coreboot to work around the issue. I have not confirmed that process works, but worst case scenario is that you can use the AMI BIOS until the newer firmware version is released for the VP2420.
Netboot
Netboot is a nice BIOS utility included with coreboot that allows you to boot an entire OS over the network. You do not need to download and image a USB drive to install the OS on the device.
The Netboot payload URL is set to a Protectli URL by default, but I do not believe it is functional at the time of this writing. You are able to change the payload URL to https://boot.netboot.xyz in order to try out the Netboot functionality.
While changing the payload worked with the VP2410, it does not seem to work with the VP2420 with the initial release of coreboot for the VP2420. Hopefully this functionality will improve over time since this is a nice feature to utilize.
If you would like to see Netboot in action, please refer to my VP2410 review where I demonstrate how to use it.
Performance
One of several considerations when purchasing hardware to use as your router/firewall or as a light weight server is performance. You may be considering the VP2420 to go beyond 1G network throughput in your network, but I have also seen reports of users wanting the VP2420 for the extra CPU performance even though they only have a 1 Gbps network. The extra CPU performance is important if you are running IDS/IPS or VPN servers on your OPNsense box.
All of the tests below are performed on two different interfaces on the VP2420 to simulate routing across networks. By default, the interfaces in OPNsense are not bridged together like a network switch so all traffic which passes from one interface to another will have to be routed through OPNsense similar to having separate physical networks attached to the router. Because of this fact, the tests will be able to determine the maximum possible throughput the VP2420 can handle. If I tried to do this over the Internet through the WAN interface, I would be limited in speed by my available Internet bandwidth.
Keep this in mind when you see the results below because they are best case scenarios. Performance will likely be less depending on your Internet speeds as well as the number of services running on your firewall. I have the bare minimum services configured in order to dedicate as much resources to the IDS/IPS tests as possible.
To keep network bandwidth testing simple, I am going to use the iperf3 tool to provide a general idea of the network performance you might see on the VP2420 depending on how you have configured your system.
OPNsense stated with the 23.1.1 update that fixes in
netmap, which both Suricata and Zenarmor rely upon, will further improve multi-threading support. They said the changes have been in the works for a while. If future improvements help spread the load across more than 1 or 2 CPU cores, I feel that could be a game changer for the low power mini-PC appliances in regards to IDS/IPS performance.
No IDS/IPS Enabled
To establish a baseline of performance, all IDS/IPS was turned off for the first test. Routing without processing all of the network packets is not very CPU intensive so not a lot of hardware is required for basic routing (up to a certain amount of network throughput – at which point you would either need hardware acceleration or lots of CPU performance).
As is expected without IDS/IPS enabled, the 2.5 Gbps interface can be fully saturated. There is some network overhead so you will never reach 2.5 Gbps. 2.3 Gbps is pretty close to the maximum possible throughput. The CPU utilization is also not very high during this test (< 25%, it uses less than 1 CPU core).
[ ID] Interval           Transfer     Bitrate         Retr  Cwnd
[  5]   0.00-10.00  sec  2.69 GBytes  2.31 Gbits/sec    0   3.04 MBytes
[  5]  10.00-20.00  sec  2.69 GBytes  2.31 Gbits/sec    0   3.04 MBytes
[  5]  20.00-30.00  sec  2.68 GBytes  2.30 Gbits/sec    0   3.04 MBytes
[  5]  30.00-40.00  sec  2.68 GBytes  2.30 Gbits/sec    0   3.04 MBytes
[  5]  40.00-50.00  sec  2.68 GBytes  2.30 Gbits/sec    0   3.04 MBytes
[  5]  50.00-60.00  sec  2.68 GBytes  2.30 Gbits/sec    0   3.04 MBytes
- - - - - - - - - - - - - - - - - - - - - - - - -
[ ID] Interval           Transfer     Bitrate         Retr
[  5]   0.00-60.00  sec  16.1 GBytes  2.30 Gbits/sec    0             sender
[  5]   0.00-60.04  sec  16.1 GBytes  2.30 Gbits/sec                  receiver

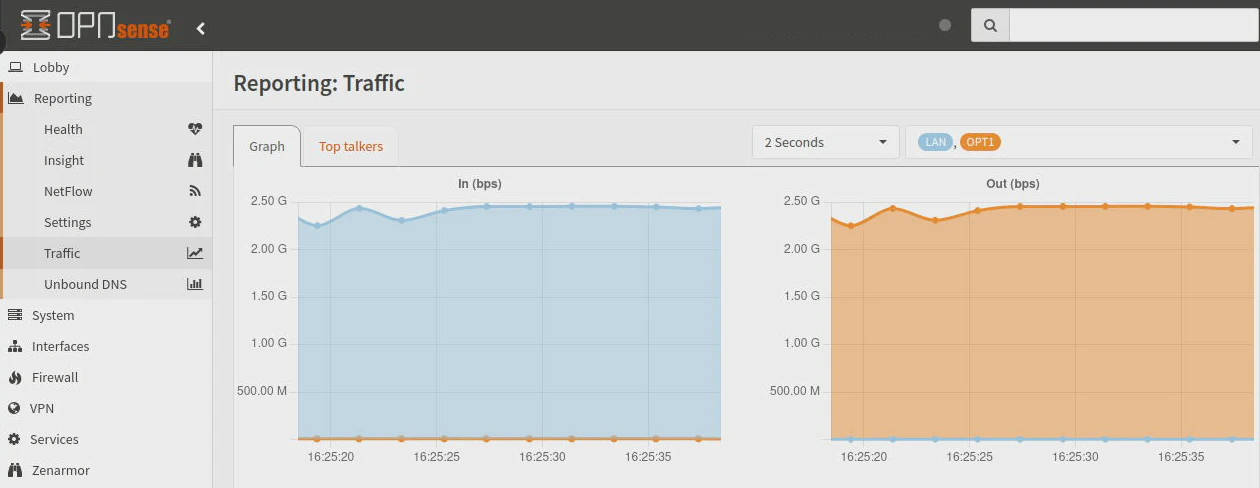
Zenarmor Enabled
For the Zenarmor test, I enabled it on both the LAN and OPT1 interfaces. Typically, users enable Zenarmor on all local network interfaces where security protection, ad blocking, and network policies are desired and Suricata is used on the WAN if running both services.
After running several tests, I decided to allow the tests to run for longer (2 minutes instead of 1) to get a better picture of performance since I noticed occasional dips and spikes in the first half of the tests. What I found interesting with Zenarmor is within the first 30 seconds or so of the test, the throughput would drop and spike a few times before leveling off at around the maximum 2.5 Gbps throughput.
I find it quite impressive that after the first 30 seconds or so, the network throughput does not seem to greatly impacted by running Zenarmor. This is great news if you are worried about a drastic drop in performance on your local network when you are routing a lot of data across your network between systems with 2.5G interfaces.
Even though performance starts off a bit slow, it does seem to eventually fully saturate the 2.5G interface. I do not know if that is due to the CPU cores ramping up (I would think it would happen sooner) or if any CPU caching is at play. All I know from testing is that this behavior was consistent every time I ran the tests. The CPU utilization during the tests is about 50% so it is using 2 cores.
[ ID] Interval           Transfer     Bitrate         Retr  Cwnd
[  5]   0.00-10.00  sec  1.47 GBytes  1.26 Gbits/sec  1201   1.69 MBytes
[  5]  10.00-20.00  sec  1.53 GBytes  1.32 Gbits/sec    1   1.41 KBytes
[  5]  20.00-30.00  sec  2.51 GBytes  2.15 Gbits/sec  303   1.87 MBytes
[  5]  30.00-40.00  sec  2.74 GBytes  2.35 Gbits/sec    0   1.87 MBytes
[  5]  40.00-50.00  sec  2.74 GBytes  2.35 Gbits/sec    0   2.74 MBytes
[  5]  50.00-60.00  sec  2.73 GBytes  2.35 Gbits/sec  292   1.92 MBytes
[  5]  60.00-70.00  sec  2.74 GBytes  2.35 Gbits/sec    0   2.74 MBytes
[  5]  70.00-80.00  sec  2.74 GBytes  2.35 Gbits/sec    0   3.22 MBytes
[  5]  80.00-90.00  sec  2.68 GBytes  2.30 Gbits/sec  213   1.27 MBytes
[  5]  90.00-100.00 sec  2.73 GBytes  2.34 Gbits/sec  357   1.49 MBytes
[  5] 100.00-110.00 sec  2.74 GBytes  2.35 Gbits/sec    0   1.67 MBytes
[  5] 110.00-120.00 sec  2.73 GBytes  2.35 Gbits/sec    0   2.72 MBytes
- - - - - - - - - - - - - - - - - - - - - - - - -
[ ID] Interval           Transfer     Bitrate         Retr
[  5]   0.00-120.00 sec  30.1 GBytes  2.15 Gbits/sec  2367             sender
[  5]   0.00-120.04 sec  30.1 GBytes  2.15 Gbits/sec                  receiver
Suricata Enabled
On the first Suricata test, I only enabled Suricata on only the LAN interface to simulate only having it enabled on the WAN interface as is often the case. Performance of Suricata is always poor on these underpowered mini-PC appliances partially due to the fact that there are multi-threaded optimizations still in the works for Suricata as well as the underlying netmap framework (as mentioned earlier about the OPNsense changelog).
I enabled all of the rulesets for Suricata to obtain a worst case scenario. You may be able to improve performance by reducing the number of rules to just the items you wish to protect. With Suricata enabled on only one of the two interfaces, the network throughput is absolutely crushed by Suricata. Maximum throughput tops off around 630 Mbps.
[ ID] Interval           Transfer     Bitrate         Retr  Cwnd
[  5]   0.00-10.00  sec   739 MBytes   620 Mbits/sec   72    720 KBytes
[  5]  10.00-20.00  sec   751 MBytes   630 Mbits/sec   18    642 KBytes
[  5]  20.00-30.00  sec   751 MBytes   630 Mbits/sec   31    559 KBytes
[  5]  30.00-40.00  sec   754 MBytes   632 Mbits/sec   28    728 KBytes
[  5]  40.00-50.00  sec   754 MBytes   632 Mbits/sec   26    658 KBytes
[  5]  50.00-60.00  sec   751 MBytes   630 Mbits/sec   28    580 KBytes
[  5]  60.00-70.00  sec   739 MBytes   620 Mbits/sec   23    730 KBytes
[  5]  70.00-80.00  sec   751 MBytes   630 Mbits/sec   37    658 KBytes
[  5]  80.00-90.00  sec   752 MBytes   631 Mbits/sec   34    578 KBytes
[  5]  90.00-100.00 sec   754 MBytes   632 Mbits/sec   22    741 KBytes
[  5] 100.00-110.00 sec   749 MBytes   628 Mbits/sec   16    667 KBytes
[  5] 110.00-120.00 sec   749 MBytes   628 Mbits/sec   36    585 KBytes
- - - - - - - - - - - - - - - - - - - - - - - - -
[ ID] Interval           Transfer     Bitrate         Retr
[  5]   0.00-120.00 sec  8.78 GBytes   629 Mbits/sec  371             sender
[  5]   0.00-120.04 sec  8.78 GBytes   628 Mbits/sec                  receiver
For the second test, I enabled Suricata on both the LAN and OPT1 interfaces. Normally you would not want to run Suricata on all of your internal network interfaces since often the goal with Suricata is to protect your externally exposed apps/services on the WAN interface.
If you enable Suricata on two interfaces where traffic has to traverse, performance will take another hit. The iperf test shows that the throughput drops just below 400 Mbps.
Interestingly, performance does not seem to decrease when enabling Zenarmor on two interfaces where traffic traverses unlike Suricata (as shown in the Zenarmor test above). This allows you to protect and monitor all of your internal networks without concern of decreasing network performance.
[ ID] Interval           Transfer     Bitrate         Retr  Cwnd
[  5]   0.00-10.00  sec   474 MBytes   398 Mbits/sec   72    717 KBytes
[  5]  10.00-20.00  sec   471 MBytes   395 Mbits/sec   36    544 KBytes
[  5]  20.00-30.00  sec   469 MBytes   393 Mbits/sec   23    655 KBytes
[  5]  30.00-40.00  sec   471 MBytes   395 Mbits/sec   22    721 KBytes
[  5]  40.00-50.00  sec   431 MBytes   362 Mbits/sec   22    745 KBytes
[  5]  50.00-60.00  sec   450 MBytes   377 Mbits/sec   36    578 KBytes
[  5]  60.00-70.00  sec   444 MBytes   372 Mbits/sec   22    666 KBytes
[  5]  70.00-80.00  sec   454 MBytes   381 Mbits/sec   13    716 KBytes
[  5]  80.00-90.00  sec   446 MBytes   374 Mbits/sec   22    741 KBytes
[  5]  90.00-100.00 sec   451 MBytes   379 Mbits/sec   24    590 KBytes
[  5] 100.00-110.00 sec   446 MBytes   374 Mbits/sec   24    621 KBytes
[  5] 110.00-120.00 sec   460 MBytes   386 Mbits/sec   24    690 KBytes
- - - - - - - - - - - - - - - - - - - - - - - - -
[ ID] Interval           Transfer     Bitrate         Retr
[  5]   0.00-120.00 sec  5.34 GBytes   382 Mbits/sec  340             sender
[  5]   0.00-120.07 sec  5.34 GBytes   382 Mbits/sec                  receiver

Zenarmor + Suricata Enabled
A common scenario for many users is running Suricata on the WAN interface and Zenarmor on the LAN interface(s). It is not currently possible to run both Zenarmor and Suricata on the same interface since they both share the underlying netmap framework. In the future this may change and would open up more possibilities like running both services on the WAN interface.
For this test, I have Suricata enabled on the LAN interface and Zenarmor on the OPT1 interface to simulate traffic traversing from the WAN to LAN network.
As with the Suricata test, throughput drops significantly to below 600 Mbps. It actually drops slightly more than just with Suricata by itself, which is to be expected since they are fighting for teh same two CPU cores. CPU utilization hovers around 50-60% with both services running which indicates they are sharing the same CPU cores.
[ ID] Interval           Transfer     Bitrate         Retr  Cwnd
[  5]   0.00-10.00  sec   732 MBytes   614 Mbits/sec   67    707 KBytes
[  5]  10.00-20.00  sec   720 MBytes   604 Mbits/sec   20    580 KBytes
[  5]  20.00-30.00  sec   656 MBytes   551 Mbits/sec   18    634 KBytes
[  5]  30.00-40.00  sec   696 MBytes   584 Mbits/sec   34    718 KBytes
[  5]  40.00-50.00  sec   675 MBytes   566 Mbits/sec   36    776 KBytes
[  5]  50.00-60.00  sec   691 MBytes   580 Mbits/sec   48    638 KBytes
[  5]  60.00-70.00  sec   700 MBytes   587 Mbits/sec   36    730 KBytes
[  5]  70.00-80.00  sec   700 MBytes   587 Mbits/sec   37    590 KBytes
[  5]  80.00-90.00  sec   702 MBytes   589 Mbits/sec   28    691 KBytes
[  5]  90.00-100.00 sec   690 MBytes   579 Mbits/sec   22    771 KBytes
[  5] 100.00-110.00 sec   682 MBytes   573 Mbits/sec   36    621 KBytes
[  5] 110.00-120.00 sec   696 MBytes   584 Mbits/sec   13    713 KBytes
- - - - - - - - - - - - - - - - - - - - - - - - -
[ ID] Interval           Transfer     Bitrate         Retr
[  5]   0.00-120.00 sec  8.15 GBytes   583 Mbits/sec  395             sender
[  5]   0.00-120.05 sec  8.14 GBytes   583 Mbits/sec                  receiver

Storage (eMMC)
The VP2420 has 8 GB of built-in eMMC storage that may be used for extra storage or as a boot disk for a light weight OS. I decided to performance test the eMMC disk since I did not try it with the VP2410.
The read performance is more than half of a typical SSD but the write performance is 9-10 times slower than a SSD, which is not the best. If you are using it for a bit of extra storage or something which does not really need the performance, it will work perfectly fine for those purposes.

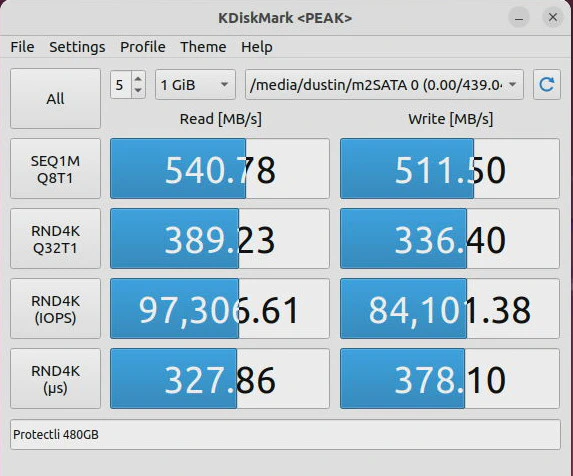
Storage (m.2 SATA)
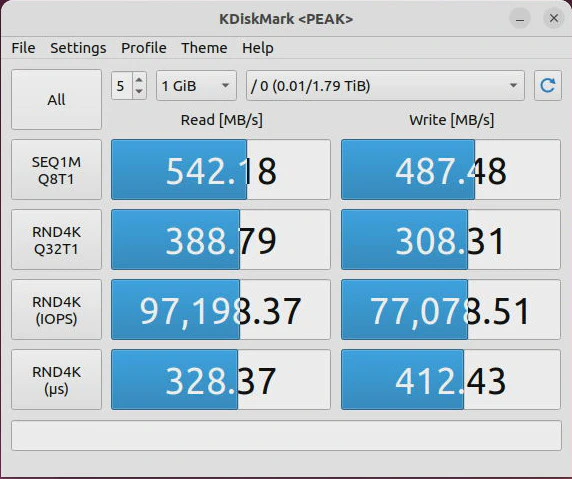
As with the VP2410, the VP2420 uses a m.2 SATA SSD as the primary storage device. A m.2 SATA interface is limited to the same 6 Gbps as a standard SATA interface so it will not be as fast as NVMe storage. If you are hoping to use NVMe drives with Protectli hardware, you will have to purchase one of the VP4600 series models.
In the image below, you will see that the Protectli 480GB m.2 SATA SSD has the same performance as a typical SATA SSD.
Storage (SATA)
The performance with the secondary SATA interface should be as good as the m.2 SATA interface. In the test below, I used a large capacity SSD, but it is not necessarily the fastest SSD in terms of write speed. I intentionally purchased a cheaper, higher capacity drive because I needed more storage where I plan to use the drive and performance is of secondary importance.
Even though the write speeds of that particular drive is slower, the performance of the SATA interface is the same as the m.2 SATA interface.
Boot Up Times
Since I received the VP2420 before the coreboot firmware was ready, I decided to time how long it takes to boot OPNsense 23.1 from the time I push the power button until the Protectli beeps a short tune, which indicates that it has finished loading the OS (the login prompt of OPNsense appears when it beeps).
With the default AMI BIOS, I found the boot time was 1 minute 25 seconds to 1 minute 30 seconds. After flashing to coreboot, the boot times were about 1 minute 15 seconds to 1 minute 20 seconds. Approximately 10 seconds of boot time is saved when using coreboot. I was expecting more of a difference in boot times but 10 seconds faster is still a noticeable difference especially when waiting for your network/Internet to be functional after a reboot.
Of course, the boot times may vary depending on the OS you are using. I was also simply using the stopwatch on my phone to get a general idea of how long the boot process takes so it was not the most accurate way to measure.
Power Consumption
To measure power consumption, I plugged the VP2420’s into a Z-Wave plug with energy monitoring. Such an energy monitor may not necessarily be the most accurate way to measure power but it seems to provide a reasonable reading on power. The VP2420’s J6412 CPU has a TDP of 10 Watts, which means on an average workload the VP2420 should consume about 10W of power.
When I boot up, the wattage was around 10-11W at first and then went up to 20-21W before settling at around 10W when idling. When running performance tests which peaked around 50% CPU utilization, the wattage used was around 20-21W.
As you can see, these boxes are very power efficient for the amount of performance you receive, which is one of the many reasons why they are popular for home users as a router/firewall or lightweight server/NAS that often run 24/7.
Temperature
As with my other reviews, I will provide a brief description of my personal experience with the temperature of the VP2420 as I do not have a temperature gun or thermal imaging to measure temperature.
What I noticed early on is that the VP2420 seems to get noticeably warmer than the VP2410. Even though it feels slightly warmer, I did not feel the need to pull my hand away because it was too hot. With my old Qotom box, I would not want to put my hand on it very long when the box was at its hottest running temperature. The Protectli chassis seems to dissipate heat well enough to be comfortable to the touch.
The J6412 CPU has a 10nm process versus the 14nm process of the J4125 CPU so that likely helps keep the power consumption and temperatures lower than it would have been otherwise with such a performance increase.
On the OPNsense Dashboard, the idle temperature seems to be between 52-55C. When under load, temps can be in the low to mid 60s. However, at one point I saw it peak at mid 70s. Even at that temperature, the outer chassis of the VP2420 did not feel so hot that I could not touch it. The ambient room temperature of my office may have been a bit higher with the heat running when I saw it peak in the mid 70s.
Where to Purchase?
If you think the Protectli VP2420 meets your home network needs, you may purchase this device on Protectli’s website or on Amazon (affiliate link) .
One great reason to order directly through Protectli besides great customer service is that you can customize the specs of your box. They also have accessories not found on Amazon. You can select coreboot as an option so that it is installed by Protectli so you do not have to worry about potentially bricking your new device.
Full disclosure: I do not earn any affiliate income if you purchase through Protectli, but I do earn a small amount if you purchase a Protectli through Amazon if you click on any of my affiliate links.