How to Migrate from ISC DHCP to dnsmasq or Kea DHCP in OPNsense

Photo by bluebay2014 from Getty Images Pro
Table of Contents
ISC (Internet Systems Consortium) is the organization that developed and maintained the open source ISC DHCP server. In October 2022, ISC released the last maintenance version of the ISC DHCP server.
The official successor to ISC DHCP is called Kea DHCP which is also created and maintained by the ISC organization.
ISC DHCP was the default DHCP server in OPNsense until version 25.7 where dnsmasq has become the new default since it is a good light weight option for small networks. OPNsense also includes Kea DHCP so users have the choice of which DHCP server to use on their networks.
In this guide I will show how to migrate from ISC DHCP to both dnsmasq and Kea DHCP. I have been holding off on writing this guide until the dnsmasq and Kea options have matured in the OPNsense UI as well as a better migration path.
With OPNsense 25.7, now is the best time to migrate since the DHCP alternatives have matured and the OPNsense team have provided export options to ease the transition of static DHCP leases.
Before You Begin
Note that there will be several steps in this guide that are optional since not everyone will need or want to implement all available features such as static DHCP reservations or domain/host overrides. I like to such topics in case you happen to make use of those features.
Also, there are a couple of decisions you will need to make when following this guide such as which DHCP and DNS service you plan to use.
Assumptions
I will assume in this scenario that you have upgraded from OPNsense 25.1 to 25.7 while still using ISC DHCP – hence the purpose and need for this migration guide since new installations of OPNsense 25.7 use dnsmasq by default.
In addition, I am going to be using Unbound DNS in this example not only since it is still the default DNS server in OPNsense 25.7 but also because Unbound DNS will work with both dnsmasq and Kea DHCP.
For the dnsmasq configuration example, I will also use the DNS server provided by dnsmasq so that you will be able to have local hostname DNS resolution. If you do not enable the dnsmasq DNS server and forward local domains to dnsmasq from Unbound DNS, local hostname lookups will fail.
If you choose Kea DHCP, you would need to use Unbound DNS since Kea is only a DHCP service.
Which DHCP Server should You Use?
At this point you can choose dnsmasq or Kea DHCP. If you are unsure of which DHCP server, here are some use cases that may help you decide:
dnsmasq DHCP
- Recommended for simple, small networks (most home users fall into this category and is new the default option in OPNsense 25.7)
- If you want both DHCP and DNS managed by dnsmasq instead of using Unbound DNS (dnsmasq only acts as a DNS forwarder and is not a recursive DNS resolver like Unbound DNS)
- Local hostnames of dynamic clients can automatically be registered in DNS unlike Kea DHCP which only supports registering static DHCP reservations
- Dnsmasq supports on demand population of IP addresses for a domain name in a special type of firewall alias, which can be helpful for blocking access to specific domains
- Does not support prefix delegation (PD) for downstream routers on your network, which is a more advanced use case that most home users do not need (note that tracking a WAN interface and assigning different IPv6 prefixes to various LAN/VLAN interfaces is supported similar to ISC/Kea DHCP)
Kea DHCP
- If you wish to set up high availability for the DHCP service on your network
- Supports prefix delegation (PD) for downstream routers on your network (at the time of this writing, the OPNsense documentation states that static routes are not automatically generated for downstream routers and dynamic IPv6 prefix delegation for downstream routers is not supported, unfortunately)
- Local hostnames of clients with dynamic IPs are not registered in Unbound DNS with Kea DHCP unlike dnsmasq – only static DHCP reservations are registered in Unbound DNS (Unbound DNS needs restarted after adding a static reservation)
Which DNS Server should You Use?
In addition to selecting the desired DHCP service to use on your network, you also have the option to use the DNS server provided by dnsmasq or by Unbound DNS.
The default DNS server in OPNsense 25.7 is still Unbound DNS. Blow are some use cases to help you decide which to use:
dnsmasq DNS
- If you do not want to use Unbound DNS and have everything configured in one place
- If you want to make use of a firewall alias that has IP addresses dynamically populated for a domain name so it can be used in a block or allow rule
- There are less configuration options for dnsmasq DNS
- There is less logging for DNS queries and other DNS related information than with Unbound DNS
Unbound DNS
- It is the default DNS server
- Unbound is a recursive DNS resolver which generally provides more secure and authoritative DNS lookups via the root name server (this means it can be slower than using other non-root DNS servers but the queries are cached locally to improve performance of known domains)
- Unbound DNS has block list support (DNSBL) similar to Pi-hole
- DNS over TLS is available with Unbound DNS which makes it very simple to configure (note when using DNS over TLS, you are no longer using Unbound as a recursive DNS resolver since you will be forwarding queries to specific non-root DNS servers such as Cloudflare, Quad9, etc.)
- Unbound DNS has a statistics page under the “Reporting” section that you may enable for greater visibility of the DNS queries/blocks on your network
Both dnsmasq DNS and Unbound DNS
- You have the option to use the dnsmasq DNS server and Unbound DNS together so that you can have local hostname DNS resolution on your network when you are using dnsmasq for DHCP
- Clients on your network would use Unbound DNS which will then forward local domain name lookups to dnsmasq DNS in order to resolve local network hostnames
Export Static DHCPv4 Reservations (Optional)
If you have static DHCPv4 reservations, you will need to export the information so that you do not need to manually enter your static reservations or use some 3rd party custom script to export/import this configuration.
The great aspect about the export of static DHCP reservations is that the OPNsense team designed the export to work for both migration paths of dnsmasq and Kea.

Info
At the time this guide was written, there are no export options for static DHCPv6 reservations.
Option 1: Dnsmasq Configuration
I imagine most home users and smaller networks will choose dnsmasq over Kea since it is a mature, simple to use DHCP/DNS service. A large portion of OPNsense users have smaller networks (< 1000 clients) which is one reason why OPNsense decided to default to dnsmasq for the ISC DHCP replacement.
If you choose the dnsmasq option, you do not need to complete any steps in the Kea DHCP Configuration section.
Option 1.1: General Settings
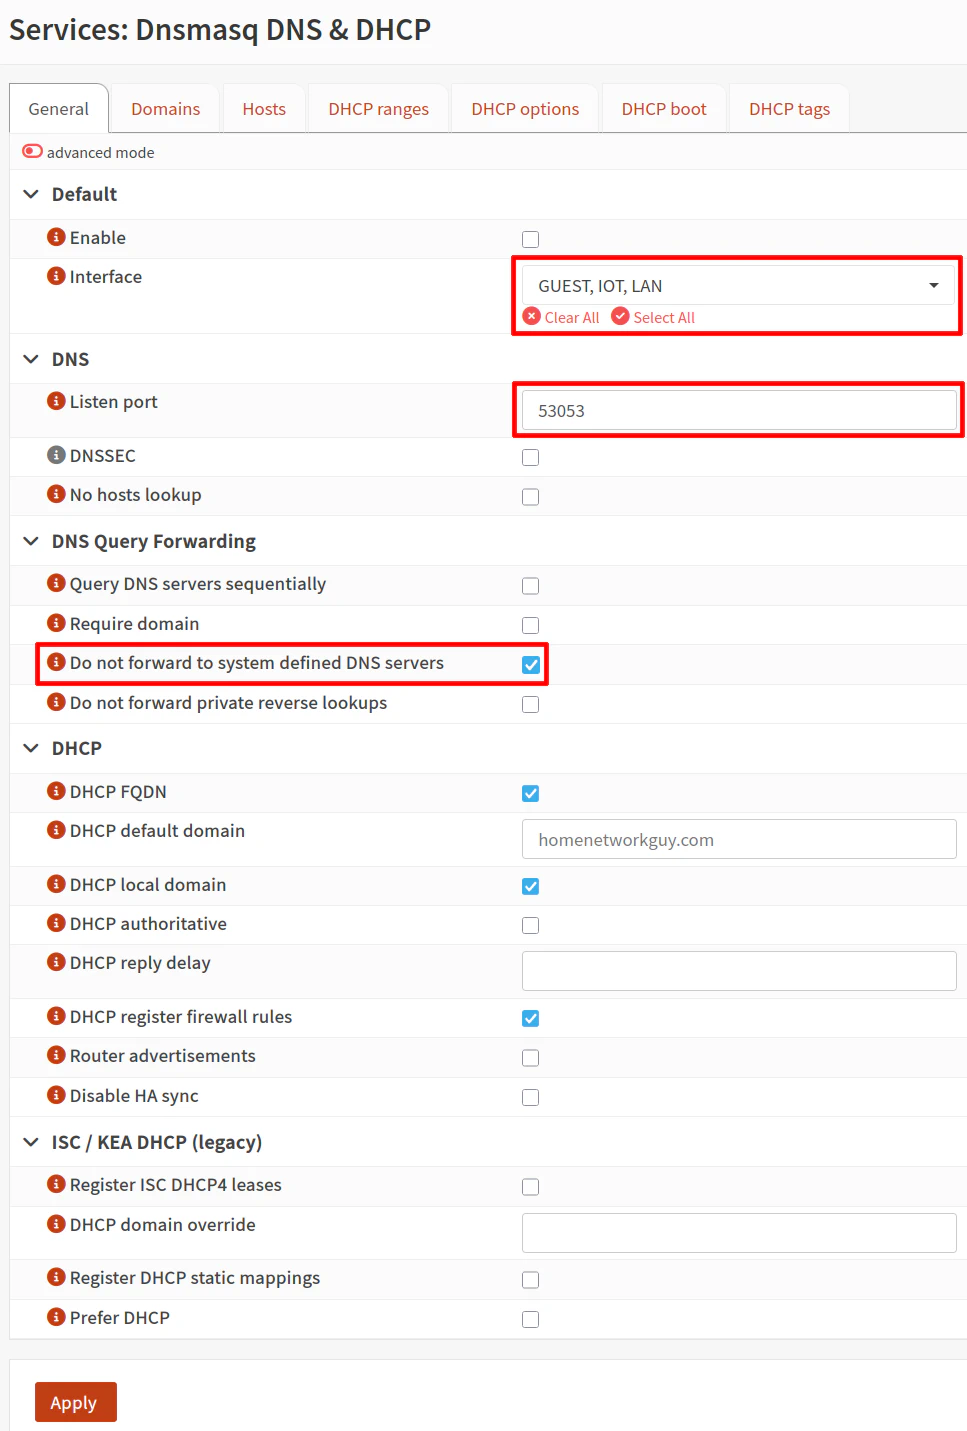
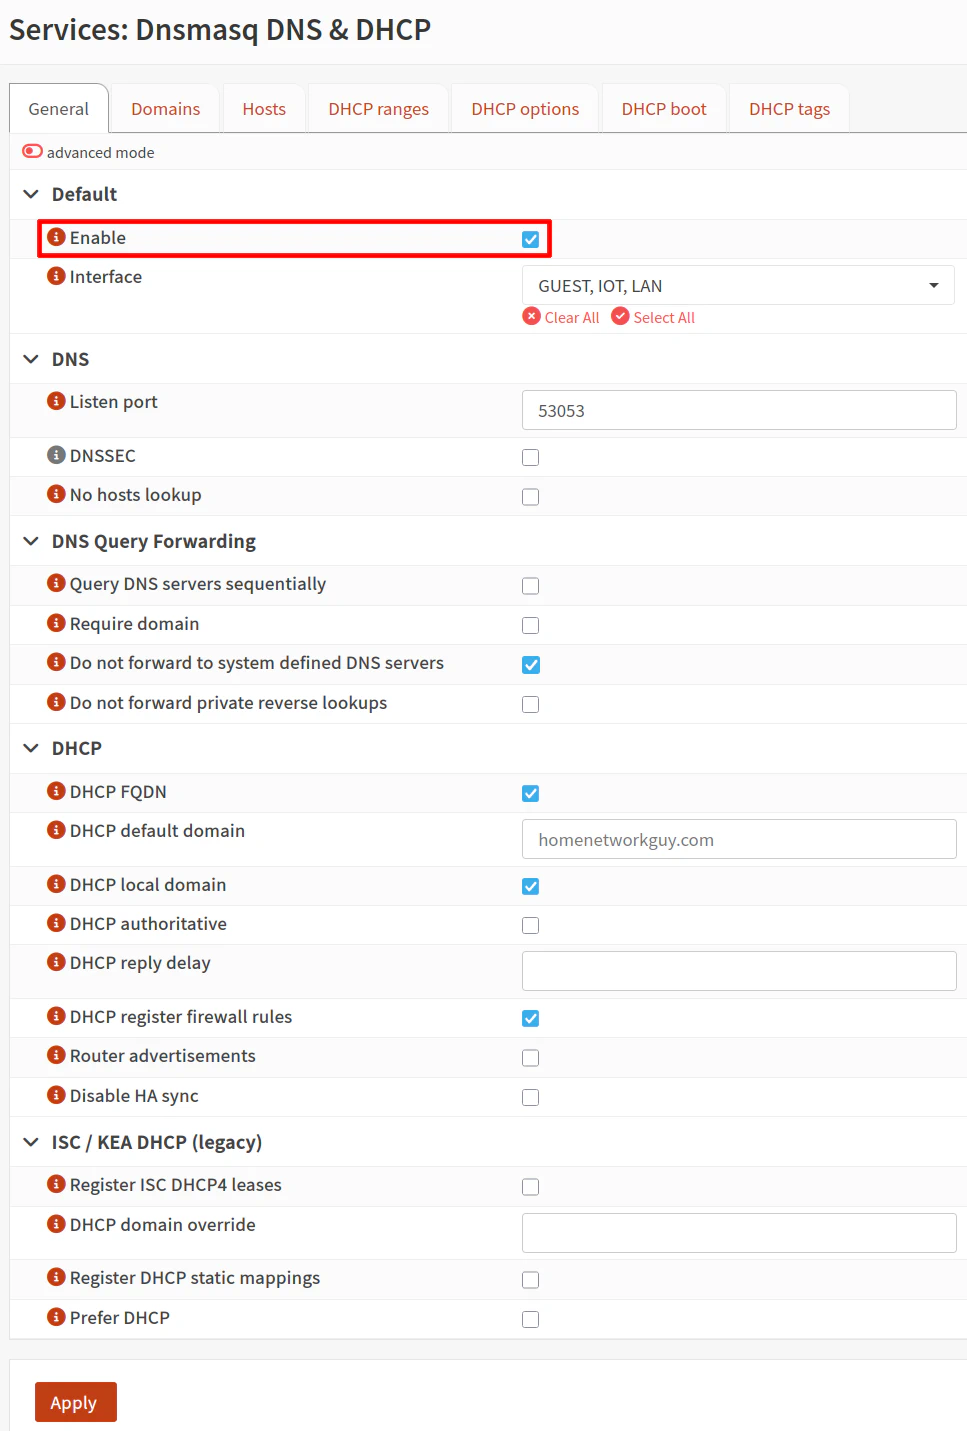
On the “General” tab of the “Services > Dnsmasq DNS & DHCP” page, you will see a list of the main dnsmasq service settings.
The “Enable” checkbox is the first option, but you should wait until you are done configuring dnsmasq and turn off ISC DHCP before enabling dnsmasq. The service will fail to start if you do it too soon since it uses the same port for DHCP as ISC DHCP.
For the “Interface”, you will need to select each interface you wish to use dnsmasq. It is convenient that you can select all of the desired interfaces in one dropdown box as well as configure all DHCP ranges on its own tab without needing to navigate to each separate interface page like you would with ISC DHCP.
If you wish to have DNS resolution of local hostnames on your network, you will want to enable dnsmasq DNS (you will also need to complete the steps in the Forward Local Domains from Unbound DNS to dnsmasq DNS section).
To enable dnsmasq DNS, in the “DNS” section you will want to set the “Listen port” to something like 53053 instead of the default 0 value.
Tip
Do not use port 5353 since that is used for multicast DNS for service discovery.
In the “DNS Query Forwarding” section, enable the “Do not forward to system defined DNS servers” to prevent dnsmasq from using the DNS servers on the “System > General” page since dnsmasq DNS is only being used for local hostnames. This option prevents local hostname lookups of unknown hostnames from querying DNS servers outside of your network.
Under the “DHCP” section, there should be 3 default options enabled that you may leave enabled: “DHCP FQDN”, “DHCP local domain”, and “DHCP register firewall rules”.
If you leave the “DHCP default domain” box blank, it will default to the domain name specified on the “System > General” page. This behavior is similar to ISC DHCP. However, you can choose to override the default domain used by all DHCP clients on your network with this option. You may also change it something different for each DHCP range, similar to ISC DHCP.
Note
The TLD (top level domain) .internal may be used for the local domain name of your network since it is officially approved by ICANN for such a purpose (along with .home.arpa, which I personally like less than .internal).
You will notice at the bottom of the page that there is an “ISC/KEA DHCP (legacy)” section. You do not need to enable any of the options in order to have local hostname resolution with the method described in this guide (which is based upon the OPNsense documentation).
Option 1.2: DHCP Ranges
As with ISC DHCP, you will need to define the DHCP address ranges to be used by your dynamic clients for each of your LAN/VLAN interfaces.
Tip
One notable difference I saw when reading through the OPNsense documentation is that it is recommended that static DHCP reservations be included inside the DHCP range for dnsmasq rather than outside of the range is recommended for both ISC and Kea DHCP.
If you already have static DHCP reservations outside of the range when migrating to dnsmasq, simply change your DHCP range to also include your existing static DHCP reservations so that you do not have to change all of your existing static IP addresses.
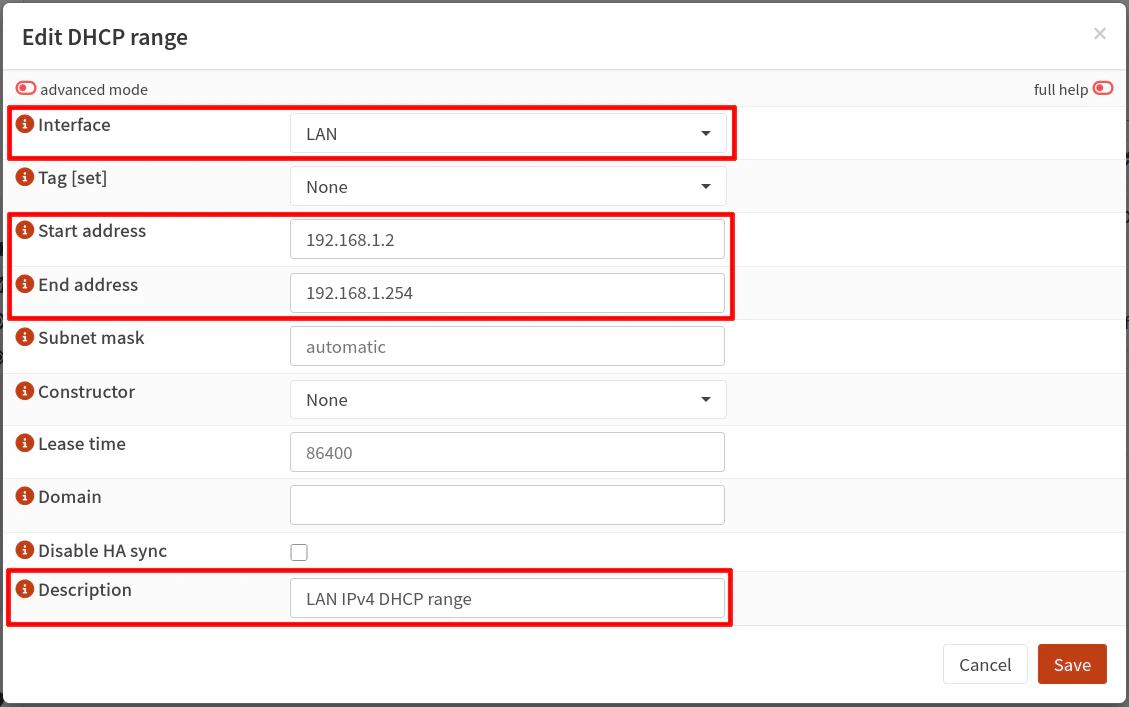
To add a new DHCP range, click on the “+” button on the bottom right hand corner of the page.
Select the “Interface” you wish to create a DHCP range. Then enter the “Start address” and “End address” such as 192.168.1.2 and 192.168.1.254 for example if you are setting an IPv4 range.
You do not need to set the “Subnet mask” since you are specifying a DHCP range on a LAN/VLAN interface on the OPNsense system (it can determine it automatically based on the interface information).
You may enter a “Description” such as LAN IPv4 DHCP range or leave it blank. Click “Save”
Note that you will need to create a range for IPv4 and IPv6 for each interface as separate entries if you plan to have both protocols on your network.
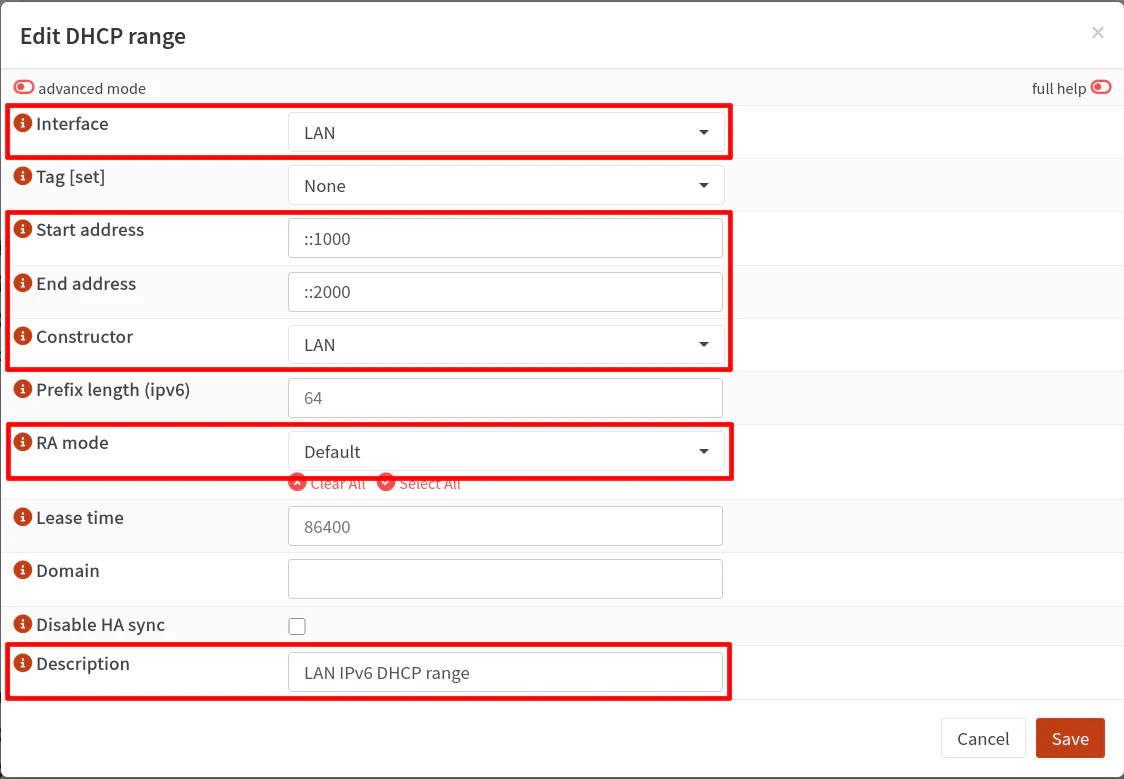
Repeat the process above for IPv6, but note the following differences if you have dynamic IPv6 addresses (most home/residential users do). For the “Start address” and “End address”, enter a range such as ::1000 and ::2000 when you have dynamic IPv6 addresses since the first portion of the IPv6 address will be dynamically assigned.
You will need to set the “Constructor” dropdown to the interface to base the IPv6 address such as LAN if you are creating a DHCPv6 range for the LAN interface. It will use the track interface configuration that you specified for the interface on the “Interfaces > [LAN]” page (where “LAN” is the name of your interface).
If you plan to use the “Services > Router Advertisements” (the radvd service) instead of router advertisements provided via dnsmasq, leave the “RA mode” at Default. If you use the radvd service when using dnsmasq, the only option available on the “Router Advertisements” page for each interface is Assisted.
However, if you set the “RA mode” to an option such as slaac or ra-stateless, you should disable the router advertisements on the “Router Advertisements” page for each interface. Essentially you should use one or the other because there may be the potential risk sending router advertisements from both services (I am not sure if that will be problematic for your network).

Tip
If you used the Assisted option with the “Router Advertisements” (radvd) service and you wish to use dnsmasq instead, use the value slaac and not ra-stateless since it will assign both a DHCPv6 address in addition to a SLAAC address. ra-stateless only generates a SLAAC address.
Also you may wish to use ra-names to register DHCPv6 names in DNS (this option does not work if clients are not using privacy extensions).
Option 1.3: Forward Local Domains from Unbound DNS to dnsmasq DNS
As mentioned earlier in the guide, my example is demonstrating how to use Unbound DNS with dnsmasq DNS in order to have local hostname resolution, which mimics the behavior of using ISC DHCP with Unbound DNS. I imagine this is what most users will want and expect to have configured on their network.
I am going to assume you already have Unbound DNS running when you migrated from OPNsense 25.1 to 25.7 so I am only going to cover the settings needed to provide local hostname resolution when using dnsmasq and not include other Unbound DNS configuration.
On the “Services > Unbound DNS > Query Forwarding” page, you will need to use query forwarding your local domain name(s) to the dnsmasq DNS server.
The OPNsense documentation show examples using different domains for each interface/LAN/VLAN, but I will be using a single domain for all local networks, which I imagine may be a common scenario for home network usage. This means I will only need to query forward one domain name to dnsmasq DNS in my example.
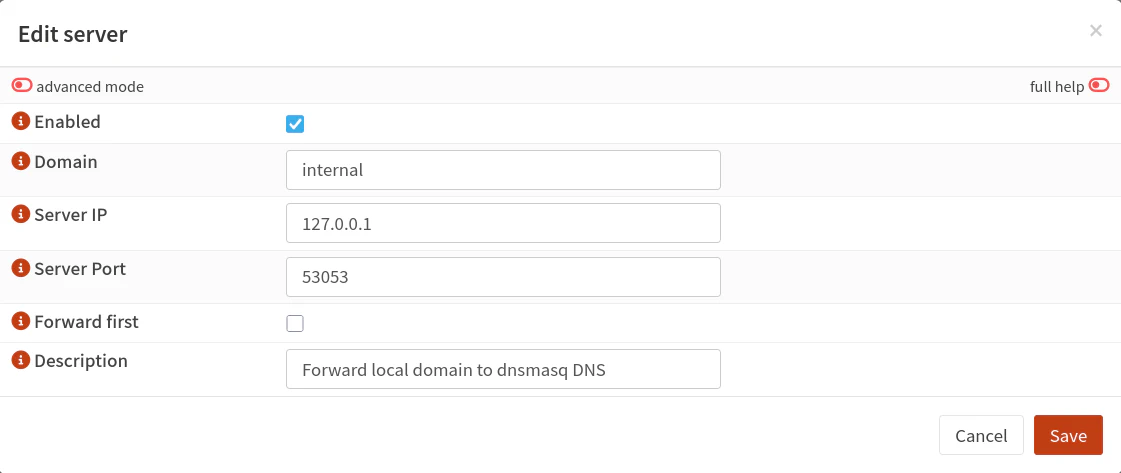
Click on the “+” button at the bottom right of the “Custom forwarding” table. Enter the “Domain” you wish to use such as .internal. For the “Server IP”, use 127.0.0.1 for localhost and the “Server Port” of 53053 or the port you used when enabling the dnsmasq DNS server. You may optionally add a “Description”. Click “Save”.
If you are using a different domain for each local network (such as .lan, .iot, etc.), you will need to create an entry for each domain name.
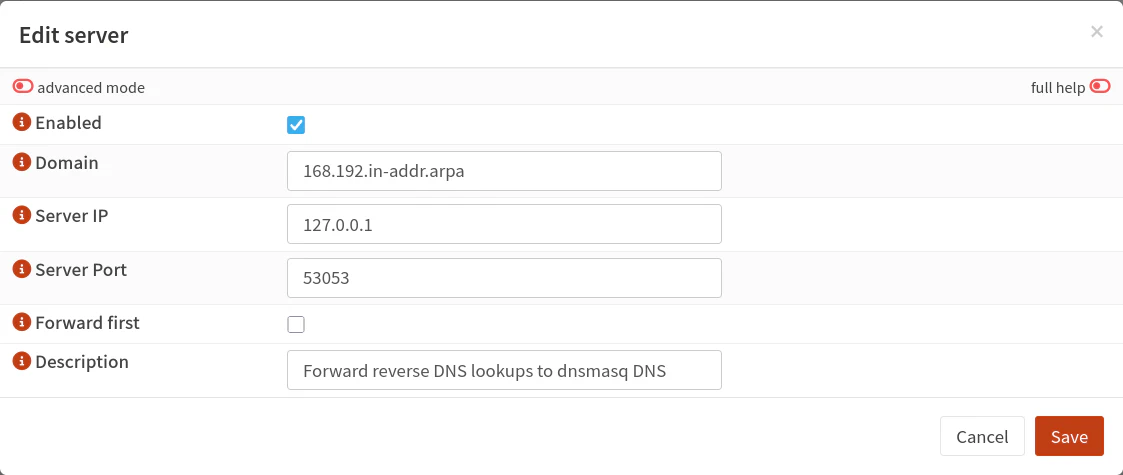
One helpful query forwarding entry you may wish to add is one which will allow reverse DNS lookups. Reverse DNS lookups allow you to look up a hostname based upon its IP address. Sometimes you may only have the IP when looking at logs and want to know which device is associated to that IP address.
To add a reverse DNS entry, it is very similar to adding the local domain query forwarding. Click on the “+” icon again. For the “Domain”, you will need to add the reverse domain name.
The standard format for this domain is the subnet (minus the client portion of the IP address) in reverse with .in-addr.arpa appended to it. The OPNsense documentation shows creating one per local network, but in my example, I am creating a reverse DNS entry for the entire 192.168.0.0/16 IP address space to cover all of the local networks in a single entry. That means the client portion of the address is the last 2 octets. The domain name for the reverse DNS entry is therefore 168.192.in-addr.arpa.
Use the local host IP address 127.0.0.1 for the “Server IP” and the dnsmasq DNS server port 53053. Add a “Description” if you like.
Option 1.4: Domains (Optional)
If you are using dnsmasq’s DNS service, you may make use of domain overrides if you wish to use alternative DNS servers when looking up specific domain names.
This feature is useful when you want domains to bypass DNS block list or other DNS filtering.
One interesting aspect about the domain overrides for dnsmasq is that you may associate the domain override to a special firewall alias that dynamically adds all associated IP addresses of the domain and any resolved subdomains to the alias.
A standard firewall alias for a domain name does not include IP addresses of resolved subdomains so it is not as effective at allowing/blocking access to an entire domain name.
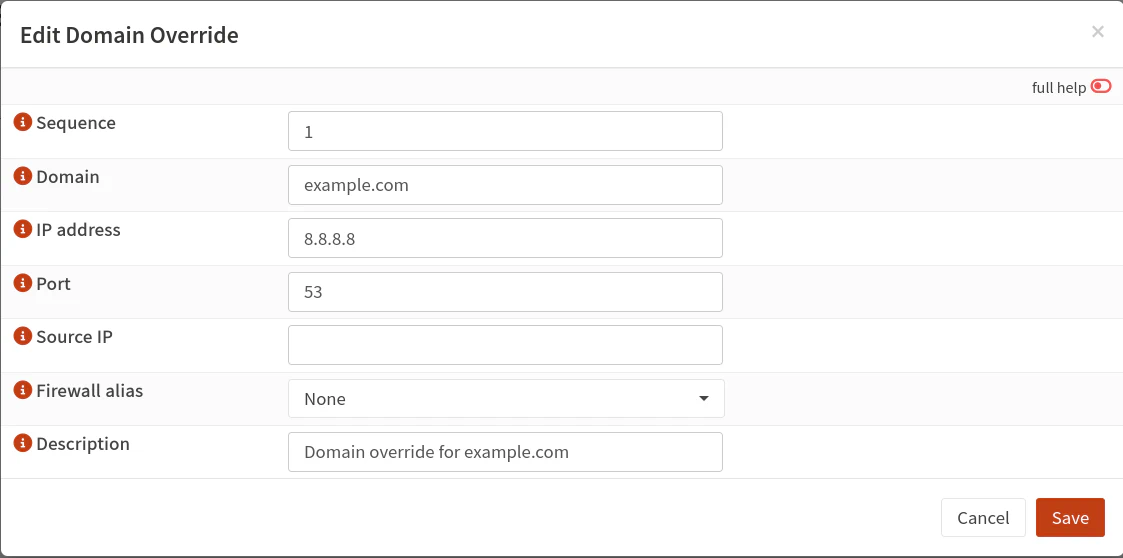
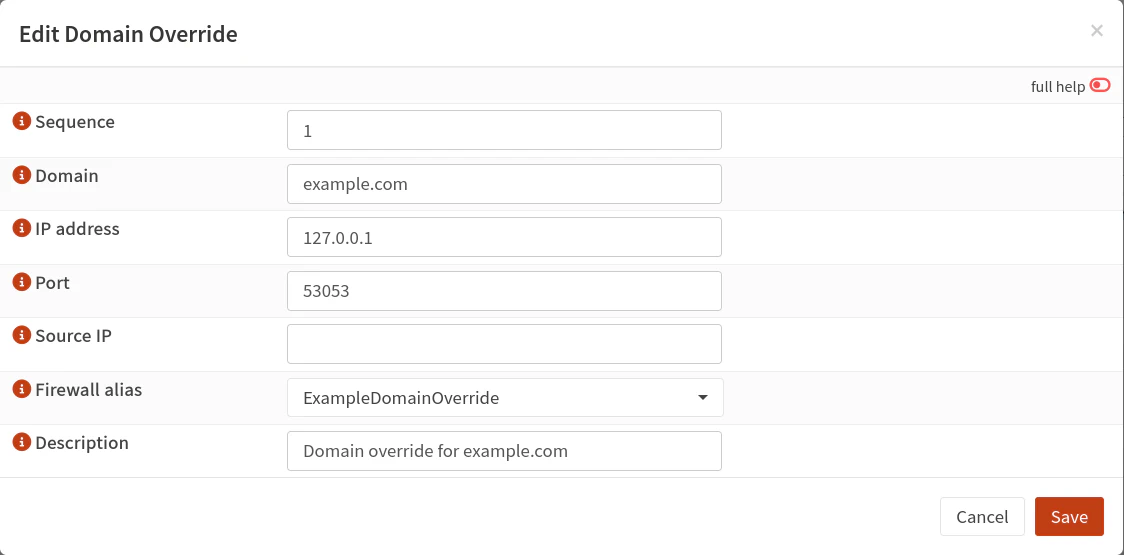
To make use of this feature, you first need to create the firewall alias. Select the “Type” of External (advanced) when creating the alias. Be sure to click “Apply” when you are done.

Then you will be able to select the alias when creating a domain override. Make sure you are using your dnsmasq DNS server as the DNS server which is 127.0.0.1 using port 53053.
Warning
Associating a domain override to a firewall alias is both a powerful and potentially dangerous feature.
It is powerful because the special alias will enable you to easily allow or block access to a particular domain name and all subdomains (of a website, for example).
However, it is potentially dangerous if you add a domain that resolves to many IP addresses since the alias may grow to include a wide range of IP addresses that may be inadvertently allowed or blocked.
The OPNsense documentation suggests that this special alias is best for allow lists than block lists since a lot of services are hosted on shared resources using the same IP addresses so you may end up blocking access to something unrelated to what you are intending to block.
Also note that IP addresses in the alias will need to be manually flushed if they change for the domain name since the alias does not check the TTL (time to live) for the IP addresses. Therefore, you could run into issues when the IP addresses change for the domain.
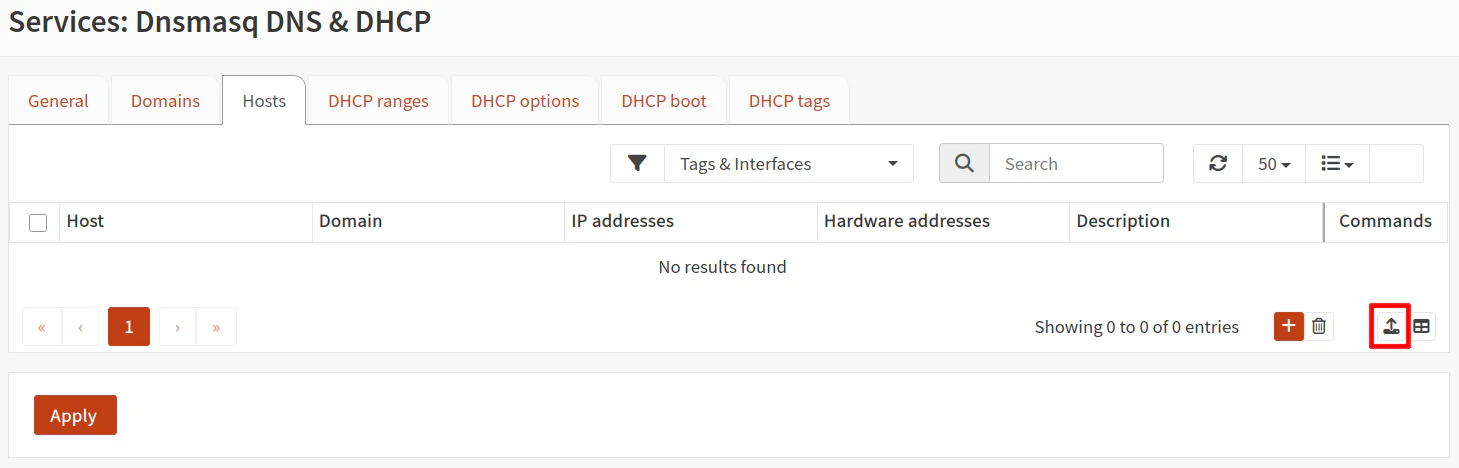
Option 1.5: Hosts (Optional)
The “Hosts” tab shows all of your static DHCP reservations, but it can also be used for hostname overrides if you have DNS enabled for dnsmasq. You will notice on the “Edit Host Override” pop up dialog box that it has both DNS and DHCP configuration.
At the bottom right hand corner of the table of hosts (which will be empty by default), you may import your static DHCPv4 reservations that you exported from ISC DHCP.
If you wish to add a new static DHCP reservation, you can click on the “+” button at the bottom of the page. Then enter the “Host”, “IP address”, and “Hardware address” of the client similar to how you would do it for ISC DHCP. Note that “Domain” is not required since it will default to your system configured domain name.
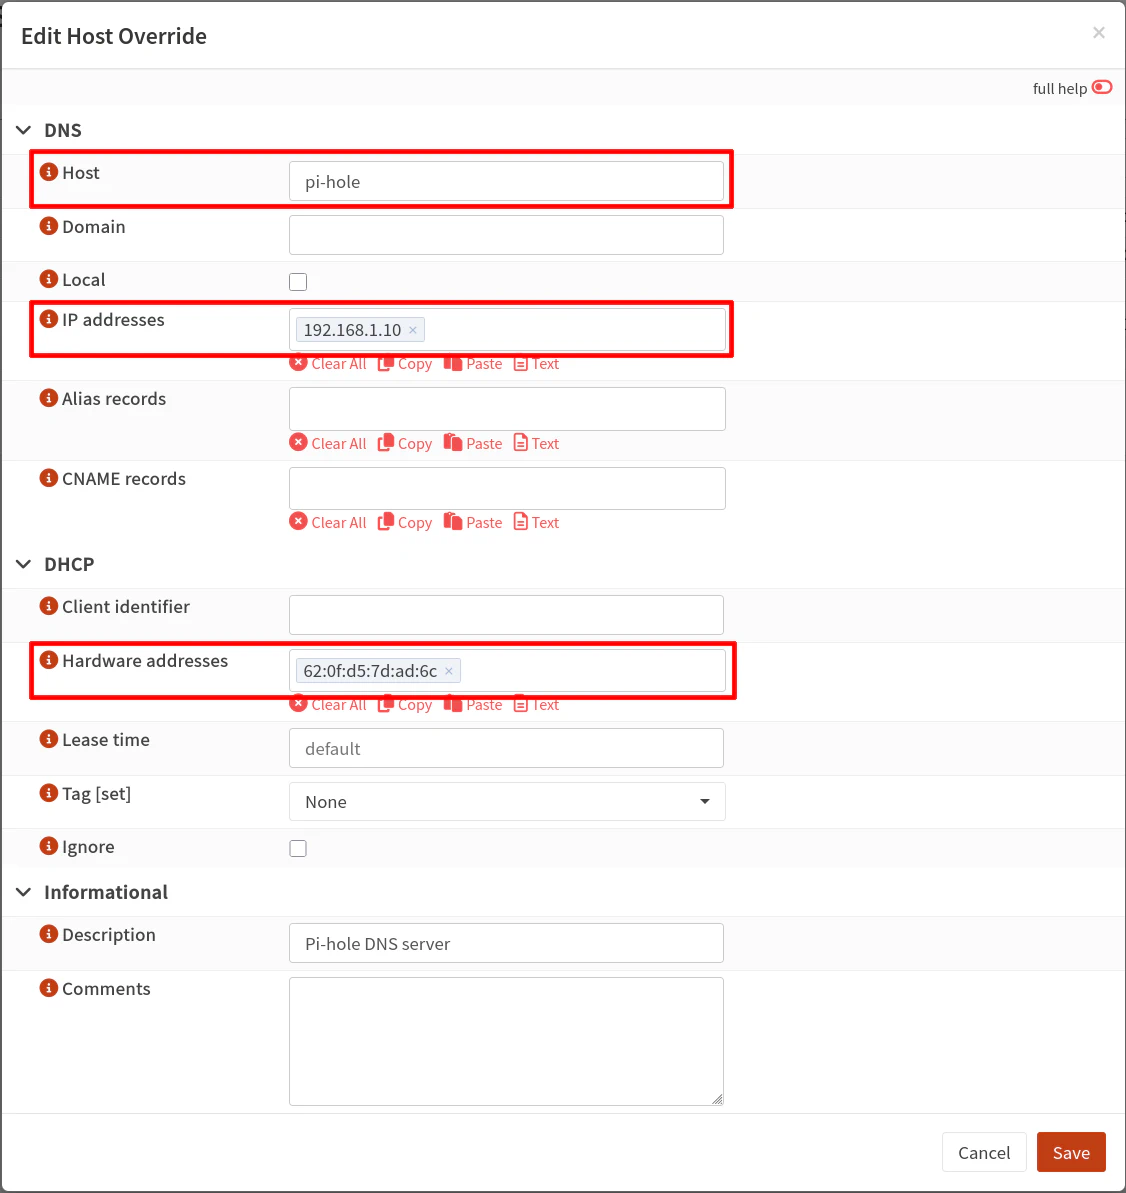
As stated at the beginning of this section, you can create an alias for hosts by adding an “Alias record”, which is useful when you are running a reverse proxy. You can even use a “CNAME record” for clients with dynamic IPv4 and partial IPv6 addresses.
Note
Interestingly, if you are using Unbound DNS that is configured to forward local hostname lookups to dnsmasq DNS, you may either use the “Alias record” option in the dnsmasq hosts or host overrides in Unbound DNS.
One reason you may wish to use Unbound DNS instead of dnsmasq for host overrides is if you have existing Unbound DNS configuration when you were using ISC DHCP. You may leave the Unbound DNS settings alone, and it should continue function properly.
Option 1.6: DHCP Options (Optional)
As mentioned in the DHCP Ranges section, you may use the router advertisements option for IPv6 via dnsmasq (“RA mode”) or via “Services > Router Advertisements” page (the radvd service).
If the radvd service is disabled on the “Router Advertisements” interface page, I noticed that IPv6 clients did not receive the IPv6 DNS server address automatically like it does with the radvd service.
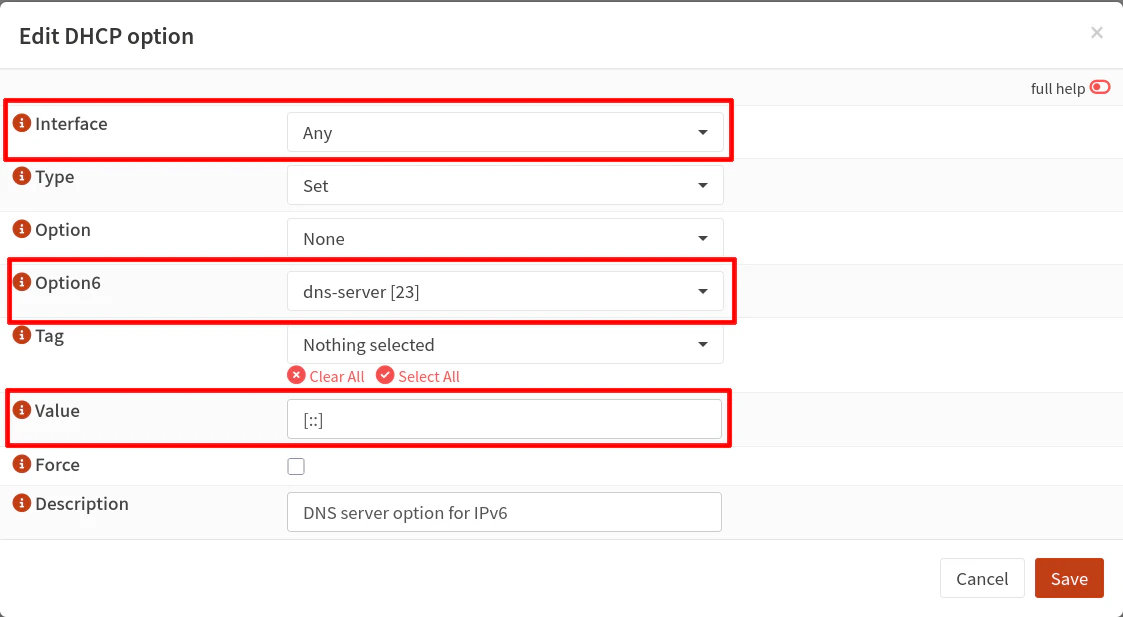
Therefore, when using “RA mode” with dnsmasq, you will need to set the IPv6 DNS server on the “DHCP Options” tab.
To add the IPv6 DNS server option, click on the “+” button under the “Options” section (not the “Boot” section). Select “dns-server [23]” option in the “Option6” dropdown box. Leave the “Interface” as Any so it will work for all of your LAN/VLAN interfaces.
For the “Value”, enter [::]. You must include the brackets because it is a special notation that means ‘use the interface IP address as the DNS server’ so that you do not have to hard code the interface IP address.
Tip
If you want to use an alternate IPv6 DNS server other than the DNS server listening on each interface (such as the default Unbound DNS server), you will want to disable router advertisements on the “Services > Router Advertisement” page for each interface and make use of the DHCP options to set the desired IPv6 DNS server.
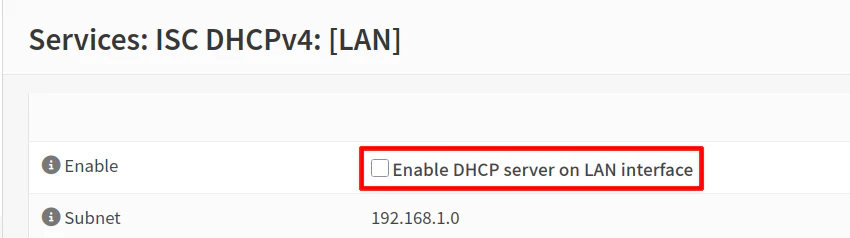
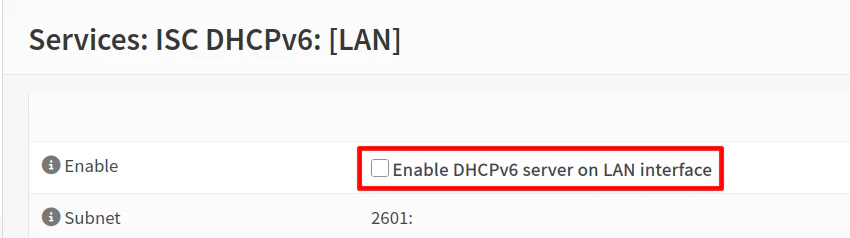
Option 1.7: Disable ISC DHCP and Enable dnsmasq
Once you have everything configured in dnsmasq, you may disable the ISC DHCP service on each of your interfaces for both IPv4 and IPv6 if you are using both. Dnsmasq will not start if you do not disable ISC from all interfaces before enabling dnsmasq since it uses the same port for the DHCP service as ISC DHCP.
On the “Dnsmasq DNS & DHCP > General” page, enable the dnsmasq service. Verify that it is running by seeing if it has a green play button icon or via the log.
If you are on a system that is receiving an IP address via DHCP, you should not lose connectivity immediately since your current DHCP lease should not expire right away.
You can release/renew your DHCP lease via command line on your system or simply disconnect/reconnect to the network (via the network icon on your system tray or by physically disconnecting/reconnecting) to verify that the dnsmasq service is working properly. You should receive a new IP address in the appropriate range.
If for some reason there was an issue with your configuration, you could manually configure the IP address on your system in order to access the web UI of OPNsense. Worst case scenario is that you can revert your changes and try again.
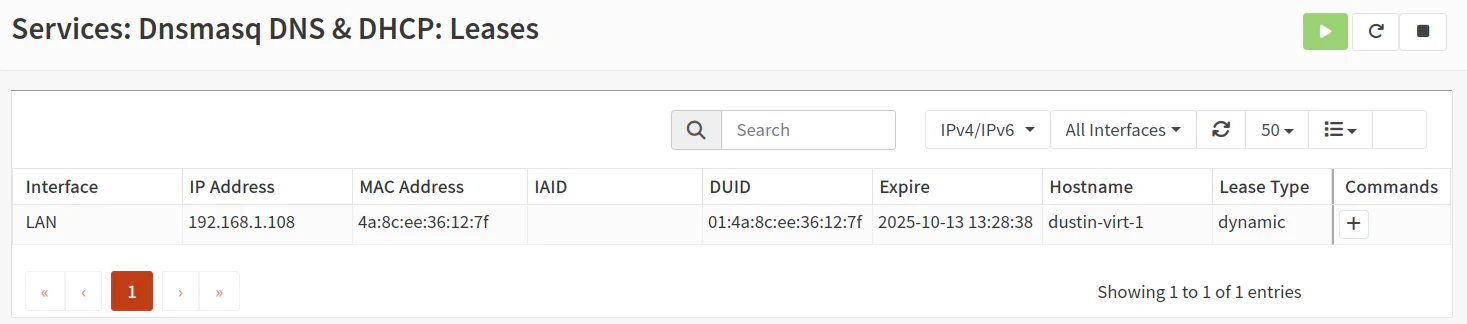
You should be able to check if the leases are being assigned by dnsmasq by going to the “Services > Dnsmasq DNS & DHCP > Leases” page.
Option 2: Kea DHCP Configuration
If you choose Kea DHCP, you may follow the steps in this section and skip the steps in the Dnsmasq Configuration section. Note that I do not plan to demonstrate setting up high availability with Kea as that is a separate topic of discussion.
Option 2.1: Kea DHCPv4: Settings
Before setting up the DHCPv4 ranges on Kea, there are some general settings which will need updated on the “Services > Kea DHCP > Kea DHCPv4” page on the “Settings” tab.
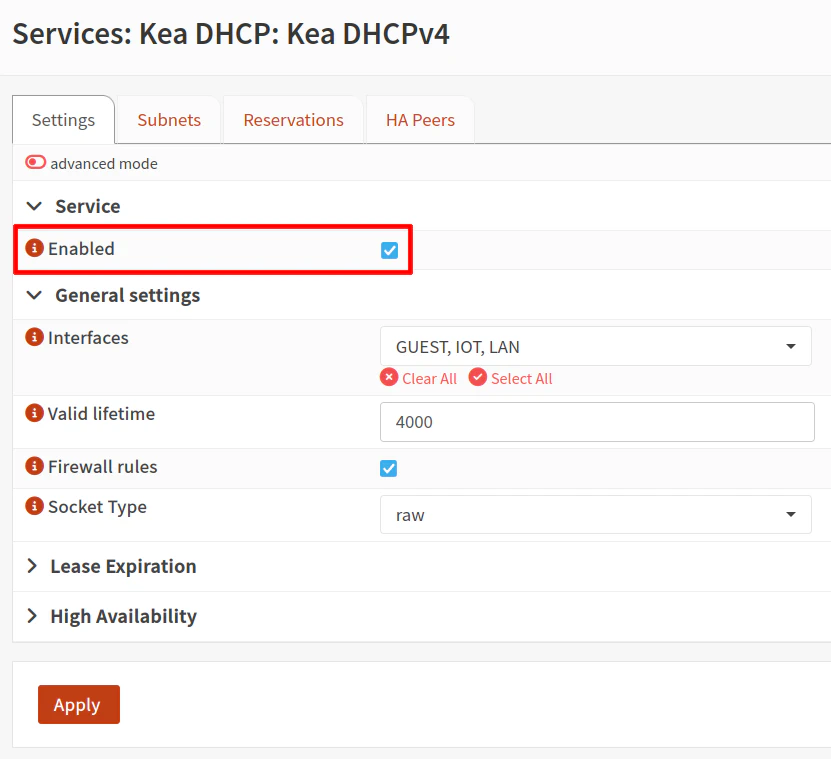
Do not check the “Enabled” box until everything is configured and you are ready to disable ISC DHCPv4 on all your interfaces.
For the “Interfaces” dropdown, select the interfaces which you want to set up the DHCPv4 subnets. You may leave the other options at the default value. Ensure that “Firewall rules” is enabled since that is necessary to allow the DHCP service on your network.

Option 2.2: Kea DHCPv4: Subnets
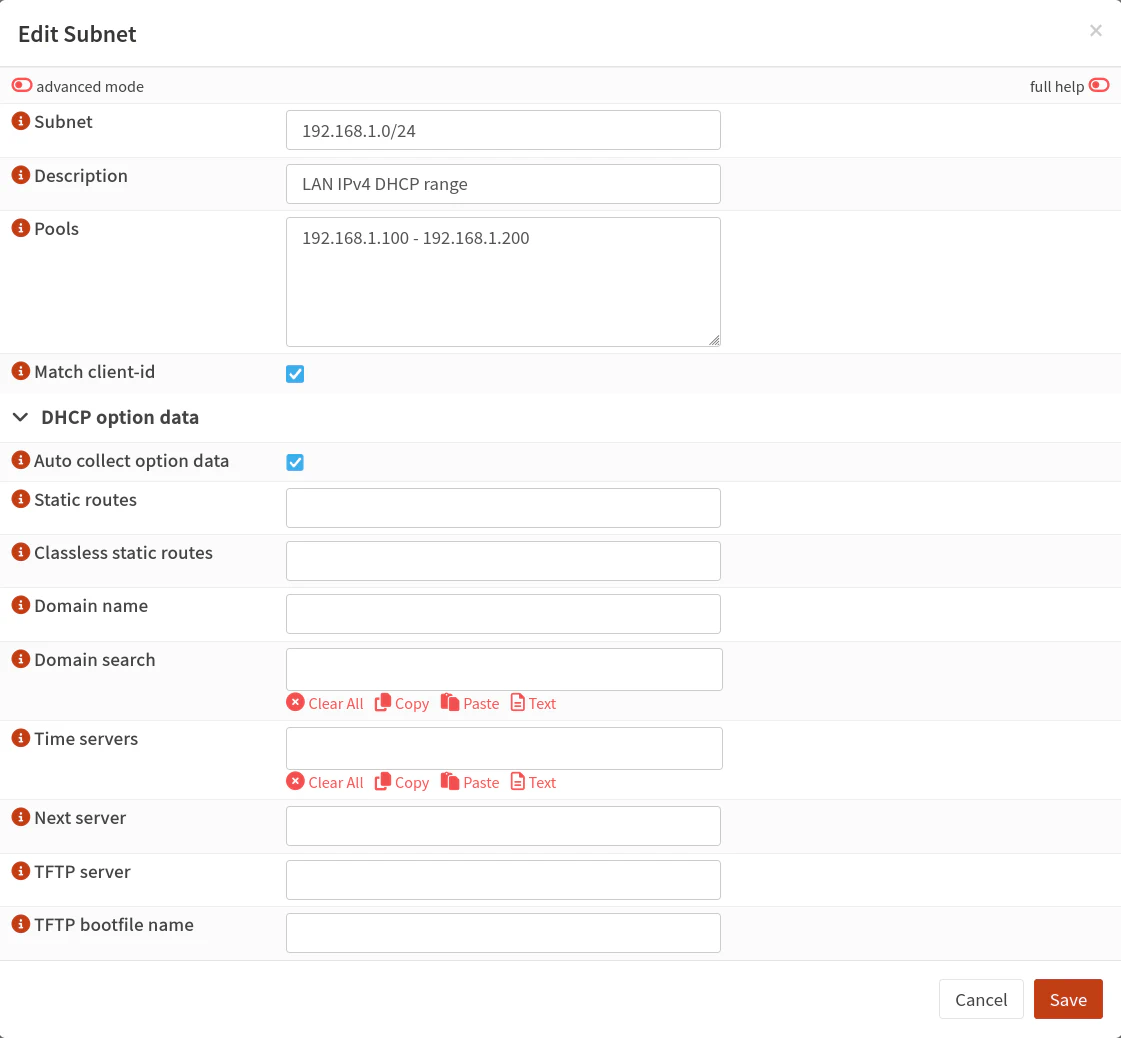
On the “Subnets” tab, click on the “+” button to add a new DHCPv4 range.
For the “Subnet” for the LAN interface, for example, enter a subnet such as 192.168.1.0/24. Enter a “Description” if you like. In the “Pools” box, you can specify one or more range of IP addresses such as 192.168.1.100-192.168.1.200.
The rest of the values can remain blank or at their default state of enabled.
Option 2.3: Kea DHCPv4: Reservations (Optional)
If you have static DHCPv4 reservations from ISC DHCPv4, you may import the list that you exported from ISC by clicking on the upload icon in the bottom right corner of the “Services > Kea DHCP > Leases DHCPv6” page.
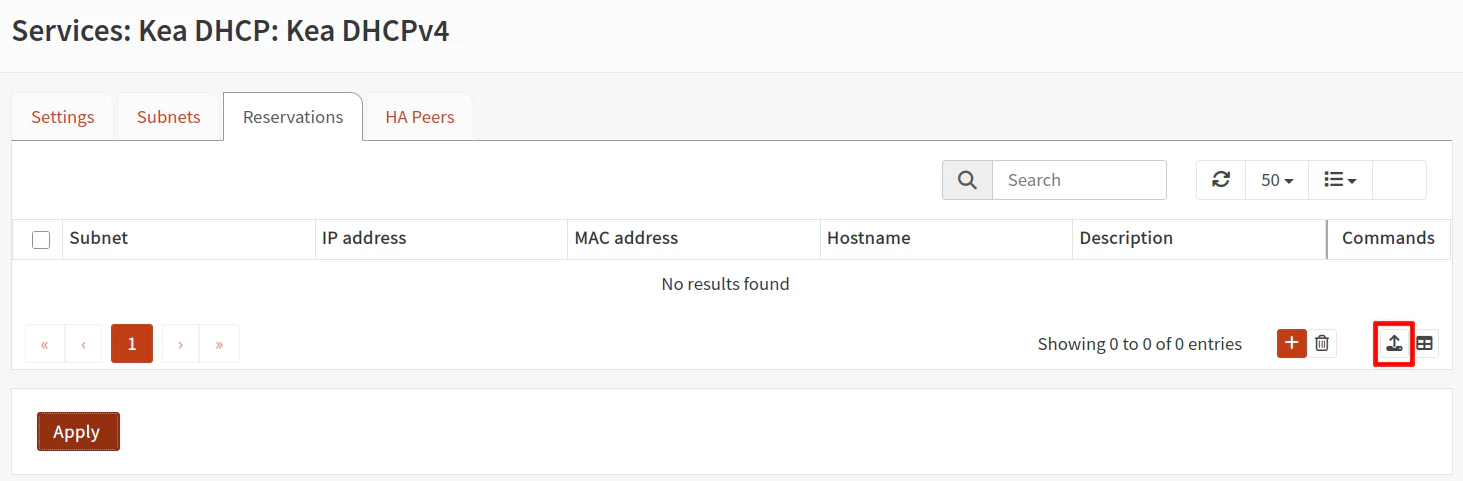
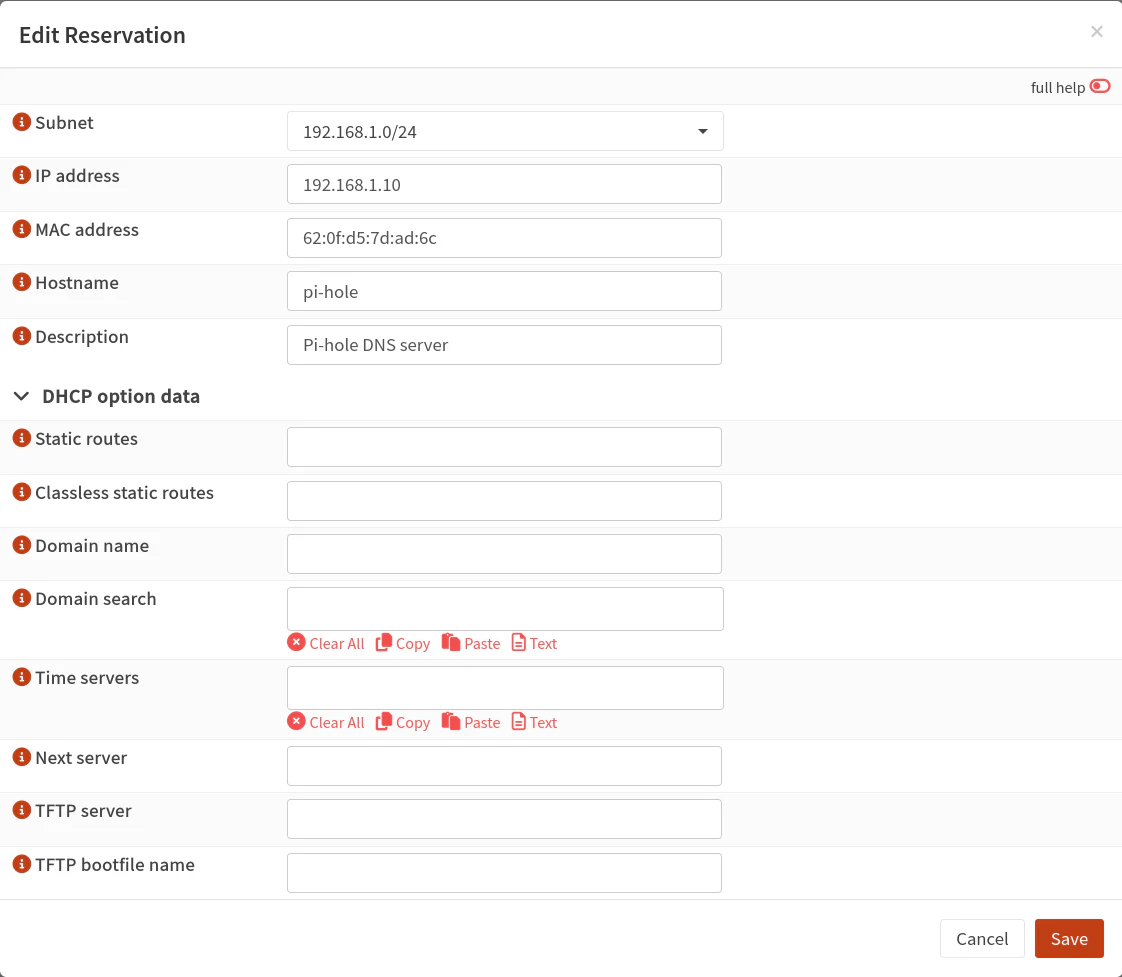
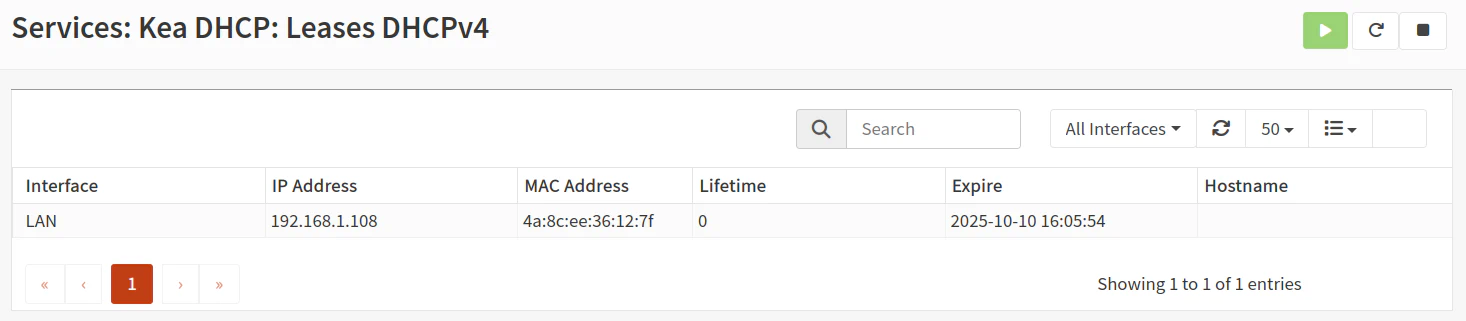
You may also enter a new static DHCPv4 reservation by clicking on the “+” button and entering the “IP address”, “MAC address”, “Hostname” and optional “Description” for the client. The MAC addresses can be found on the “Services > Kea DHCP > Leases DHCPv4” page.
Option 2.4: Kea DHCPv6: Settings
After spending some time digging into dynamic IPv6 with Kea and looking over the OPNsense forum, I realized that Kea seems to be designed more for static IPv6 configuration than dynamic configuration, which is unfortunate for many residential users who have only dynamic IPv6 addresses.
At first, I tried to enter the IPv6 information similar to ISC DHCPv6 where you can rely on the first portion of the IPv6 to be populated based on the interface tracking.
Then after digging into it further, I discovered that you can use dynamic IPv6, but you must hard coding the dynamic prefix when setting up the subnet IPv6 ranges. This means you will need to either manually update the prefix when it changes or run a script that is able to automatically update the prefix when it changes. If you are willing to manage that scenario, be sure to complete the remaining steps below (several of which are optional). Also, be sure to set the router advertisements on the “Services > Router Advertisements” page to be Managed or Assisted.
Obviously for dynamic IPv6 users, this is a less than ideal situation when compared to ISC DHCPv6. However, all is not lost if you do not wish to deal with that issue. If you do not have a need for static IPv6 reservations and only want basic IPv6 connectivity, you could simply rely on SLAAC addresses.
To utilize SLAAC addressing with Kea, you can leave Kea DHCPv6 disabled and have router advertisements on the “Services > Router Advertisements” page set to Unmanaged (for SLAAC addressing). Your devices should be able to obtain IPv6 SLAAC addresses without the Kea DHCPv6 service enabled. (I am assuming you have the interface configuration for IPv6 to track the WAN interface as you would have done with ISC DHCPv6).
If you choose to use SLAAC addressing, you may skip the remaining sections in this guide (but be sure to enable Kea DHCPv4 as described in Option 2.9 below)
Note
If you set the Assisted or Stateless option on the “Router Advertisements” page, clients should still obtain SLAAC addresses because both of those options include SLAAC addressing. The clients will not be assigned stateful or stateless DHCPv6 IPv6 addresses since the Kea DHCPv6 service is not enabled for the dynamic IPv6 clients on your network.
Option 2.5: Kea DHCPv6: Subnets
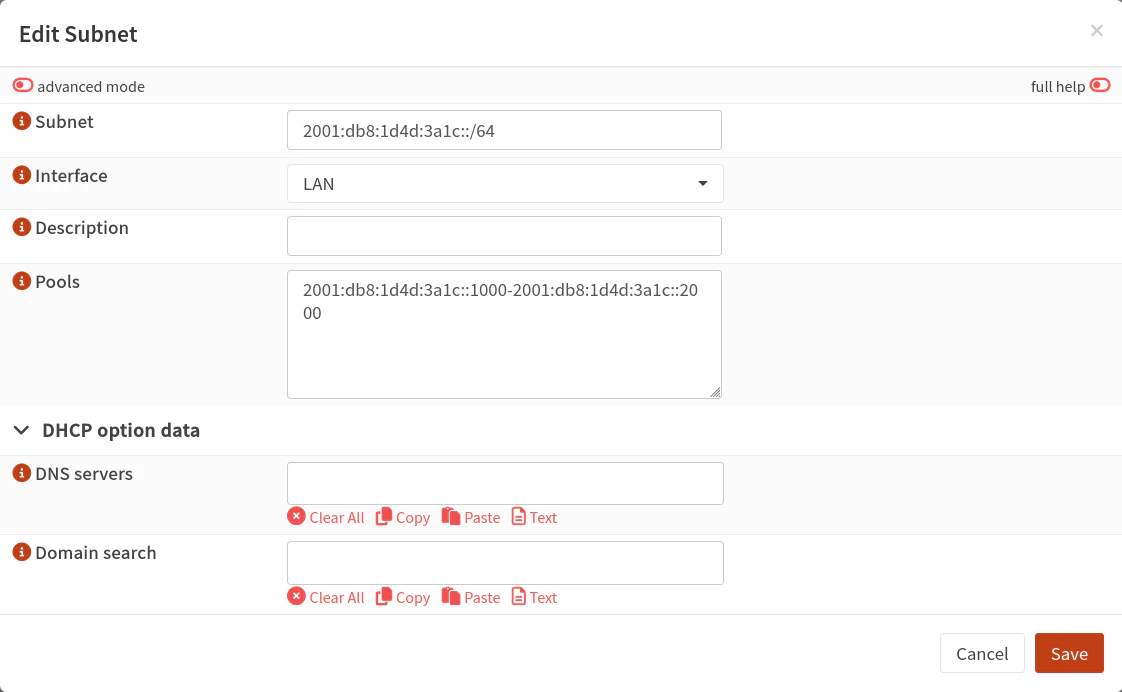
If you are willing to manually update the IPv6 prefixes when they change or have a script that can perform such updates, you may configure DHCPv6 subnets similar to DHCPv4.
You will need to enter the full IPv6 prefix for the “Subnet”. Typically this will be a /64 subnet (when using prefix delegation, each LAN/VLAN interface can have its own /64 subnet).
Option 2.6: Kea DHCPv6: Reservations (Optional)
If you want to have static IPv6 reservations (and you have Kea DHCPv6 configured), there is no import option for IPv6 static reservations. You will need to manually add each entry or use a script to help automate the process.
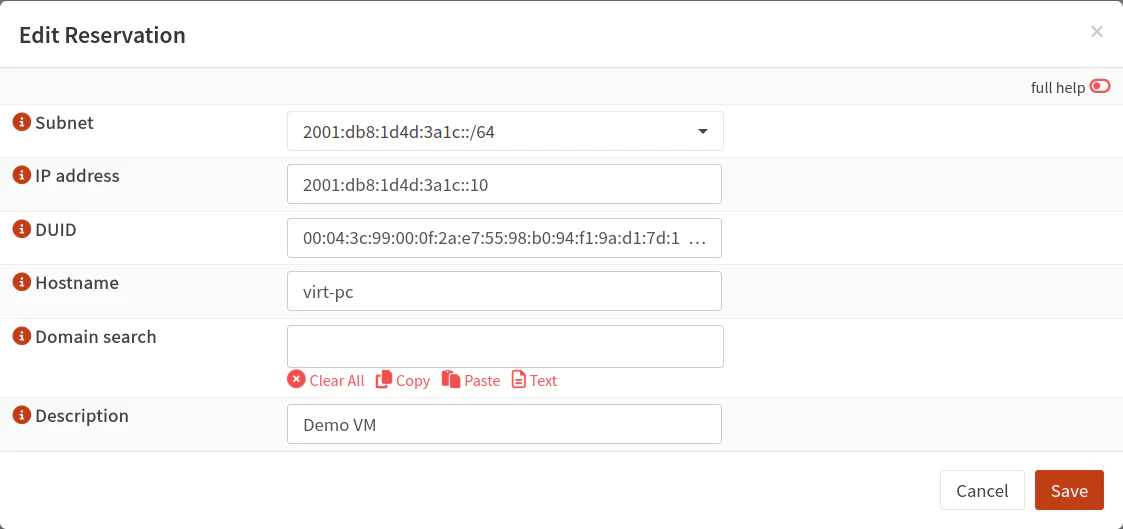
You may enter a new static DHCPv6 reservation in a similar manner as the static DHCPv4 reservations. IPv6 static reservations use DUIDs instead of MAC addresses. You may find the client DUIDs on the “Services > Kea DHCP > Leases DHCPv6” page.
Option 2.7: Kea DHCPv6: PD Pools (Optional)
The “PD Pools” tab allows you to advertise prefix delegation ranges to downstream routers. Most home users will not need this option.
However for lab environments (like I have set up), it is convenient to make use of prefix delegation when testing IPv6 configuration and creating guides using dynamic IPv6 configuration that mimics the process of setting up a primary router that sits on the edge of a user’s network.
Unfortunately, at the time of this writing, dynamic IPv6 PD is not supported and even with static IPv6 prefix delegation, the static routes are not automatically created like they are with ISC (see the Kea DHCP OPNsense documentation on the PD Pools (DHCPv6) tab).
Therefore, it seems prefix delegation to downstream routers in Kea is not as mature and feature complete as ISC in OPNsense.
Option 2.8: Control Agent (Optional)
You will only need to enable the control agent in high availability scenarios, which is a topic I am not covering in this guide. I wanted to mention that it is not necessary to enable the control agent in case you are curious about that functionality.
Option 2.9: Disable ISC DHCP and Enable Kea DHCP
Once Kea DHCP is configured, you may disable ISC DHCP for all interfaces for both IPv4 and IPv6 if you are using both protocols.
Once they are disabled, go to the “Settings” tab on the “Services > Kea DHCP > Kea DHCPv4” and “Services > Kea DHCP > Kea DHCPv6” pages to enable Kea DHCP (remember, you only need to enable Kea DHCPv6 if you have static IPv6 addresses or you have a mechanism to update the dynamic IPv6 subnets).
Verify that that Kea DHCP is running without errors by checking the log file at “Services > Kea DHCP > Log File”. If you see the green play button that typically indicates the service is running without a configuration error (but that does not necessarily mean everything functions as you intended).
You may release and renew your DHCP leases (disconnect/reconnect works as well) to verify that you receive an IP address via Kea DHCP.
If you do not receive an IP address, you may manually configure an IP address in the same subnet range to connect back to OPNsense in order to troubleshoot the DHCP configuration issues.
Similar to dnsmasq, you should be able to check if the leases are being assigned by Kea DHCP by going to the “Services > Kea DHCP > Leases DHCPv4” page.
Note
At the time of this writing, I noticed that the Kea DHCP leases took a little while before they would show up in the list.
When I viewed the leases via command line (located at /var/db/kea/kea-leases4.csv and /var/db/kea/kea-leases6.csv), I could see the leases, but they did not show up on the web interface until sometime later. I wanted to mention this in case it happens to you as well.