How to Configure IPv6 Prefix Delegation on OPNsense for a Secondary Router

Photo by kreci from Getty Images Signature
Table of Contents
To minimize disruption on my home network, I typically create most of my guides either in a disconnected lab environment or on my LAB VLAN that I have set up on my main network for this purpose. This allows me to tinker to my heart’s content without messing with the configuration of my primary network (aka my “production” network).
One area I attempt to include in more current guides is IPv6 configuration. The IPv6 configuration includes setting up GUAs (Global Unicast Addresses). Fortunately with IPv6, I am able to demonstrate this IPv6 GUA configuration on a secondary router connected to my LAB VLAN of my primary router. This allows me to mimic a real world scenario of a router being on the edge of the network as would be the case for most home users.
My ISP provides residential customers with a /60 IPv6 prefix so I am able to have 16 /64 IPv6 networks. That may sound like plenty, but I wish I had more since I use around 10 of those for my primary network. That does not leave me with very many IPv6 networks to use in a lab environment.
When creating my 2025 edition of the OPNsense full network build video, I took the time to figure out how to delegate a portion of my IPv6 prefixes to a secondary router on my LAB VLAN.
I was pleased to discover the process is not quite as complicated as I had thought, but there was one step in particular that I struggled with until I found a helpful OPNsense forum post.
Note
This guide will demonstrate how to do this using ISC DHCPv6, which is a deprecated, but I plan to follow up this guide with how to do this using Kea DHCP – the successor to ISC DHCPv6.
Also note that dnsmasq which is the default DHCP server starting with OPNsense 25.7 does not support prefix delegation to other routers on the network.
Assumptions
Before I continue with the guide, I am going to assume the following:
- You already have IPv6 configured on your network and that your ISP provides dynamic IPv6 (it is likely many residential customers have dynamic IPv6).
- The WAN interface will have
DHCPv6set for the “IPv6 Configuration Type” with a “Prefix delegation size” of/60or some other value such as/56or/48depending on what the ISP offers. - One of your internal physical or VLAN interfaces will be set to
Track Interfacefor the “IPv6 Configuration Type” and you have a prefix assigned for the “Assign prefix ID” option so that clients connected to that interface are assigned IPv6 addresses.
If you need additional information on how to set up IPv6 for ISPs which provide dynamic IPv6 addressing, please see my IPv6 configuration guide.
Set the Prefix Delegation Range on the Interface of the Primary OPNsense Router
In order to allocate a portion of your IPv6 prefixes to a secondary router, you will need to decide which interface/VLAN where your secondary router is going to be connected. In my example, I am going to be using my LAB VLAN since that is where I do all my testing for guides and demonstrations.
At this point it is important to mention that you may wish to use a IPv6 subnet calculator to help you determine the ranges of each of the IPv6 networks based upon CIDR notation (CIDR notation looks like: /60). One such calculator can be found by visiting: https://www.pierky.com/ipv6-prefix-calculator/.
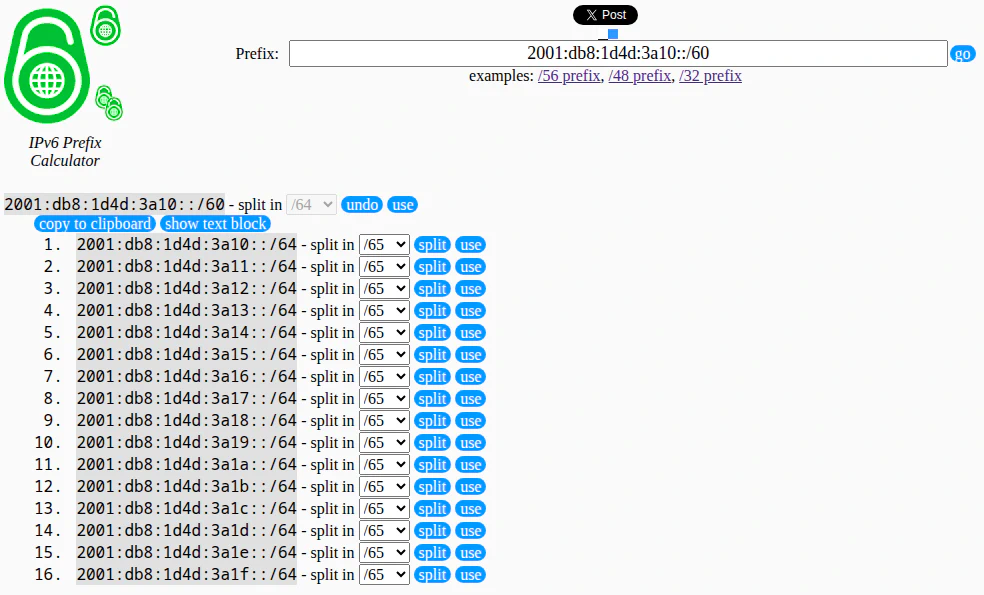
When you go to that site, it will show your current system IPv6 address. You can change the default prefix from /64 to be /60 or whatever prefix your ISP allows. Then click “Go”.
At the bottom of the page, you can specify how you wish to divide up the IPv6 networks. If you choose /64 which is the default value, it will show all 16 possible IPv6 networks such as below:
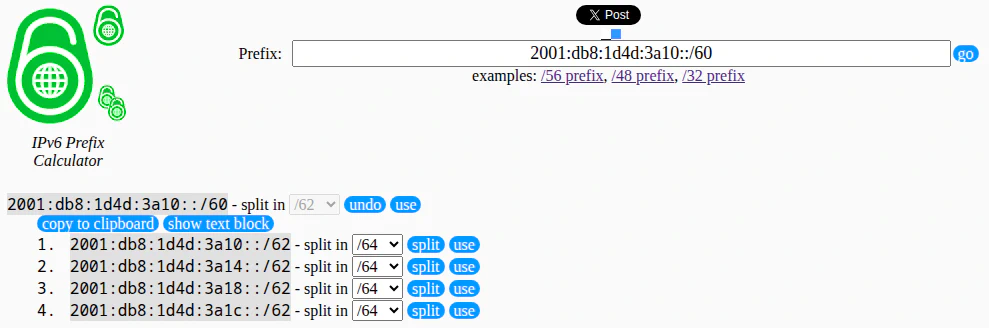
For our example, I am going to be using a /62 prefix so that I can allocate 4 IPv6 networks to the secondary router.
You will notice when selecting a /62, there are only 4 IPv6 ranges available because each range contains 4 /64 networks (and 4 x 4 = 16).
Because you will be using a potentially different IPv6 prefix size depending on your ISP, and the IPv6 ranges that you wish to allocate are going to be different than my example, I cannot provide you with the exact IPv6 values you should be using. You will need to use the appropriate values for your IPv6 addressing.
In OPNsense on the LAB VLAN interface (use your desired interface), in the “Prefix Delegation Range” input box, you will need to enter the “from” and “to” values. This is where I needed some further guidance that I found in the OPNsense forum post.
Essentially you only need to enter the start of each prefix range. It is not the full IPv6 address range provided by the prefix. So if you are only allocating a single prefix range, the “from” and “to” values will be the same. For example, if using the 2001:db8:1d4d:3a1c::/62 prefix, you would use use ::c:0:0:0:0 for the “from” and “to” range rather than ::c:0:0:0:0 and ::f:0:0:0:0 which would be the full range of IPv6 addresses in that prefix.
However, if you are allocating 2 prefix ranges that are next to each other, the “from” will be the start of the first prefix range while the “to” will be the start of the second prefix range such as ::8:0:0:0:0 to ::c:0:0:0:0. If you are including more than 2 prefixes, the “to” will be the start of the last prefix range. I hope you get the picture from the examples (please refer to the subnet calculator to help visualize the network address ranges if necessary).
Note when you have dynamic IPv6 addresses, you only need to enter the prefix portion of the address because the first portion of the IPv6 address is dynamic and is subject to change. For the 2001:db8:1d4d:3a1c::/62 prefix address, you just need to enter ::c:0:0:0:0. The part of the IPv6 address before the :: is the dynamic portion, which in our example is 2001:db8:1d4d:3a1. Only the last hexadecimal digit of the first half of the IPv6 address is part of the /62 prefix so that is why you only need to enter c after the ::. The 0:0:0:0 part of the prefix range simply indicates using the full address range of that prefix delegation, which makes up the 2nd half of the IPv6 address.

Tip
If you wish to use all 4 of the /64 IPv6 subnets on the secondary router, ensure that you choose a prefix delegation range that is different than the prefix used for interface of the primary router where the WAN interface of the secondary router is connected. Otherwise, the WAN interface of the secondary router will use one of the prefix subnets.
In other words, you cannot use the prefix ID of 0 (the first prefix in the delegated range) for one of your LAN/VLAN interfaces of the secondary router if the WAN interface of the secondary router belongs to that same IPv6 subnet.
Configure WAN Interface on Secondary Router
Once the primary OPNsense router is configured, you should be able to make use of the prefix delegation(s) on the secondary router much like you would if it was the primary router on the edge of your network. There is one notable nuance I will mention later.
I will be using another OPNsense router as an example for the secondary router configuration. To differentiate between the two routers, I will use dark mode for the secondary router.
On the “Interfaces > [WAN]” page, set the “IPv6 Configuration Type” to DHCPv6 as you typically would with an ISP that provides dynamic IPv6 addresses.
Then for the “Prefix delegation size”, you can select the smaller prefix size that was configured on the primary router such as /62 as mentioned above.
For the secondary router, enabling the “Send prefix ID” option may not be necessary since you are controlling the prefix delegation of the primary router so the secondary router should be able to pick up on the prefix delegation advertised by the primary router.

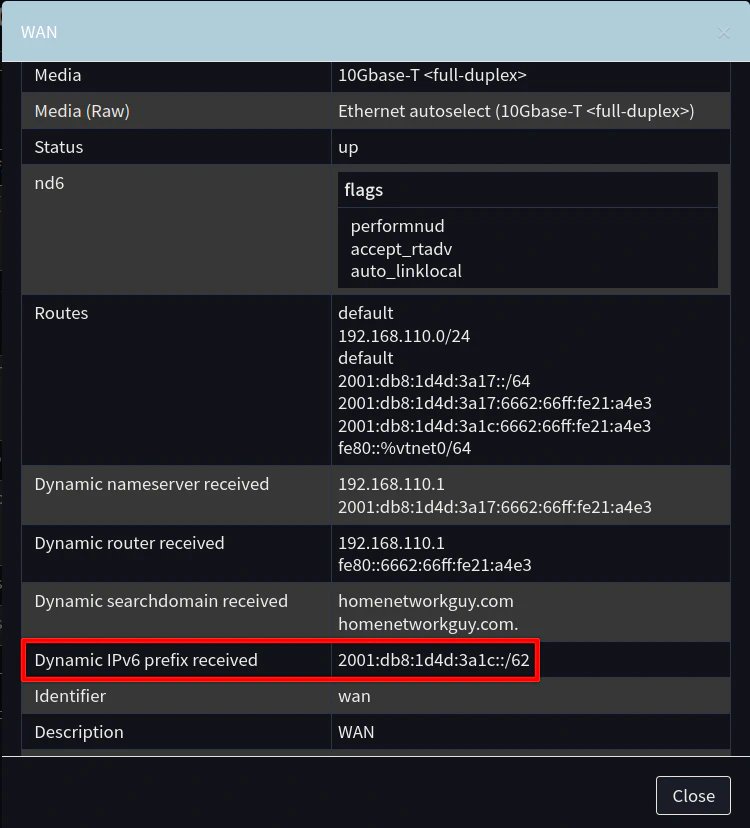
You may check the “Interfaces > Overview” page to see if the WAN interface obtained the proper prefix delegation by clicking on the details icon (the magnifying glass) and looking for “Dynamic IPv6 prefix received”. The value will only be displayed when a prefix delegation has been received properly.
Configure Internal Interfaces on Secondary Router
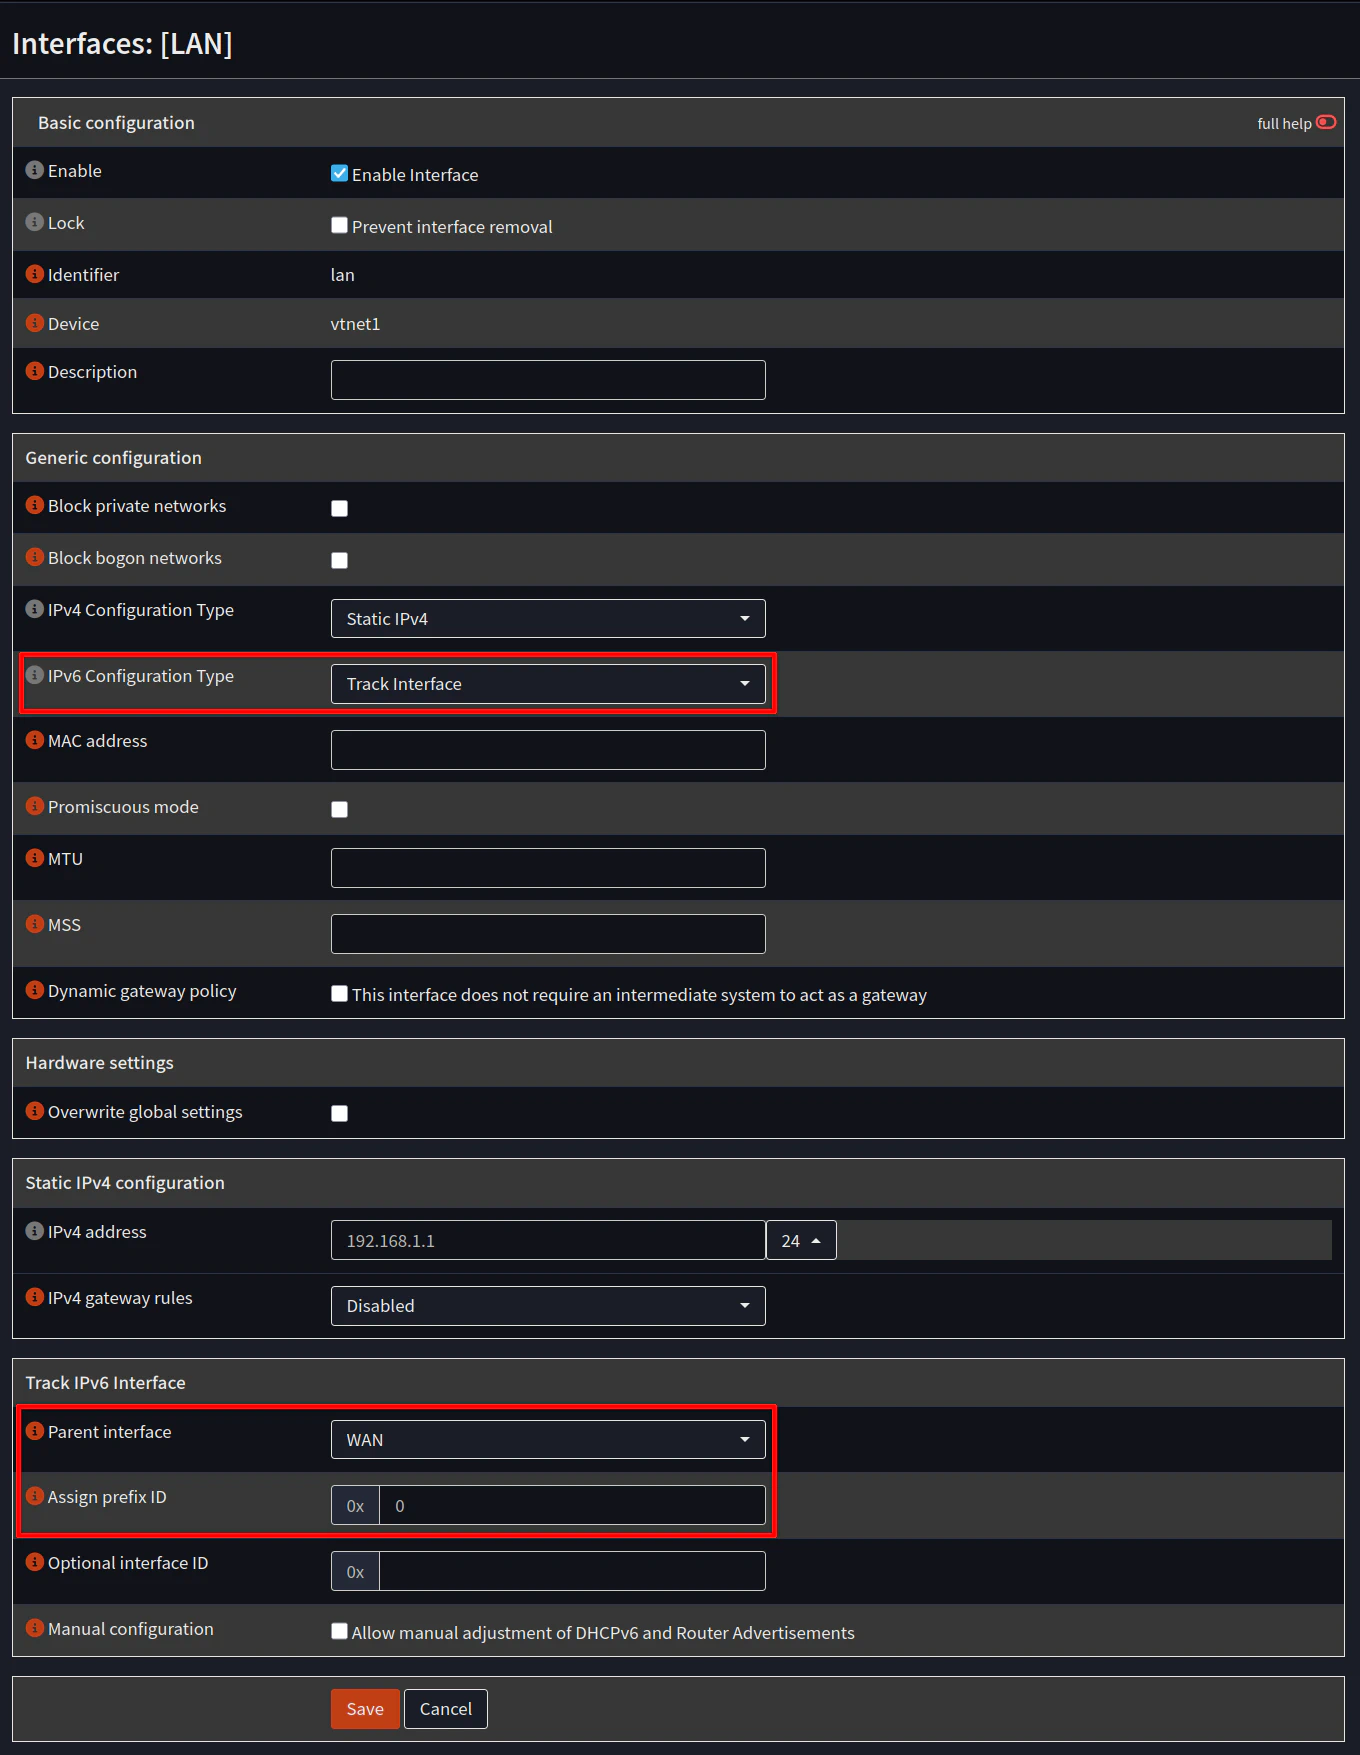
If you have one or more LAN/VLAN interface on the secondary router which you would like to assign IPv6 addresses, you can configure it similar to the usual method in OPNsense by tracking the WAN interface and setting the prefix ID on each LAN/VLAN interface.
To use the first /64 range of the /62 prefix, you would enter 0 for the “Assign prefix ID”. Then second /64 range prefix ID will be 1 and so on. The prefix ID is hexadecimal like the IPv6 address so after 9, you would use hexadecimal values of a-f for decimal values of 10-15.
Note
Keep in mind that the prefix ID is relative to the assigned delegated prefix so the prefix ID of 0 on the secondary router in this example refers to the 2001:db8:1d4d:3a1c::/64 subnet and not the 2001:db8:1d4d:3a10::/64 subnet since the delegated prefix range starts with 2001:db8:1d4d:3a1c::/62.
On the primary router, the prefix IDs just so happens to match the last digit of the IPv6 address simply because the base IPv6 address assigned by the example ISP ends with 0 (2001:db8:1d4d:3a10::/60). Therefore the prefix ID of 4 on the primary router would refer to the 2001:db8:1d4d:3a14::/64 subnet.
There is one scenario where you will want to start with the prefix ID of 1 instead of 0 – if the primary router has advertised a prefix to the LAN/VLAN interface where the secondary router is connected in the same range as the delegated prefix that is assigned to the secondary router.
For example, if the LAN/VLAN interface of the primary router is assigned the prefix ID of c and the advertised prefix delegation is ::c:0:0:0:0, you will only be able to use the prefixes of d, e, and f because the WAN interface of the secondary router is on the 2001:db8:1d4d:3a1c::/64 subnet. You cannot assign that same IPv6 subnet to any of your LAN/VLAN interfaces on the secondary router.
If all goes well, you should have a working IPv6 configuration with GUAs on your secondary router!