Protectli VP2410 Network Appliance

Photo by Protectli from protectli.com
Table of Contents
After writing for this site for several years, I have recently been approached by a couple of hardware vendors to try out their hardware. I view this is as a great opportunity to expand upon my hardware recommendations page with real world experience and hopefully provide interesting information not as readily available elsewhere.
Protectli is a well-known maker of firewall appliances so I was very excited when they asked if I would like to try out some hardware. I chose a 4 port model since it should be representative of what many home users might consider purchasing due to being more budget friendly than the 6 port models.
In this review, I am going to take a close look at the VP2410, which was released in 2021. The “VP” (Vault Pro) series models by Protectli offer a greater number of configuration options such as a larger amount of maximum supported RAM and the option for secondary storage. The VP2410 was the first VP series model released by Protectli.
The VP2410 only has 1G network interfaces, which may be adequate for many users who only use 1G networking and/or their Internet bandwidth is 1 Gbps or less. Protectli does produce models which have 2.5G network interfaces if you are interested in more network throughput.
Unboxing
As you can see in the image below, everything I received was packaged in a box with Protectli branded packaging tape. There was an appropriate amount of bubble bags to keep all of the boxes/bags inside protected during shipping.

One thing that I noticed that was interesting is the box containing the VP2410 has a security seal on it so that you will know if someone has tampered with the box.
The contents of the box containing the VP2410 are the following: the VP2410, VESA mount bracket, USB cable, SATA power cable, SATA data cable, 2 packets of screws, Ethernet interface labels, and a Quick Start Guide card.
I think it is nice that a VESA mount is included so that it can be easily mounted on anything that supports the VESA mount standard. The USB cable is included so you can connect to the serial console over USB, which is convenient if you prefer not to connect a keyboard and monitor. The VP2410 comes with SATA data and power cables because a SATA drive may be installed for additional secondary storage.

Because the VP2410 is designed to be more for general purpose usage rather than just firewall usage, the ports on the device are labeled 1-4 rather than WAN, LAN, OPT1, OPT2 like the other Protectli models. The Ethernet interface labels are nice inclusion since it allows you to neatly label your system depending on how you plan to use your device.

On the back side, there is a helpful table that shows which row of labels you should use based on the software you are running on the box. I wish my Qotom came with labels like these because the interface order in OPNsense was not the same order as the physical interfaces so it was a little bit confusing to figure out which ports matched up with the interface names in OPNsense.

Build Quality
The build quality of the Protectli VP2410 is quite nice. The exterior appears to be powder coated with a very dark gray color. You can feel the texture of the coating since it is not a smooth coating like some metal chassis. Similar to other Protectli models, the edges have a beveled polished metal finish which gives the devices their more distinctive appearance.


When you open the VP2410, you will see a m.2 SATA SSD and DDR4 RAM module installed. The SSD is in the same form factor as a standard NVMe drive, but it uses the SATA bus instead of PCIe like NVMe drives utilize. On the outer plate which is shown on the left side of the image below, there are rails to mount a 2.5" SSD.

Under the m.2 SATA SSD, there is a slot for a WiFi module. The WiFi module is not compatible with FreeBSD operating systems so you cannot use it for OPNsense, but if you plan on using the VP2410 for other purposes, you have the option for a WiFi module.

I placed the VP2410 beside my Qotom box that I bought in 2017 and you can see a notable size difference between the two boxes. The VP2410 is only slightly deeper than the Qotom and more shallow everywhere else. The heatsink fins are taller on the VP2410 so the height is almost the same as the Qotom.
I noticed that the rubber feet on the bottom of the VP2410 grip to surfaces much better than the feet on the Qotom, which tends to slip when you push against it. That is a subtle detail that should be appreciated when plugging cables into the VP2410 since it will not slide around as much. The systems are relatively lightweight so having a nice surface grip makes the device feel more substantial and higher quality.


Hardware Specifications
When I selected the hardware options for the VP2410, I tried to select options that would be more representative of what the average home user might choose since cost becomes a factor. However, I upgraded a few options a bit higher than I would recommend if you are purely using the VP2410 for OPNsense because I want to be able to experiment with other non-firewall Operating Systems.
| Hardware | Option |
|---|---|
| CPU | Intel Celeron J4125 (only available option) |
| Memory | 16 GB Crucial RAM |
| Storage (m.2 SATA SSD) | 480 GB Protectli M.2 SSD |
| Storage (2.5" SSD) | No Storage |
| TPM | Protectli TPM |
| WiFi Module | No WiFi Module |
| 4G LTE Modem | 4G LTE External Modem |
| BIOS | coreboot (UEFI) |
If you are using OPNsense, I would recommend 8 GB of RAM if you plan to use IDS/IPS such as Suricata/Zenarmor, but if you are not, you would be fine using 4 GB of RAM. If you think you may repurpose the device in the future, getting extra RAM will greatly help future proof the device.
As for storage, 120 GB would be plenty of storage for OPNsense unless you plan to do a lot of logging or run other apps/services on the same box which require more disk usage. The VP2410 actually comes with a 8 GB eMMC module if you want to use it for a light weight Operating System, but I imagine that storage would get cramped pretty quickly.
Although I have a TPM module in my unit, you do not need it for OPNsense. TPM is used by Operating Systems that support TPM such as Microsoft Windows, etc. I wanted to mention the TPM because I do not want you to purchase the TPM if you are only planning to use OPNsense. However, you may consider purchasing one for increased security for OS’s which support it.
Noteworthy Specs
Below is a list of hardware specs that I find interesting with the VP2410 as compared to the FW4B and other non-VP series devices:
-
I noticed on the Intel Ark page for the J4125 processor is that the architecture claims to only support a maximum of 8 GB of RAM but VP2410 supports 16 GB as stated on their compatible hardware page. I can confirm the system recognizes 16 GB of RAM just fine (Protectli would not offer that option if it was not possible, of course).
-
The VP series models support DDR4 RAM rather than DDR3 so memory performance should be better than their lower end Vault models.
-
The CPU in the VP2410 is nearly 2.5 times faster than the FW4B’s CPU based purely on PassMark scores, which are roughly on a linear scale. Of course, the scores are not perfect representations of the actual performance especially since software performance can vary per application.
-
It is important to note that the primary storage on the VP2410 uses a M.2 SATA and not a M.2 NVMe so keep that in mind if you are adding your own storage or want to replace the existing storage. That means the performance of the drive should be the same as a standard SATA interface. There is a second SATA interface as well for a second drive. The VP4600 series does support a M.2 NVMe drive so you should expect better storage performance on that higher end model.
-
The VP series models use the UEFI BIOS instead of the legacy BIOS of the non-VP series models. There are more coreboot features available for the UEFI BIOS as well, which I plan to discuss further.
Using the USB Serial Console
The VP2410 is equipped with a USB console, which is convenient if you wish to view the console screen from your computer without needing to attach a monitor and keyboard to the VP2410. The fact that it is a USB serial console is great because you can use any micro USB cable that you may have lying around. Protectli provides a standard micro USB cable in the box, but it is nice to not need a special USB to serial cable (affiliate link) .
From an aesthetics point of view, the micro USB port looks a lot cleaner and more modern than a bulky serial port (you can see the serial port on my Qotom in an earlier comparison picture).
The value of a console port may often be overlooked in a homelab environment. However, if you would like to configure your box without attaching a monitor and keyboard, the serial console will benefit you. With the console connection, you can actually open up the console window while the box is off and when you turn it on, you will see the boot screen as though you are directly attached with a monitor – very cool!
PuTTY is a popular SSH and telnet client, but it can also connect to serial consoles. PuTTY works essentially the same on Windows as it does on Linux. On a Debian/Ubuntu based Linux system, you can simply install PuTTY by entering:
sudo apt install putty
In order to use the graphical interface without encountering a permission issue or to use the command line version of PuTTY without using sudo, you need to add your user to the dialout group by entering the following command (substitute homenetworkguy for your actual username):
sudo adduser homenetworkguy dialout
You will need to log out and back into your desktop session for the changes to take effect.
The serial console location on your Debian/Ubuntu based system is /dev/ttyUSB0. You will need to determine this location if it differs in order to connect to the serial console. Select “Serial” as the connection type. Then you can enter /dev/ttyUSB0 with the speed of 115200. Once you click “Open”, a console window will be displayed.
You need to make sure you have the USB cable connected before you click “Open”, but the VP2410 can be turned off. If you already have your VP2410 on, note that you will still see a blank screen until something is updated on the screen. You may need to reboot the system to starting seeing any output in the console.

Coreboot
Coreboot is an open source firmware that replaces traditional BIOS and UEFI implementations. It is designed to be fast, secure, and customizable. The coreboot website also claims to be designed with an unbrickable update process, which is great news for those of us who may stress out during firmware updates hoping we do not brick our relatively expensive electronics.
One of the biggest reasons for choosing hardware which runs coreboot is that it has an increased level of security simply not found in traditional firmware. Not only is it designed with security in mind, the code is freely available to examine so it could be audited for backdoors or other security flaws. Coreboot is the perfect compliment to a firewall appliance because security is the primary reason for having a firewall.
Protectli has stated to me that they have published their own contributions to coreboot but not all of the Intel code is open source.
Since not all hardware has coreboot support, coreboot is arguably one of the greatest selling points of Protectli hardware. I have seen users on Reddit and elsewhere seek out Protectli for that feature alone. If you want maximum security for your firewall appliance, getting a coreboot enabled device is a great option. I feel the security of the system firmware is one area that is likely often overlooked especially by many home users. More information about coreboot on the VP2410 can be found on the Protectli website.
Note
I saw a comment on Amazon by Protectli that stated none of the Protectli devices on Amazon ship with coreboot so you will need to order directly from Protectli’s website in order to get coreboot preinstalled if you do not feel comfortable flashing your device with coreboot. If you feel comfortable installing firmware, Protectli has a utility called Flashli that you may use to switch to coreboot.
Netboot
Netboot is a very cool feature that allows you to boot a device over the network even when you have no Operating System installed on your system. This functionality negates the need to download and image a USB drive to install the OS on the device. The coreboot firmware provided by Protectli has Netboot functionality included.
By default, the Netboot payload URL is set to a Protectli URL, but I found that it would not load properly. I thought that it was working at some point, but when I tried it later, I was having issues. I decided to change the Netboot payload URL to https://boot.netboot.xyz in order to try out the Netboot functionality and it seemed to work properly. Protectli indicated to me that the Netboot functionality may not yet be fully baked in but using a different payload URL does work.
To change the Netboot payload, press “F11” during boot to get to the boot menu options.

Press “Enter” on “Network Boot and Utilities” option.

Go to the “Advanced” menu.

Select “Change Netboot iPXE Payload URL” by pressing “Enter”.

The current Netboot payload URL is displayed. You need to select “Change Netboot iPXE Payload URL” again.

Enter the URL https://boot.netboot.xyz so that you can load all of the OS options available on netboot.xyz.

“Apply and Exit” to save the changes.

Now you can select “OS Selection & Utilities” to load the netboot.xyz menu options.

You should see the Netboot options being loaded.

You will be presented with various options for distributions and tools.

As an example, I clicked on “Linux Network Installs (64-bit)” to show a list of available distros. Many commonly used Linux distros are available, which is convenient.

I personally tried live booting into Ubuntu, and it was able to boot properly. Very cool!
Performance
Performance is an area that I imagine many users are the most concerned with since it can potentially limit the types of apps/services you wish to run on the system. For the purpose of this review, I am going to perform basic iperf3 tests to keep things simple and to provide a general idea of what you can theoretically expect to see on the VP2410.
In the future I may consider using some tools that could perhaps simulate various types of network traffic to provide more realistic results. My time is limited so I have to manage what I am able to get done in a reasonable amount of time.
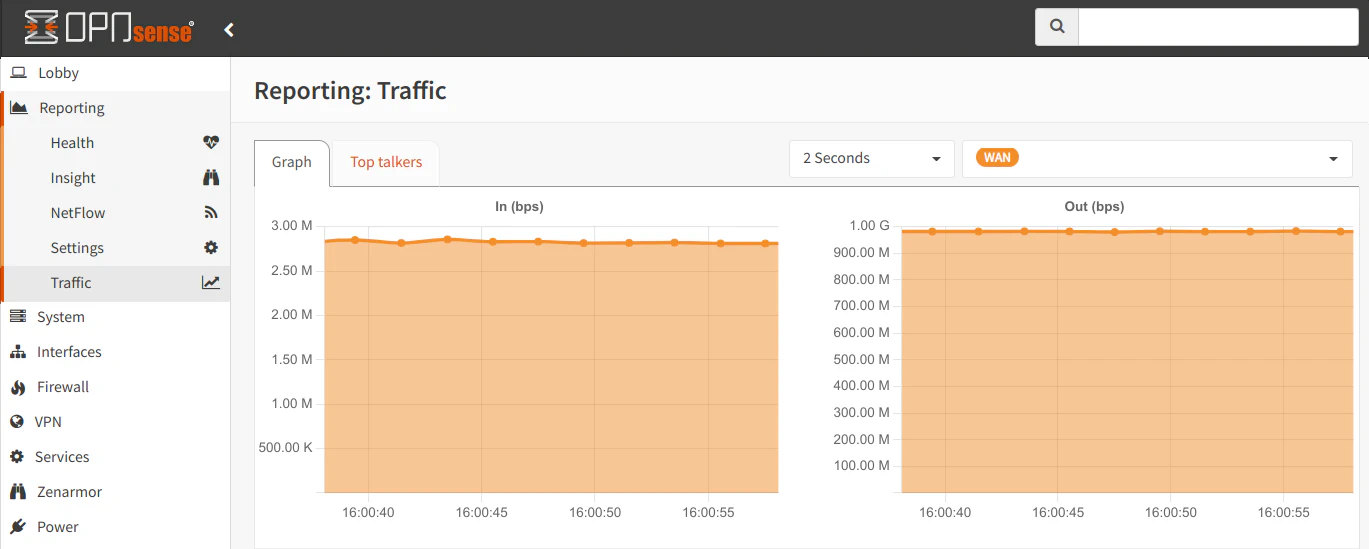
No IDS/IPS Enabled
As you would expect with no IDS/IPS enabled, the 1 Gbps interface can be easily saturated at approximately the theoretical maximum throughput. The stream of packets is very even as you can see in the traffic graph on the OPNsense web interface.
[ ID] Interval           Transfer     Bitrate         Retr  Cwnd
[  5]   0.00-10.00  sec  1.10 GBytes   941 Mbits/sec    8    653 KBytes
[  5]  10.00-20.00  sec  1.09 GBytes   940 Mbits/sec   39    738 KBytes
[  5]  20.00-30.00  sec  1.09 GBytes   938 Mbits/sec    6    749 KBytes
[  5]  30.00-40.00  sec  1.09 GBytes   940 Mbits/sec   13    672 KBytes
[  5]  40.00-50.00  sec  1.09 GBytes   938 Mbits/sec    7    711 KBytes
[  5]  50.00-60.00  sec  1.09 GBytes   940 Mbits/sec    8    837 KBytes
- - - - - - - - - - - - - - - - - - - - - - - - -
[ ID] Interval           Transfer     Bitrate         Retr
[  5]   0.00-60.00  sec  6.56 GBytes   939 Mbits/sec   81             sender
[  5]   0.00-60.05  sec  6.56 GBytes   938 Mbits/sec                  receiver
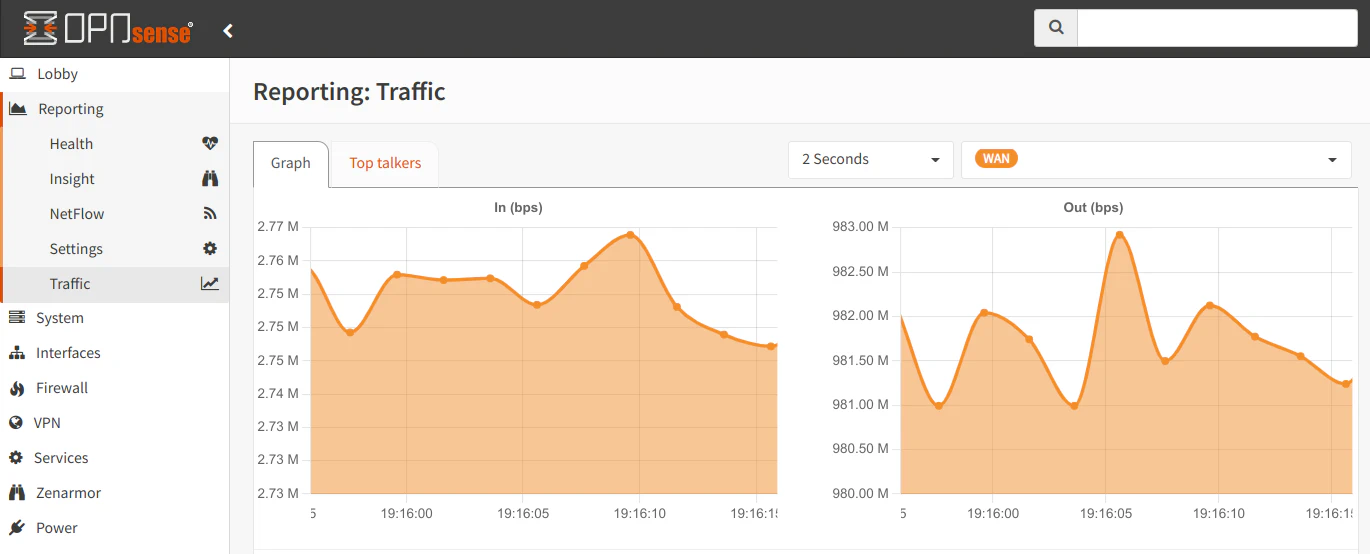
Zenarmor Enabled
With enabling Zenarmor on the LAN interface, there is only a very minimal drop in throughput. In fact, it is so close to the previous results that you could say that it virtually has no impact on performance at 1G since it is within the margin of variation you would expect with performance testing. I did notice that the data stream is not always quite as smooth as it is when no IDS/IPS is enabled, but those small dips could very well occur with no IDS/IPS enabled especially since other devices are also connected to my network consuming bandwidth.
[ ID] Interval           Transfer     Bitrate         Retr  Cwnd
[  5]   0.00-10.00  sec  1.09 GBytes   940 Mbits/sec    8   1015 KBytes
[  5]  10.00-20.00  sec  1.09 GBytes   934 Mbits/sec    6    768 KBytes
[  5]  20.00-30.00  sec  1.09 GBytes   934 Mbits/sec    4    977 KBytes
[  5]  30.00-40.00  sec  1.09 GBytes   933 Mbits/sec    8    826 KBytes
[  5]  40.00-50.00  sec  1.09 GBytes   937 Mbits/sec    7    536 KBytes
[  5]  50.00-60.00  sec  1.08 GBytes   930 Mbits/sec    0   1.02 MBytes
- - - - - - - - - - - - - - - - - - - - - - - - -
[ ID] Interval           Transfer     Bitrate         Retr
[  5]   0.00-60.00  sec  6.53 GBytes   935 Mbits/sec   33             sender
[  5]   0.00-60.05  sec  6.53 GBytes   934 Mbits/sec                  receiver

Suricata Enabled
If I enable only Suricata on the LAN (or WAN) interface, the results are similar to Zenarmor with fully saturating the 1 Gbps interface. This is even with all of the rules enabled to test the worst case scenario! The data stream is not quite as smooth as it is with no IDS/IPS, but the overall throughput is pretty much the same. However, the story is different when both Suricata and Zenarmor are enabled as you will see in the next example.
[ ID] Interval           Transfer     Bitrate         Retr  Cwnd
[  5]   0.00-10.00  sec  1.10 GBytes   941 Mbits/sec    7    846 KBytes
[  5]  10.00-20.00  sec  1.09 GBytes   940 Mbits/sec   10    604 KBytes
[  5]  20.00-30.00  sec  1.09 GBytes   938 Mbits/sec   11    846 KBytes
[  5]  30.00-40.00  sec  1.09 GBytes   940 Mbits/sec    7    721 KBytes
[  5]  40.00-50.00  sec  1.09 GBytes   938 Mbits/sec   28    802 KBytes
[  5]  50.00-60.00  sec  1.09 GBytes   940 Mbits/sec    7    748 KBytes
- - - - - - - - - - - - - - - - - - - - - - - - -
[ ID] Interval           Transfer     Bitrate         Retr
[  5]   0.00-60.00  sec  6.56 GBytes   939 Mbits/sec   70             sender
[  5]   0.00-60.05  sec  6.56 GBytes   938 Mbits/sec                  receiver
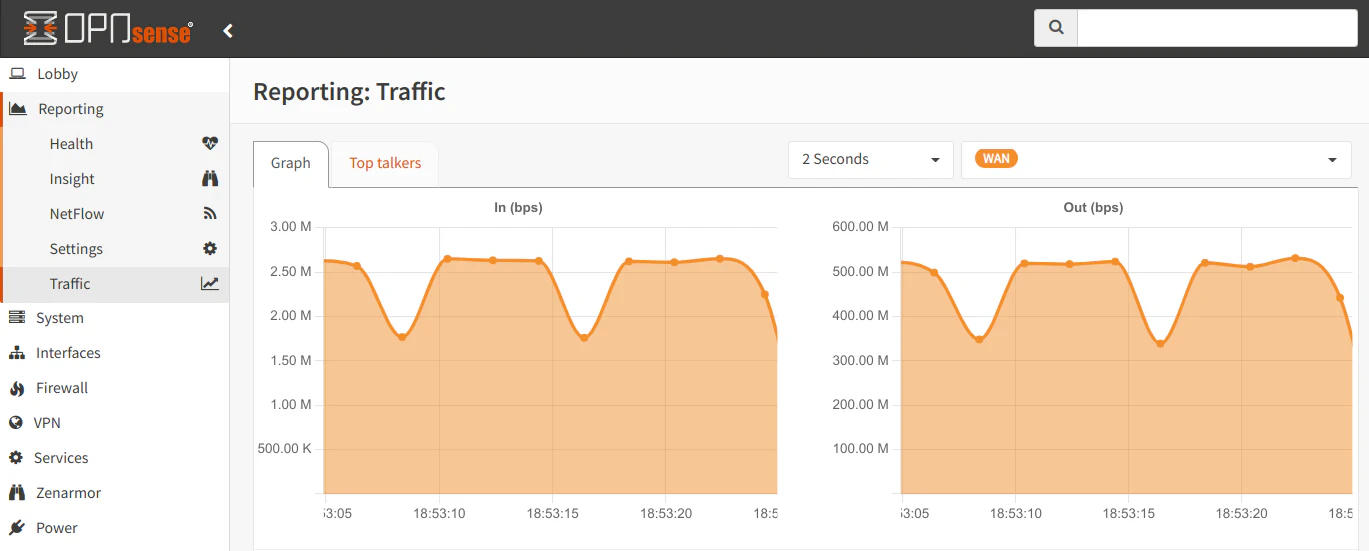
Zenarmor + Suricata Enabled
Some users prefer to run Suricata on the WAN interface and Zenarmor on the LAN interface since it is not currently possible to run both Suricata and Zenarmor on the same interfaces. In this test, I have Suricata enabled on the WAN interface and Zenarmor on the LAN interface. I personally used this configuration until I upgraded my Internet speeds, and my Qotom box could no longer maintain the maximum throughput. The CPU would be at nearly 100% utilization, and I would lose throughput.
With the VP2410, there is a similar loss in throughput as my Qotom with using both Suricata with Zenarmor. The drop is actually quite significant with a loss of approximately half of the bandwidth. For this test, I enabled all of the Suricata rules to see the worst case scenario. If you enable less rule sets, you may see less of a dip in throughput.
The interesting thing I noticed is that CPU utilization was only at 50-80% most of the time during the testing. I saw an initial CPU utilization of nearly 100% before it settled into the 50-80% range. Unlike my Qotom, the CPU is not fully pegged at 100%.
[ ID] Interval           Transfer     Bitrate         Retr  Cwnd
[  5]   0.00-10.00  sec   574 MBytes   482 Mbits/sec   71    776 KBytes
[  5]  10.00-20.00  sec   585 MBytes   491 Mbits/sec    7    693 KBytes
[  5]  20.00-30.00  sec   540 MBytes   453 Mbits/sec  100    693 KBytes
[  5]  30.00-40.00  sec   511 MBytes   429 Mbits/sec  112    642 KBytes
[  5]  40.00-50.00  sec   552 MBytes   463 Mbits/sec  147    660 KBytes
[  5]  50.00-60.00  sec   549 MBytes   460 Mbits/sec  125    682 KBytes
- - - - - - - - - - - - - - - - - - - - - - - - -
[ ID] Interval           Transfer     Bitrate         Retr
[  5]   0.00-60.00  sec  3.23 GBytes   463 Mbits/sec  562             sender
[  5]   0.00-60.05  sec  3.23 GBytes   462 Mbits/sec                  receiver
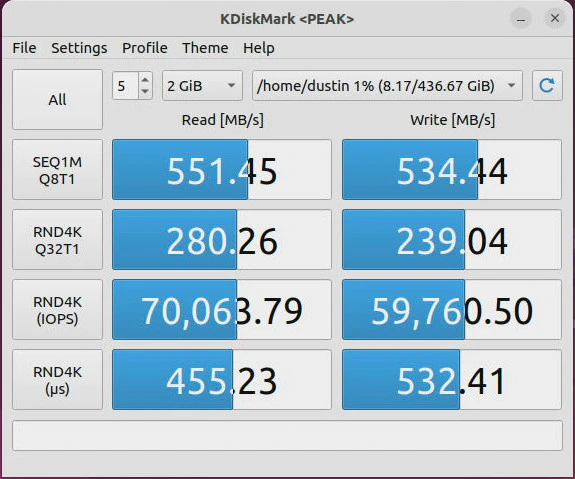
Storage
The VP2410 comes with a m.2 SATA SSD which means it uses the m.2 interface but operates on the SATA bus rather than on the PCIe bus so bandwidth is limited to 6 Gbps. The fastest SSDs are rated around 550 MB/s read and 530 MB/s write speeds such as the Samsung 870 EVO SSD (affiliate link) .
Based on the test below, it appears the Protectli 480GB SSD runs at the maximum throughput for a typical SATA SSD.
Power Consumption
When connected to a smart plug with energy monitoring, the VP2410’s power consumption generally ranged between 6.5W to 20W. I would see an occasional spike above 20W but those are often short bursts of energy usage. The wattage seems to be around 6.5-8.5W when idling, but I did not have a full network load or a lot of services configured in OPNsense. When doing network performance testing, I saw the wattage range from 9-14W. When booting up the VP2410, the power would temporarily surge between 15-20W or more. While I was tinkering in the coreboot menus, I noticed the wattage hovering between 14-15W.
Those are just a few examples to help give you a general idea of power consumption during various workloads. In general, most mini-PC devices use very little power compared to desktops and servers which is why they are great devices to use 24/7 for your home network router and firewall. Also, if you are concerned with power consumption and do not need a lot of desktop performance, you could consider using a device such as this as a low power desktop.
The power consumption on the VP2410 is about 2-4 times more than a Raspberry Pi 4, but you gain several times the performance as well. Since the VP2410 is x64 based, you can run most any 64-bit Operating System and applications that you like since you do not need an ARM compatible version.
Temperature
One thing I noticed about the VP2410 is that it runs a lot cooler than my old Qotom which uses about the same amount of power. Granted, I had less services running on the VP2410 when testing but even during the moments when I was using it more heavily, it still felt only slightly warm to the touch. My Qotom box is quite warm to the touch even when the system is not doing a whole lot.
While I do not have a temperature gun to measure tha actual temperature, I do not have any concerns about overheating with the VP2410. My Qotom on the other hand… it has been hot enough that it made me want to quickly remove my hand off the device because it was so hot to the touch. I assume much less heat is generated by the Intel J4125 CPU with a 14 nm process than the Intel i5-4200U CPU with a 22 nm process.
Where to Purchase?
If you think the Protectli VP2410 meets your needs in your home, you may purchase this device on their website or on Amazon (affiliate link) .
The advantages of ordering directly through Protectli is that you can customize the specs of your box, purchase accessories not found on Amazon, and have coreboot installed by Protectli. If you purchase on Amazon, none of the Protectli systems come with coreboot preinstalled so you would have to install the firmware yourself.
Full disclosure: I do not earn any affiliate income if you purchase through Protectli, but I do earn a small amount if you purchase a Protectli through Amazon if you click on any of my affiliate links.