How to Configure VLANs on a TP-Link Managed Switch

Photo by thexfilephoto from iStock
Table of Contents
I purchased the budget friendly TP-Link T2600G-28TS L2 managed switch (affiliate link) for my home network since I wanted to be able to segregate the devices on my network to help address the security concerns of hosting public services and using various IoT devices.
The focus of this topic is configuring a managed switch, the TP-Link T2600G-28TS in particular, to create several VLANs. For my home network, I created 6 VLANs, which may be a little bit overkill for a home network. However, it does provide a reasonable separation between devices that serve different purposes. The network device management is limited to its own network, IoT devices are isolated from my other network devices, my publicly accessible server is isolated from the rest of my private network, the video camera network has no Internet access to prevent creepers from hacking it, visitors have their own dedicated guest network to prevent outside users from infecting my network, my home security system has its own network, etc.
Configuring VLANs
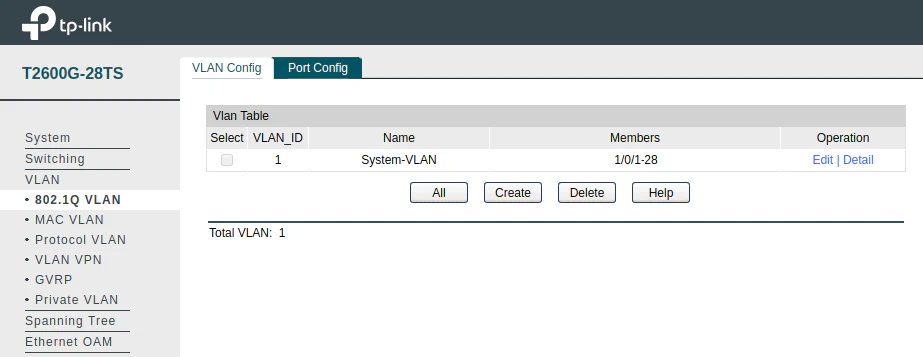
Let’s get started configuring the VLAN. Visit the “VLAN > 802.1Q VLAN” page to view the current list of VLANs. By default there is only one VLAN, the system VLAN. Its ID is set to 1, which is the default VLAN ID for most network switches. Every port in the switch is considered to be in this default VLAN so all devices connected to the switch can communicate with each other since they are in the same broadcast domain. This is essentially like an unmanaged switch.
Before setting up the first VLAN, I recommend setting up any trunk ports that you may have. A trunk port will be any port connected to your router or another managed network switch – basically any VLAN aware device that you are plugging into the switch including some wireless access points. The reason I recommend setting up trunk ports before the VLANs is that you will be able to select trunk ports as tagged ports when creating a new VLAN (which we will discuss later).
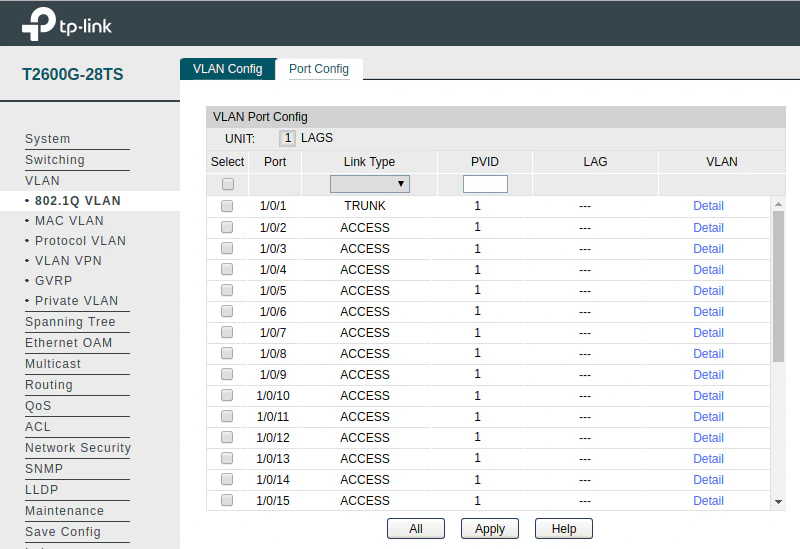
In our example, go to the “Port Config” tab, and set port 1 of the switch as “TRUNK”. Leave the PVID as 1, which is the default VLAN ID for untagged network traffic. To apply the settings in the web interface, you must click the checkbox beside the first port, select “TRUNK” in the “Link Type” dropdown box, enter “1” for PVID, and then click “Apply”. You may repeat this for other ports if you have other VLAN aware devices plugged into your switch. This allows you to expand your VLANs beyond a single network device.
On the “VLAN Config” tab, click the “Create” button so a new VLAN can be added. Enter the VLAN ID of your choice and the name for the VLAN. In the “Untagged port” section, select all of the ports which you want included in the same VLAN. You may select one or more ports that are not trunk ports (any ports that are considered “ACCESS” ports on the “Port Config” tab). Trunk ports are automatically grayed out in the untagged section so you cannot accidentally select those ports. In the “Tagged port” section, select the trunk port(s) that you wish the VLAN communication to traverse. Any VLANs that you wish to have Internet access or to communicate to other VLANs (inter-VLAN communication) will need to have the router trunk port selected assuming your router has access to the Internet and is capable of handling VLAN traffic. Once the desired ports are selected, click “Apply” to save the new VLAN configuration.

Summary and Notes
You have set up your first VLAN network! As you can see, setting up new VLANs is not difficult. You only have to select the ports you want in each VLAN and give the VLAN a unique ID and name. For a basic home network configuration, you may only have one trunk port – the port connected to your router. If you want an isolated VLAN that does not have access to the Internet, you do not have to select a trunk port when creating the VLAN. This is how I set up my VIDEO VLAN. It is a local network just for IP security cameras with no Internet access.
When configuring VLANs on your switch, you will need to be careful to ensure that you stay in the same VLAN where the switch’s web administration is available. The safest way to ensure that you are in the same VLAN is to leave the port you are plugged into as the default VLAN 1, which is often used as the management VLAN. Once the VLANs are configured in your switch and router, you can can then move your computer to the desired VLAN later by physically plugging into a different port assigned to a different VLAN or by changing the VLAN of the port you are currently plugged into after everything else has been configured.
One last note that is important if you are not familiar with configuring TP-Link switches (and possibly other switches) is that you must click the “Save Config” from the navigation sidebar so that the changes persist when you reboot the switch. Otherwise, all of your changes will be lost!