Virtualize OPNsense on Proxmox as Your Primary Router

Photo by yucelyilmaz from iStock
Table of Contents
When deciding to virtualize OPNsense on Proxmox, you may have a lot of questions on how to go about it. There are a number of approaches you may take especially with how you wish to utilize the network interfaces.
In this guide, I present one way you could configure OPNsense in a VM on Proxmox, but it is certainly not the only way. I find that providing detailed examples that mimic real world scenarios increases understanding on how all the parts fit together.
You may have different needs than I do so you may wish to design your network differently. That is the joy of building your home network and homelab: you can tailor it to fit your current needs and evolve it over time to meet your future needs. My hope is that this guide will help you along the way.
Note
This guide is not intended to be a demonstration of a full network build like my other guides but rather the focus is on setting up Proxmox and creating an OPNsense VM. Once you have the VM created, you may begin building out your home network as usual following my other OPNsense guides.
Before You Begin
I will assume you already have an existing network set up so that you can download all of the necessary software. With your existing network, you will also have the benefit of testing out OPNsense on your Proxmox server before you deploy the virtualized OPNsense as your primary router.
In addition, I will assume the management network is going to be the LAN network (192.168.1.1/24) as I often do in my guides.
You may download the ISO image of the latest version of Proxmox on their website: https://proxmox.com/downloads. I will assume the hardware you are using for Proxmox has virtualization options enabled in the BIOS. Some systems may have this enabled out of the box.
I prefer to use Etcher to image USB/flash memory cards, but you can use whatever imaging software you like which supports imaging ISOs.
OPNsense may be downloaded on their website. You will want the DVD image so you can import the ISO file into Proxmox via the web interface so you can install OPNsense in a VM: https://opnsense.org/download. After you download the file, you need to extract the file. Linux operating systems such as Kubuntu (which I use as my primary desktop) provide a right click menu option to extract various types of compressed files making it very simple to extra the file with no additional software necessary.
Hardware Used for Demonstration
Below is the hardware I used to produce this guide:
- Protectli VP6650 mini-PC (affiliate link) as the Proxmox server where the OPNsense VM will exist
- Grandstream GWN7806 (non-PoE) switch (GWN7806P PoE version (affiliate link) ) as shown in pictures for the physical connections
- ZimaBoard 832 (affiliate link) as the PC I am using to configure Proxmox and the OPNsense VM
- TinyPilot 2a (affiliate link) to connect to the Protectli and later to the ZimaBoard for screen captures
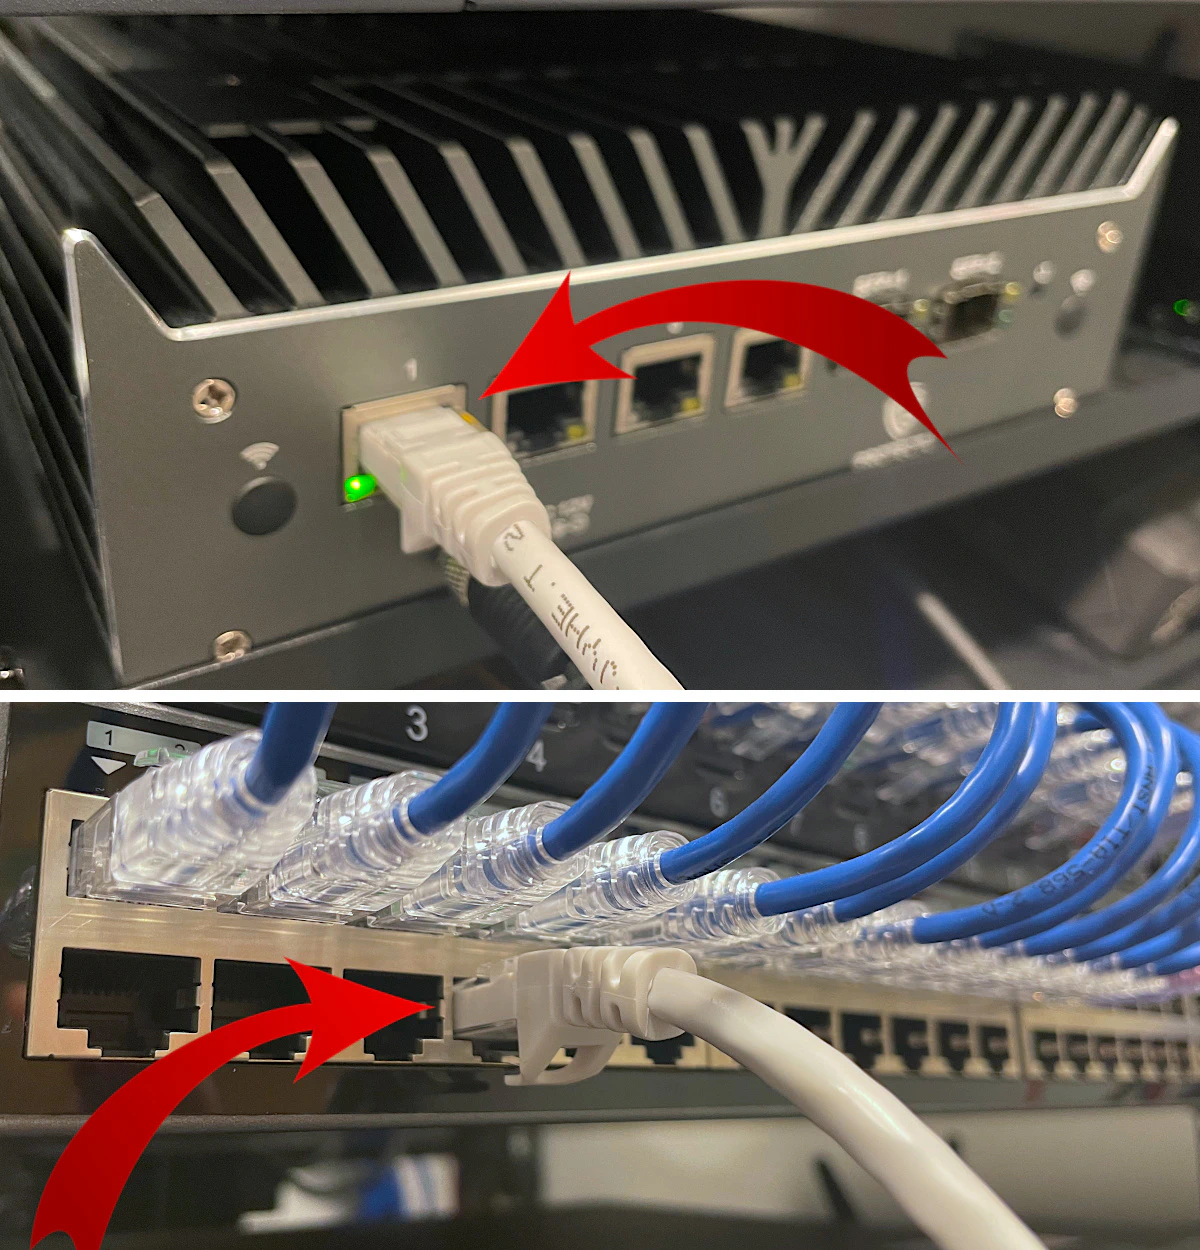
Connect Your Proxmox System to the Network
You will want the Proxmox system connected on your network so you will be able to configure it via the web interface. Only connect a single interface that you plan to use as the management interface. The system that will be used to configure Proxmox should be on the same network/VLAN.
I am also going to assume you have a PC (such as the ZimaBoard that I am using) to configure Proxmox connected to the network.
Set up Proxmox Server
Once the Proxmox system is connected to your network, it is time to start setting it up. Before proceeding, insert the USB drive with the Proxmox installer and ensure that you are booting from the USB drive.
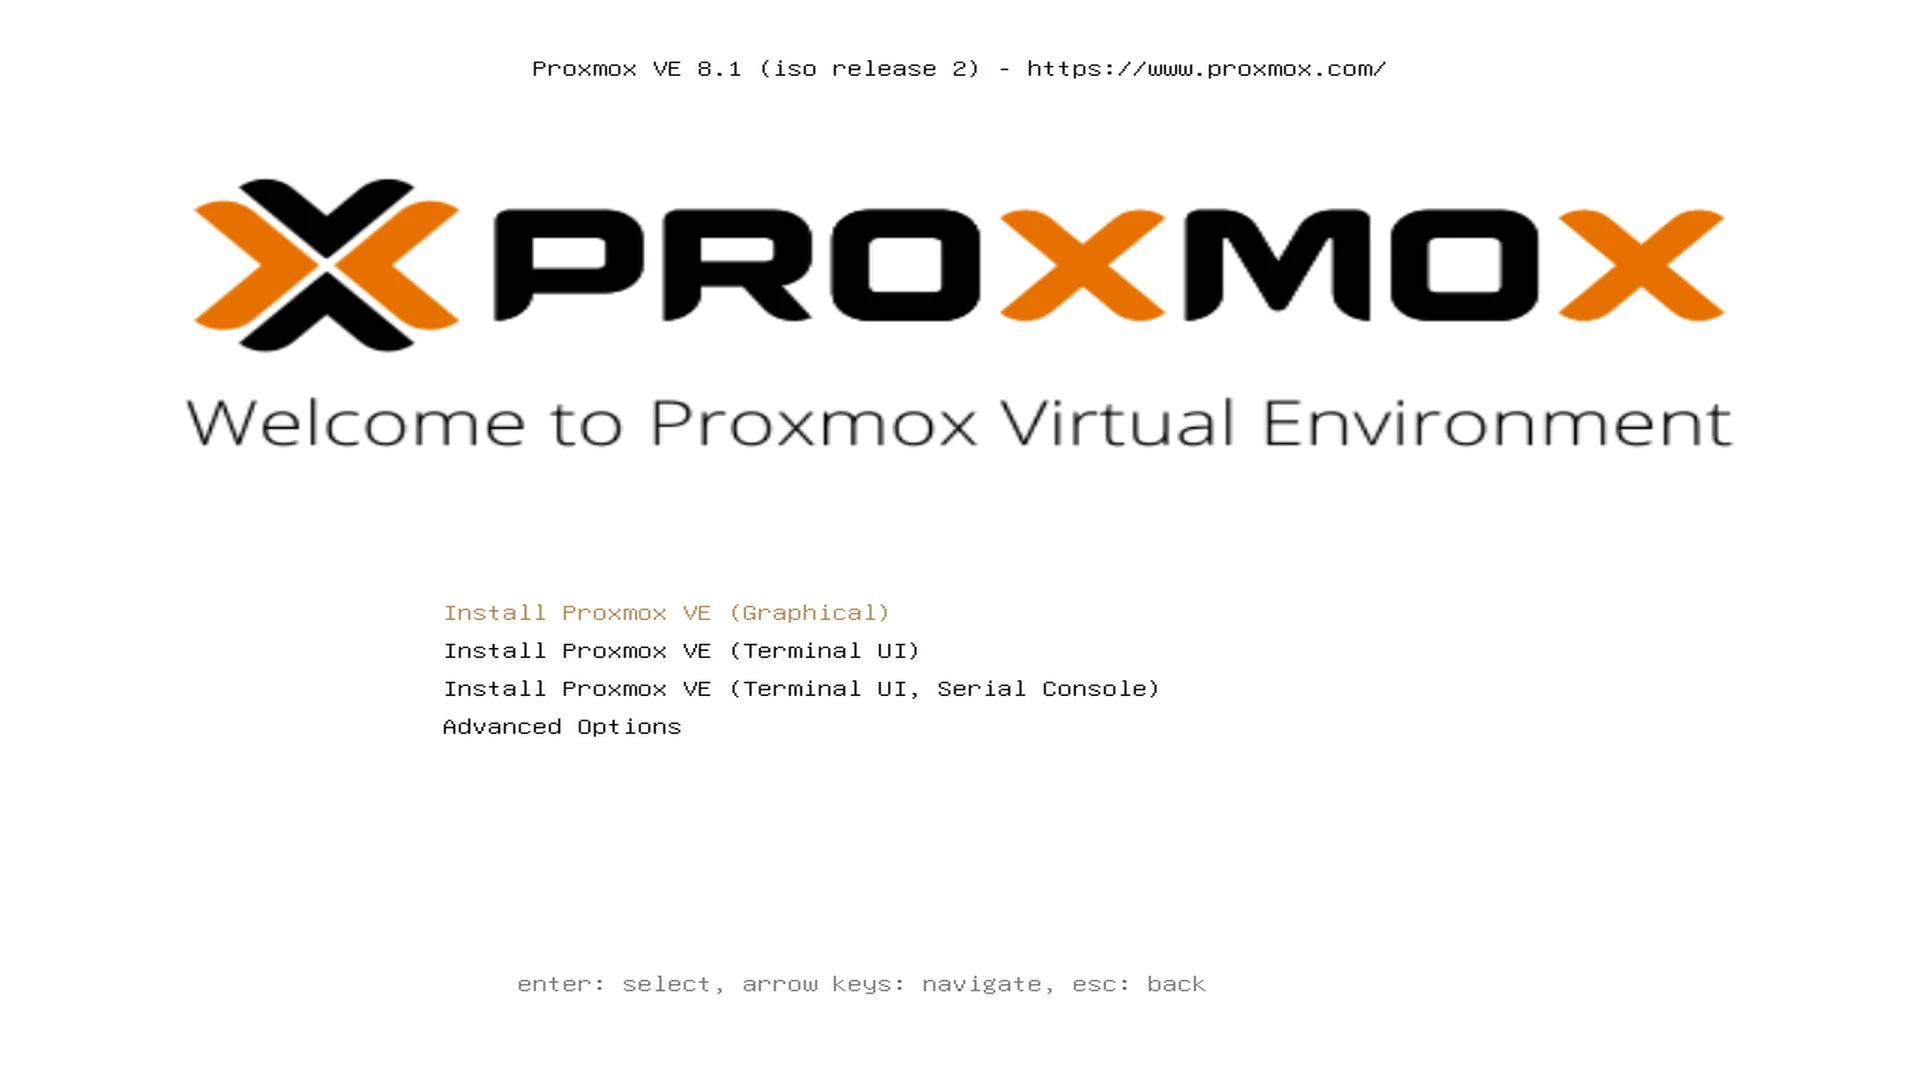
Install Proxmox
Select “I Agree” to the EULA.
Next you will need to select the desired “Filesystem” and the “Target Harddisk”. I typically prefer ZFS. If you only want to use a single disk for the boot disk, you can select ZFS (RAID0) option. You can select -- do not use -- for the other disks if you have more than one disk installed in the system.
As for which disk to use, I generally I like to use SSDs for the OS storage and save the faster NVMe storage for VMs.
Tip
I highly recommend using a separate disk for VMs/CTs so that you do not fill up your boot drive since it can make it very difficult to recover access to the Proxmox web UI, etc. I have learned this the hard way when accidentally filling the boot drive.
Select your “Country”, “Time zone”, and “Keyboard Layout”.
Enter your “Password” and “Email” address. The email address is used to email system alerts (if you configure postfix), but you can use other email addresses for other alerts such as the status of backup jobs.
Select the interface to be used as the “Management Interface”. If you only have one interface plugged in, it should select the proper interface as the management interface. If not, you can select it from the dropdown menu.
Enter the desired “Hostname (FQDN)” for your Proxmox server. Make sure it is a unique hostname for your network. Since this is for demonstration purposes, I will be calling my node pve-test but you should use your preferred hostname.
For the “IP Address (CIDR)”, enter the value you want to use for your management interface. Since I am using the LAN network address of 192.168.1.1/24, I will use the “IP Address” 192.168.1.70 for the Proxmox management interface in this example, but you may use a different IP address if you like. The “Gateway” and “DNS Sever” should be 192.168.1.1.
Click “Install” to install Proxmox!
Set up Community Repository and Update Proxmox
Out of the box, Proxmox ships with the enterprise repositories which require a subscription to use. If you do not wish to obtain a Proxmox license, you may use the community repositories and disable the enterprise repositories. There are instructions on how to do this on the Proxmox website under the heading Proxmox VE No-Subscription Repository.
Alternatively, you may prefer to use a Proxmox post installation helper script to automate this process. This script also removes the subscription nag box that pops up after you log in as well as disable high availability features if you are not planning to use them to save on system resources.
To run the script, you may run the following command. You may select “Yes” for everything except for disabling high availability if you plan to use clusters. Your system should update and reboot afterwards:
bash -c "$(wget -qLO - https://github.com/tteck/Proxmox/raw/main/misc/post-pve-install.sh)"
You will need to clear your browser cache after running the script for the subscription nag box to no longer appear.
As a general recommendation, be sure to look at the contents of any script you are running to verify it is not doing anything malicious. A lot of people use these Proxmox helper scripts so they should be generally trusted. Otherwise, you can do the process manually if you feel more comfortable.
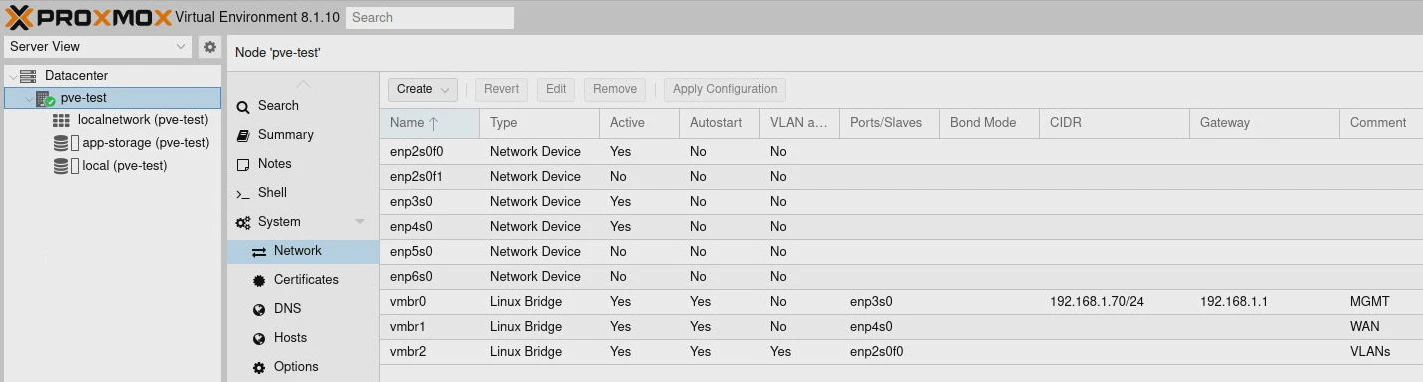
Configure Network Interfaces
By default, Proxmox creates a bridged interface for the management interface you selected during the installation of Proxmox. In this guide, I will be using that same bridge for the LAN interface of OPNsense which means you do not need to dedicate another interface for the LAN. The great thing about bridges is that they can be shared among multiple VMs/CTs.
The not-so-great thing about bridges is that they do not perform as well as passing through the interface. You should only notice performance degradation with bridges with the VP6650 when using bridges with the 10G SFP+ interfaces (expect approximately 5-6 Gbps with a base installation of OPNsense with the Protectli VP6650).
You can obtain better performance on the 10G interfaces when you pass through an interface, but it makes it more difficult to migrate VMs to another node. There are some configuration options in Proxmox for setting up cluster level hardware resources which may work well for manual live migrations. However, a user on Reddit pointed out me that it does not yet work with automatic failover with high availability. I have yet to verify that assertion at the time of this writing.
The screenshot below shows the final result after completing this section of the guide:
WAN Interface (2.5G)
The first bridge you need to create will be used for the WAN interface. I will be using the second 2.5G interface since the first 2.5G interface is being used as the management interface for Proxmox and will be used as the LAN interface in OPNsense.
In this example, the bridge will be named vmbr1 and the “Bridge ports” will be the enp4s0 interface. The actual interface name could be different on your hardware so use the appropriate value for the interface. You may enter a “Comment” so you know it is used for the WAN interface.
VLANs Interface (10G)
The next bridge to create will be for one of the 10G interfaces where all of the VLANs for the local network will exist. This is considered a router on a stick configuration since there is only a single trunk to a switch where all of your devices connect on one or more networks.
When using a bridge on the 10G interface, you will still benefit with routing traffic faster than 1 Gbps across your VLANs even with the reduced performance caused by the bridge.
Another benefit of using a bridge is that you can have other VMs/CTs on the same Proxmox node share the same bridge. If you make the bridge VLAN-aware, you can assign VMs/CTs to any VLAN you have defined in OPNsense and your other network infrastructure! That ability makes it very flexible on deploying various VMs/CTs since you can essentially place them anywhere you want on the network! If you used passthrough, you would not be able to do that (you would have to use another interface that is connected to your network instead).
If you wish to have maximum routing performance, you may pass through the 10G interface to the VM keeping in mind all of the caveats I mentioned earlier (especially if you plan to use a Proxmox cluster).
I am personally ok with the performance hit of using a bridge on the 10G interface since most of my network infrastructure and devices are 1G, and I have created a separate 10G storage backend network for all of my NAS and backup traffic. Therefore I minimize the amount of inter-VLAN traffic on my network. For my needs, it will be more important to easily migrate the VM than to achieve maximum throughput on the interface since I most likely will not have issues with a network bottleneck due to how I architected my network.
For the “Bridge ports”, I will be using enp2s0f0 but the actual value may vary from system to system. Like with the WAN interface, you may enter a “Comment” to describe the purpose of the interface, which I recommend when you have more than a few interfaces since it can get confusing quickly.
If you plan to use the same 10G interface to assign other VMs/CTs besides OPNsense, you should select the “VLAN aware” option. Otherwise, it is not necessary to select that option if you only plan to use VLANs in the OPNsense VM.
Other Interfaces
In the demonstration for this guide, I am only using 3 of the 6 network interfaces, so what are some uses for the remaining interfaces?
When clustering in Proxmox it is helpful to dedicate separate interfaces to Corosync traffic so that bandwidth intensive traffic does not impact communication between all of the Corosync clients. You could use one of the 2.5G interfaces for that purpose since you do not need a large amount of bandwidth for a couple of nodes. Low latency is more important than higher bandwidth (for a small number of nodes).
If you have a 10G backend storage network like I do, you may want to dedicate one of the 10G interfaces to attach to that network. That will allow you to have NAS traffic communicate over that network as well as VM/CT migrations and backups. Building your network in this fashion greatly reduces the amount of high bandwidth traffic which needs to be routed across the VLANs.
Add Storage Disk for VMs
The VP6650 I am using has both a SSD and NVMe storage disk installed. The SSD was used for the Proxmox OS and the NVMe is going to be used for storing VMs and CTs.
If your second disk needs to be wiped before using it for VM/CT storage, go to the “pve-test > Disks” page. There is a “Wipe Disk” option at the top.
Tip
You may not be able to wipe the disk if you were using LVM, so you will need to go to the “pve-test > Disks > LVM” page to delete the LVM volume by clicking on the “More” button and choosing “Destroy” for the selected LVM volume.
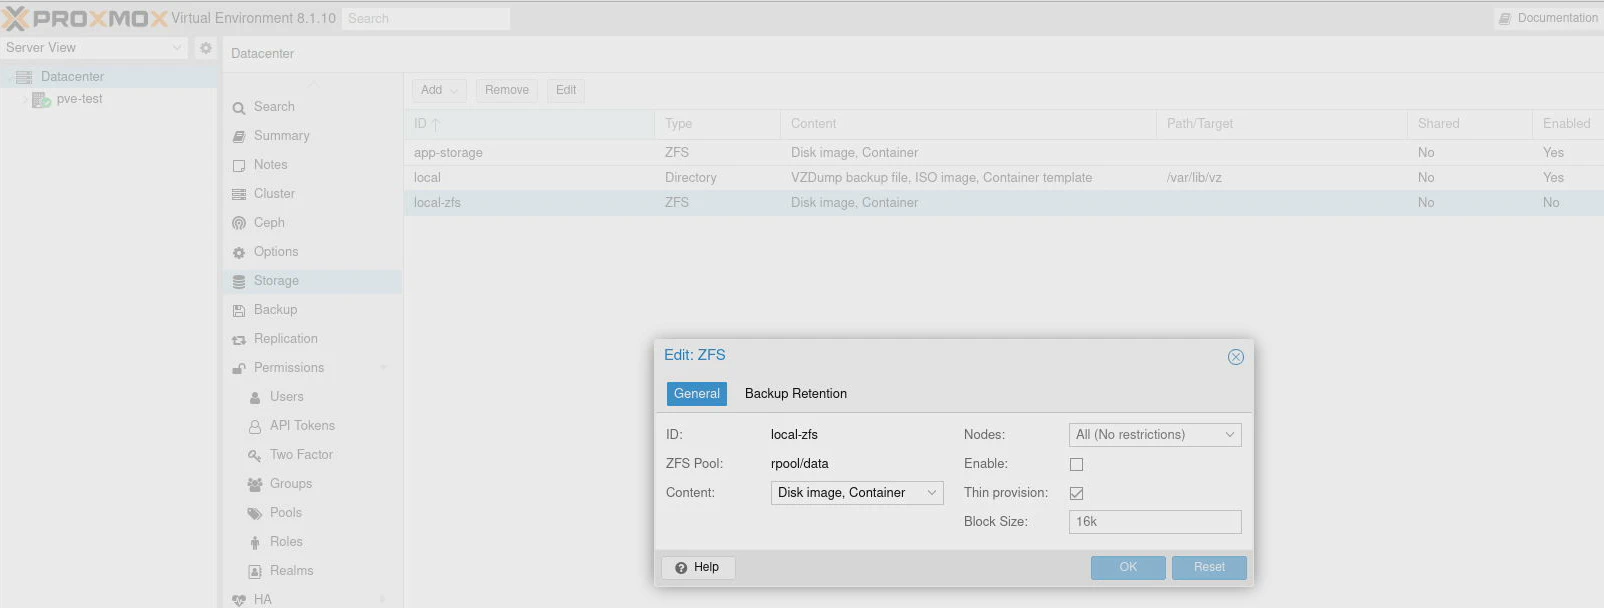
On the “pve-test > Disks > ZFS” page, click the “Create: ZFS” button to use ZFS on the NVMe storage. Enter the name app-storage and ensure the disk is selected (it should be by default if it is the only clean disk available).
Note there is an option for “Thin provision” at “Datacenter > Storage” page for the app-storage storage that was just created. Check the option to thin provision VMs/CTs so that less disk space is used. Keep in mind this allows you to overprovision your disk space so you will need to monitor your overall disk space since nothing is preventing you from using more disk space that you have available.
The local-zfs storage created by the Proxmox installer has thin provisioning enabled by default.
If you are only using a single disk, you may wish to disable thin provisioning to ensure you do not overprovision the disk space on your boot drive and run the risk of filling up the disk.
Disable the Default Storage for VMs
By default when you use the ZFS filesystem, a default storage called local-zfs is created to store VMs/CTs. I recommend disabling that storage since you will be using the new app-storage location for VMs and CTs. This helps reduce the likelihood of accidentally picking the wrong storage and filling up your boot disk.
Filling up the boot disk is difficult to recover in Proxmox since it may cause the web UI to be unresponsive and even SSH may be less responsive. I have found this out accidentally twice (for two different reasons).
Go to the “Datacenter > Storage” page. Click on local-zfs and uncheck the “Enable” box.
Import OPNsense ISO in Proxmox
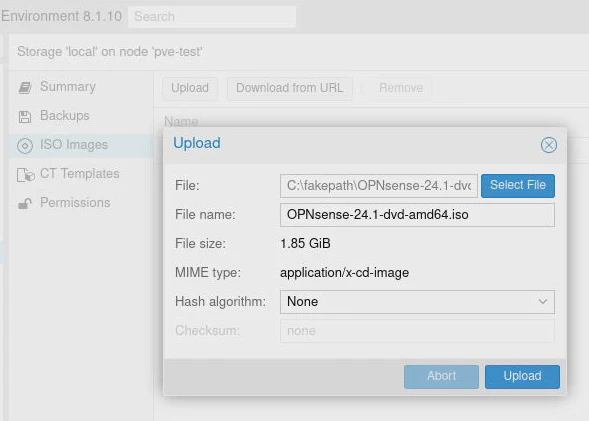
Go to “pve-test > local” and click on “ISO Images”. You should see an “Upload” button where you can choose a file to upload. Select the OPNsense ISO image and click the “Upload” button.
If you have other storage locations created besides the default local storage, you may choose that location instead of local.
Note
There is an option to download directly from a URL, which is convenient. It even supports decompressing certain file types and can verify checksums. Unfortunately, the compression algorithm used by OPNsense is not supported so you will need to download, extract the ISO, and upload the file as described above.
If your book disk does not have a lot of free disk space, you may delete the ISO image after you finish creating the OPNsense VM.
Set up OPNsense VM
Once Proxmox has been set up, you may now set up the OPNsense VM. I will be setting it up OPNsense from scratch for demonstration purposes, but you may be able to import your existing OPNsense configuration if you are moving from bare metal to a VM (you will either have to change the network interfaces in the backup config XML file or reassign the interfaces in the web UI).
To avoid any potential conflicts with setting up OPNsense if you happen to be using the same IP address ranges such as 192.168.1.1/24, I recommend unplugging the Proxmox server from your main network before proceeding. Also, this will avoid having multiple DHCP servers operating on the same network(s).
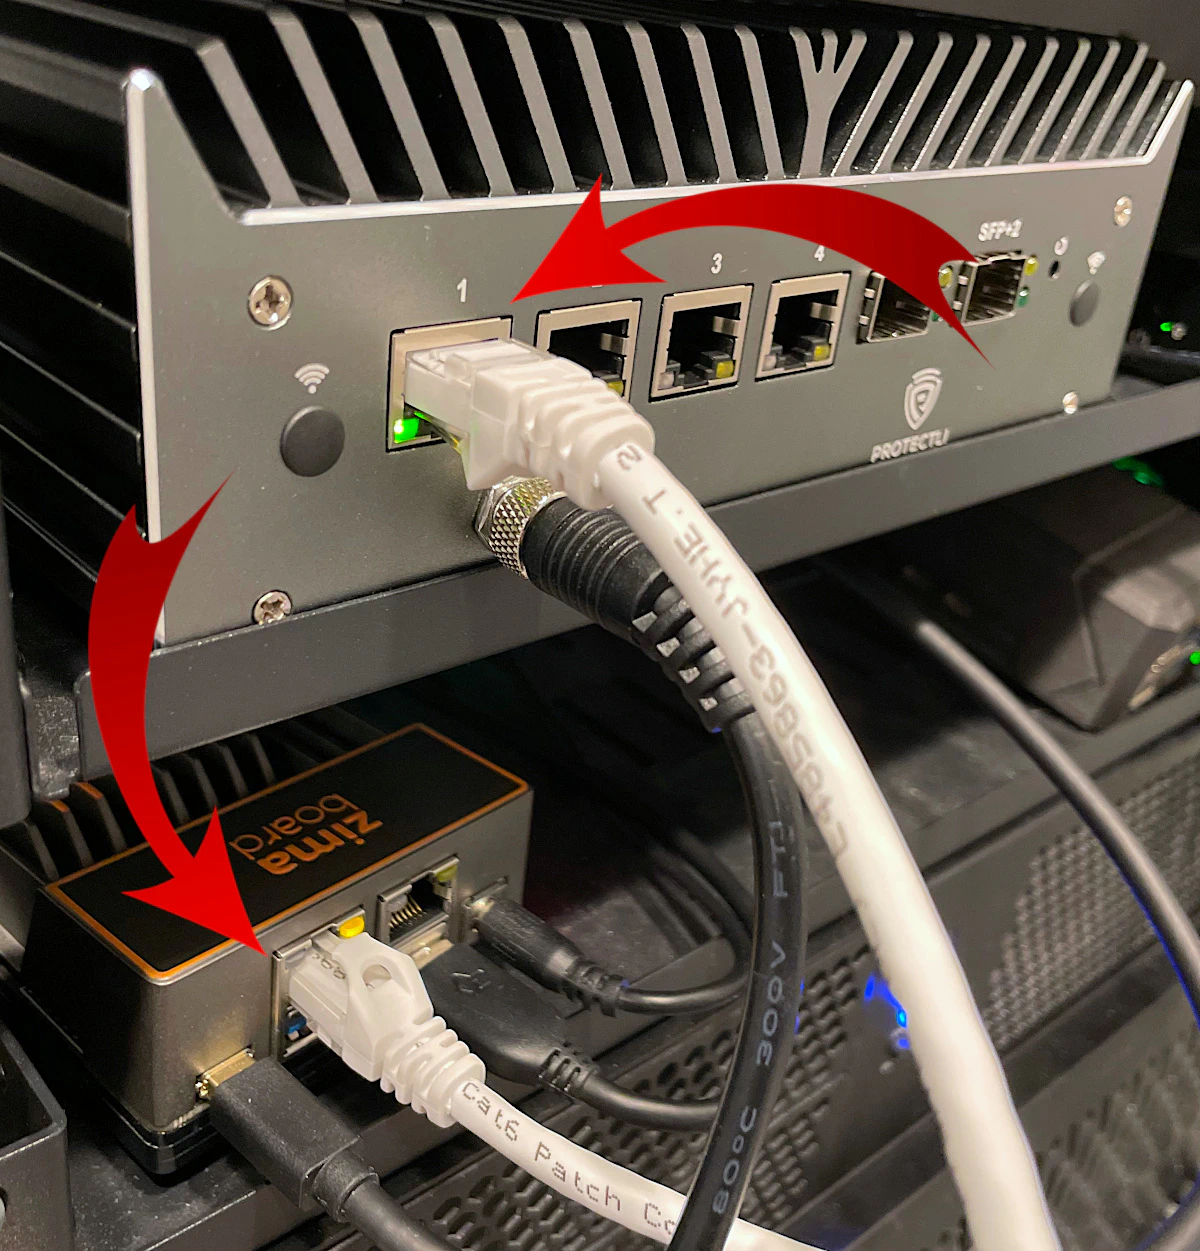
After unplugging Proxmox from your network, you may plug your PC you are using to configure Proxmox directly into the management port of Proxmox (the first 2.5G interface). You will still be able to log into the Proxmox web interface as well as the OPNsense web interface (after it is set up) since you will be configuring the OPNsense VM to use the same interface for the LAN network. I think it is very nice that you can manage both platforms from the same Ethernet interface on the Proxmox server!
Note: For this to work, you will need to configure a static IP address on your PC such as 192.168.1.10 since DHCP will not be set up on that interface until OPNsense is set up.
If you are careful how you connect the interfaces used by the OPNsense VM to your network (such as creating a dedicated network for testing using an IP address range not in use by any of the interfaces in the OPNsense VM), you could update OPNsense and test other OPNsense configuration separately from the rest of your network before making the virtualized OPNsense your primary router/firewall.
Create New VM for OPNsense
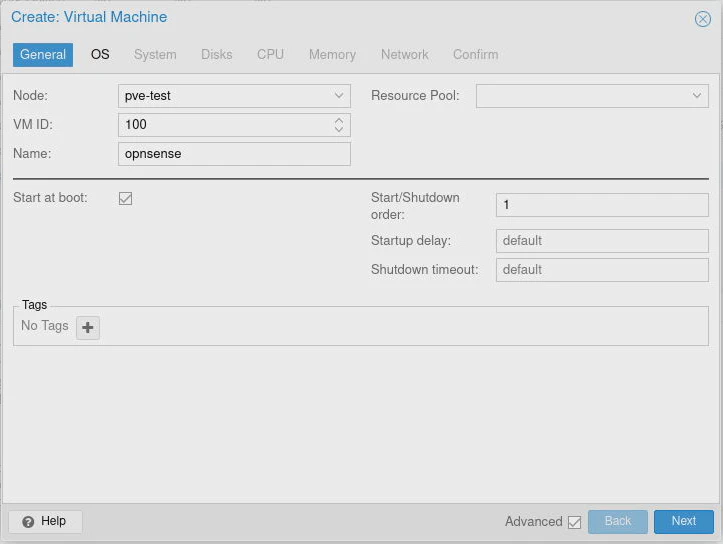
To create a new virtual machine, click on the “Create VM” at the top right corner of the Proxmox web UI. Enter the “VM ID” of your choice. It will default to 100 if you have no other VMs or CTs created. Enter a “Name” such as opnsense.
Click on the “Advanced” options box at the bottom of the dialog box so that you can select other options. Since this VM will be used as the primary router/firewall when everything is finished, you should enable the “Start at boot” option in the advanced section so the VM will always load when you reboot your Proxmox system.
You may even want to set the “Start/Shutdown order” to 1 so the OPNsense VM starts before other VMs/CTs and make the startup/shutdown order of other VMs/CTs which require network access start up after the OPNsense VM by setting the order to 2 or higher. This will ensure the network is available before anything else attempts on that node attempts to use it. Click “Next”.
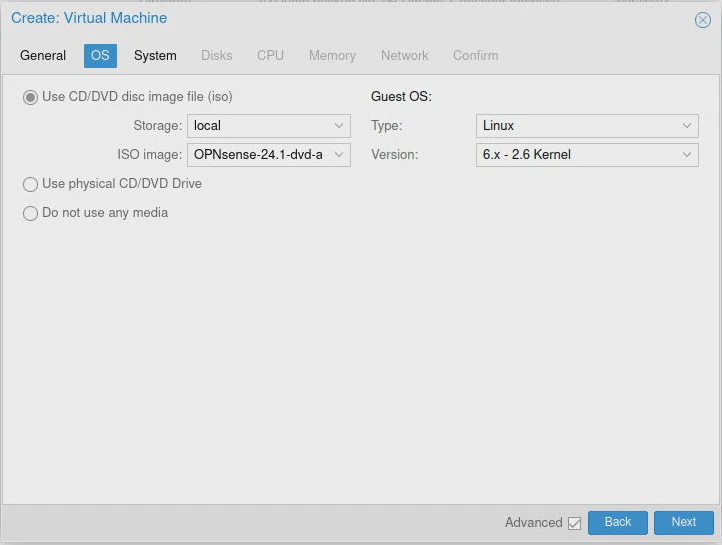
The “Use CD/DVD disk image file (iso)” option should be selected. Choose the storage location where the ISO is located such as the local storage. Select the OPNsense ISO image using the “ISO image” dropdown. The “Guest OS” options can be left at the default. Click “Next”.
Although I am going to be using bridges for the network interfaces in my example scenario, I will show the configuration you should use if you are planning to use PCI passthrough so you do not have to attempt to change it later since it can be a bit more challenging/potentially problematic. You may decide in the future you would like more performance on the 10G interfaces.
Since using the UEFI configuration does not impact bridging, you might as well use UEFI for better PCI passthrough support (it is recommended in the pfSense documentation for PCI passthrough, and there is also a brief mention of VM settings in the OPNsense documentation).
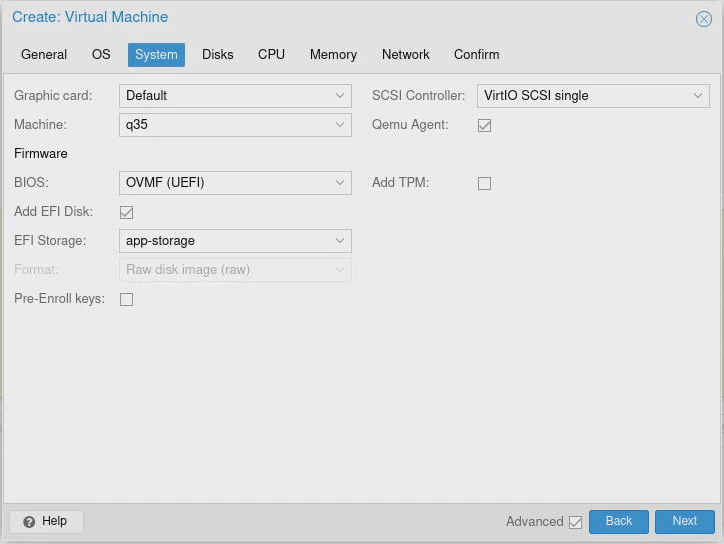
For the “System” settings, use q35 as the “Machine”. Select the OVMF (UEFI) option for the “BIOS”, check the “Add EFI Disk” box, and select the app-storage location for the EFI disk. You should uncheck the “Pre-Enroll keys” option so that Secure Boot will not be enabled because OPNsense does not support it.
You may want to enable the “Qemu Agent” as well. If you do, you should install the “Qemu Agent” plugin in OPNsense.
As mentioned earlier, you could use the default SeaBIOS if you do not plan to ever use PCI passthrough for your network interfaces. Click “Next”.
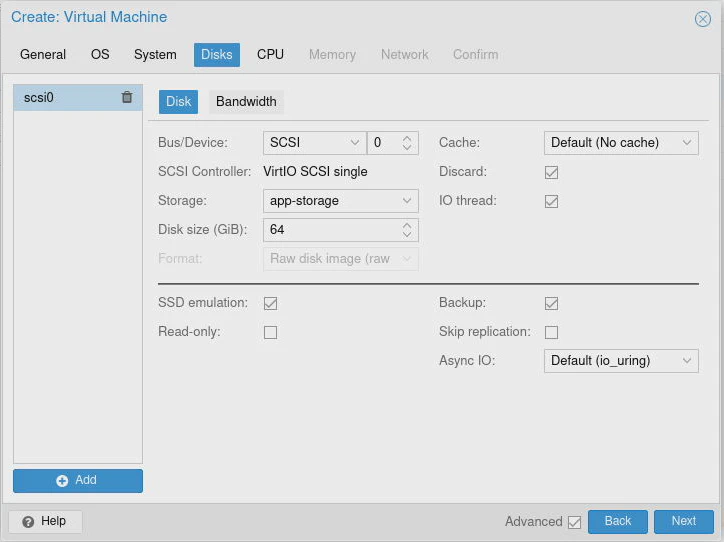
On the “Disks” tab, you may want to increase the “Disk size” from 32 GB to something like 64 GB to ensure there is enough space for logs, plugins, and reporting data. There may be other options that help with disk performance or maintenance such as enabling “SSD emulation” or the “Discard” option. It may not make a big difference for the OPNsense VM, but they are options to consider. Click “Next”.
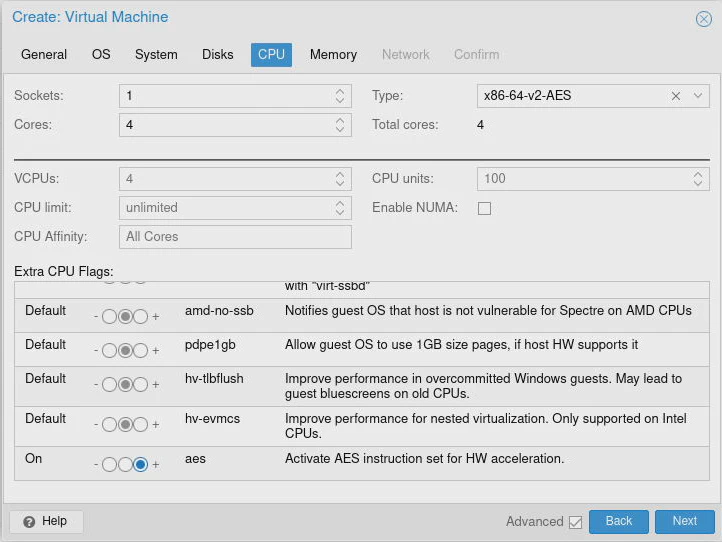
For the “CPU” options, you should select at least 4 cores, but if you are not running any heavy services on your network, you might be able to get away with 2 cores. If you find that 4 cores is not enough, you can easily change that later. A great thing about virtualization is being able to increase or decrease hardware resource allocations to maximize the use of your hardware.
In my personal experience, I have not seen OPNsense take full advantage of systems that have more than 4 cores due to the fact that not all of the services are multithreaded. Also not all of the services are CPU intensive especially for smaller home networks.
The “CPU Type” defaults to x86-64-v2-AES but you may change it if you like. The pfSense documentation I linked to earlier says to set it to host which may help maximize the use of the CPU features for the CPU you are using, but if you are planning to run a cluster with machines that are not identical, you may not want to use host since the underlying hardware is different. I saw that mentioned as a recommendation, but I have not tested this assertion to verify if it causes problems in clusters with mixed hardware architectures.
I assume that since the “CPU Type” has AES in the name that it has AES enabled by default but there is an option in the “Extra CPU Flags” section to enable AES. To ensure that it is enabled, I recommend selecting that option by clicking on the far right radio button. AES will be beneficial if you are using VPNs, etc. Click “Next”.
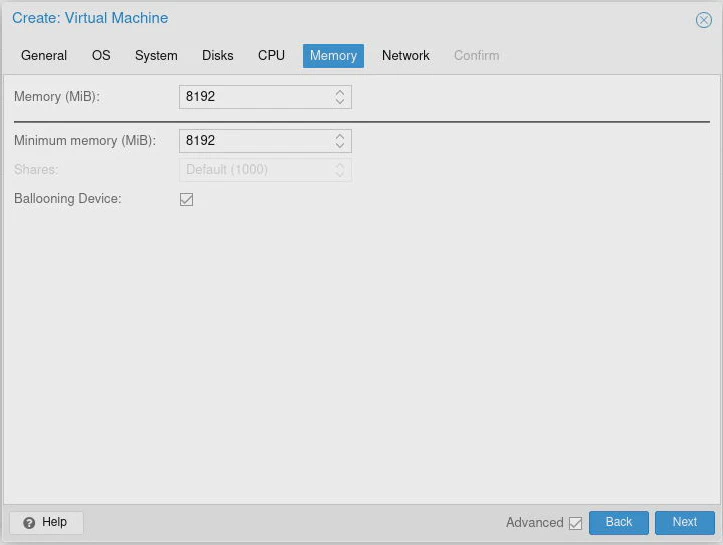
As for the amount of “Memory” to allocate, the absolute bare minimum should be 1,024 MB (1 GB). I recommend using a minimum of 8,192 MB (8 GB) if you plan to use IDS/IPS especially Zenarmor when using the local Elasticsearch database since those services will easily use 5-6 GB of RAM. You can leave the “Ballooning Device” option enabled since that can help save some RAM on the host Proxmox system when running multiple VMs. Click “Next”.
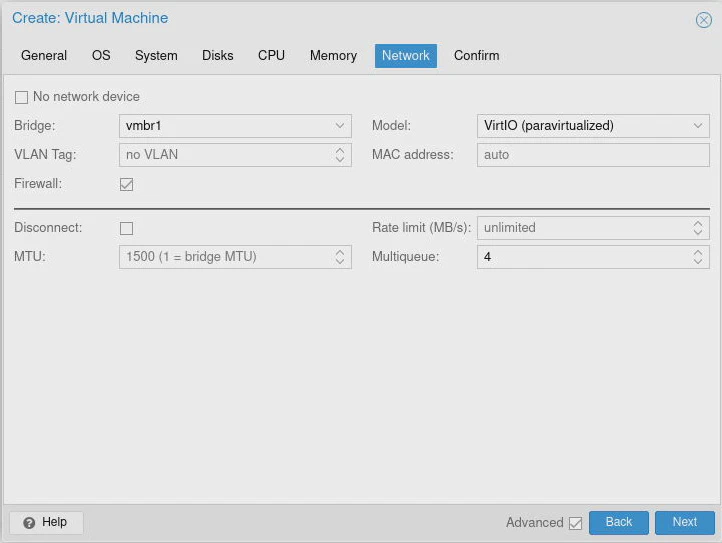
The VM creation wizard only allows you to set up one network device but you can add more after you finish creating the initial VM configuration. Select the “Bridge” called vmbr1 since that will be the WAN interface. Make sure you use VirtIO (paravirtualized) for the “Model” for best bridging performance. You do not really need to have the “Firewall” option enabled since that makes use of the Proxmox firewall. It does not hurt to leave it enabled assuming you do not configure any firewall rules in Proxmox.
You should enter 4 for the “Multiqueue” option. I believe it is recommended to set this value to the same number of CPU cores you have entered. The “Multiqueue” option is supposed to help improve the bridging performance of your virtualized network interface. Click “Next”.
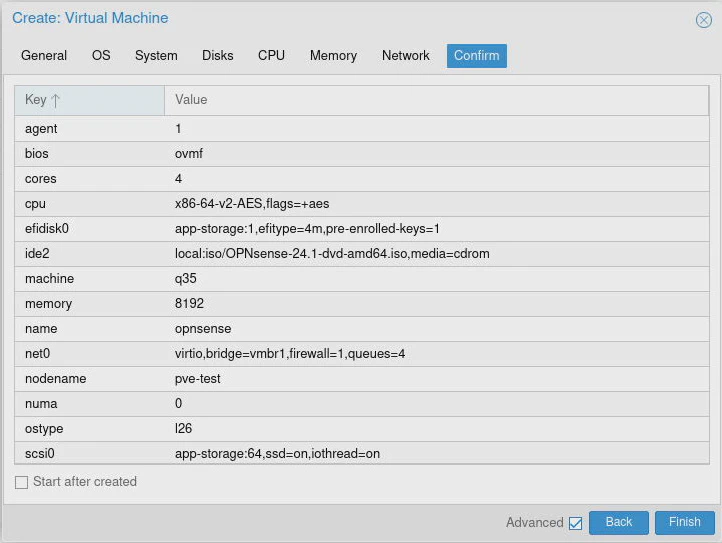
On the “Confirm” tab, make sure you do not have the “Start after created” option enabled so that you can finish adding the network interfaces to the VM. Click the “Finish” button.
Now you should see the opnsense VM appear under the pve-test node if it is expanded on the left side of the page. Click on that VM and then click on “Hardware”.
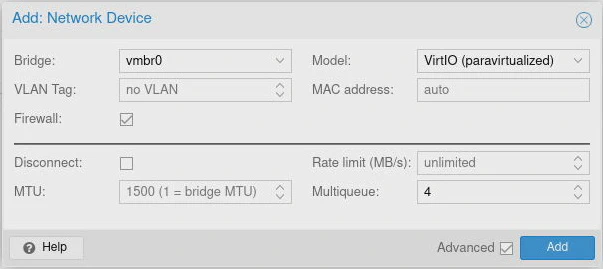
Click on the “Add” option to select “Network Device”. For the “Bridge” you will select vmbr0 to be used for the LAN interface (it is also the same bridge used for the Proxmox management interface). Make sure you enter 4 for the “Multiqueue” option.
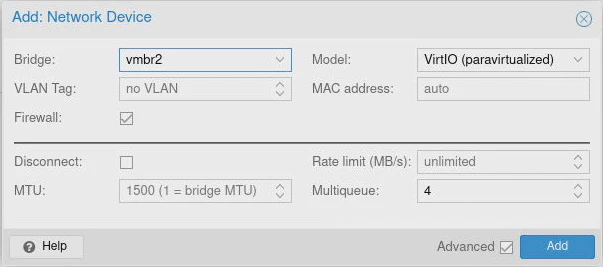
Repeat this process for the third interface to add to the VM. This time use vmbr2 which will be the interface which contains all the VLANs for your network.
Now you are ready to start the VM! Click on the “Start” button in the upper right hand corner of the page.
Install OPNsense
When you see the “Press any key to start the configuration importer”, you may wait a few seconds to skip it.
You should see “Press any key to start the manual interface assignment”. Press the “any” key to manually assign the interfaces (just kidding, there is no “any” key, but press any key of your choice).
Press “N” to both the “configure LAGGs” and “configure VLANs” options.
For the WAN interface, enter vtnet0, the LAN interface vtnet1, and the OPT1 interface as vtnet2. Interface assignment happens to be the same order as the numbers on the virtual interfaces due to the order you created the interfaces on the VM (I did this on purpose to make interface assignments easy).
At the login prompt, enter installer as the username and opnsense as the password to continue installing OPNsense.
If you are in the US or prefer the US keymap, press the “Enter” key. Otherwise, select the keymap of your choice.
Since the host storage in Proxmox for the VMs/CTs is using ZFS, you should not use ZFS inside your virtual machine since it is not recommended to run ZFS virtualized on top of ZFS on the host. You are not going to need the ZFS features in the VM anyway since you can take advantage of the features on the Proxmox host. You should be backing up the VM itself rather than using ZFS snapshots inside the VM, for example. Press “Enter” to continue.
Select the disk to be used. You will see two options with one being the installation “DVD” image so you will need to pick the hard disk. It may have the ID of da0 but the name of the disk will be obvious like QEMU HARDDISK as opposed to QEMU DVDROM. Press “Enter”.
You may press “Enter” for the recommended swap partition. That is only used if you run out of RAM so it is good to have a small amount of disk space enabled to prevent issues when RAM is low. Of course, since you are running OPNsense in a VM, you should be able to remedy low RAM by increasing the amount of resources available to the VM.
When the installation is finished, you will be prompted if you want to change the “Root Password”. I recommend doing it now instead of later so you do not forget (it also for best security practice to do so). Press “Enter” when you are finished.
OPNsense should now reboot. Installation is complete! You may remove the DVD image from the “Hardware” section of the VM if you like.
Configure OPNsense
At this point, you may configure OPNsense as you would with a bare metal installation by logging into https://192.168.1.1. I do not plan to include those details since I have written other guides which include that process.
Tip
If your ISP requires you to call them anytime your router MAC address changes (when swapping out router hardware) or it takes a long time for new MAC addresses to automatically register, you could simply enter the same MAC address of your existing router on the interface settings of your virtualized OPNsense. That way your ISP will think it is the same router that is connected to your modem/ONT device. I have done this before when I was impatient when swapping hardware since I just wanted my network to be up and running ASAP.
Swap Existing Hardware
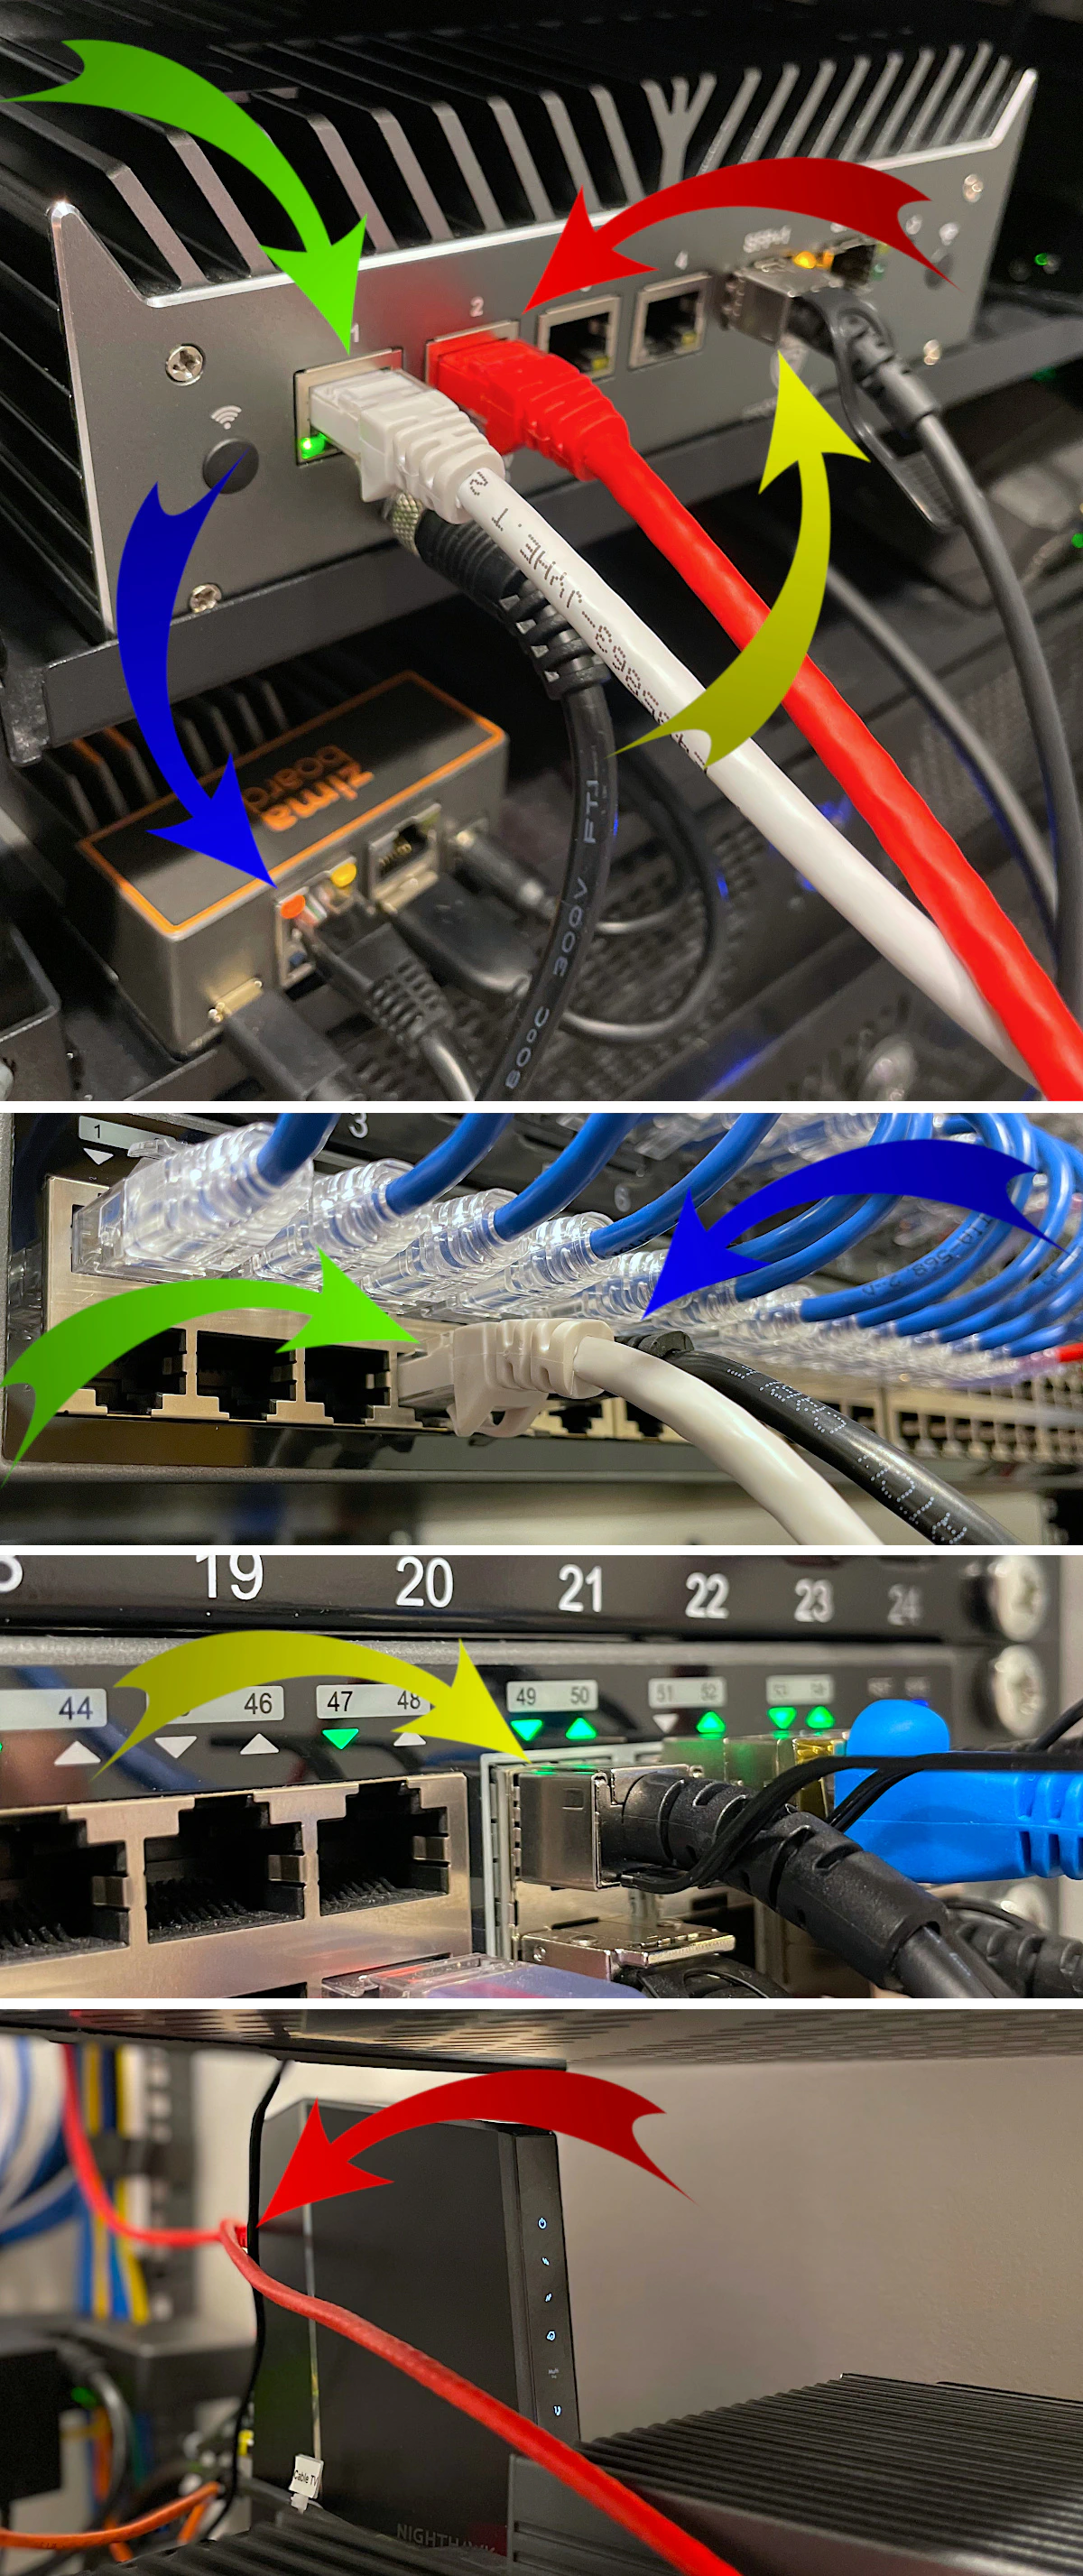
Once you feel comfortable with the configuration of OPNsense, you may plug the Proxmox management interface (and the OPNsense LAN interface) into an interface on your network switch that is not assigned to any VLANs.
Then plug the modem/ONT into WAN interface of OPNsense which will be the second 2.5G interface.
Finally, you can connect the first 10G interface into your network switch where you have a VLAN trunk assigned on your network switch (so that all VLAN traffic is allowed to pass through to OPNsense).
If you have VLANs configured properly on your network switch, all of your devices should be on the appropriate VLANs. This should be pretty straightforward if you already have VLANs configured on your switch and you are replace an existing bare metal installation with a virtualized instance. You will be able to pick up from where you left off. Otherwise, you will need to get all of that configuration complete as well to finish your network configuration.
A Note about VMs and CTs on Proxmox
I wanted to mention that if you create VMs and CTs on the same Proxmox system as the OPNsense VM, you can assign them to any VLAN on your network by selecting the vmbr2 bridge (the bridge where all your VLANs exist) and entering a “VLAN Tag” when configuring the network device(s) for your VMs and CTs. If you want something to run on the LAN network, you need to use vmbr0.

That is an awesome aspect of virtualization – you can mix your virtualized VMs and CTs with real physical hardware on your network without needing to dedicate additional physical hardware.
I hope this guide helps you get started on your virtualization journey in your home network or homelab!