Backup Your Data to Backblaze B2 with Duplicati from a Proxmox LXC Container
Photo by fernandozhiminaicela from Pixabay
Table of Contents
For a number of years, I have used Crashplan as my offsite backup. I found the price and features attractive. It also worked on Linux which further won me over since I was running a Linux server as my file server. Their unlimited plan for a single machine was very affordable especially when purchasing multiple years. $3-4 per month for unlimited backup was well worth the price to have peace of mind in case something bad happens at home (I actually did need to use it one time when I had a failing hard drive corrupt several of my files). Their desktop application was easy enough to use even though it was rather bloated. If you were uploading 1 TB or more of data, it is recommended to increase the amount of memory that is allocated to the application.
Then the infamous day came when they got rid of the consumer part of their service to focus on their small business and higher plans. The price for a single machine then became $10 per month, which was a 2.5-3x increase in price. $10 a month is not really that terrible for an unlimited backup your most precious data, but it is still a bit of a sticker shock when you are used to paying $3-4 per month for essentially the same service. To help lessen the impact, Crashplan offered a discount for a year after your original plan expires. The plan was $2.50 per month so it kept the price on par with the original service. The transition year provided a great opportunity to consider alternatives now that the service was at the $10 per month level. There are more competitors in that price range than there were at the lower price point so it was worth evaluating the current landscape of online cloud backup service providers. As my discount year was approaching an end, I began evaluating options. I think I found a good alternative after trying a different service provider which did not offer the best experience (I wanted to like it, but I could not). Options for Linux are more limited unfortunately…but…
Enter Backblaze…
Backblaze offers a $6 per month unlimited personal backup service but it only works on Windows and Mac – no love for Linux. Even if they showed love for Linux with that backup service, it would likely have a desktop client which would require a full desktop environment consistent with their other operating system offerings. I am seeking a headless Linux server backup especially since I migrated my server to Proxmox (more on that later). I do not want to set up a virtual machine for sole purpose of backing up my data offsite since it is a waste of resources especially if I was going to run Crashplan on top of the VM overhead. I had various issues trying to make that scenario work (no fault to Crashplan but with how I had everything configured on Proxmox to separate various services on my server). Frustration can sometimes lead to fruitful outcomes because you finally have the motivation to seek better alternatives to solve the problems you are facing…but I digress.
Backblaze offers B2 cloud storage which is similar to and compatible with Amazon S3. The advantage of Backblaze B2 is that you can use a variety of 3rd party integrations/software in order to backup your data. That means you have options when it comes to the software you use to backup your data, which is very nice! The flexibility of 3rd party integration allows you to run Linux-based software to backup to Backblaze B2 (that is kind of a tongue twister!). All you need to do is find the right software that can run headless on Linux and you are set!
What is the biggest downside you might ask? B2 storage costs $5 per TB so if you have several terabytes of data, it will end up being more expensive than the Backblaze personal plan and also more than the Crashplan which both offer unlimited data. That may be a deal breaker for you if you have a lot of data. Since I only used about 2 TB of space with Crashplan, it will be about the same price as Crashplan per month. However, I was able to reduce the backup size down closer to 1 TB by choosing the most essential data that I want backed up (when you have an unlimited plan, you tend to backup more than you really need because why not?). That means I can still pay about half the price of Crashplan while having greater flexibility and using less server resources by running headless, which is a win in my book for my current needs. Keep in mind that you must pay when you upload (which includes using their API) and download data. If you are mostly archiving/backing up data, you should not incur that much in download costs unless you need to recover lost files. The download cost is still much cheaper than paying a data recovery service for files that you can hopefully get back.
For the backup software I chose to use to back up data to Backblaze is Duplicati. The features I like most about Duplicati is that it can run headless on Linux, and it has a web interface that can be used to easily configure and monitor backups. It is nice having a simple dashboard to view and configure backups. It is a light weight process so it does not consume nearly as much resources as Crashplan. Duplicati also has the usual great backup features similar to the usual service providers such as AES-256 encryption, version retention, de-duplication, and scheduled backups. These are standard features that really all modern backup software should contain. Did I mention that Duplicati is free software?
One thing to keep in mind is that Duplicati uploads data into 50 MB chunks of encrypted data by default (the chunk size can be increased). This is perfectly fine for a secure backup since it makes it much more difficult to know which files are contained in the encrypted chunks of data without being able to properly decrypt and reassemble the files. However, if you wish to share the files or access the files directly from the B2 storage for other purposes, you may not want to use Duplicati. The purpose of Duplicati is for backing up and restoring data securely, which meets my need. Because of the encrypted file chunking performed during the upload process, you must use Duplicati to restore your files.
Speaking of free software, for this how-to I will be using LXC containers in Proxmox. I have been wanting to try Proxmox for a while now, and I finally decided to take the plunge. I converted my long running Ubuntu server into a Proxmox server (which runs on Debian Linux under the hood). I must admit that there is a learning curve to setting up certain things in Proxmox. I struggled with file permissions for a little while until I understood it better. For this particular configuration, I do not think you should encounter any file permission issues. However, I will state up front that I am backing up data from my Nextcloud server which is running in separate LXC container. I have already assigned the file permissions inside that container to the www-data user. The UID for the www-data user (which may be something like 33) inside the LXC container maps to something like 10033 on the host Proxmox machine. So when looking at the files in my Duplicati LXC container, it shows up as the usual www-data user. Since Duplicati runs as a root process, it can access the files that need backed up. I say this in case you happen to have any file permission issues when you mount data to the LXC container.
Let us get started!
Create LXC Container using Ubuntu Server
To limit the scope of this how-to, I am going to assume you already have Proxmox installed, have data stored on the host Proxmox server that is ready to be backed up, and know how to access the Proxmox web interface. That process could be a how-to of its own to be honest. I know it was quite the process for me because I had to shuffle data around to get everything migrated to a ZFS file system.
Rather than use a LXC container, you may use a virtual machine instead. I prefer to use containers when possible because the resources are so light. Keep in mind that if you wish to make use of the live migration functionality of Proxmox, you must use virtual machines. This is a more advanced feature that someone new to Proxmox may not need to use especially if you are only running a single Proxmox server.
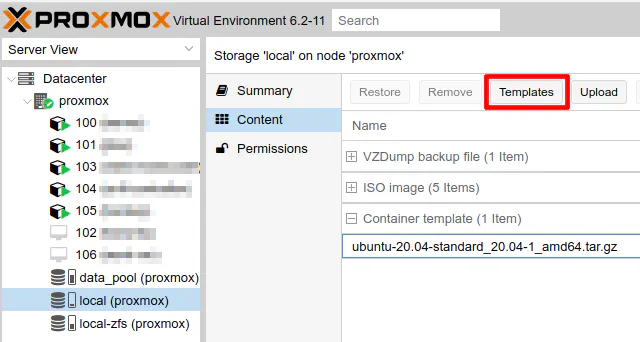
If you have not done so already in your Proxmox installation, you will need to download a LXC template before creating your container. You may choose a variety of Linux distributions for your container. Choose the Linux distro which you are most comfortable using. For myself and purposes of this how-to, I will be using Ubuntu. The latest version at the time of this writing is 20.04. To download that template, you must go to the default location where templates are stored which is called “local” and the name of your proxmox server in parenthesis. In my example, it is creatively named “proxmox”.
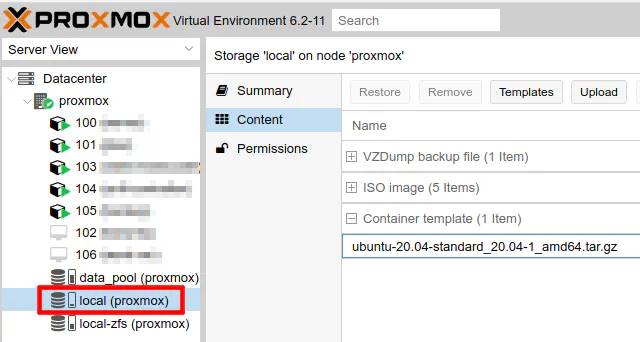
Click the “Templates” button.
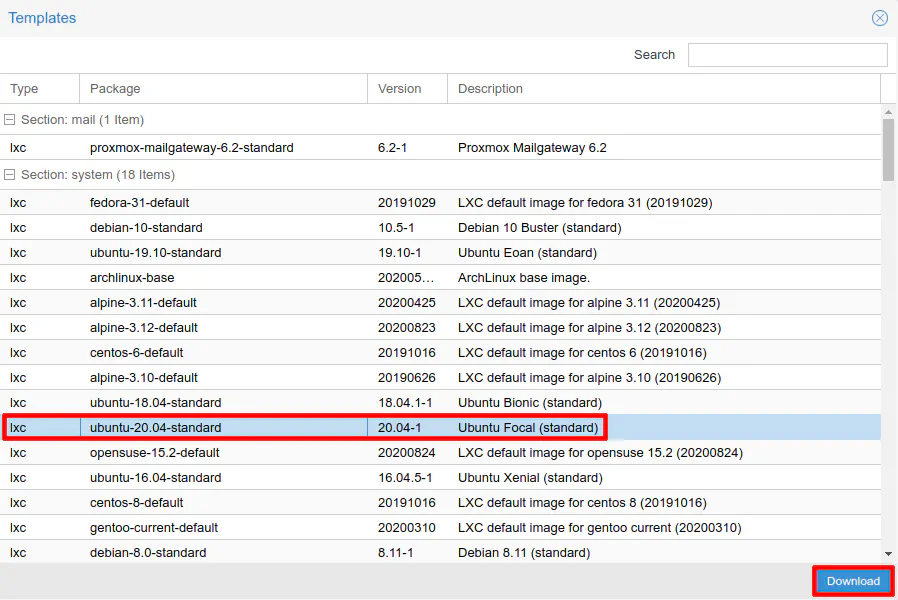
Choose the “ubuntu-20.04-standard” template and click “Download”.
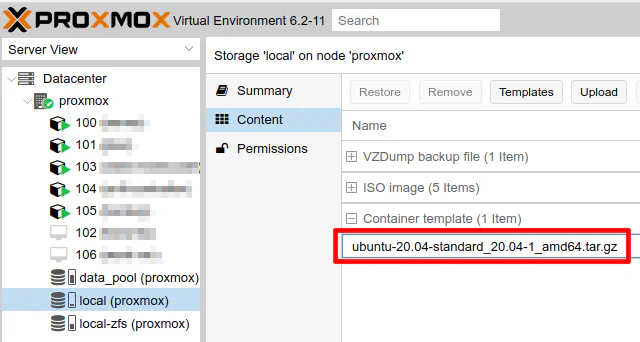
You should see the template show up in your list of templates.
Now you are ready to create the LXC container. Click on “Create CT” in the upper right hand corner of your Proxmox user interface.

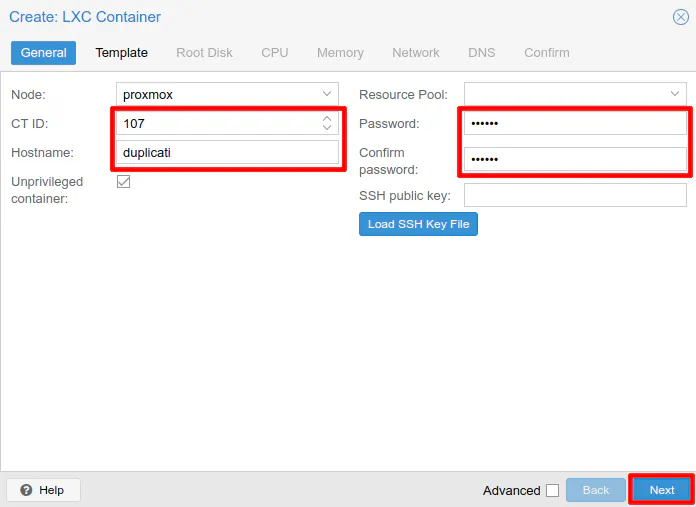
You can choose your desired container ID or leave it at the default value. It starts at 100 and counts upward when you add new containers. Enter your desired hostname. I chose “duplicati” in this example but you can name it “backup-server” or your desired creative name. You will need to enter the password that is used for the root user when logging into the container. Once you have entered all of that information, you have satisfied all of the required fields. If you already have a generated public SSH key, you can add it, but for this example it is not necessary. The keys are automatically generated when the container is created if you wish to use SSH (if you use the Proxmox GUI, you technically do not need to use SSH since it is similar to working directly from the console of a physical machine).
One last thing – leave the checkmark in the box for “Unprivileged container”. This is a security feature to help further isolate the container from the host operating system by remapping the UIDs/GIDs. Because of the remapping, permission issues can arise using unprivileged containers, which is why you will often see users switching to privileged containers to get around the issue. While there may be situations where you must run privileged containers, I prefer to run all my containers as unprivileged. So far I have been able to get everything to function properly without needing to resort to privileged containers (I am also just running standard services so that could be why I do not need privileged containers). Click “Next” to continue.
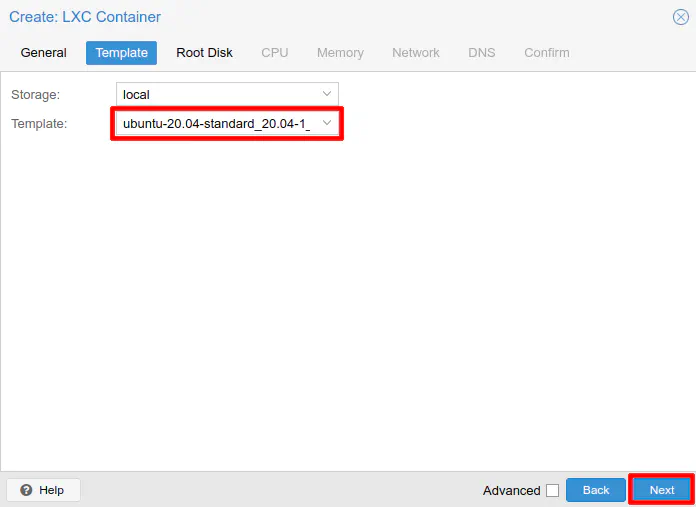
If you only have one storage location (the default location) configured for LXC templates, you will only see “local” as your storage option. Choose the “ubuntu-20.04-standard” template that you downloaded. Click “Next” to continue.
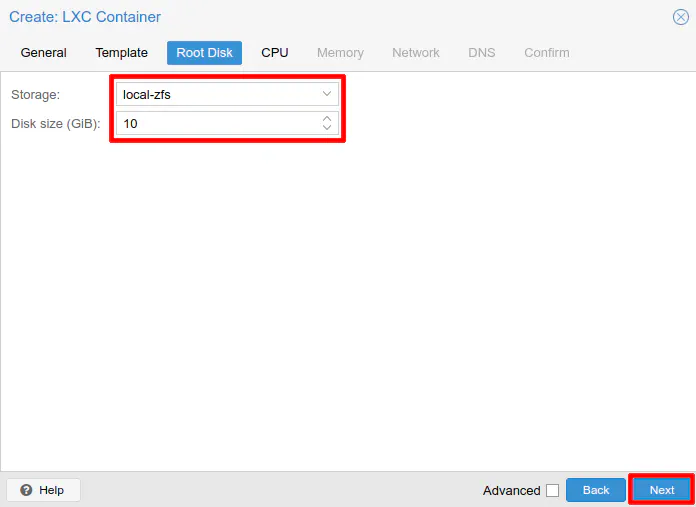
Pick a location where you wish to store the new LXC container. If you have configured a data store in addition to the default data stores, you may have more than option to select from. In my example, I have a data store of ZFS formatted disks (a zpool) called “data_pool”, but I also have the default data store of “local-zfs”. If you did not install Proxmox using ZFS on the main drive(s), you might have a different name for the default data store. Since I am using a pair of mirrored SSDs as my main disks, I will be using “local-zfs” for improved performance.
It it up to you to decide whether or not you want to store containers and virtual machines on the same drive(s) as the Proxmox installation. Some prefer to store them in a separate data store on different drives. Even if you choose to store the containers/VMs on the main Proxmox hard drive(s), you can still choose to backup the containers/VMs to a different drive, which should help improve reliability if you need to restore from backups.
For the disk size, you really do not need that much at all to run Duplicati in a container. I chose 10 GB in this example but you could get away with something as low as 3 GB. My installation is just a little more than 2 GB. The mono library takes up the most space since it uses at least 400-500 MB. I like to make my disk sizes slightly larger than what I think I will need because it does not actually use all of that disk space on the host Proxmox machine, and it prevents having to resize the disks on a regular basis. It is the amount of space the container will see when you view the free space. Click “Next” to continue.
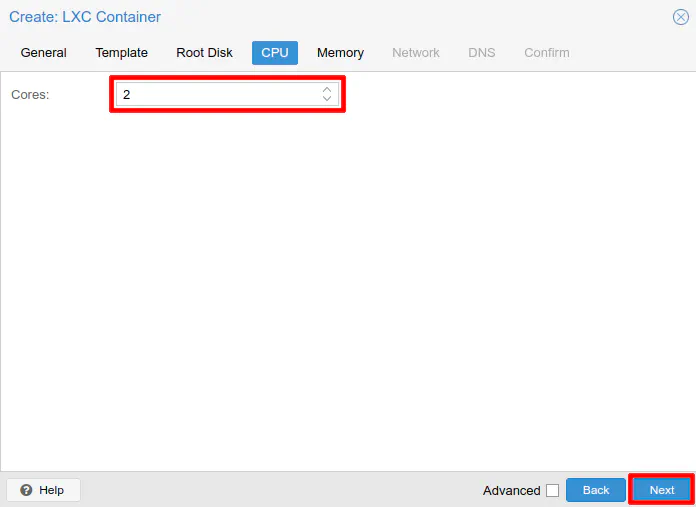
The number of CPU cores you choose may depend on how many cores you have available in your system. Duplicati seems pretty light on CPU resources even though the data is encrypted before backing up to the cloud. I have 4 CPU cores enabled on mine, but I put 2 cores in the example since I only use a few percent of the 4 cores. It does not hurt your overall system’s performance if you allocate more cores and they are not being fully utilized. Really the core count is like the max CPU cores you wish the container to use. This setting can help prevent a container or virtual machine from consuming all of the system’s resources. Click “Next” to continue.
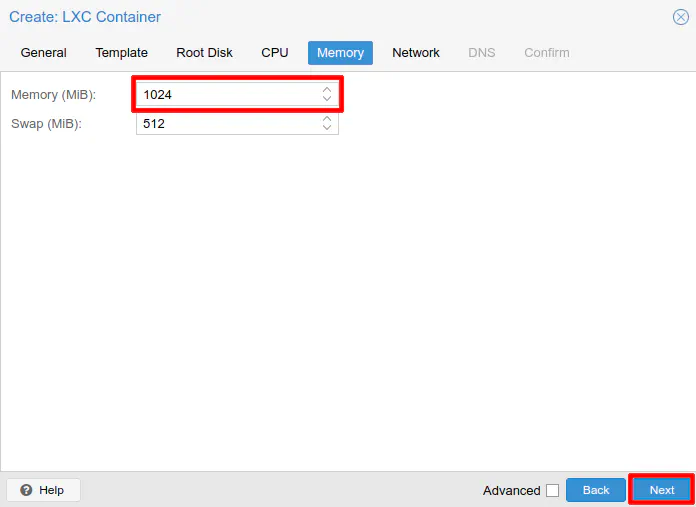
Like with the CPU requirements, the memory requires are quite low also. My Duplicati installation has been running for a few days now and it is only consuming about 240-250 MB of memory! Not bad especially when comparing to Crashplan and you had to allow several GB of RAM if you had several terabytes of data uploaded. While the default 512 MB of RAM may actually be sufficient, it does not hurt if you set it to 1 GB to add some cushion. Click “Next” to continue.
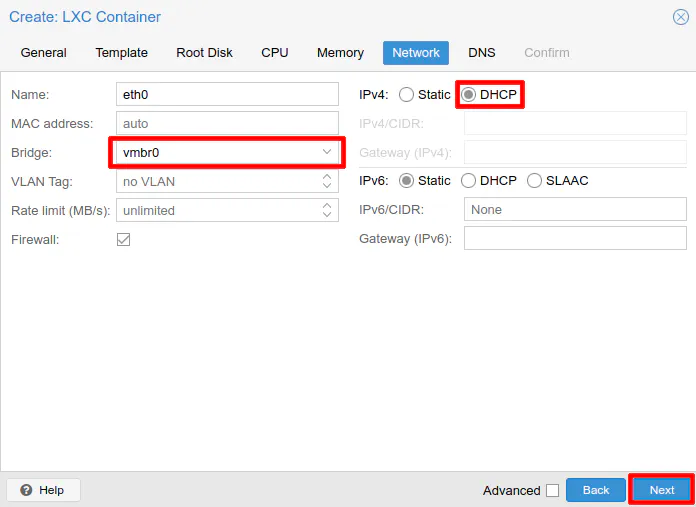
For the network settings, this could vary depending on how you have your network configured. For purposes of illustration, I am going to use the default network bridge that is created by Proxmox if you only have one network adapter in your system. It is called vmbr0. If you do not wish to use static IP addresses, select DHCP for IPv4. By default, IPv6 is set to “None” so you may change that as well if you wish to use IPv6. Click “Next” to continue.
On my Proxmox server, I added a 4 port 1 Gbps network adapter to my server so that I can physically connected various containers and VMs to different VLANs on my network. My goal of adding extra network ports was to minimize any bottlenecks with data traveling between the different VLANs. If using a single port, the bandwidth is shared among the VLANs (like a router on a stick configuration). By using separate physical ports, each VLAN will have the full 1 Gbps bandwidth instead of shared on a single 1 Gbps link.
I realize that I could also connect all 4 ports to my switch and set it up as a LAG interface to share bandwidth. Perhaps I will do that one day, but I think it is simple enough to use them as separate interfaces. The nice thing about individual physical interfaces is that any time I spin up a new container or VM and select the desired bridge they just show up on my network in the appropriate VLANs because I have those physical ports configured on my switch to belong to particular VLANs.
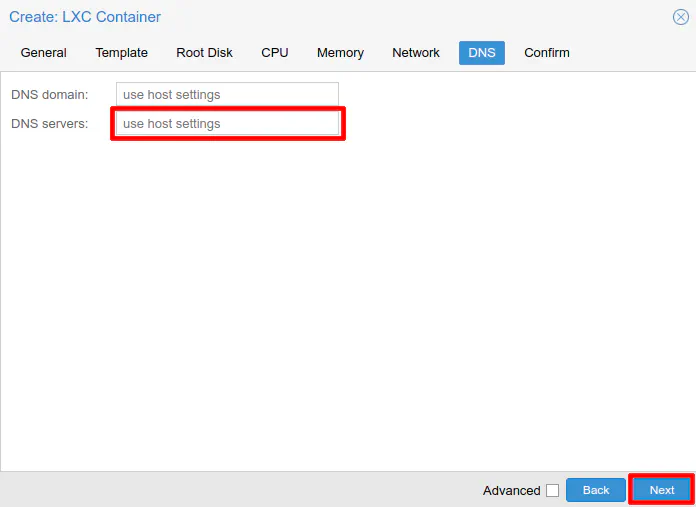
On the DNS settings section, you may leave both boxes blank if you wish to use the same domain name and DNS server as the host. When using the default network bridge which the Proxmox management access also uses, you may leave the DNS settings blank. However, if you are using a network bridge that is connected to a different network/VLAN, you will need to set the DNS server to the interface/gateway address of that network. For instance, if the network bridge is connected to VLAN 20 with the network address of 192.168.20.0/24, you likely will want to set the DNS server to 192.168.20.1 unless you have the gateway set to a different IP address. This is a very important option to configure properly because you may not be able to access anything else on your network or the Internet using domain names. Click “Next” to continue.
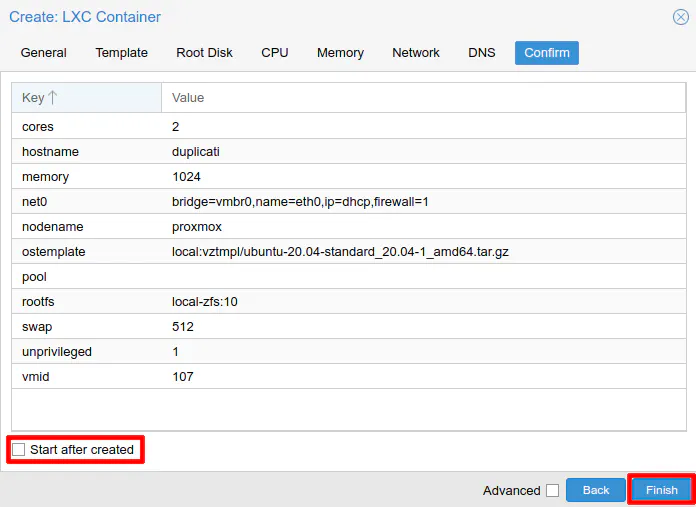
On the summary page, be sure to leave “Start after created” unselected since the next step is to create bind mount(s) for the data you wish to back up. The bind mounts are recognized until you restart the container so if you add the bind mounts before starting the container, they will be immediately available. Click “Finish” to create the LXC container.
You will see the output of the LXC container creation that should look something like the following:
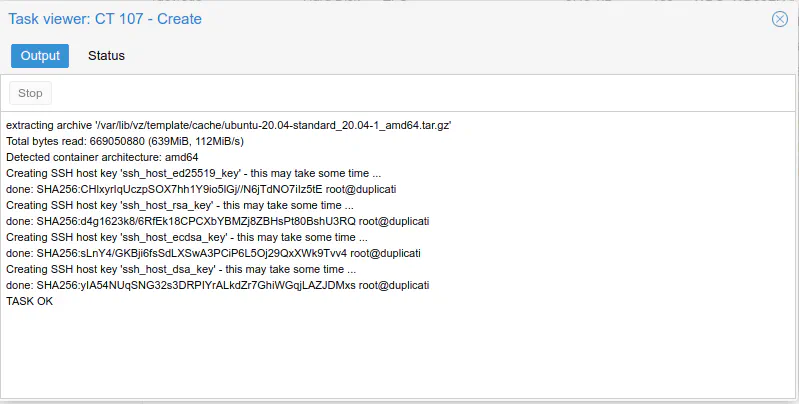
If it says everything is “Ok” then it is time to mount the data to be backed up!
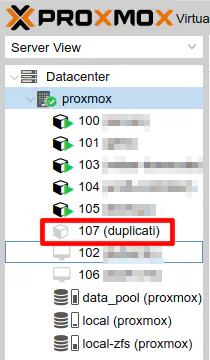
Create bind mounts if using local storage
I am going to assume for simplicity that you already have the storage drives set up and there is data on the host Proxmox machine that you are wanting to backup. If you do not, you will need to do that before proceeding with this how-to. If you have another location which contains data like a network file share, you would need to mount the data differently (perhaps inside the LXC container itself rather than the Proxmox host) so you would skip this step.
With the LXC container created but not yet running, it is a good time to add bind mount(s) to the container. Bind mounts provide a way to share data from the host Proxmox server to any LXC container. They work with both privileged and unprivileged containers, but depending on what you are trying to accomplish, you may run into some permission issues while running an unprivileged container. I believe it is possible to remedy some of those issues in an unprivileged container if you have an understanding of how to manage permissions.
If you are running virtual machines, you will have to share the data via SMB or NFS just like you would with any other machine on your local network. Virtual machines appear as separate physical machines on your network. I found it to be a little bit frustrating to have to create network shares when the data is on the same physical machine since I was accustomed to VirtualBox which easily allows mounting folders from the host machine. The folders end up appearing as network folders in the VM, but the configuration was simple. You could argue that setting up SMB/NFS is easy enough, but it does require configuring SMB or NFS on the host machine and mounting the share in each VM rather that just tweaking the VM only as with VirtualBox (since you do not need to set up SMB or NFS on the host machine with VirtualBox).
Creating bind mounts can be done via command line or by editing the container’s configuration file directly on the host proxmox machine. Go to your Proxmox server in the web GUI and click “Shell” (or log into your Proxmox server via SSH).

The command for adding a bind mount is:
pct set 100 -mp0 /data_pool/media,mp=/mnt/media
The value “100” is the number that you assigned to your container. By default, the numbers start at 100. -mp0 is the mount point number. It must begin with -mp but if you have more than one folder you wish to bind mount, you will need to use -mp1, -mp2, etc. It is important to note if you use this command and you use the same mount point as an existing mount, it will be replaced. There is no warning message about overriding the existing bind mount! Next is the folder on the host system you wish to bind mount. Finally, you must set the mount location inside the LXC container. Linux typically includes a standard /mnt folder so in my example command I used that folder. You do not need to create the folder in the container before adding the bind mount.
If you wish, you may edit the LXC container configuration file to add bind mounts rather than using the pct command. There may be situations where this is more convenient. If you have several mount points, you could copy and paste them from another container’s configuration file if you are using similar folders or you could add several mount points at a time directly in the text editor both of which may be quicker than running several commands. To edit the configuration file, open it using the following command:
nano /etc/pve/lxc/100.conf
The name of the configuration file is the number you used for the container so if your container number was 102, you would use 102.conf as the filename. You will see the following configuration from the container that you created following the steps in the previous section of this page.
arch: amd64
cores: 2
hostname: duplicati
memory: 1024
net0: name=eth0,bridge=vmbr0,firewall=1,hwaddr=B2:F7:4B:6E:1B:C3,ip=dhcp,type=veth
ostype: ubuntu
rootfs: local-zfs:subvol-107-disk-0,size=10G
swap: 512
unprivileged: 1
Simply add the bind mount to the bottom of the file as save it using “Ctrl + O” and “Ctrl + X”. That is all you need to do!
...
swap: 512
unprivileged: 1
mp0: /data_pool/media,mp=/mnt/media
Start Container and Update Packages
With the container configured, it is now time to start it. Click on the container and then the “Start” button in the Proxmox web GUI. Then click on the “Console” button to bring up the console window. Log in as the root user using the password you set when you created the container.

It is a good idea to keep your software up to date for security and bug fixes, so run the standard Debian/Ubuntu update commands:
apt update
apt dist-upgrade
Install Mono
Duplicati is built upon the .NET framework so you will need to install Mono when using Duplicati on Linux. Mono is an open source implementation of the .NET framework. Using the installation instructions on Mono’s website, you will need to run the following commands. It is a large library so it may take several minutes to download and install.
apt install gnupg ca-certificates
apt-key adv --keyserver hkp://keyserver.ubuntu.com:80 --recv-keys 3FA7E0328081BFF6A14DA29AA6A19B38D3D831EF
echo "deb https://download.mono-project.com/repo/ubuntu stable-focal main" | tee /etc/apt/sources.list.d/mono-official-stable.list
apt update
apt install mono-devel
Install and Configure Duplicati
Finally, it is time to install Duplicati. You will need to go to their website to find the download link to the latest version. At the time of this writing, the URL to the latest version is https://updates.duplicati.com/beta/duplicati_2.0.5.1-1_all.deb. Once you have that URL, you can download it via command:
wget https://updates.duplicati.com/beta/duplicati_2.0.5.1-1_all.deb
In the same folder where you downloaded the file, you can manually install the .deb file by entering:
apt install ./duplicati_2.0.5.1-1_all.deb
Now that Duplicati is installed, you will need to configure the web interface so that it is accessible on the network. By default, the web interface only listens on localhost. This may be fine if you plan to tunnel into your Duplicati server to access the web interface. However, it is more convenient to access it directly on the network. You may set a password so that it is not as easily accessible and of course, you may restrict access to your Duplicati server via firewall rules (which I have written about on this site using the OPNsense firewall).
To edit the configuration file, you can run the following command:
nano /etc/default/duplicati
Then you can add the following line at the bottom of the configuration. The default port is 8200 so you do not need to include the “–webservice-port” option if you wish to use the default port. I included that parameter in case you wish to change it. If you wish to set a password to the web interface, you can use the “–webservice-password” parameter. I recommend setting a password to make it more difficult for someone on your network to mess with your backup. Press “Ctrl + O” and “Ctrl + X” to save and exit.
DAEMON_OPTS="--webservice-interface=any --webservice-port=8200 --webservice-password=password123"
To enable the Duplicati service and start it, you may use the following commands as stated in the Duplicati documentation:
systemctl enable duplicati.service
systemctl daemon-reload
systemctl start duplicati.service
You can check the status of the service to ensure it is running properly:
systemctl status duplicati.service
You may remove the install file once you have verified the service is running properly.
rm duplicati_2.0.5.1-1_all.deb
Log into Duplicati
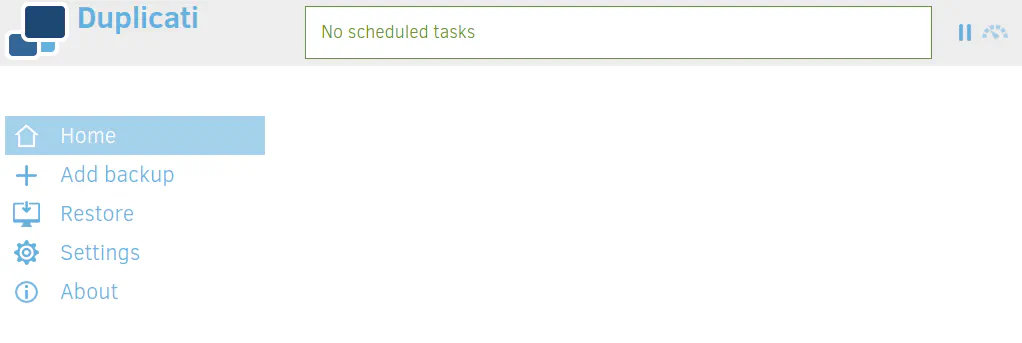
Now you may log into the Duplicati web GUI using your IP address of your Duplicati server. For instance, it will look something like http://192.168.1.100:8200. You will need to use the default port number of 8200 or use the port number you set for the Duplicati web interface. The main page of Duplicati should display entering the proper URL.
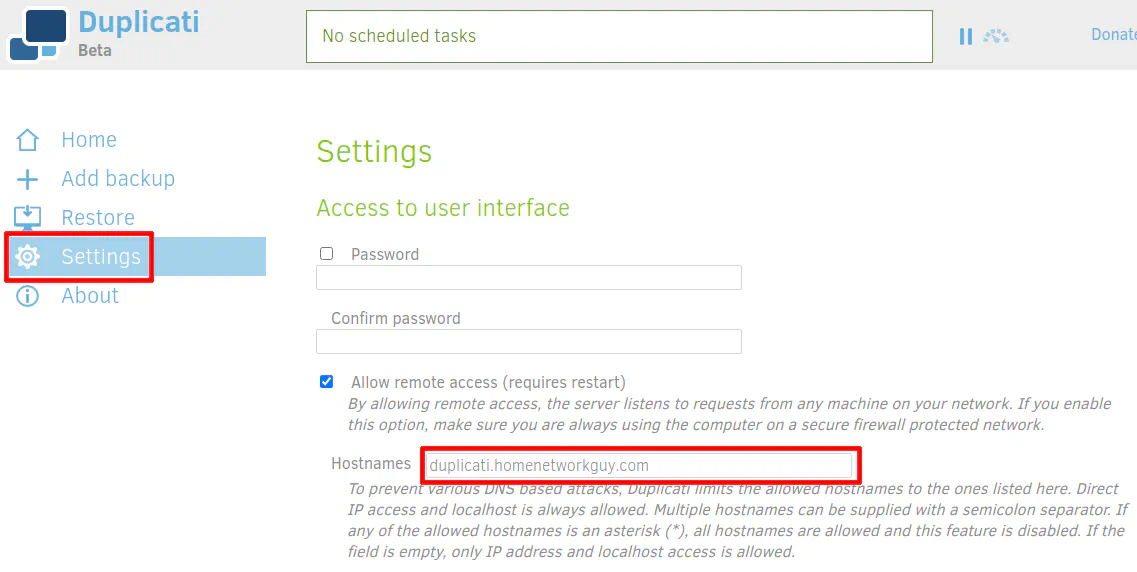
If you wish to access Duplicati using a hostname instead of an IP address, you need to set the hostname on the “Settings” page. The note on the page says they do this to prevent DNS attacks, but I am not sure which attacks they are worried about in particular. It is good they are considering security implications even though it causes a slight inconvenience.
Create your Backblaze B2 Backup
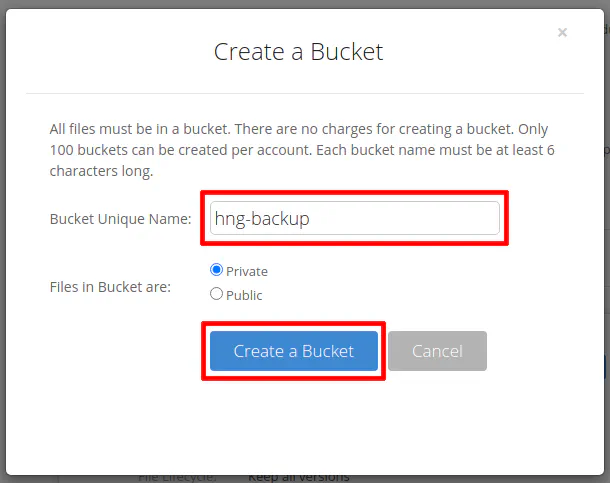
If you have not done so already, you will need to create a Backblaze B2 bucket. To create a bucket is simple. Click on the “Buckets” menu option and then “Create a Bucket”.
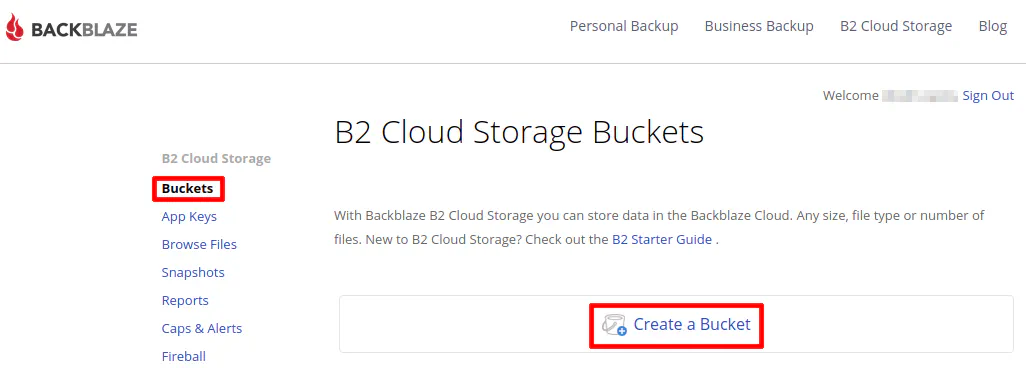
Enter the name of your bucket and leave the setting as private since you are only using the bucket for backup purposes. Remember the files Duplicati create are chunked, encrypted files so you could not share any useful data anyway. That is not typically the purpose of a secure, encrypted cloud backup.
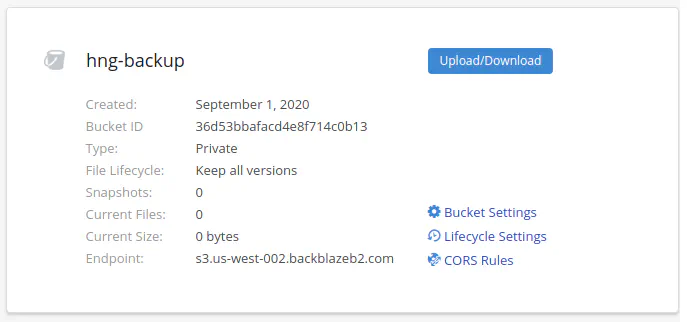
You should see the bucket listed on the buckets page. Note that I did not blur out the bucket ID in the screenshot since I created it (and later deleted it) for purposes of this how-to.
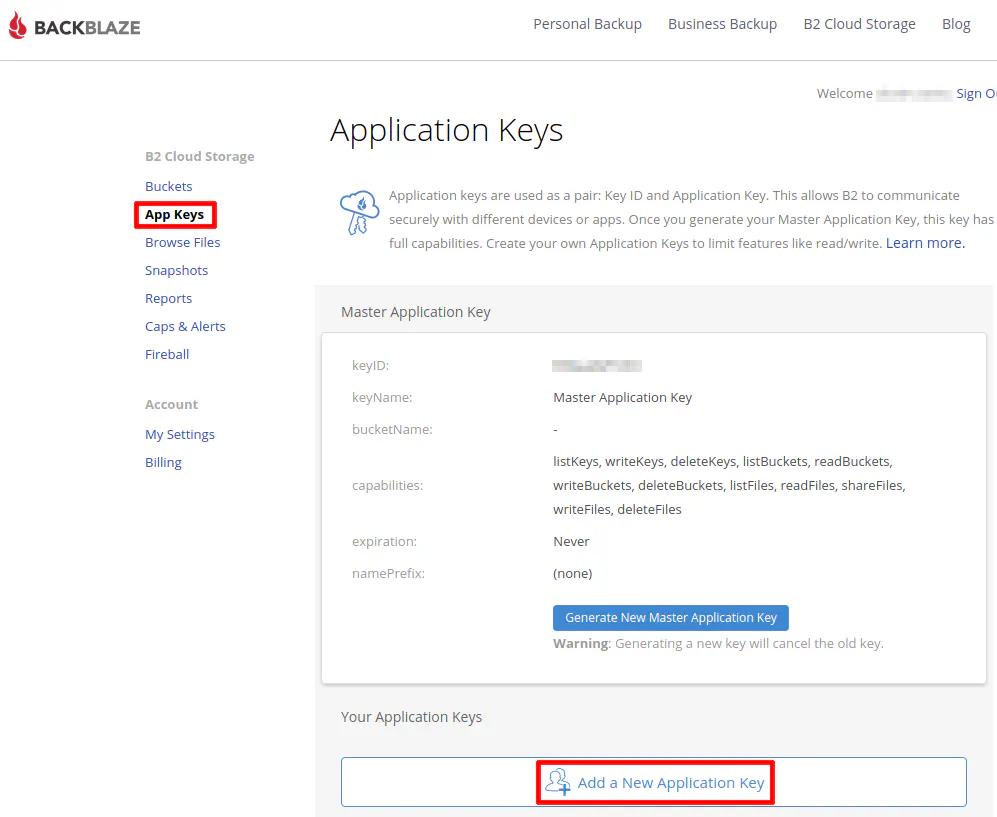
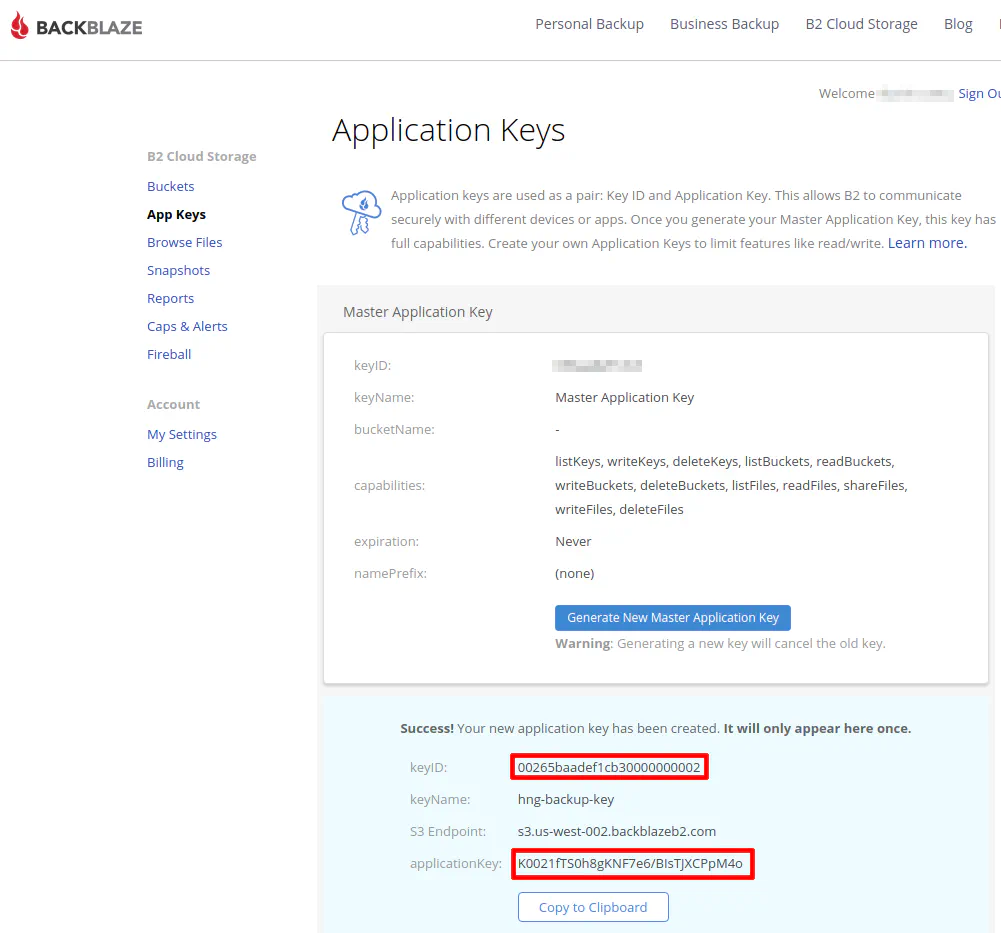
Next you will need to create an application key to give to Duplicati so it can access your B2 bucket. Click on the “App Keys” menu and then “Add a New Application Key”.
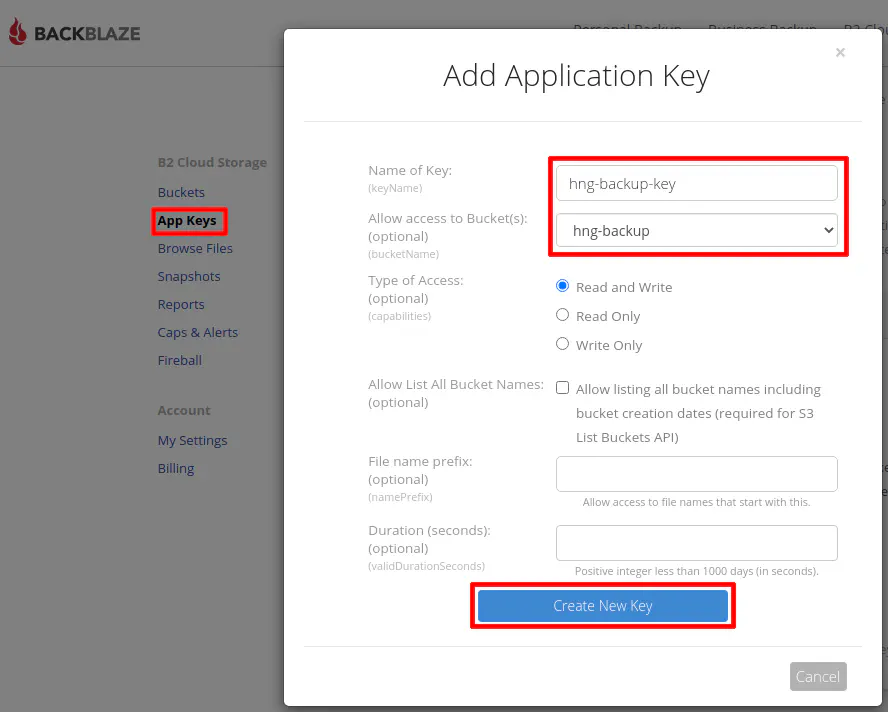
Enter the name of the application key. It can be whatever you like. Select your backup database to further restrict your app key. Click the “Create New Key” button when you are finished.
Make note of the “keyID” and the “applicationKey” values. They will need to be entered into Duplicati. These values are only shown once for security purposes. If you lose track of them, you will have to generate a new app key. I left the ID/key visible in the screenshots to show what they should look like. I am not using those values for my personal backups.
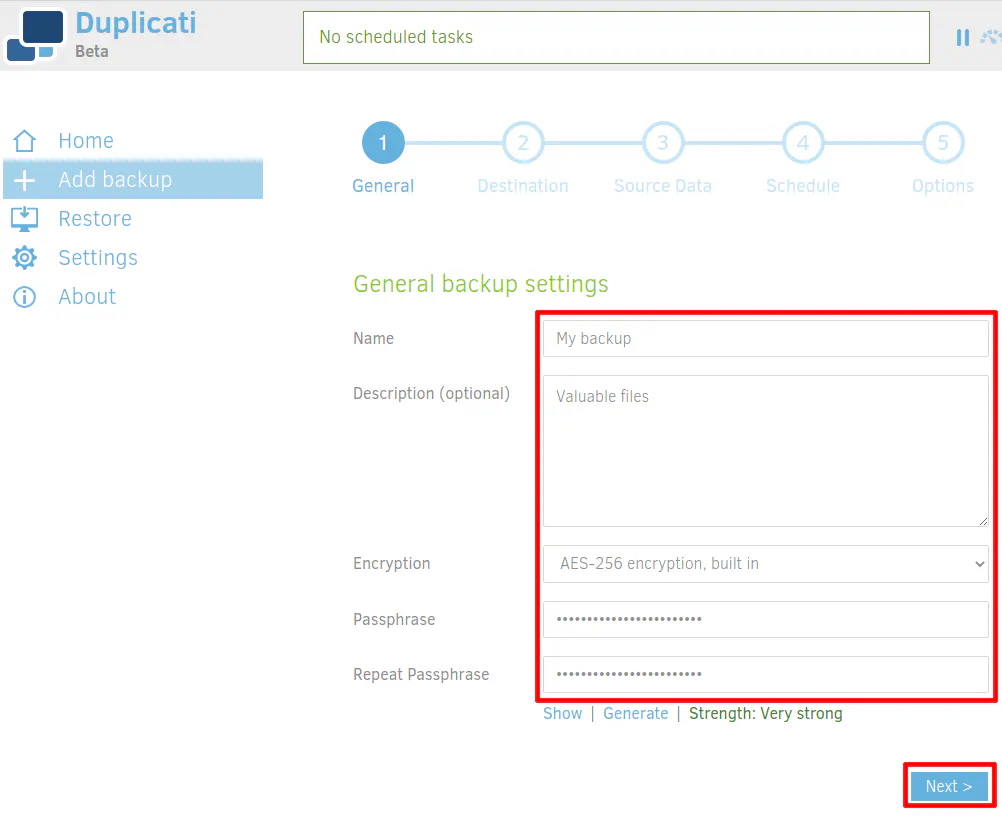
Now you are ready to create your backup using Backblaze! In the Duplicati web interface, go to “Add Backup”. The option “Configure New Backup” should be selected by default.

Enter the name and description for your backup. My example has a creative name of “My backup” and description of “Valuable files”. AES encryption should be selected by default, which is highly recommended for secure backups. Finally, enter a strong passphrase for the encrypted backup. The passphrase will be used to encrypt the files. If you lose this password, you will not be able to recover your backups! I would highly recommend using a password manager to store all of your passwords.
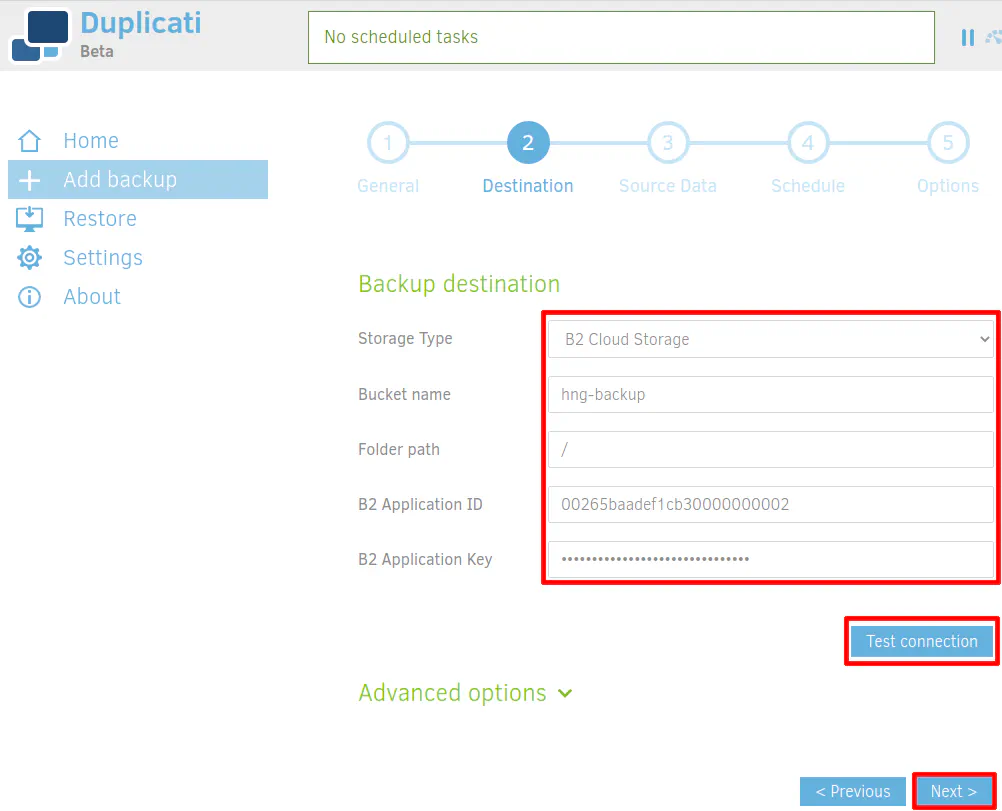
For the backup destination, select B2 storage to use your Backblaze B2 storage. Enter the name of your B2 bucket. My example used “hng-backup”. Unless you are using your bucket for more than just backups, you likely do not need to set a folder path. Enter a “/” to save files in the root directory. Set the “B2 Application ID” to be the same value as your “keyID” when you generated your app key in Backblaze. Likewise, the “B2 Application Key” will be set to the “applicationKey” value. Once the values are set, you should click “Test Connection” to ensure you entered everything properly and can connect to your B2 bucket.
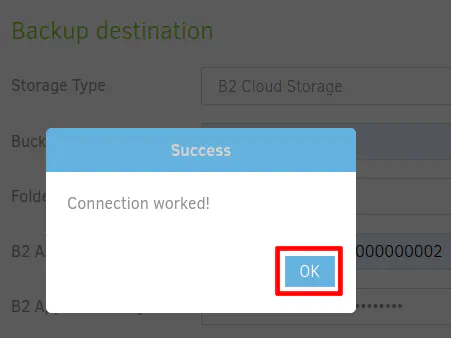
You should see a successful test connection if everything has been set up properly.
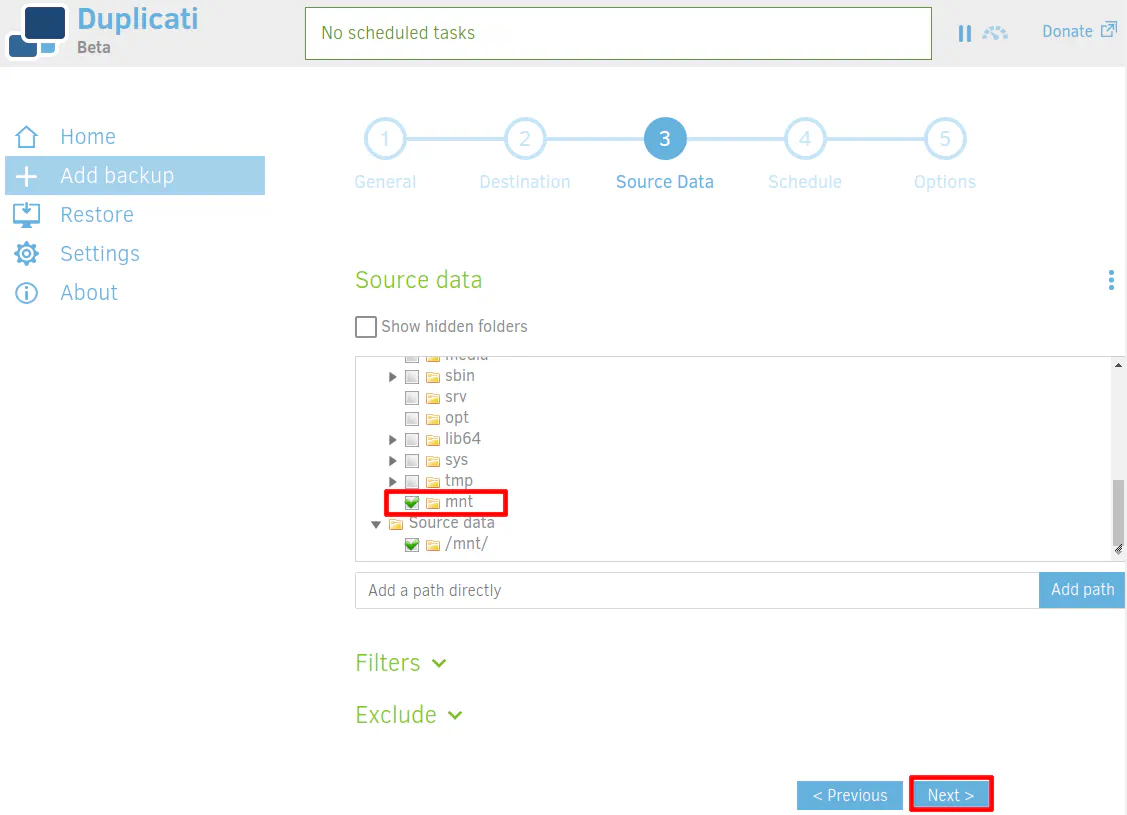
The source data should be the folder you mounted earlier in the “/mnt” folder. I just selected the entire folder in my example but you will likely want to click the folder inside the “/mnt” folder. You can include/exclude specific folders based on your backup needs so you do not have to backup the entire folder if you only want certain folders to be backed up.
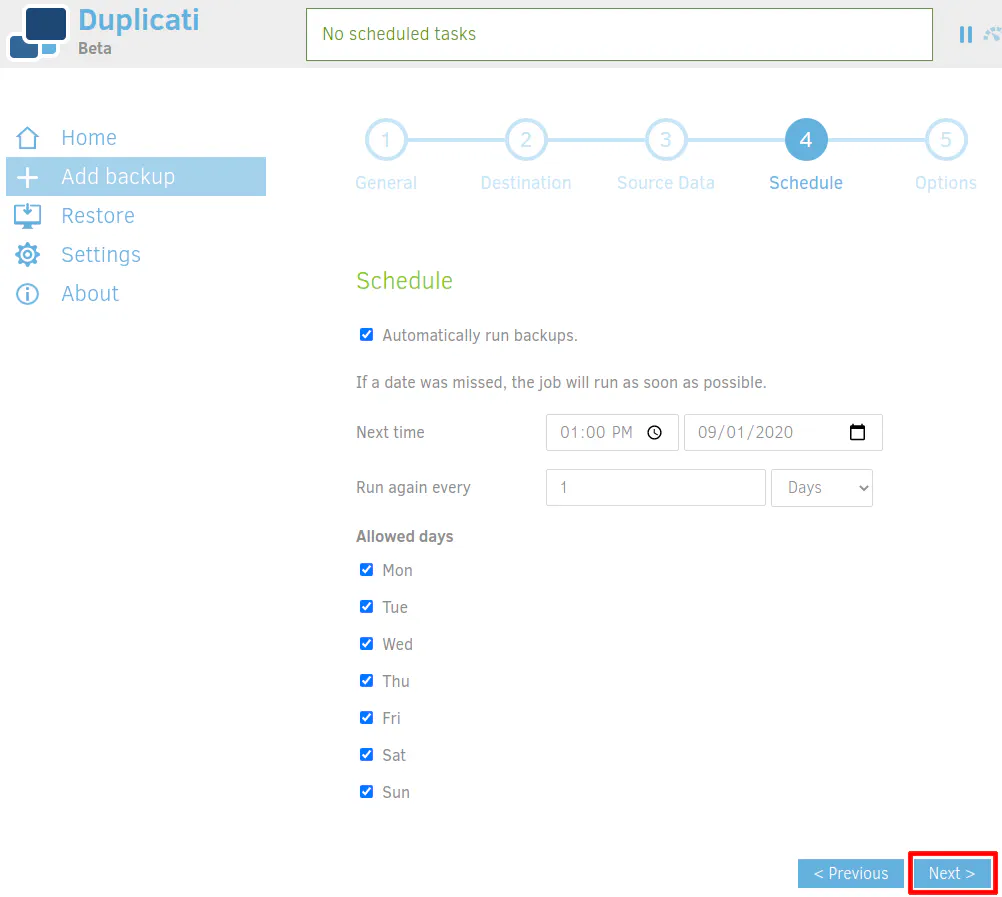
You can choose whatever schedule works best for your backups such as in the middle of the night when you are not actively using your network. Since the offsite backup should not be your only copy of the data, once a day backups may be adequate to protect your files unless you desire more continual backups. Duplicati allows you to select down to the minute level so you can make backups close to real time. However, you may not want to be too frequent just in case it makes API calls to Backblaze which you may get charged for. That may not be the case (I have not used B2 long enough to find out), but I wanted to mention it so that you are not surprised if something like that happens to you. Crashplan’s backup service would run periodically checking for new or updated files to backup so you could mimic that with Duplicati (with way less resource utilization).
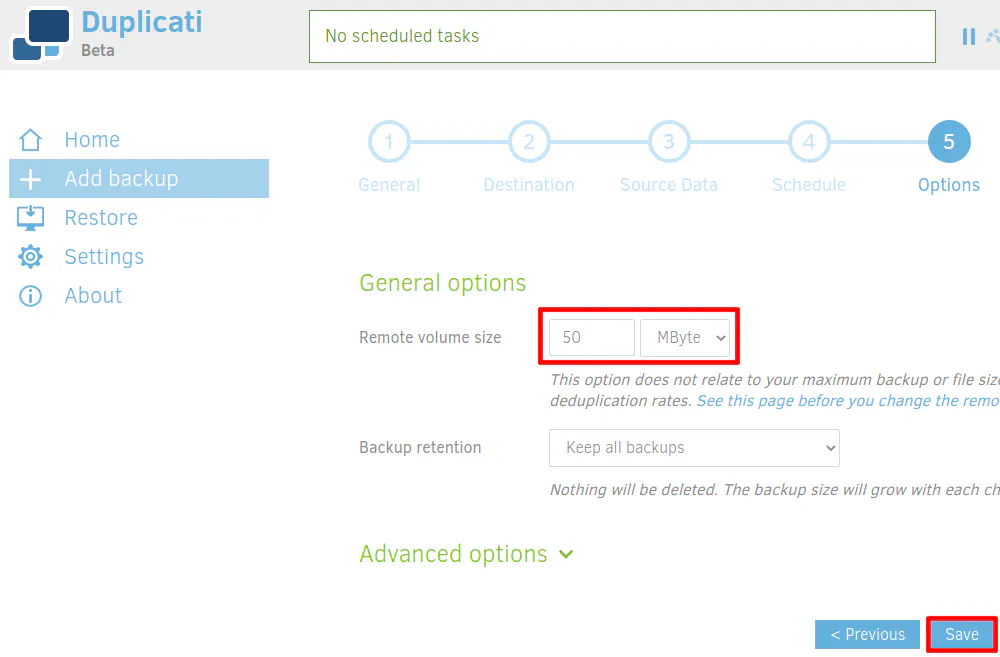
The last thing you may want to configure is the “Remote Volume Size”. This is how large each encrypted file chunk should be. The default is 50 MB. You can make it larger or smaller if you want. The Duplicati team recommends smaller file sizes for slower and/or less stable Internet connections while larger files can be used with faster, stable connections. I believe there are various reasons for that recommendation. Entire file chunks may need to be uploaded or downloaded depending on changes made to files, interrupted network connections, data corruption, and restoring files. Since a file chunk may contain parts of many files, if you have too large of a file chunk, you will need to download a lot more data than necessary in order to retrieve the desired files. The same goes for uploading file chunks. If one small file gets updated, an entire encrypted file chunk will need to be uploaded with the updates. You may also consider where you are backing files to since some destinations may not perform well with having hundreds of thousands of files in a single folder. I imagine with B2 having lots of files in a single folder should not be a problem since it is a cloud-based system designed to handle lots of data.
Once you save your backup configuration, you should see it listed on the main Duplicati page. You will see the status of whether or not the backup is running. Depending on how you configured your backup schedule, you may want to just start the backup to get the initial upload completed. If you have lots of data and a low amount of Internet bandwidth, be prepared to allow several days or weeks for the initial backup to finish.

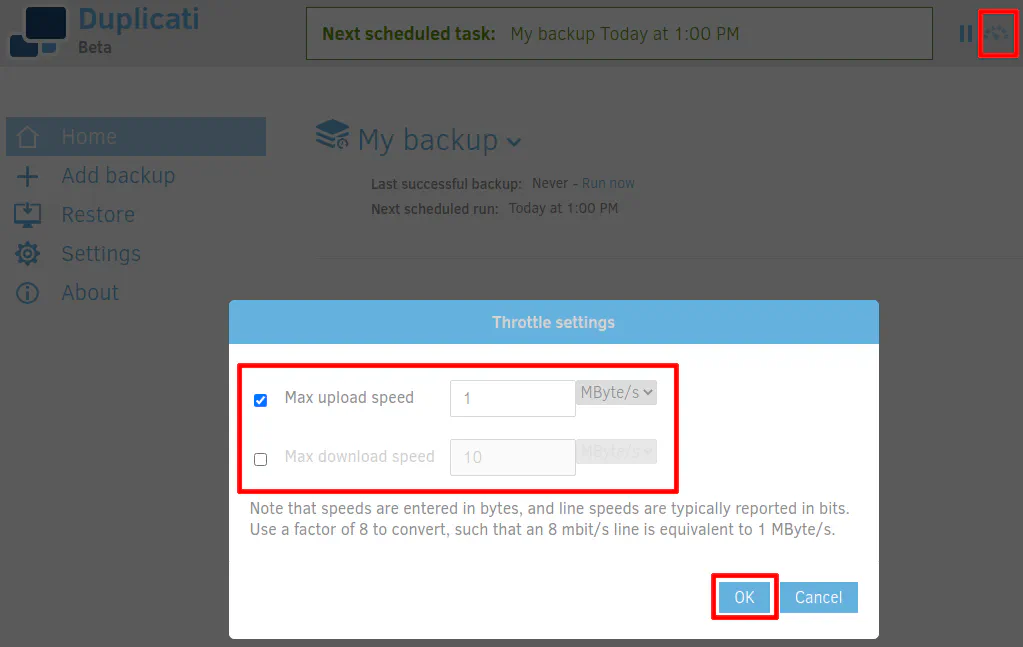
If you are not blessed with a large amount of upload bandwidth, you may want to limit the amount of bandwidth used to upload the data. Even if you have a lot of upload bandwidth, you still may want to set a limit so it does not saturate your entire pipe (if you have QoS set up on your network, perhaps this is not a problem for you). You can do so by clicking the throttle icon beside the backup progress bar at the top of the page. The bandwidth is measured in bytes instead of bits, so you need to do the math to determine the proper value to set. Divide your Mbps (or Gbps if you are blessed with that amount of bandwidth) by 8 to figure out the number of bytes. So for a 8 Mbps (megabits) connection, it would be 1 MBps (megabytes).
