Build a Compact Raspberry Pi Zero Powered Music Player

Table of Contents
In my children’s bedrooms, we use old iPhones to play quiet music at bedtime and at nap time. However, the kids are very tempted to play with the phones which has caused some issues in the past (filling up the storage with random photos, etc.). You can only disable and hide so many features on the iPhone. I have long said that I should just build my own music player so all they can do is pick music and nothing else. That day has finally come!
My goal was to use only off the shelf components that are “plug and play” to keep things simple. Although I enjoy digging into more complex projects, I do not always have time to spend on them. Because of the requirement to use off the shelf components, I had to strike a balance between having some components inside of a pretty case and other components outside of the case. Since my kids will be touching it, I wanted minimal electronics exposure to reduce the likelihood of damaging the hardware but also there could be a small chance of getting an electrical shock.
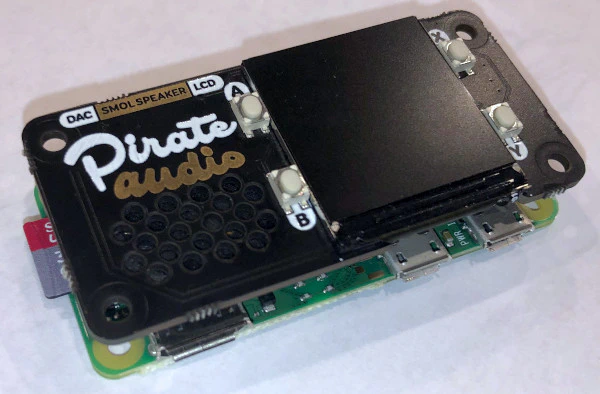
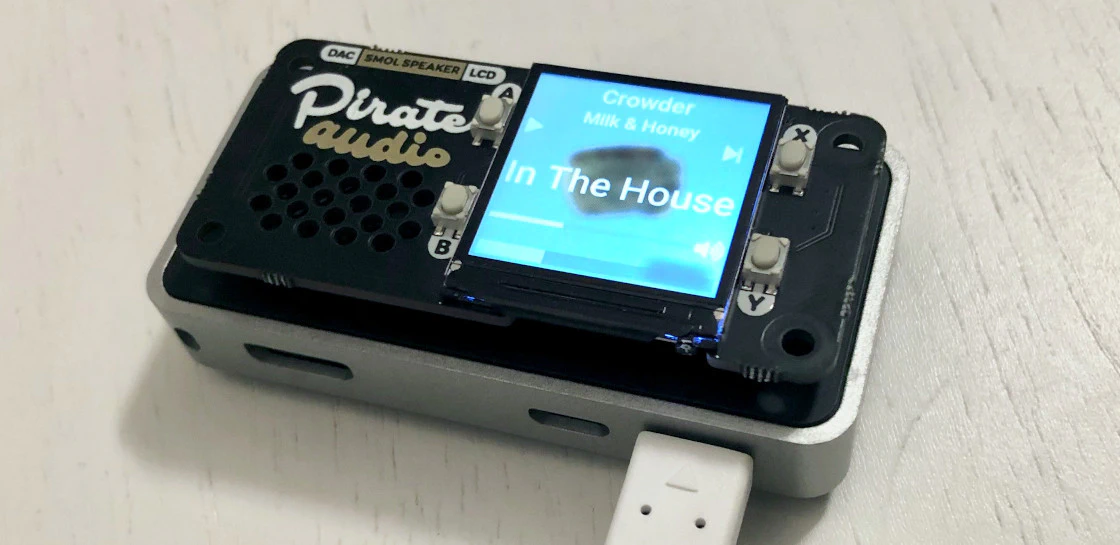
What I came up with for my youngest child’s bedroom is using a Raspberry Pi Zero 2 W in a Flirc case (which is a beautiful case) with a Pimoroni Pirate Audio Speaker/Display HAT on top. It makes for a fairly clean appearance. The Pi Zero is protected within the case as well as the microSD card so the kids cannot mess with those components. The Pirate Audio HAT only has a few simple buttons and is not a touch screen so you cannot choose the audio from the device itself. The kids can only press play/pause, next track, and volume up/down for the current play queue or playlist. To select music, a web browser on a phone or computer must be used. This is a perfectly acceptable requirement for my use case for my youngest child (for my older children, I am looking into using a small touch screen so they can pick their own music to give them more control).
Note
Please keep in mind that the audio quality is actually worse than a cell phone especially at loud volumes but when turned down low, it does sound more similar to the quality of phone speakers. Since I am using it for quiet ambient music, it works well enough for that purpose. I would not recommend this speaker if you wish to fill a room with nice quality audio (even for a small room). You are likely to be more amazed at the end product than the audio quality because it is just awesome to build something and have it work properly.
I posted my music player on Twitter since I liked the end result of the project. Although the concept was not entirely unique (someone shared in a comment a similar build using a different case), it seemed to be very well received. Therefore, I decided to write up how I built it. Originally, I used the automated installation script provided by Pimoroni, so I was thinking there would not be much to write about. When my wife unplugged the music player while I was doing an important system update, I had to reinstall everything from scratch since it did not boot up properly. I seized the opportunity to document my steps. However, when I tried using the automated script again, it did not work properly. I believe the public key for the Mopidy package changed or something similar. I tried both the “Buster” and “Bullseye” versions of Raspberry Pi OS. Because the scripts recommend the older version of Raspberry Pi OS (Raspbian Buster), I thought it would be another good reason to try the manual installation to see if it would work on the latest version of the Raspberry Pi OS. Spoiler alert: it does and on the 64-bit version if you are using the Pi Zero 2!
Info
After using the music player for a few days, I feel certain that things are working better with the manual installation than the automated script that I originally used because it is using newer versions of all the software.
Previously, I experienced issues with the default Iris client not wanting to connect to the Mopidy service. Rebooting the device would fix it, but sometimes it would reconnect on its own after I tried again later. I have not noticed such issues this time around, which is great since it makes for a better experience.
Parts list
Below are the parts used for this build (disclosure: they are Amazon affiliate links):
- Raspberry Pi Zero 2 W or the original Pi Zero WH (with headers)
- Raspberry Pi Header (only need 1 if you are soldering it on a Pi Zero 2)
- Pirate Audio Display/Speaker
- Flirc Raspberry Pi Zero Case
- SanDisk 64GB Ultra MicroSD Card
- Micro USB Power Supply
Tip
I recommend you get the Raspberry Pi Zero somewhere other than Amazon because many are not authorized dealers and therefore charge higher prices. It may be difficult to find a Pi Zero during supply shortages so you may have to by a kit with extra items you may not need in order to get a Raspberry Pi Zero board.
Also, you may want to try to find a board which has the pins soldered onto the board if you do not feel comfortable soldering the pins. There are some solderless options available, but you need to ensure you purchase the proper tool to install the pins or you could damage your board (which happened in my first attempt at this project).
Insert microSD Card into Computer
You will need another system in order to write the Operating System to the microSD card. Many laptops have SD card readers and some microSD cards come with an adapter to make it a full sized SD card. If your system does not have a memory card reader, you can purchase cheap USB memory card readers (affiliate link) . On my PC, I actually am using an internal 3.5" memory card reader (affiliate link) that fits into a 3.5" bay of my computer case (it is a good ‘modern’ use for that space for cases which still have an external opening for 3.5" bays).
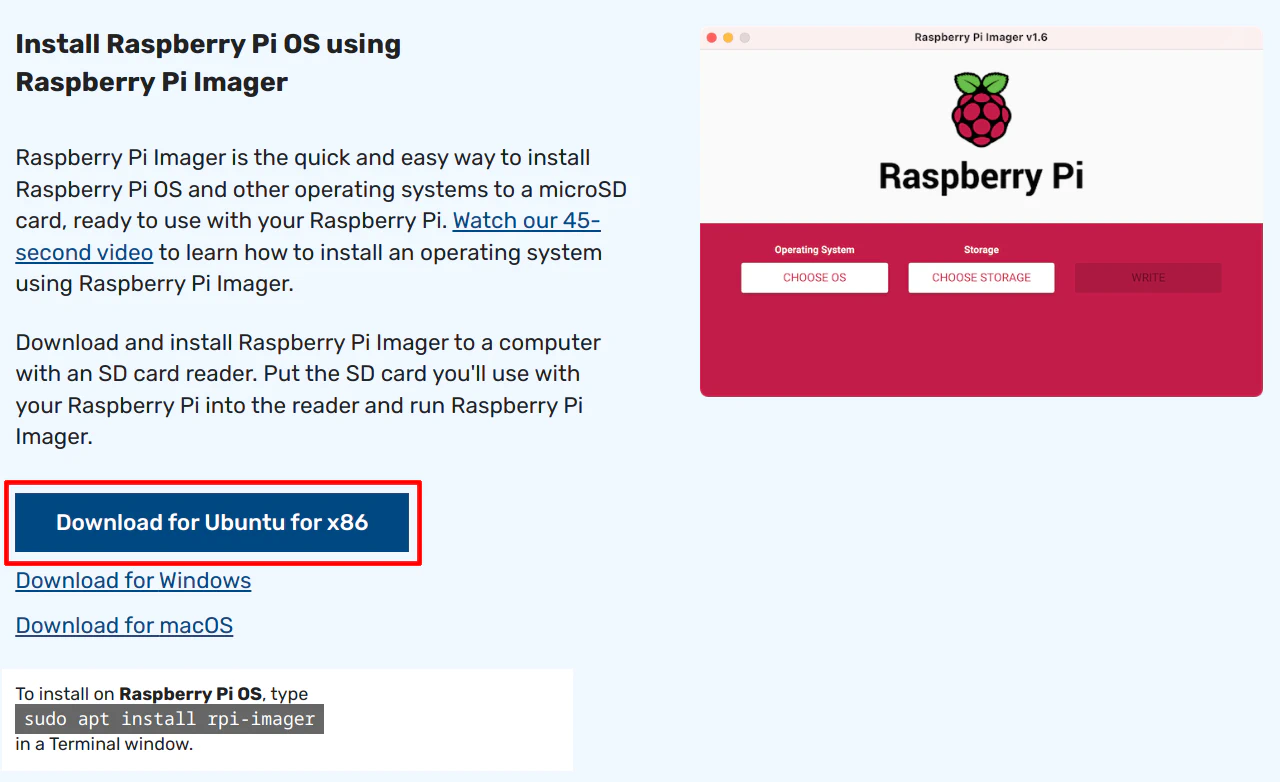
Download Raspberry Pi Imager
For common Raspberry Pi software images, I prefer to use the Raspberry Pi Imager software since it makes it really easy to select several different platforms that you can run on the Raspberry Pi. You do not have to go looking for the image downloads on various websites.
Go to the Raspberry Pi OS download page to find the imaging software.
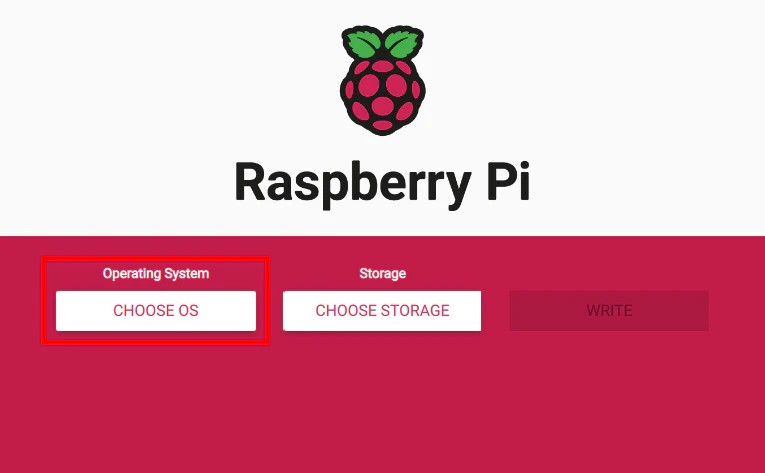
Click the “Choose OS” button.
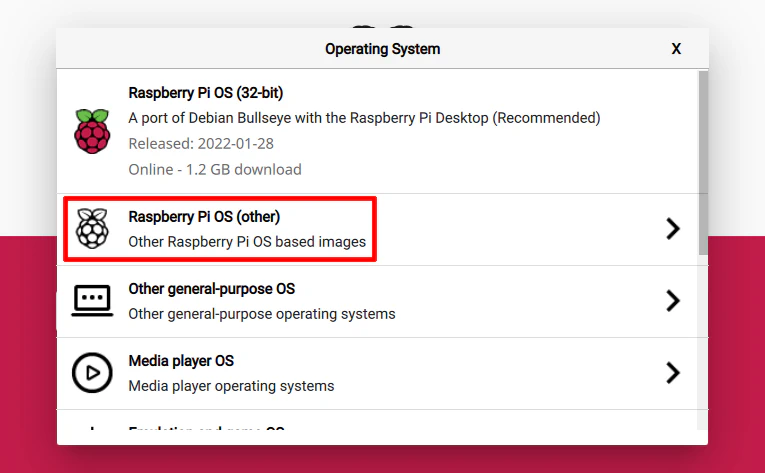
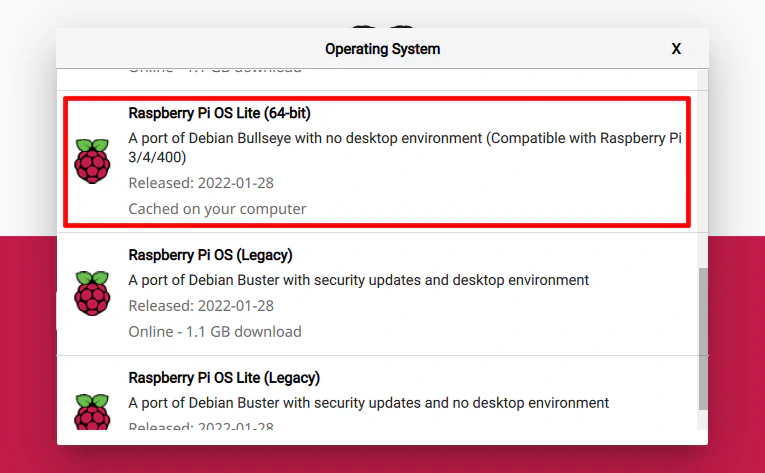
Then select the “Raspberry Pi OS (other)” option since you only need to install the “Lite” version of the Raspberry Pi OS to minimize resource usage on the Pi Zero.
If you are using the original Raspberry Pi Zero, click on “Raspberry Pi OS Lite (32-bit)” (Bullseye).
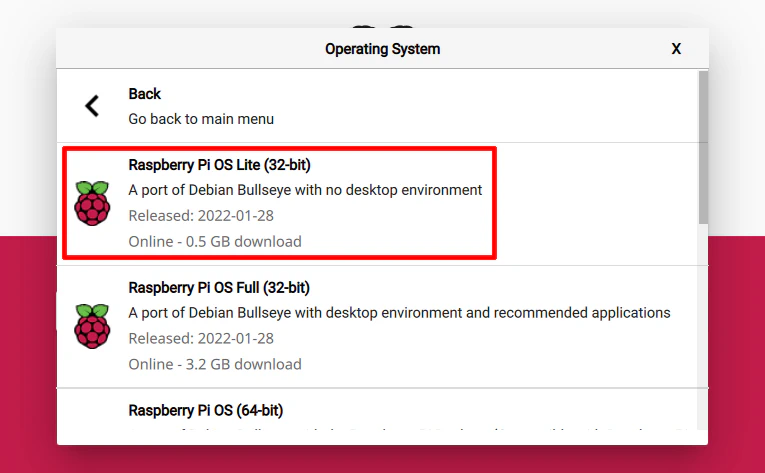
If you are using the Raspberry Pi Zero 2 W, click on “Raspberry Pi OS (other)” and then select “Raspberry Pi OS Lite (64-bit)” (Bullseye).
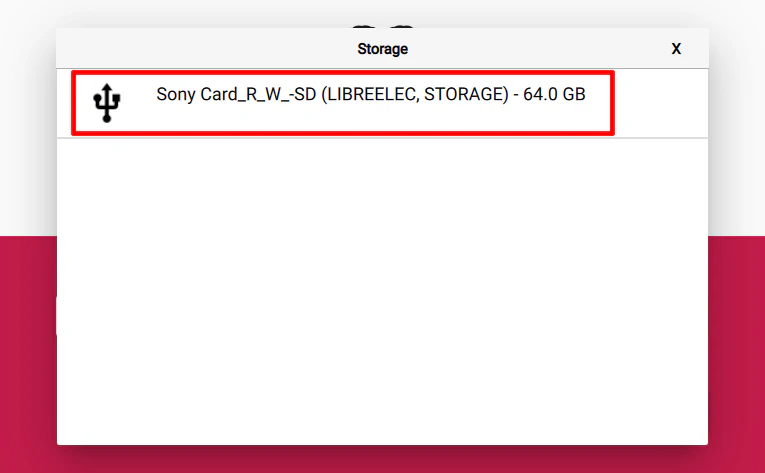
Choose your storage by clicking the “Choose Storage” button. By default, the imager will only display removable storage.

On my system, I am using a 64GB microSD card. You be using something different.
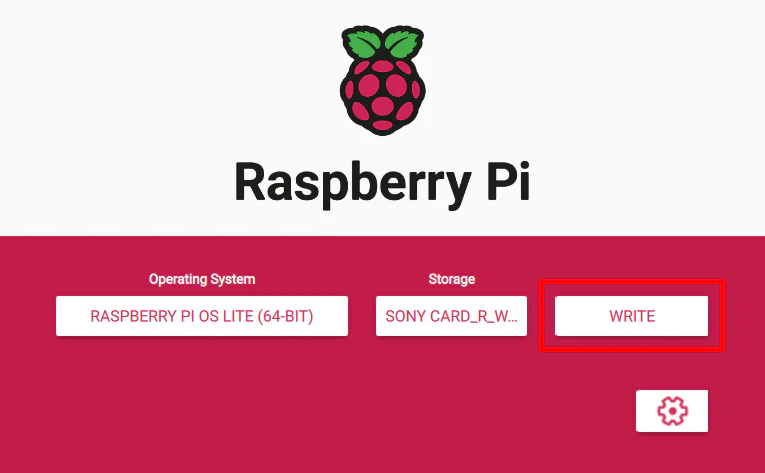
Finally, click the “Write” button to finish writing the image to the microSD card. It will verify the contents on the card after it writes the data. The “Lite” image will write much faster than the full Raspberry Pi OS.
Headless Setup
Before removing the microSD from your computer, there is some configuration that needs to be done so that you can fully access your music player over the network without needing to plug in a keyboard and display. This is called a headless setup because you do not need to plug in a keyboard and a HDMI cable to the Pi Zero to configure it. If you are not using a graphical interface, this is the most convenient way to setup your RPi. Otherwise, you will need to use an adapter for both the USB and HDMI in order to connect to a keyboard and monitor. If you do not have the adapters, your only option is to configure the RPi using a headless setup.
Enable SSH
Remote access to the Raspberry Pi can be done with SSH, which is a secure protocol used to log into a computer system. To enable the SSH server is very easy. Browse to the “boot” partition on your microSD card using your file browser. Then create a blank file called ssh with no file extension in that folder. That is all you need to do! The default credentials for the SSH server will be pi as the username and raspberry as the password.
Set up WiFi
Next up is the WiFi configuration. The Raspberry Pi example documentation shows two different examples for the configuration. Although it states that the more complex example should work with most WPA protected WiFi networks, I found that the simple example works just fine on my network so I will just use that to keep things as simple as possible.
Create a blank file called wpa_supplicant.conf to the “boot” partition on your micro SD card. Then add the following configuration to the file. You will replace the two letter abbreviation for your desired country as well as enter your WiFi network (SSID) name in place of <your SSID> and your WiFi password in place of <your password>. Do not forget to save the changes to the file!
ctrl_interface=DIR=/var/run/wpa_supplicant GROUP=netdev
country=US
update_config=1

network={
 ssid="<your SSID>"
 psk="<your password>"
}
Raspberry Pi Configuration to Enable the Pirate Audio Speaker
There are a few configuration changes that you need to make the the default Raspberry Pi config.txt file. On the “boot” partition on your microSD card, edit the config.txt file to add the following lines at the bottom of the file:
dtparam=spi=on
dtoverlay=hifiberry-dac
gpio=25=op,dh
You also need to find the line that says dtparam=audio=on and change it to “off” as shown below:
dtparam=audio=off
You are now done with the microSD card and you can remove it from your computer!
Solder the Header Pins (Required for Raspberry Pi Zero 2 W)
If you cannot buy a 3rd party Raspberry Pi Zero 2 W with the headers installed or you know how to solder, you will need to solder the header pins to the Pi Zero 2 board so that you can attach the Pimoroni Pirate Audio Speaker HAT.
Warning
If you are not comfortable with soldering and/or do not have the tools to properly solder the pins, you will either need to purchase a solderless header kit (which has a jig that you can use to safely hammer the pins in place) or you will need to find a Raspberry Pi Zero 2 W with headers soldered (or use the original Pi Zero with headers).
Soldering is not necessarily for the faint of heart because you have the chance of messing up your board. I am no soldering expert yet I was able to successfully solder pins on my Pi Zero 2.
Assemble the Raspberry Pi Zero but do not put it in its Case
For the purposes of testing, attach the Pirate Audio Speaker to the Raspberry Pi Zero and insert the microSD card – do not put it in the Flirc case until you know for sure everything is working properly! The reason is that the Flirc case covers the microSD card so you have to disassemble the case in order to remove the microSD card. I like that the case encloses the microSD card since it is one less thing for the kids to mess with. You may want to choose a different case if you wish to access the card more frequently.
Plug in the Pi Zero since it is time to boot it up!
Warning
Be sure that you plug the power into the proper USB port since one port is for power and the other is for a device such as a mouse/keyboard, etc.
Determine the Hostname/IP Address of the Raspberry Pi Zero and Log In via SSH
If the Raspberry Pi boots successfully, it should connect to the WiFi network and obtain an IP address automatically. If you only have 1 Raspberry Pi connected to your network or you have changed the default hostnames on your other RPi’s, you should be able to access your device using the default hostname of raspberrypi. You could also find the IP address by looking at your router’s DHCP leases page which lists all of the clients and their IP addresses. Of course, you could simply connect the Pi Zero to a keyboard and monitor and run the command ip a, but since I suggested using a headless Raspberry Pi setup, that defeats the convenience of a headless setup.
If you are using a Linux machine, you can simply use the following command to SSH into the Pi Zero using either the hostname or the IP address. Recent versions of Windows may have a SSH client built-in (upon a quick Google search), but I have not tried using it since I prefer to use Linux desktops.
dustin@homenetworkguy:~$ ssh pi@raspberrypi
Or if you are using the IP address instead:
dustin@homenetworkguy:~$ ssh [email protected]
The default user is pi which is already included in the previous command so all you need to do is enter the default password of raspberry. When you log in, it will recommend you change the default password. That is always a great idea for security even on your own home network since it could get compromised directly or from another compromised device on your network. To change the password, use the passwd command as shown below.
pi@raspberrypi:~ $ passwd
Changing password for pi.
Current password:
New password:
Retype new password:
passwd: password updated successfully
Tip
If you wish for SSH to be even more secure, you could enable a SSH key and disable logging into the SSH server with a password.
Software Installation
Upon successful login and password change, you are ready to start installing the software to enable the music player functionality!
Update Raspberry Pi OS
The first thing I often do after installing the OS on a RPi, VM, container, etc. is update all of the software packages. The classic Debian commands to update the software packages are below.
sudo apt update
sudo apt dist-upgrade
Install Mopidy and Dependencies
Next, install the Mopidy software and its dependencies. Mopidy is the music player backend software that will be used to power the music player. It can support local files as well as a few streaming radio services. If you use Spotify, there is a plugin that can be installed for it. I do not plan to include those instructions since I do not use Spotify, but it is available should you desire to utilize that feature.
sudo apt install python3-pip python3-pil python3-numpy mopidy
Install a Mopidy Web Client
You will need to install a web client in order to control the music player. The default web client for the automated script is called Iris. It is a good, basic client to control the music player. To install Iris, run the following commands. The second command is used to give the necessary permissions to the web client to allow more control over the music player.
sudo pip3 install mopidy-iris
echo "mopidy ALL=NOPASSWD: /usr/local/lib/python3.7/dist-packages/mopidy_iris/system.sh" | sudo tee -a /etc/sudoers
Alternatively, if you want to keep the interface as simple as possible you could install an even more basic web client called Mopidy MusicBox Webclient. The nice thing about the web clients is that you can install more than one of them at the same time and be able to access them via different URLs so you can try a couple of different clients to see which one you prefer!
sudo pip3 install Mopidy-MusicBox-Webclient
Install the Pirate Display Plugins
In order for the display to work properly, you need to install the appropriate software packages.
sudo pip3 install Mopidy-PiDi pidi-display-pil pidi-display-st7789 mopidy-raspberry-gpio
Configure Mopidy
You will need to create a config file for Mopidy. Run the following command to open a text editor.
sudo nano /etc/mopidy/mopidy.conf
Paste the contents into the modify.conf into the editor. The only thing you need to change is the local media file directory/folder. In my example, I am just using the “Music” folder in the pi user’s home directory. If you wish to play local music files, you need to ensure you use that location when copying/downloading files.
[raspberry-gpio]
enabled = true
bcm5 = play_pause,active_low,150
bcm6 = volume_down,active_low,150
bcm16 = next,active_low,150
bcm24 = volume_up,active_low,150

[pidi]
enabled = true
display = st7789

[mpd]
hostname = 0.0.0.0

[http]
hostname = 0.0.0.0

[audio]
mixer_volume = 40
output = alsasink

[file]
media_dirs =
  /home/pi/Music
Tip
The install instructions on the Pimoroni Pirate Audio GitHub page have the volume up button as bcm20 but it should be bcm24 as I have shown above. When I realized the volume up button was not working properly, I found a tip on one of the issues someone filed on GitHub which suggested the button assignment has changed and the installation script needed updated.
I also noticed that bcm24 is referenced on their product page as well. The GitHub installation instructions are out of date.
Save and close the text editor (Press Ctrl + O, Enter, and Ctrl + X).
Set up the Mopidy Service
To have the Mopidy service run on start up when you reboot the music player, you need to run the following commands. The first command adds the Mopidy service to the appropriate user groups so it has permissions to access various features of the Raspberry Pi.
sudo usermod -a -G spi,i2c,gpio,video mopidy
sudo systemctl enable mopidy
sudo systemctl start mopidy
After starting the service, it is a good idea to check the status of the service to ensure it is running properly with no errors before continuing. If the Mopidy service is not running, the music player will not function properly.
sudo systemctl status mopidy
Optional Configuration
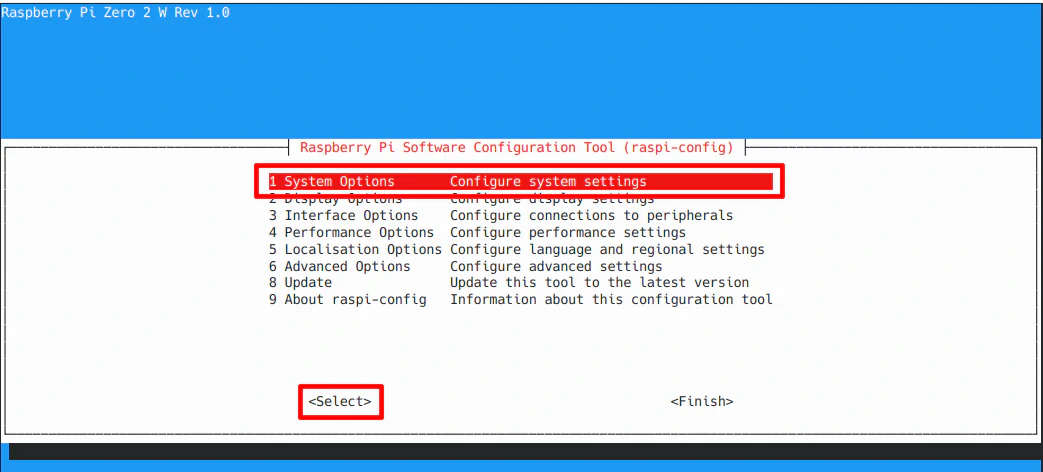
There may be some additional configuration settings you would like to tweak using the raspi-config tool.
sudo raspi-config
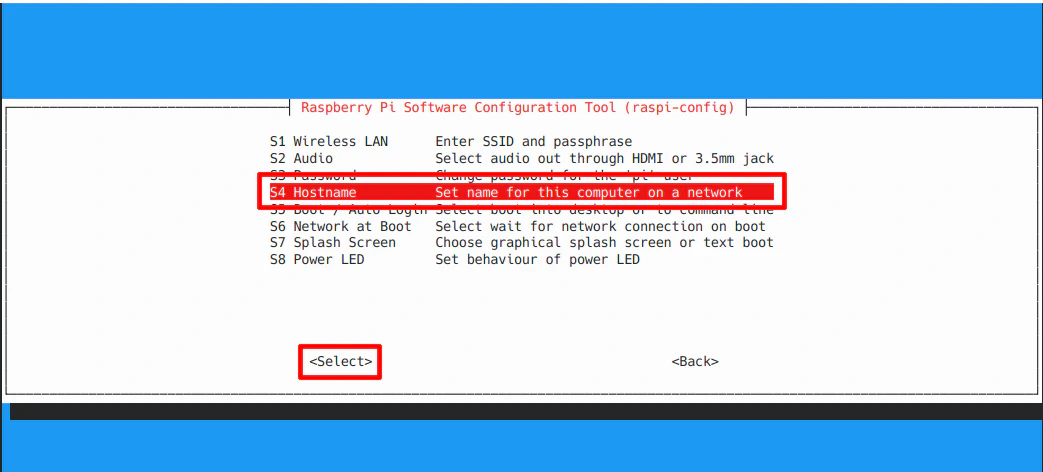
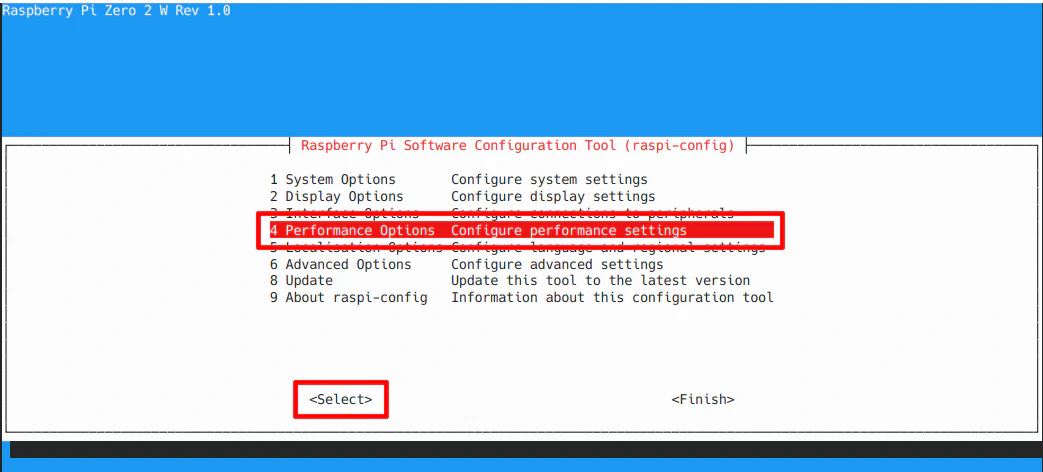
The first thing to configure would be the desired hostname so you can uniquely identify the music player on your network. Select the “System Options” menu option by pressing the “Tab” key and then the “Enter” key.
Use the “down arrow” key to select the “Hostname” option. Then press “Tab” and “Enter”.
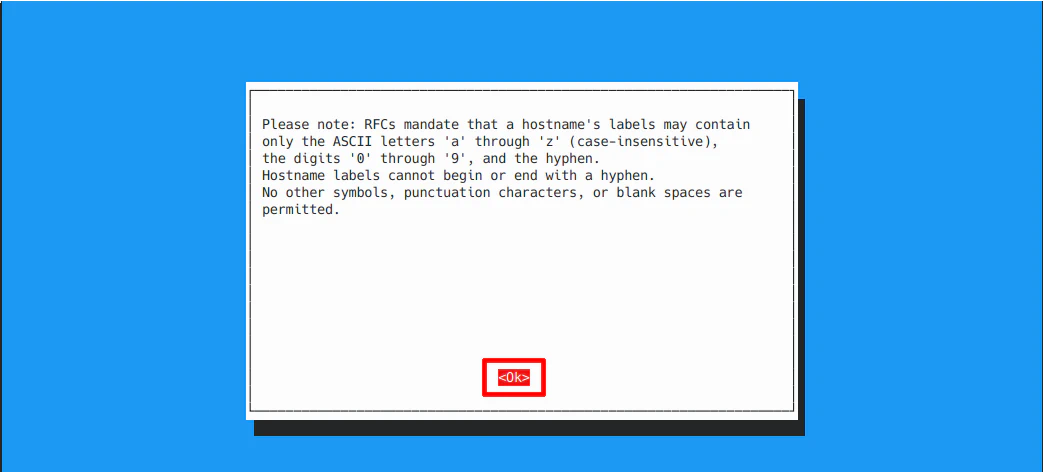
You will see a note about what is allowed in a hostname.
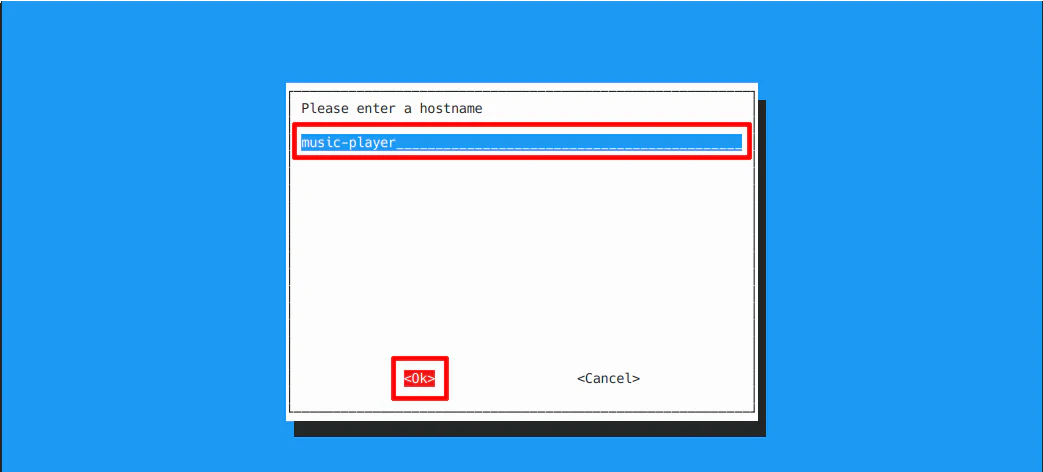
Enter a “hostname” of your choice. I have creatively used “music-player” in my example.
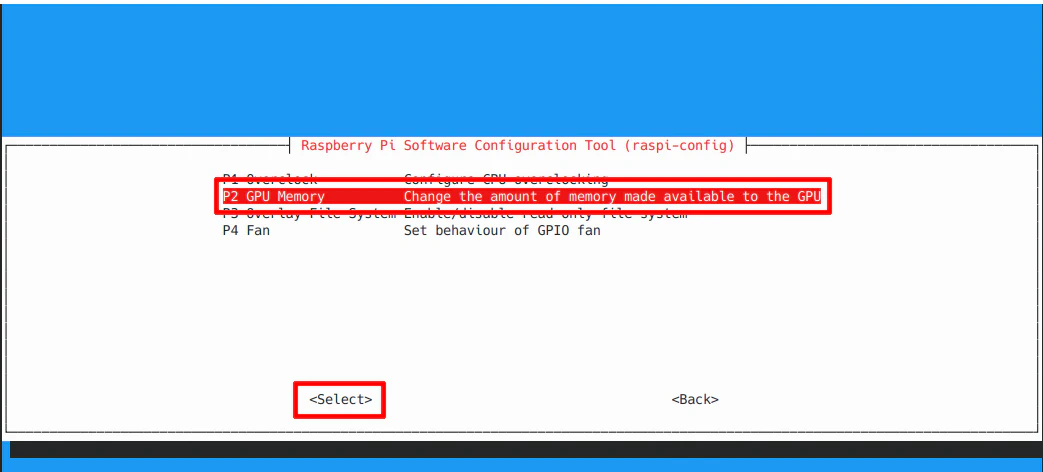
Next up is the “GPU Memory” setting. By default, the GPU is allocated 64 MB of memory, but you can lower it as low as 16 MB. Since the Pi Zero (both models) has only 512 MB, it does not hurt to minimize the amount of RAM used by the GPU when you are not running a desktop user interface on the Pi Zero. Press the “down arrow” to get to the “Performance Options” menu option. Then “Tab” and “Enter”.
Go down to the “GPU Memory” option and press “Tab” and “Enter”.
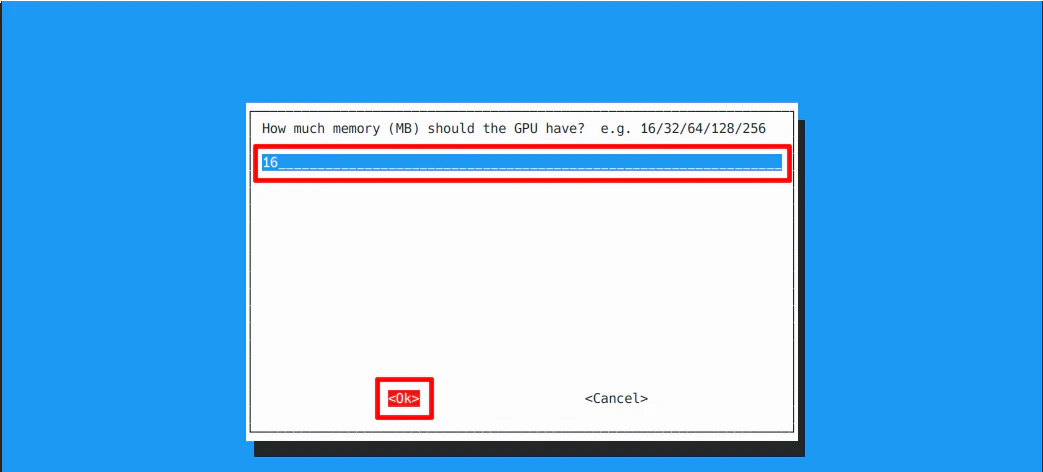
Enter 16 for the value. This will free up an extra 48 MB of RAM for other processes.
Copy Music to the Music Player
With everything configured and running, you can now copy or download files to your /home/pi/Music folder! You may use your favorite file transfer program such as FileZilla to log into your SSH server to transfer files to the folder. If for some reason you prefer not to transfer files over the network, you could of course copy files directly to that folder by inserting the microSD card in a card reader on your computer. I find it more convenient to be able to tranfser files over the network.
If you rather use a network share rather than copying files over the network, you may do that as well, but I will leave that as exercise for the reader. Also, you could connect to Internet radio and Spotify audio sources as well.
Access the Music Player via a Web Browser
Open your browser on your phone/computer to view the music player interface. If you are using Iris, navigate to http://192.168.1.100:6680/iris (or use the hostname).
If you are using the Mopidy MusicBox Webclient, navigate to http://192.168.1.100:6680/musicbox_webclient.
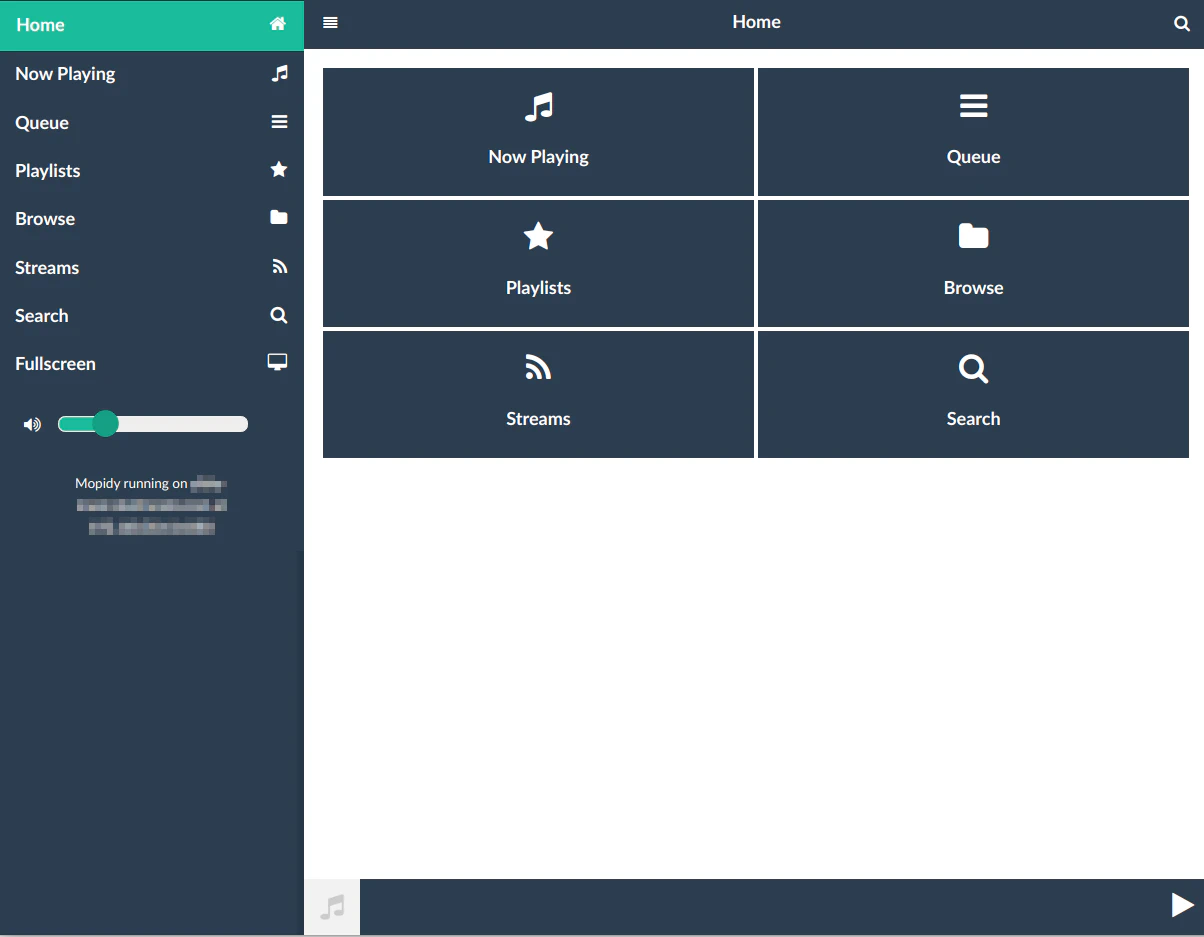
When using either client, you will need to click on “Browse” in order to view all of your local music.
I am not quite sure why the music does not show up in the artist/albums unless perhaps you need to use the “Mopidy-Local” plugin instead of the built in “Files” plugin since the “Mopidy-Local” plugin creates a local database of all your music which needs periodically scanned and updated. The Mopidy documentation states that for large music libraries, it is better to use the “Mopidy-Local” plugin but it could have other benefits like having music show up in the album/artist sections as well as display album artwork. I only have a small amount of music I use for the kids bedtime so I am not as concerned with those extra features, but you may want to explore that further if you like.
Fully Assembled Music Player
Once you are satified that everything is working properly, you can finish assembling your music player by putting the Pi Zero into the Flirc case and attaching the Pirate Audio Speaker HAT on top. Note that it will not push down all the way because of the case but it will stay on tight enough. If you would like it to hold tighter, you could perhaps use some double sided foam tape underneath the HAT to stick it to the top of the case.
I hope you found this guide helpful if you are building something similar!