Build a Raspberry Pi Touchscreen Music Player with Bluetooth Speaker Using MoOde Audio Player
Table of Contents
Have you ever wanted to build a small, compact music player using a Raspberry Pi? I did some research to come up with a solution that met my current needs well. (I know the Raspberry Pi is hard to come by at the time of this writing, but I wanted to document this process because one day that situation should improve.)
The goal for the project was to create a compact music player with a touchscreen and use a Bluetooth speaker for audio output. I wanted to minimize the expense as much as possible since the music players will be used by my older children so if something broke the financial loss would not be significant.
The solution I arrived at was to use a Raspberry Pi case that has a 3.5" touchscreen using the MoOde Audio Player software. The Raspberry Pi already has Bluetooth capability so I did not have to do anything special to the Raspberry Pi 3B+ or the Raspberry Pi 4 in order to use a Bluetooth speaker.
The UCTRONICS 3.5" touchscreen case is inexpensive and compact, which met my requirements. I will note that the resistive touch of the screen is not nearly as nice as the capacitive touch of modern cell phone screens, but it does work well enough. Using a stylus can help give you better control than using your finger. If you have a larger budget, you may want to use a larger screen such as the official 7" Raspberry Pi touchscreen.
A built-in fan is included in the UCTRONICS case which is nice because the Raspberry Pi (especially the Pi 4) get hot when enclosed in a case. One thing I noticed is that the fan only worked with the Pi 4 and not the Pi 3. I do not know if this is by design or if the fan is not compatible with the Pi 3 for some reason. It is possible it is designed to only run on the Pi 4 since it runs hotter.
I explored several music player options, but it took a lot of effort to get the Bluetooth speaker to work properly for basic functionality such as automatically connecting to the speaker when it was turned on. When I tried MoOde Audio Player, the Bluetooth functionality worked flawlessly. That alone sold me on the software, but is also has a nice user interface and quite a bit of configuration options, which makes it great software to use on the RPi.
In addition, not all RPi music players support a local display like MoOde. MoOde Audio simply uses the Chromium browser in kiosk mode so it uses the same web based interface as accessing the web page remotely. I like the fact that not only can it be controlled via the touchscreen but also with a PC or my phone. I actually control the devices more with my phone than the touchscreens since it is more convenient for me.
Tip
I also tried using MoOde Audio Player on a Raspberry Pi Zero 2 (without a touchscreen), and I had issues with the Bluetooth speaker audio cutting out a lot. My solution was to disable the onboard Bluetooth and use a USB Bluetooth adapter connected to a short USB dongle to give it some space away from the device.
You may also to do the opposite: disable the onboard WiFi and use a USB WiFi adapter on a dongle. I am assuming there are some issues with interference when using both Bluetooth and WiFi when streaming audio (the issue may be less apparent for other data streams).
Parts List
Below are the list of parts for the media player:
- Raspberry Pi 3B+ or Raspberry Pi 4 (supplies are still limited at the time of this writing)
- UCTRONICS Mini 3.5" LCD Screen with Case for Raspberry Pi 3/4 (affiliate link)
- Raspberry Pi 3 power supply (affiliate link) or Raspberry Pi 4 power supply (affiliate link)
- Bluetooth speaker of choice (if desired) such as the budget friendly Oontz Bluetooth speaker (affiliate link)
Install the Raspberry Pi Imager
I recommend using the Raspberry Pi Imager software since MoOde Audio Player is available for imaging using that tool, which makes the process for imaging a microSD card very simple. If the software is available via the Imager tool, you do not even need to visit a website to download the software.
On top of that, for certain images the Raspberry Pi Imager allows you to select options to customize the image you are writing to the microSD card. This is very convenient since you do not have to tweak any configuration files on the microSD after you write the image to the card.
Download and install the Raspberry Pi Imager from their website.
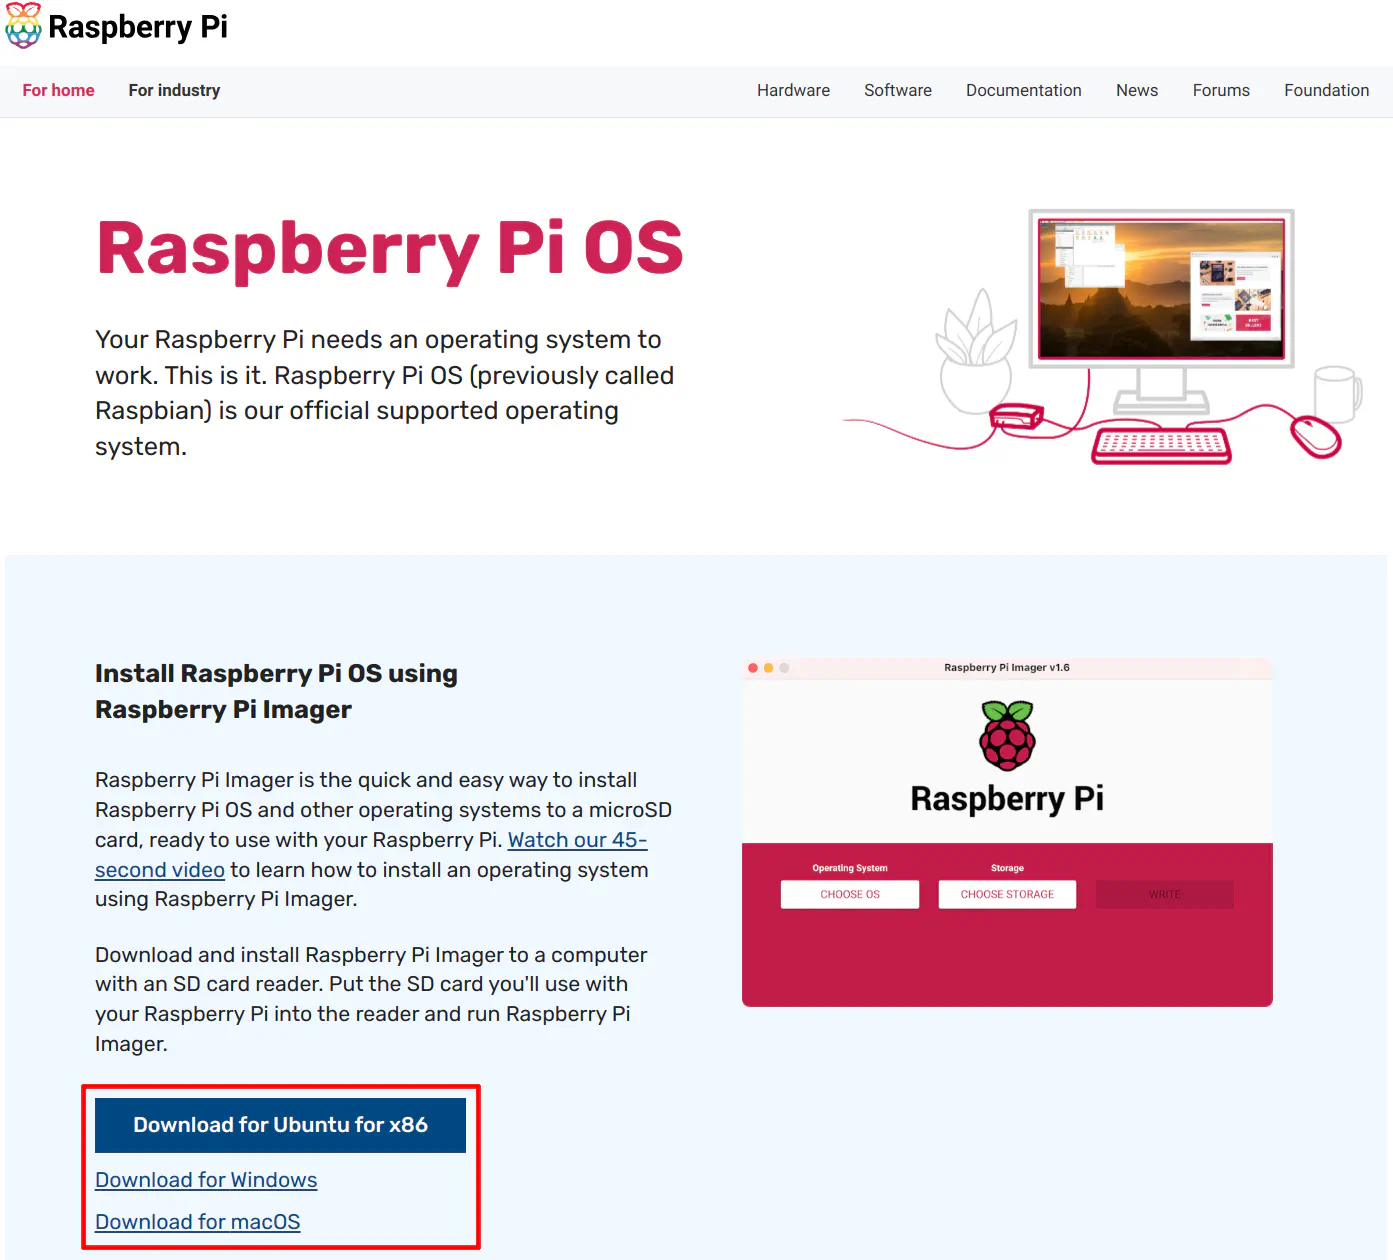
Image the MoOde Audio Player Software
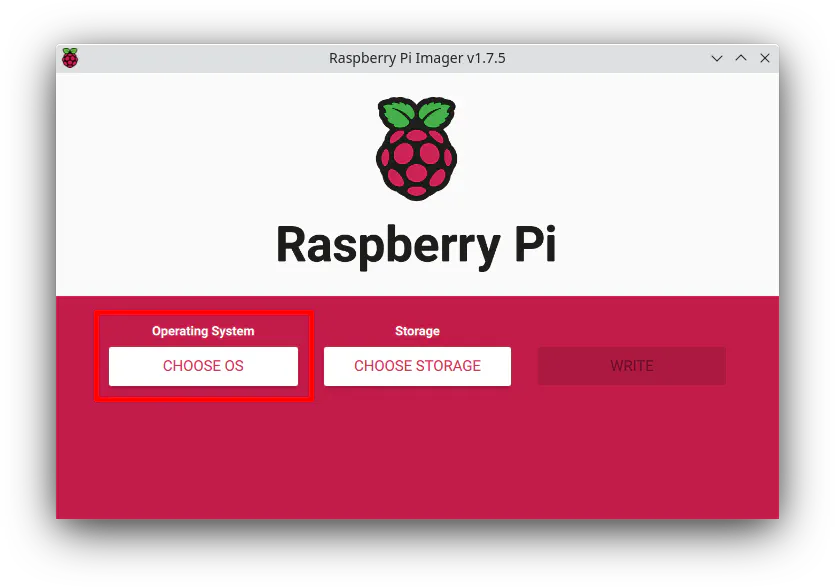
Insert your microSD card into your memory card reader and open the Raspberry Pi Imager software. Click on “Choose OS”.
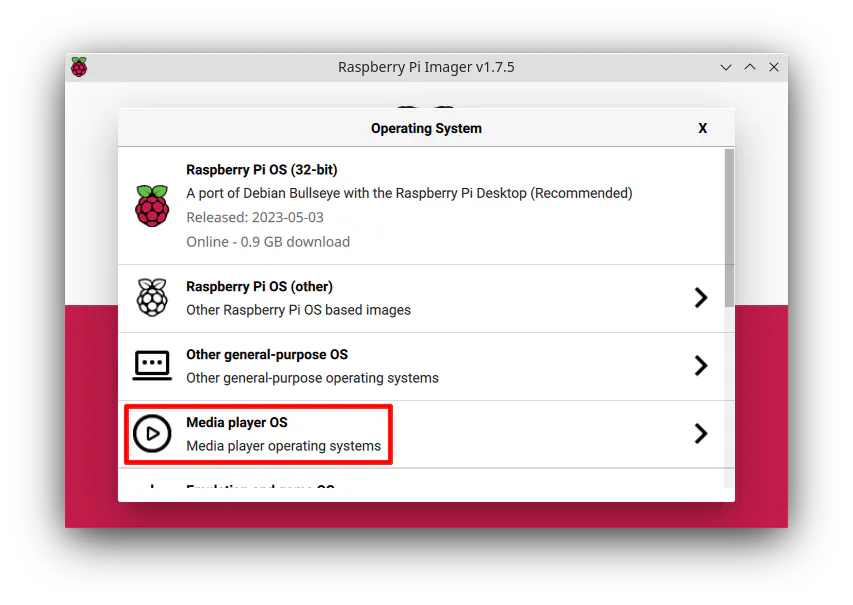
On the dialog box which appears, select the “Media player OS” option.
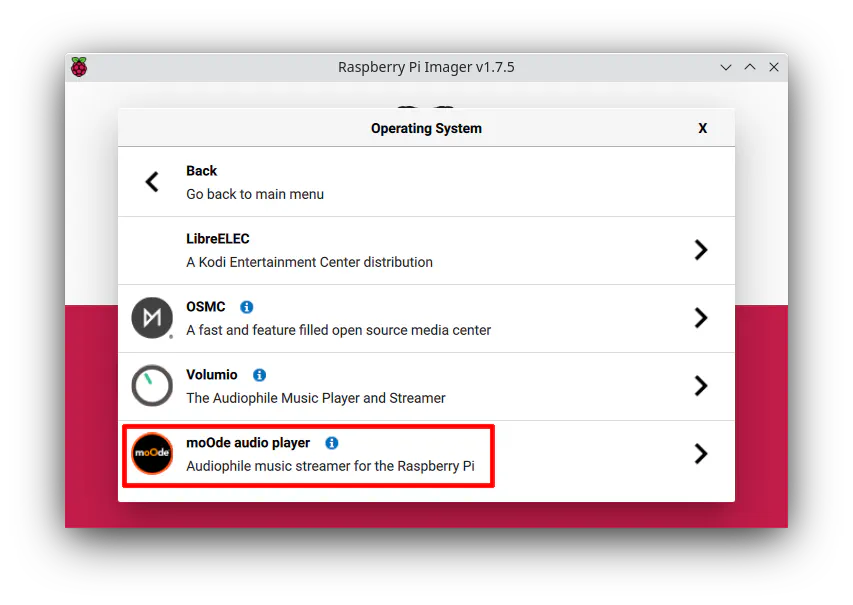
Then choose “moOde audio player”.
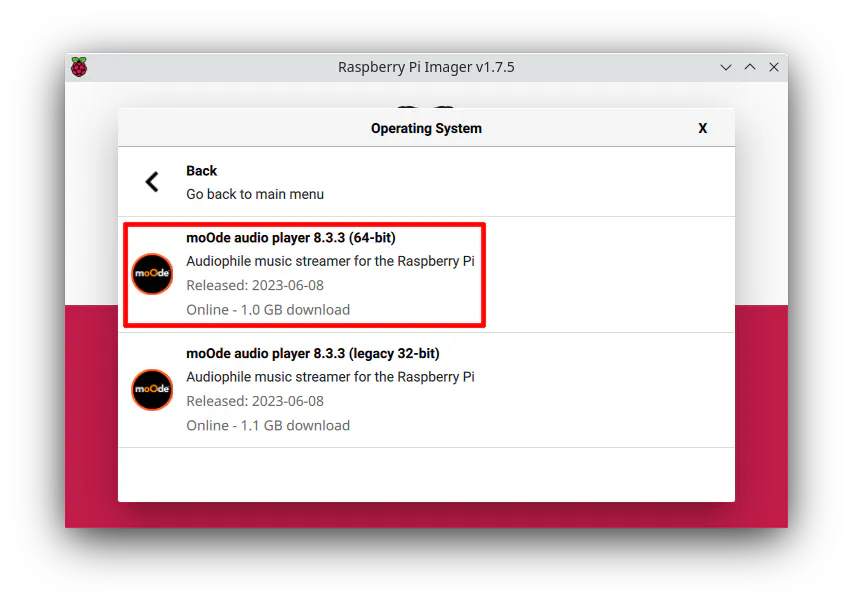
The 64-bit version will work on all newer versions of the Raspberry Pi so that is the image you most likely will want to use.
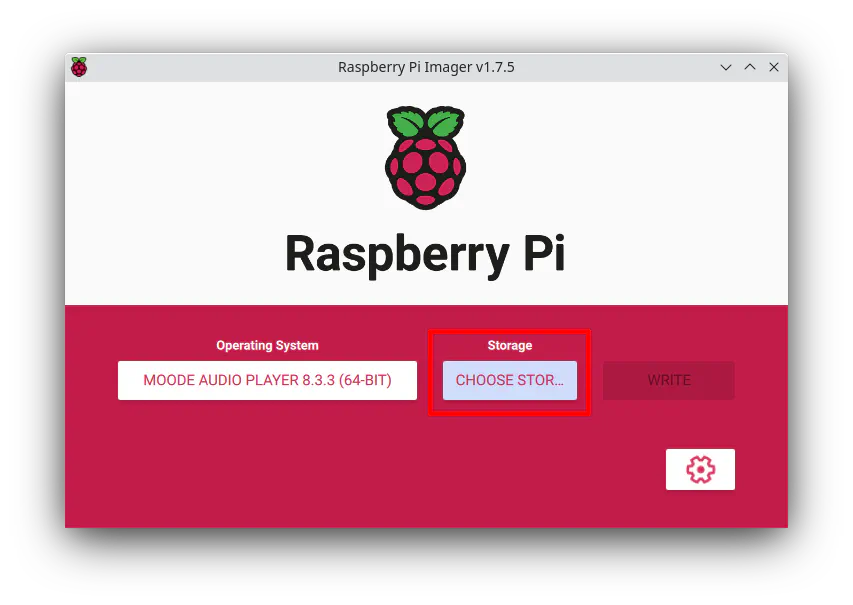
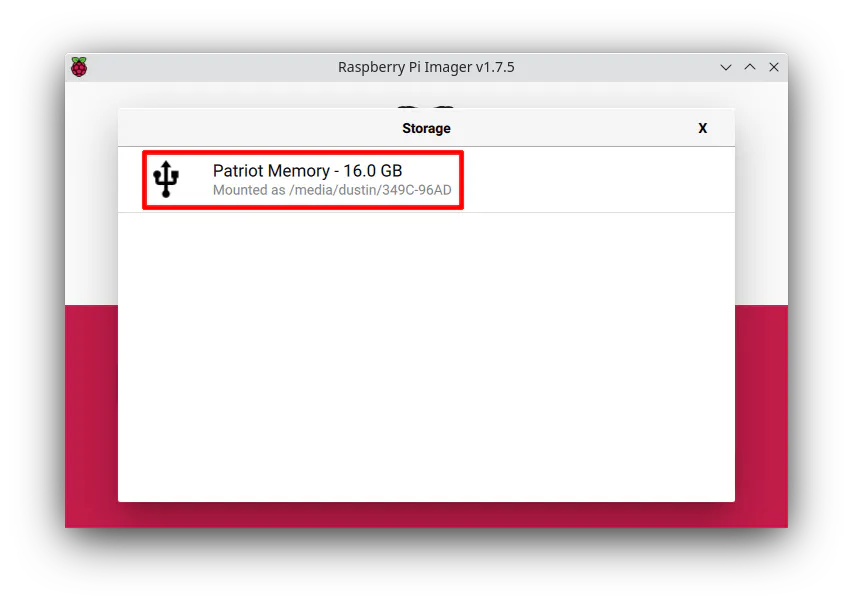
Click on the “Storage” button to select your microSD card.
Select the microSD card from the list.
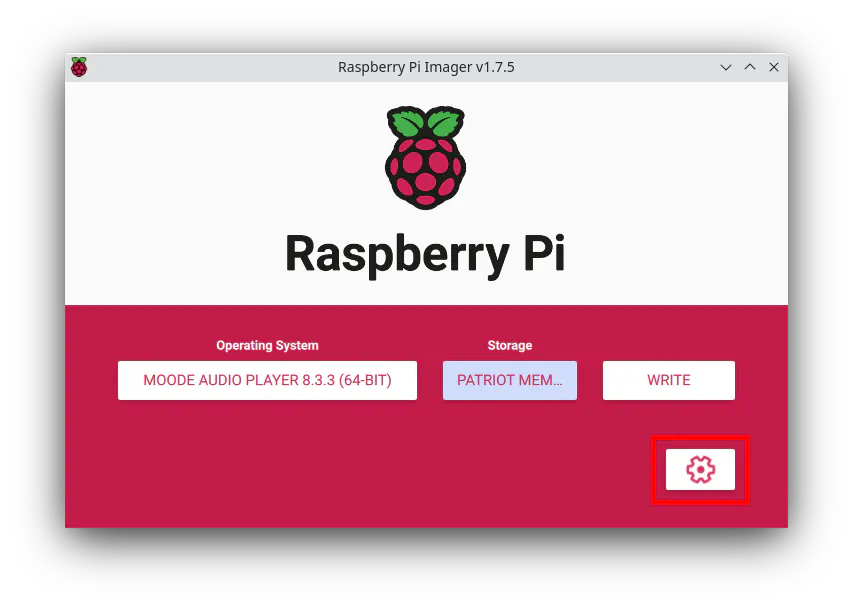
Before clicking on the “Write” button, you will want to preconfigure some of the settings so you do not need to manually configure the settings via config files after flashing the microSD card. Click on the gear icon.
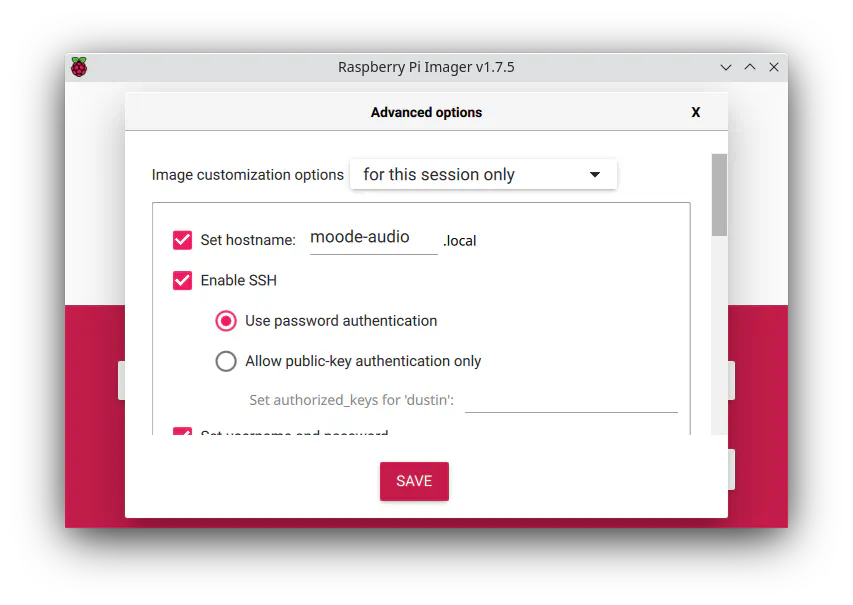
Set the desired “hostname” such as moode-audio.
Enable “SSH” so you can access the Raspberry Pi remotely (you may leave this option disabled if you never use SSH but I like having the additional access because I use it to remotely add new music files to the device among other reasons). Also, it is necessary if you need to install drivers for your touchscreen unless you are willing to connect a display and keyboard to your Raspberry Pi.
You may use password or public key authentication. Passwords are easier if you are more of a novice user but it is not as secure as using SSH keys.
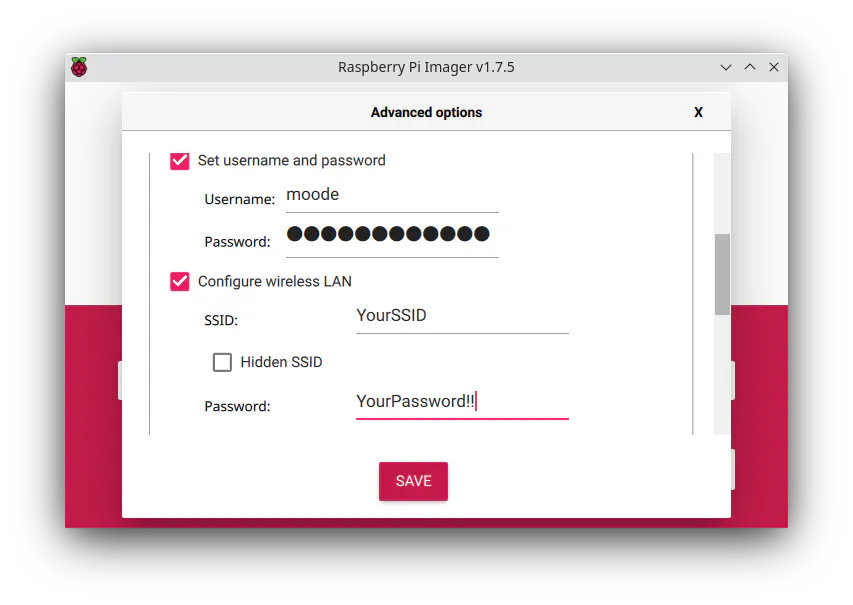
Set the “username” and “password” of the user you will use to access the RPi. The same password will be used as the SSH password if you are using password authentication.
Be sure to enable the “wireless LAN” option so that you can remotely access your device. As I mentioned earlier, I use it to drop more music files onto the device. If you prefer to keep the device completely offline, you of course can leave WiFi turned off. Enter your “SSID” and “Password” for your WiFi connection.
When you scroll down further, you will need to set the “Wireless LAN country” in order to enable the WiFi connection.
Finally, set the “locale settings” to the appropriate “time zone” and “keyboard layout”. Click “Save”.
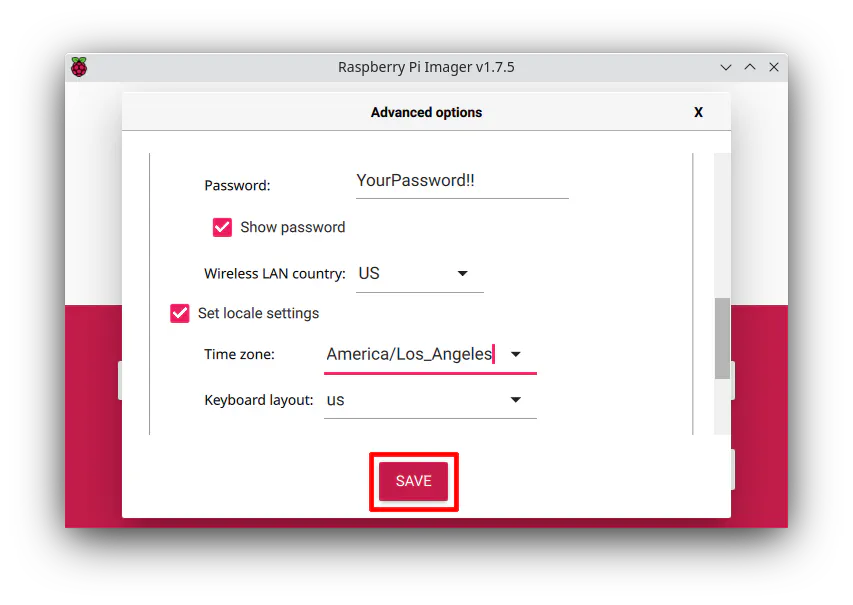
Once you are finished, you may click “Write” to image the microSD card.
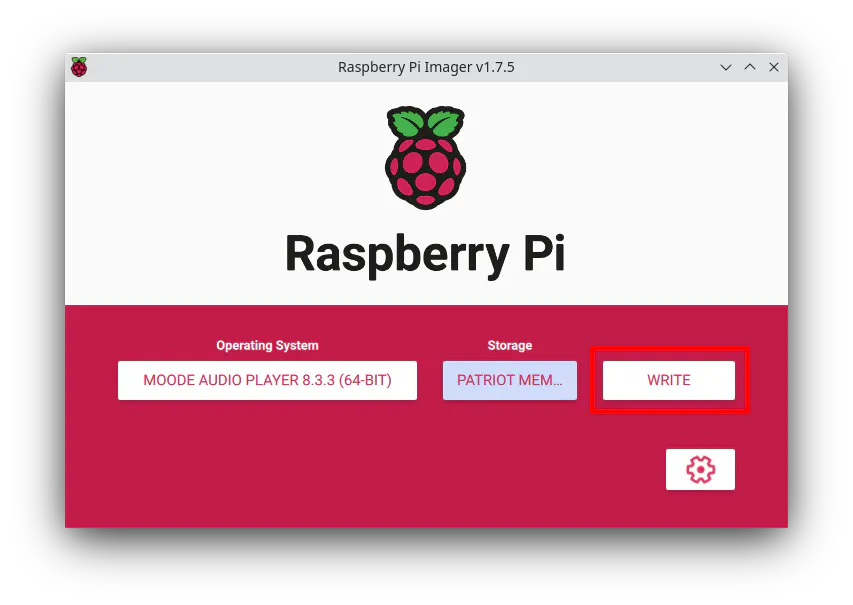
When the imaging has completed, do not unplug the microSD just yet unless you plan to do the next step later once you verify everything is working properly when you boot up the Raspberry Pi.
Copy Music to the MicroSD Card
After imaging the MoOde Audio Player to the microSD card, you may want to copy music to the card while it is still plugged into your system if you do not plan to use a network file share or to copy files via SFTP. Your files may transfer faster using the memory card reader than using a WiFi connection.
I will demonstrate how to copy music to the microSD card using a Linux Operating System since it natively supports the filesystem used on the card since MoOde runs on a Linux based Operating System (like most Raspberry Pi software).
There will be two partitions on the microSD card. Open the rootfs partition and browse to the /mnt/SDCARD folder.
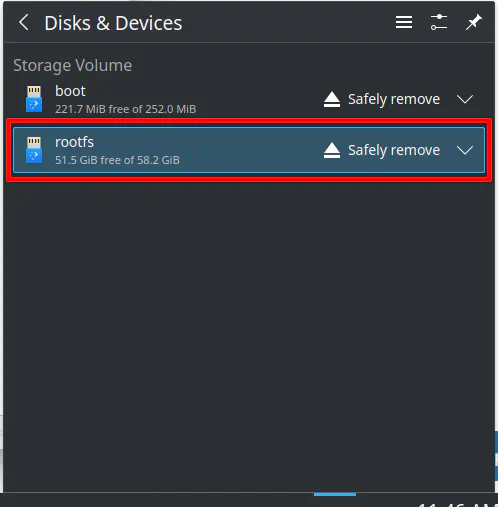
You will notice it is own by the root user.

You will need to open the terminal and change the owner of the folder. The moode username that you supplied when imaging the memory card will be used instead of the default pi user which means the user ID will mostly likely be 1000. Since you probably do not have a user called moode on your system with the 1000 user ID, you will need to run the following command (which accepts either a username or a user ID).
I am using the full path to the SDCARD folder but if you are already inside the rootfs folder, you may simply enter mnt/SDCARD
sudo chown -R 1000:1000 /media/<your-username>/rootfs/mnt/SDCARD
If you are logged in as your primary user on your Linux system, your current user name may happen to be using the user ID of 1000 also. If that is the case, the owner of the folder will be changed from root to your current username. That is what you want to see because that means you have permissions to copy files into the SDCARD folder.
When you boot up MoOde Audio on the RPi, the main user will still be moode with user ID of 1000. Users with the same user ID in Linux are essentially treated as the same user if you move the disks to a different system even if the username itself is different on each system.
Now you should be able to copy your music to the /mnt/SDCARD folder without permission issues.
Boot up the Raspberry Pi
Insert the microSD card and boot up the Raspberry Pi. Once it is loaded, you can check if your RPi connected to the wireless network by attempting to access http://moode-audio.local. You will need to use the hostname that you configured earlier. I am using moode-audio as an example. The MoOde Audio web interface should be displayed.
However, before configuring anything in the web interface, there are some things that need to be done first to have a better experience with the small touchscreen I am using for this project. The drivers for the screen need to be installed.
Install the UCTRONICS Display Driver
When using the UCTRONICS touchscreen display (and likely other displays as well), it is important to install the drivers once you have verified MoOde Audio is up and running. If you do not do this, the screen resolution will be a higher resolution downsampled to the native resolution, which makes the interface pixelated and difficult to read.
Once the drivers are installed, you will be able to use the native screen resolution so everything is much more legible. Also, the drivers are required to enable the touchscreen functionality.
Log into the RPi using ssh:
If you are using the UCTRONICS touchscreen, you can enter the following commands as described in their user manual:
git clone https://github.com/UCTRONICS/UCTRONICS_LCD35_HDMI_RPI.git
cd UCTRONICS_LCD35_HDMI_RPI/Raspbian
sudo chmod +x *.sh
sudo ./install_uc_touch_180.sh
After running the installation script, the Raspberry Pi will reboot automatically. During the boot process, you should immediately notice that the screen resolution has changed to the native resolution as all of the text is larger and more crisp.
After the RPi boots again, you may log back in and remove the touchscreen installation files:
sudo rm -rf UCTRONICS_LCD35_HDMI_RPI/
Enable the Local Display
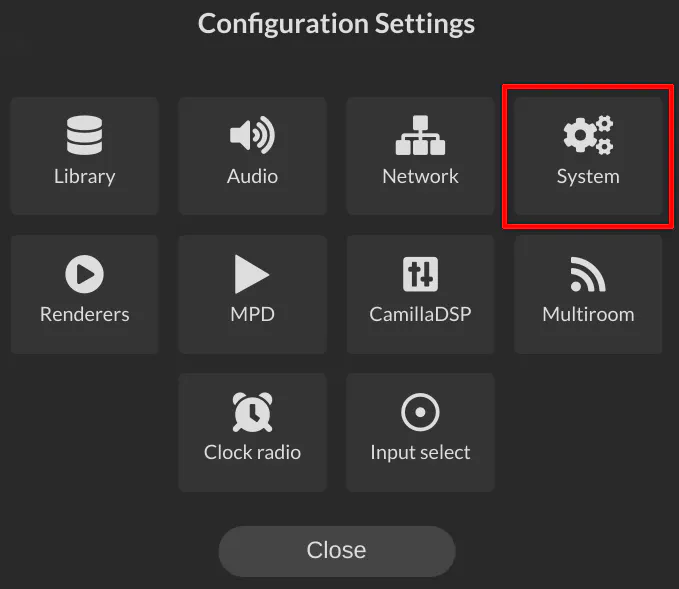
Once the display driver is installed, go back to the web interface. By default, the local display is disabled. Go to the “Configure” menu.
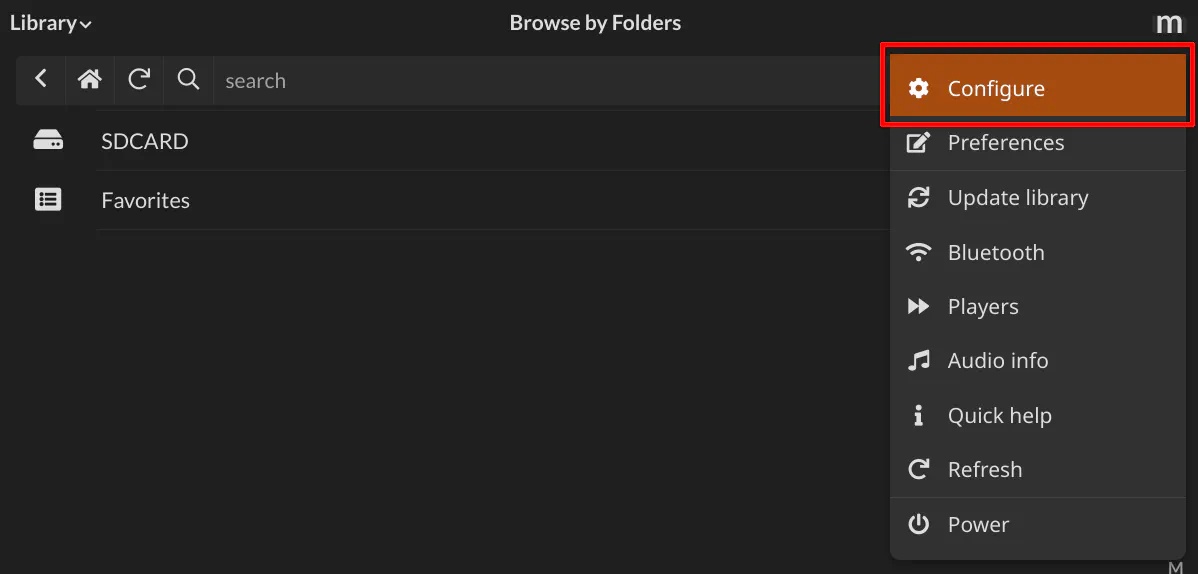
Then click on the “System” menu.
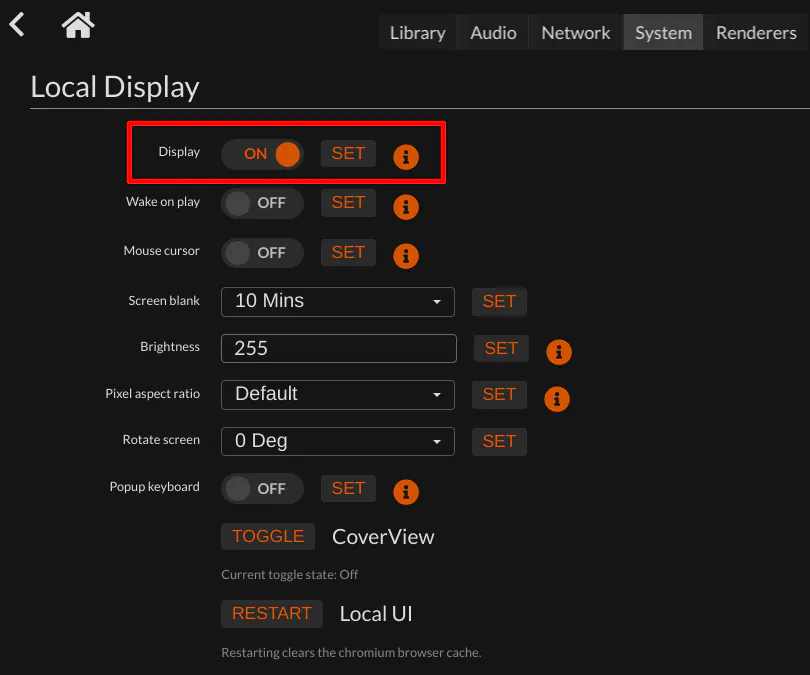
Scroll down to the “Local Display” section. You will need to click the toggle button for the “Display” option and then click the “SET” button. If you do not click the “SET” button, the local display will not be enabled.
Pair a Bluetooth Speaker (Optional)
If you are not using the audio out jack to connect to a speaker, you have the option of using a Bluetooth speaker. The Bluetooth support in MoOde Audio works quite well and is one of several reasons why I chose to use MoOde Audio.
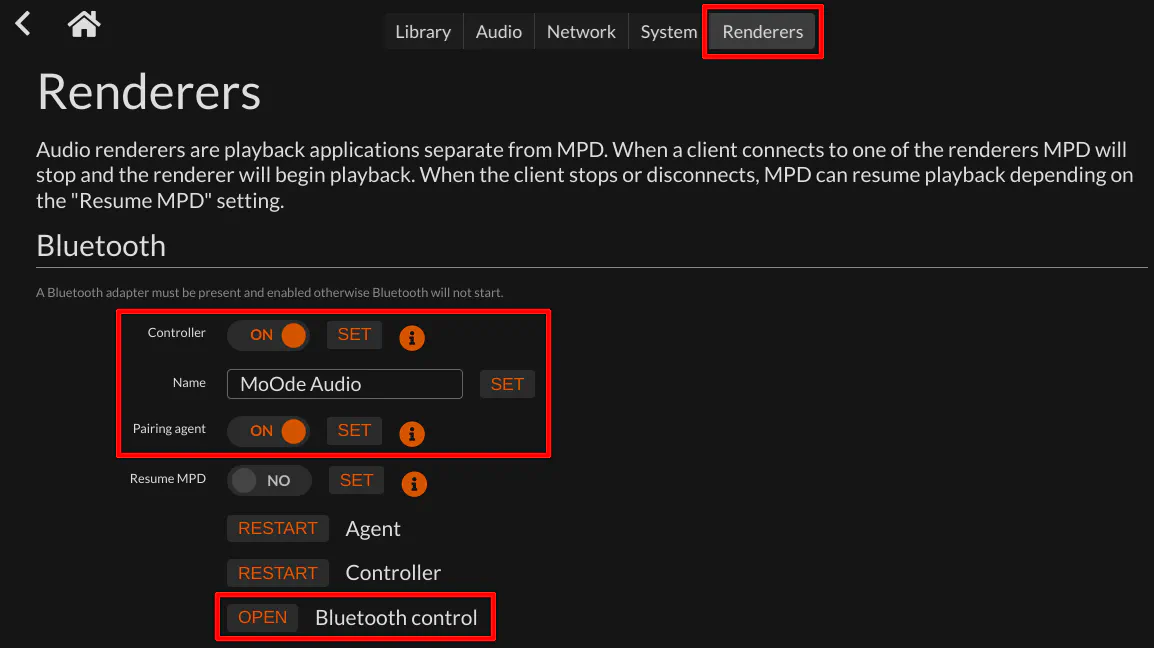
While you are still on the “System” page from the previous step, you may click the “Renderers” page at the menu bar at the top of the page.
Toggle the Bluetooth “Controller” to “ON” and click the “SET” button. Enter a “Name” for your Bluetooth speaker and click the “SET” button. Toggle the “Pairing agent” to “ON” and click the “SET” button.
Finally click the “OPEN” button to open the page where you may pair your Bluetooth speaker.
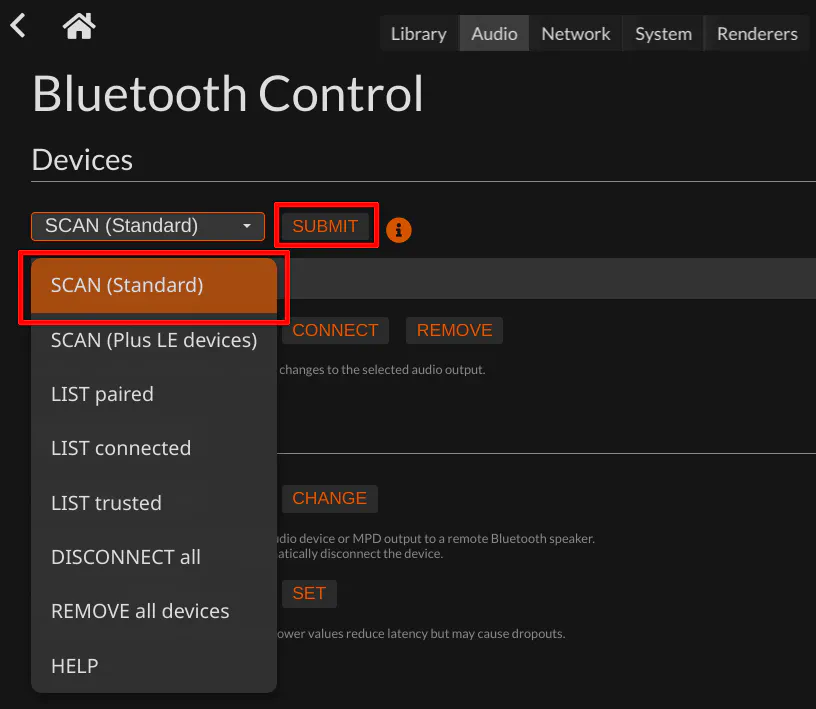
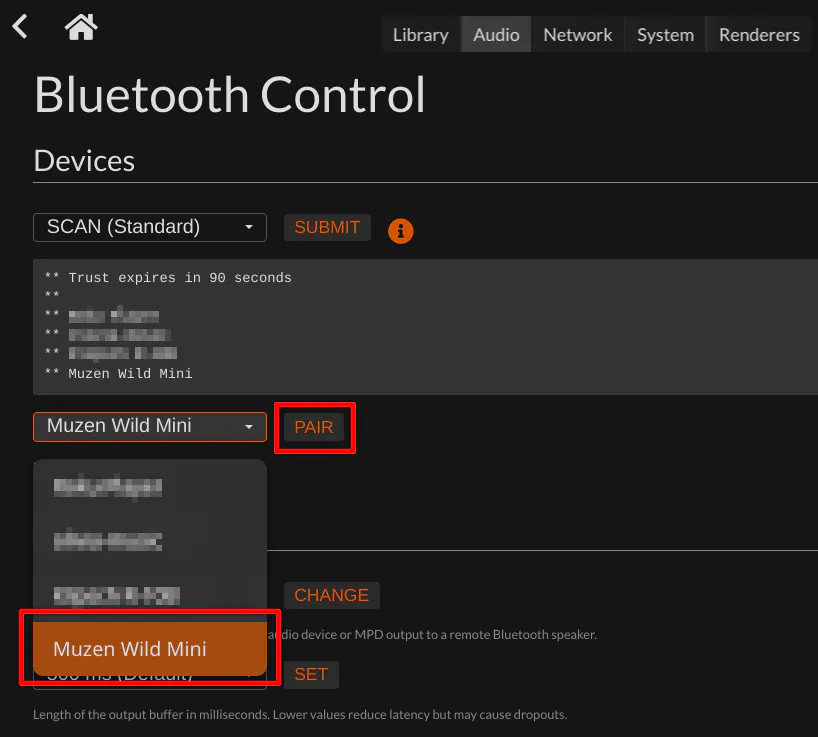
Choose the “SCAN (Standard)” dropdown option and click “SUBMIT” so it can start searching for Bluetooth devices.
Select the Bluetooth speaker you wish to pair to and then click the “PAIR” button.
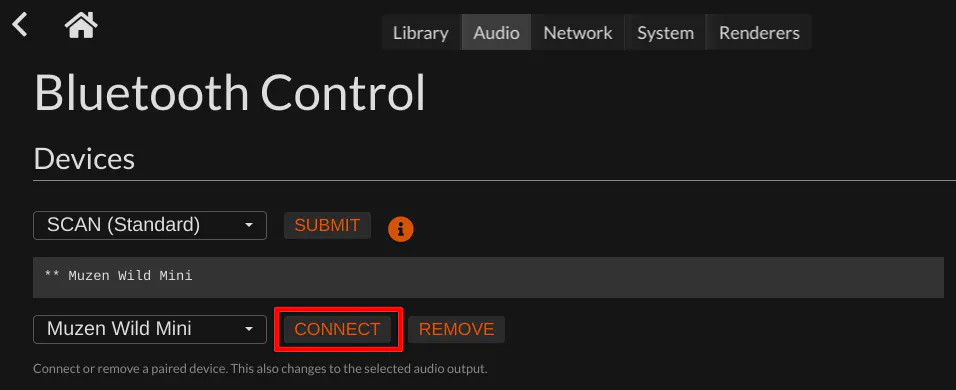
Next, you need to click “CONNECT” to connect to the Bluetooth speaker.
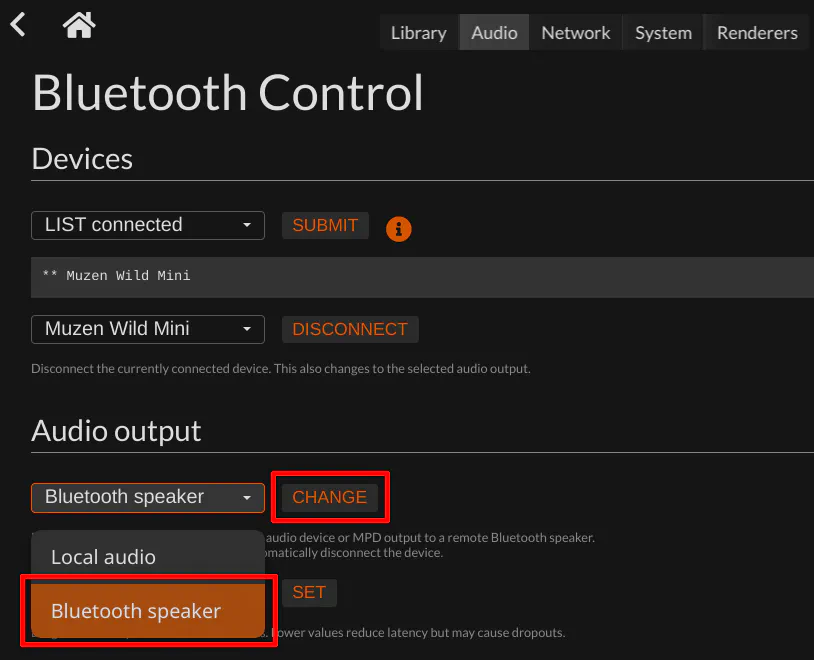
The final step is to set the “Audio output” option to the “Bluetooth speaker” and click the “CHANGE” button.
Update the Music Library
Before you can try playing music on your Bluetooth speaker, you should refresh your music library so that you can see all the music you added to the microSD card.
In the upper right hand corner of the web interface, click on the “m” for the MoOde Audio menu and choose “Update library”. Your music library should begin updating. It should not take very long if you do not have a lot of music on the microSD card.
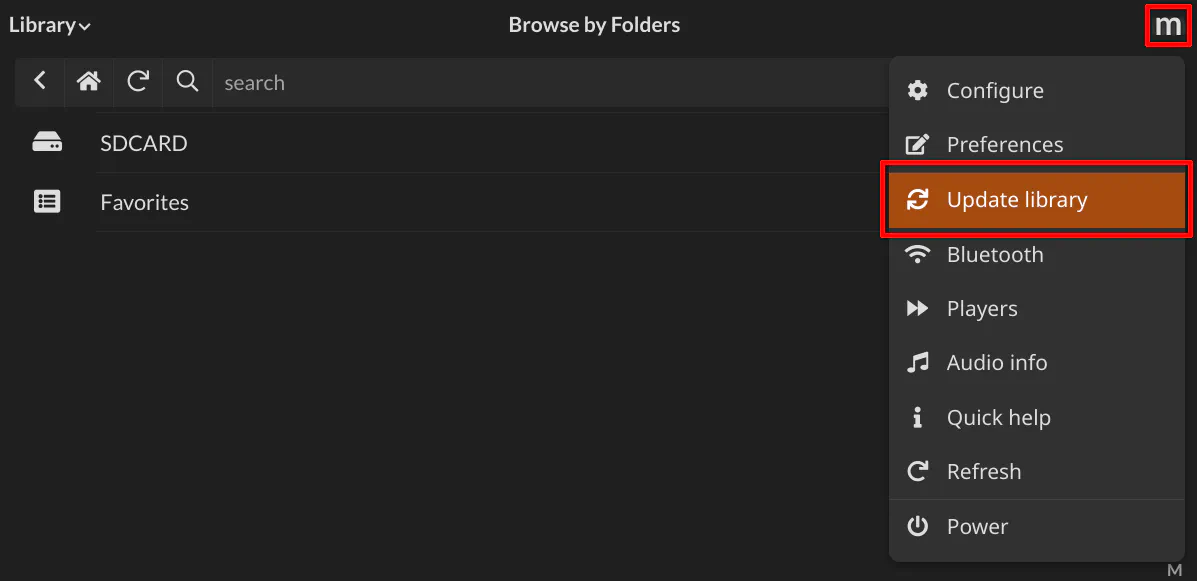
Once it is complete, you may try playing music on your speaker!
The Finished Build
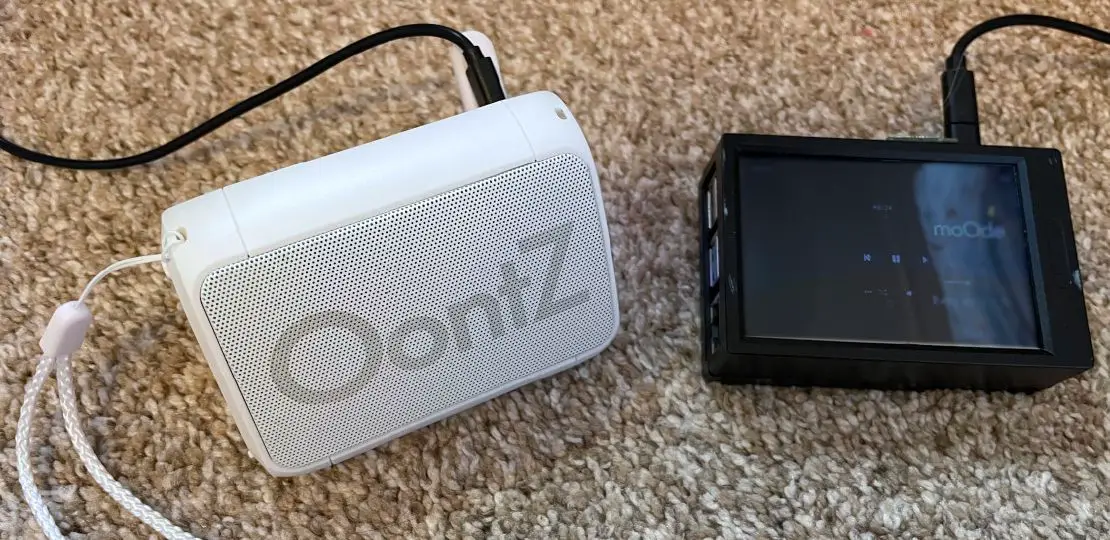
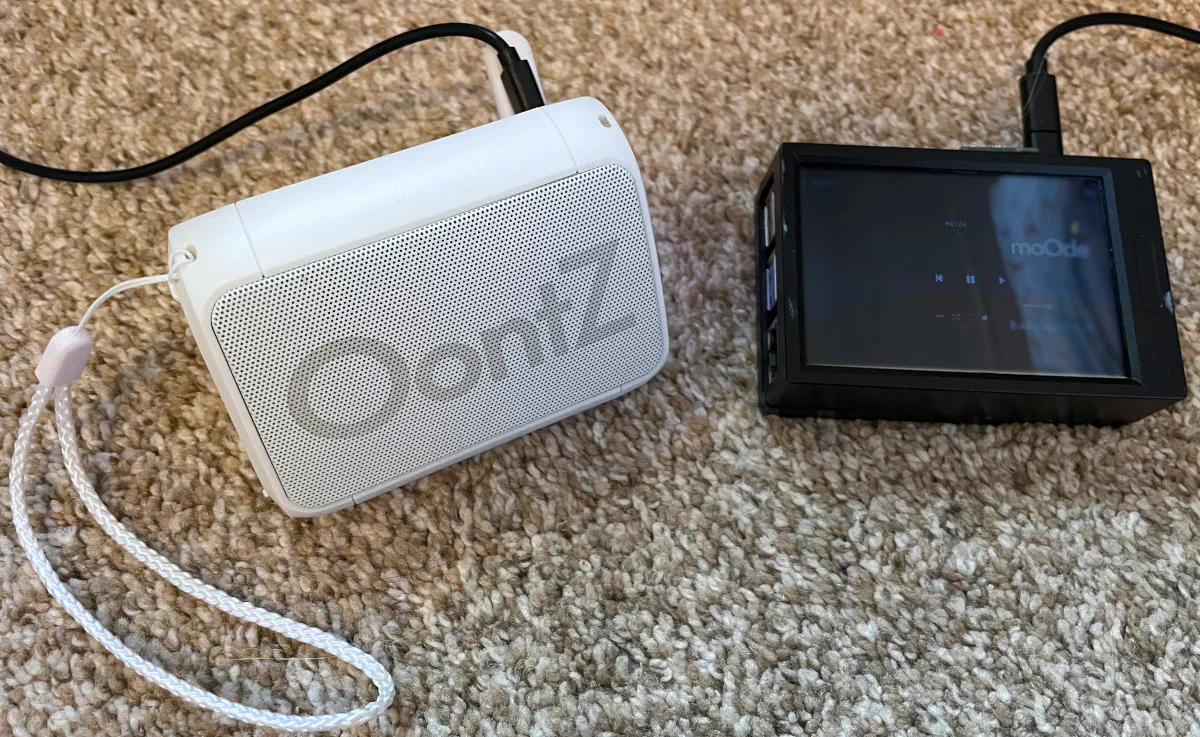
Below are images of the final product. You can see the Oontz Bluetooth speaker along with the Raspberry Pi 4, which is using the UCTRONICS case with built in 3.5" touchscreen.
Not only is the Raspberry Pi a compact solution but the Bluetooth speaker I am using is also compact as well as you can see in the image below. Even though the speaker is relatively small, the audio quality is actually pretty decent for its size and price.
The Bluetooth speaker allows a small range of mobility for listening to music, which is perfect for my kids. They like being able to pick their own music on the touchscreen, and we do not have to worry about them messing with other apps or the Internet since this device is strictly a music player.
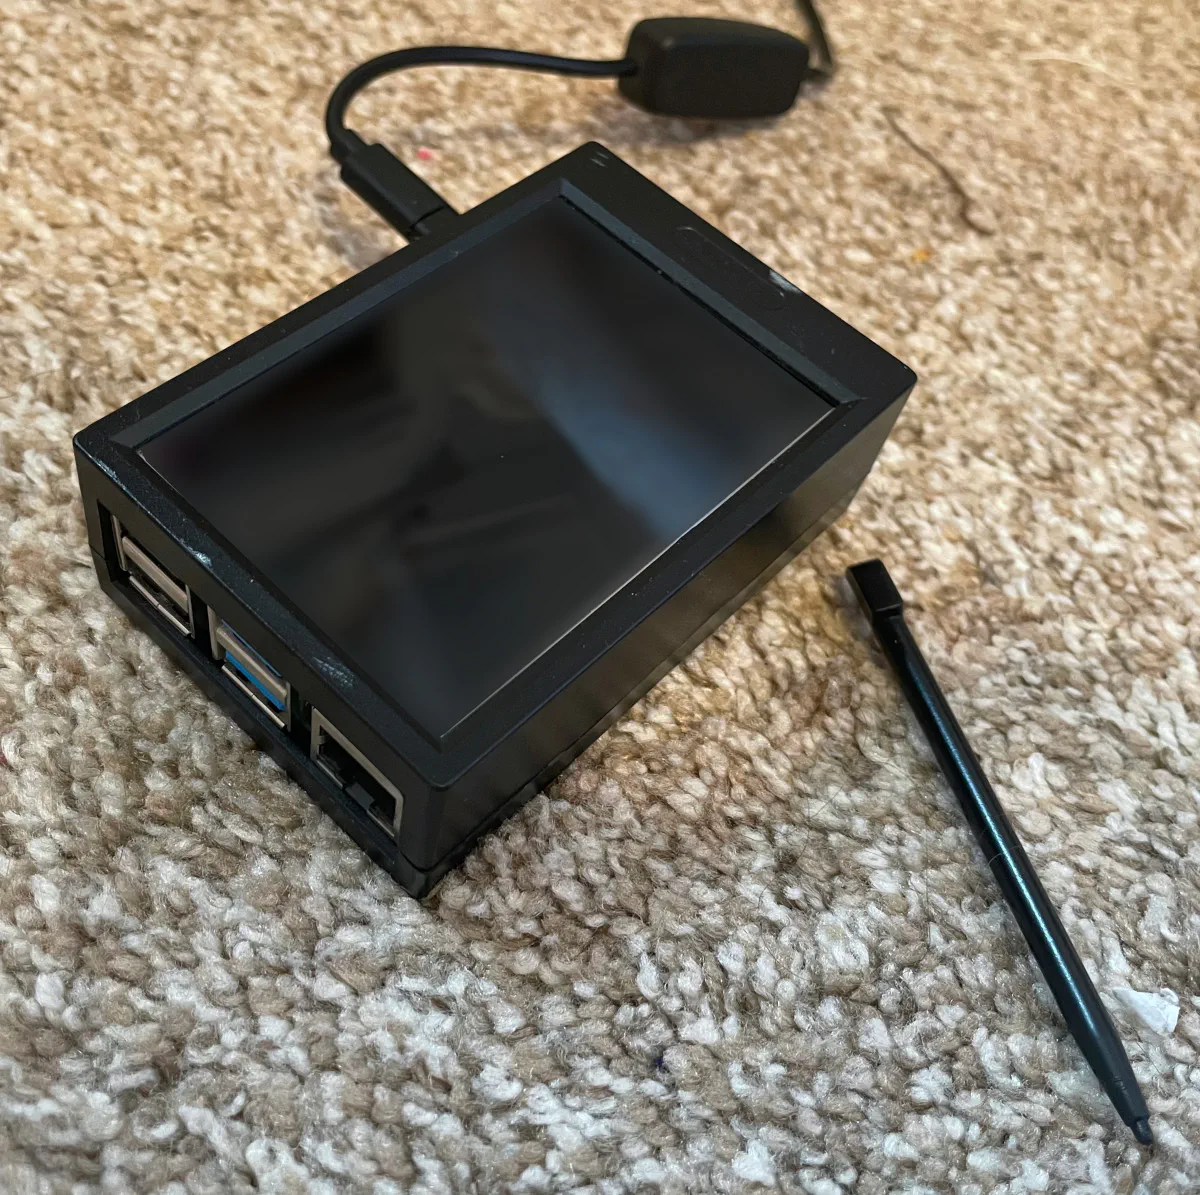
The UCTRONICS case comes with a plastic stylus which can be helpful to interact with the screen since the screen is so small. I have a more difficult time than the kids with clicking on items on the small screen since my fingers are larger. For this reason, I tend to open the web interface on my phone if I need to interact with the music players.
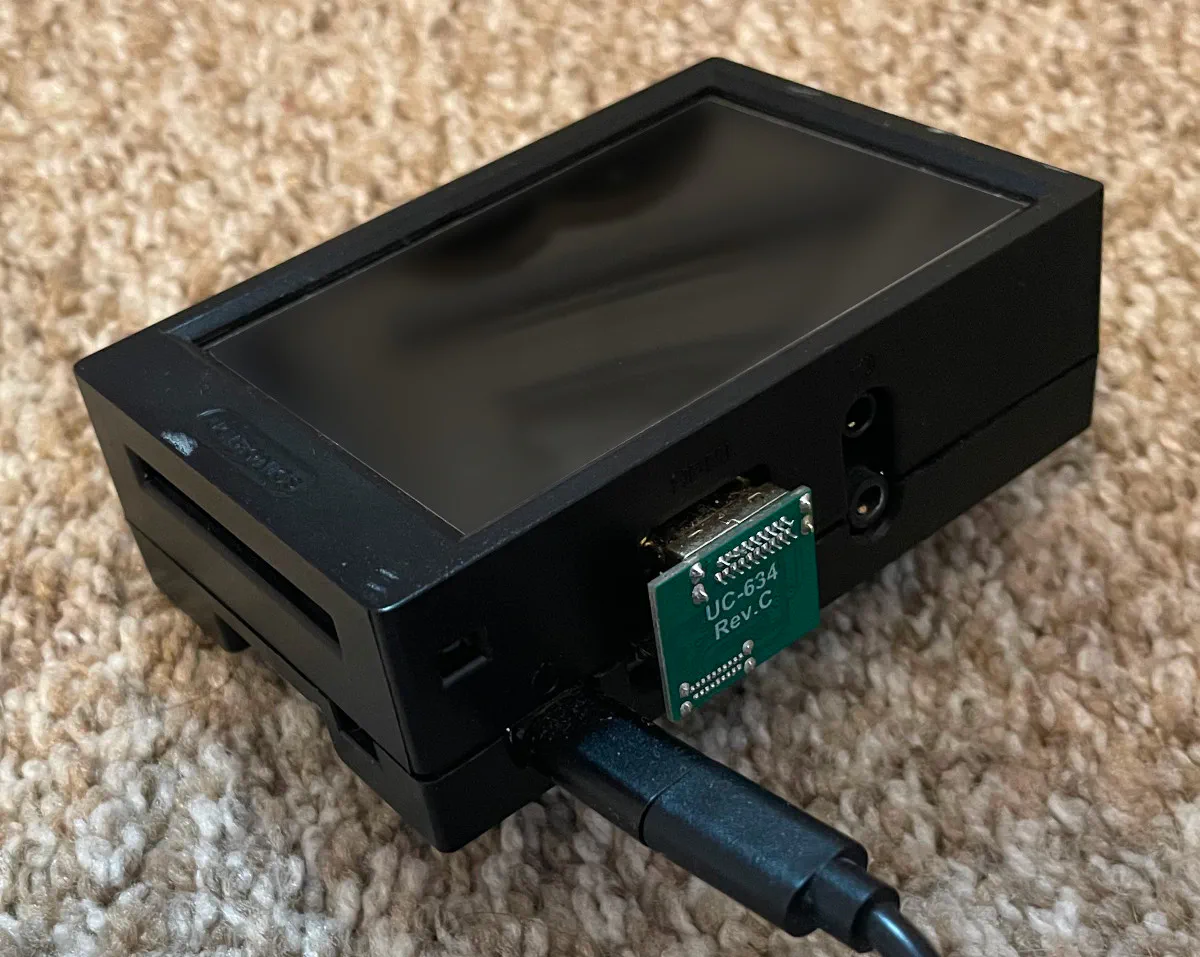
On the backside of the case, you can see that the display connects to the Raspberry Pi 4 using the micro HDMI port. It is not concealed so it is not aesthetically pleasing, but since it is on the back side, you do not notice it that much. Be warned that sometimes that chip can feel a bit hot to the touch since the RPi 4 gets warm even with the built-in fan running.
I hope you found the build information on this project useful when making your own projects!
