How to Configure Dynamic DNS in OPNsense
Photo by kreatikar from Pixabay
Table of Contents
If you have any software/services hosted on your home network that you wish to access remotely, you may have encountered a situation in which your public IP address changes periodically. Many ISPs do not assign static IP addresses to non-business accounts especially for IPv4 addresses because they are extremely limited and have technically been exhausted for some time now.
When your modem stays connected for a long period of time with an ISP, it is possible your IP address will not change very often. In my experience, that seems to be the case with Comcast Xfinity. If you have an interruption of service, power outage, or you replace your modem, you may end up receiving a new IP address when your old IP address expires.
To work around this issue, you can set up domain name using a dynamic DNS service so that your router or other device on the network can periodically update the DNS record for that domain name with your IP address. Whenever you use that domain name to access your home network, it should always have the correct up to date IP address for your network (unless you happen to connect in between the update interval after your IP address has changed).
There are a number of dynamic DNS services that are free, but you are limited to using a handful of generic domain names with those free services. Some of the services have an option where you can pay to use your own custom domain name if your registrar does not have a means to update DNS records automatically with a script or API.
If your registrar has an API available, you can update the DNS record(s) via a dynamic DNS client without needing a 3rd party service to manage/update the DNS records. That feature is really nice because you do not need to pay for a domain name and pay for a dynamic DNS service that supports custom domain names. DreamHost and Cloudflare are two examples of domain registrars which have such an API.
Install the Dynamic DNS Plugin
Unlike some consumer routers which support dynamic DNS out of the box, OPNsense does not have dynamic DNS functionality installed by default, but this is easily remedied by installing the Dynamic DNS plugin. Go to “System > Firmware > Plugins” and click the “+” button for the os-ddclient plugin to install it.
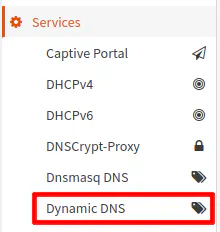
Once the plugin is installed, you will see the “Dynamic DNS” menu option under the “Services” menu. You will have to click to another page or refresh the page to see the new menu option.
Configuring the Dynamic DNS Client
Go to the “Services > Dynamic DNS > Settings” page and click the “+” button in order to add a new dynamic DNS entry. The exact settings you will use will depend on which service you are using to update your DNS. You may have to look up what the values need to be for the ddclient which is being used by the Dynamic DNS plugin in order to properly configure the update client.
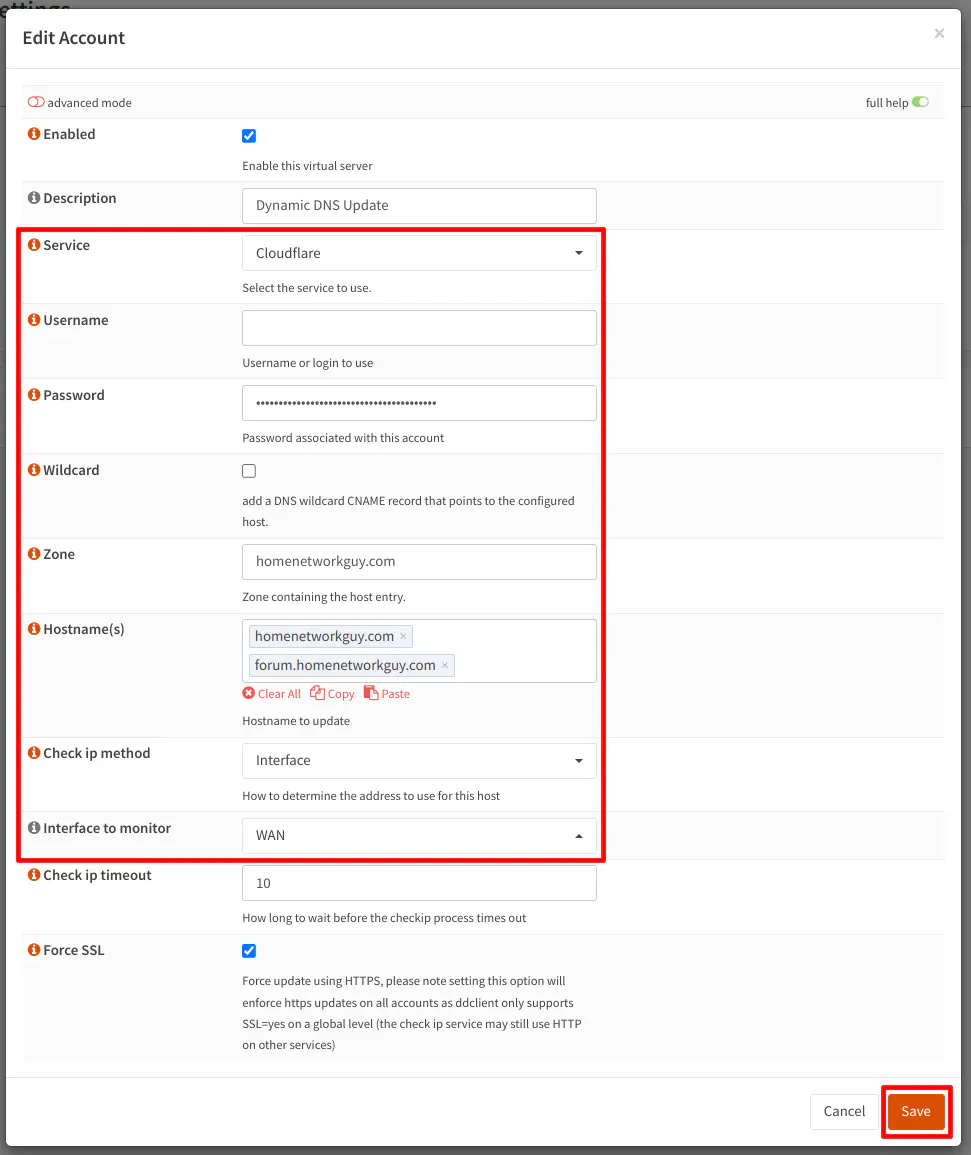
The “Enable” checkbox should be checked by default when adding a new dynamic DNS account. An optional “Description” may be entered if you have several dynamic DNS accounts to add, and you would like to provide more details. The “Description” shows up on the main list on the “Dynamic DNS Settings” page so it can be helpful when you have several accounts set up.
For the “Service”, select your dynamic DNS provider or registrar that supports updating DNS records. In this example, I am using Cloudflare as the registrar.
The “Username” needs to be blank when you are using an API key for Cloudflare. This is very important. I believe the dynamic DNS client used to work with the username entered, but I noticed on more recent versions that it was no longer updating properly if it was entered. I found a mention of not needing a username on a blog post describing how to set up ddclient with Cloudflare.
In the the “Password” box, use the “Edit zone DNS” token that you created in your Cloudflare account (which only allows access to update DNS entries).
For the “Zone” enter the domain name for the zone you wish to update. In my example, the zone will be homenetworkguy.com.
For the “Hostname(s)”, if you want to update the root of the domain, simply enter the domain name such as homenetworkguy.com. If you have subdomains which need assigned the same IP address, enter each subdomain. You may enter wildcard domains such as *.homenetworkguy.com if you have them configured with your DNS registrar.
The “Check ip method” can be set to “Interface” if your router is directly connected to the Internet. The “Interface to monitor” dropdown box will then be displayed. The interface should typically be the WAN interface since that has your public IP address, but if you have more than one WAN interface, you may choose the appropriate interface in the dropdown box.
“Force SSL” is checked by default so you may leave that option so you can securely update the IP addresses.
When you are finished, you need to click “Save” and then “Apply” for changes to be applied. You should check the “Services > Dynamic DNS > Log File” page to see if the IP address update occurred successfully.
Setting the Update Interval and Other Advanced Settings
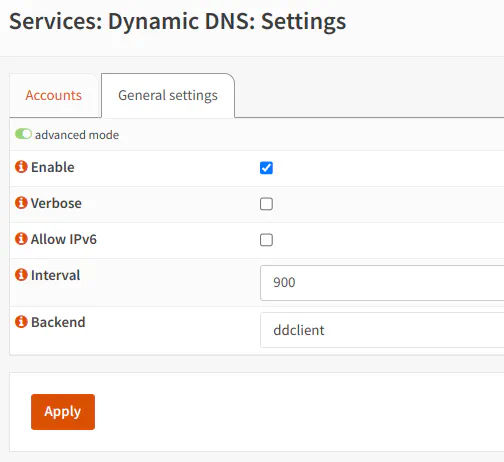
On the “Services > Dynamic DNS > Settings” page and the “General settings” tab, you can enable verbose logging by checking the “Verbose” option. This gives you more detailed information on the “Services > Dynamic DNS > Log File” page. If you wish to update IPv6 addresses, check the “Allow IPv6” option.
Finally, the “Interval” is a value you may wish to change. In my example below, I have set it for every 15 minutes (900 seconds). You may not want to check for an IP address update very often especially if some registrars prefer you do not do it too frequently so they do not get overwhelmed with lots of update requests from dynamic DNS clients.
