Configure the IP Address on a TP-Link Managed Switch

Table of Contents
In this how-to, I will using the TP-Link T2600G-28TS L2 managed switch (affiliate link) and the TP-Link T1500G-10MPS PoE smart switch (affiliate link) to show the difference between the firmware versions. I am assuming the switch is currently configured with the default settings from the factory.
To begin configuring the switch, first plug a desktop or laptop computer into any port in the switch. The switch does not need to be plugged into other network device such as a router until the initial configuration is completed. The switch does not have DHCP enabled by default so you will need to manually enter your IP address in your computer. Since the default IP address for the switch is 192.168.0.1, you should set your IP address within the same subnet (192.168.0.2-192.168.0.254) so that you may access the web administration for the switch.
Log into Web Administration Page
Log into the the web administration page by visiting http://192.168.0.1 with the default username:password of admin:admin. You should change those defaults ASAP, of course, for security reasons. If your network preference is similar to mine, I use the default LAN subnet of 192.168.1.0 as my management VLAN. Therefore the default IP of the switch will need to be changed so that the web administration page can be accessed.
I am choosing in this example to use a static IP address rather than one dynamically assigned by my router. This is a personal preference. The reason I use a static address is so that I can connect to the switch and configure it before I connect it to the rest of the network (which is important if you are using link aggregation, for instance). I also know the what the fixed IP address will be, and I do not have to browse to my router web admin page to find the IP address of the switch. Since my network infrastructure will not change often, a static IP address works great in this scenario.
Older Firmware Version
If you have the older firmware version, you can change the IP address in the settings by going to Routing > Interface section. Then click edit on the Vlan1 entry in the Interface List section to set the default IP address of the switch:
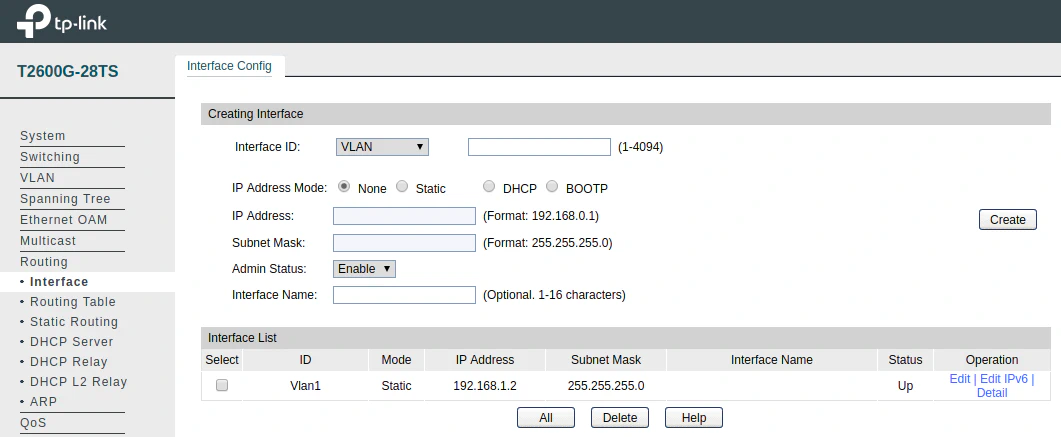
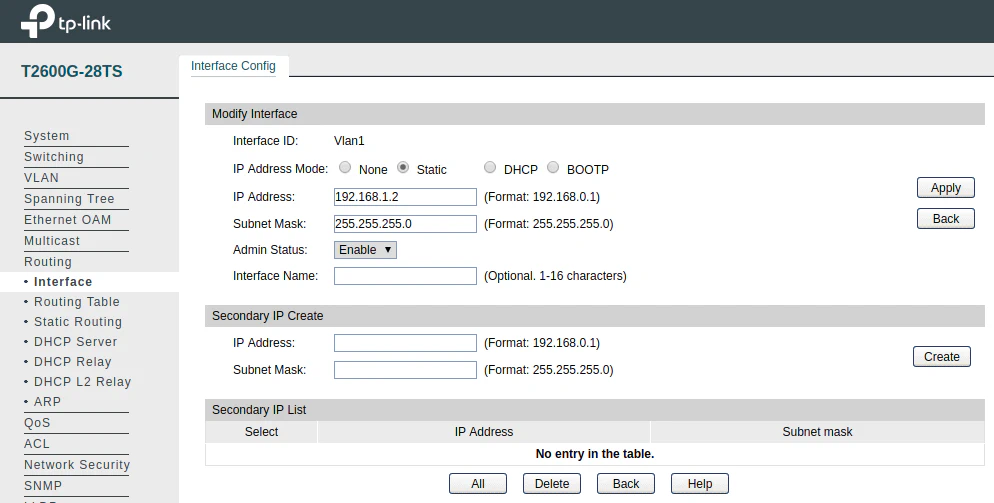
On the edit page, you will be able to set the IP address, subnet mask, and optional interface name. Be sure that you do not accidentally set the IP address to the same as your router by simply changing the IP to 192.168.1.1 since that is likely the same as the router. The last octet needs to be changed to avoid an IP address conflict. I decided to set the switch IP to 192.168.1.2:
Newer Firmware Version
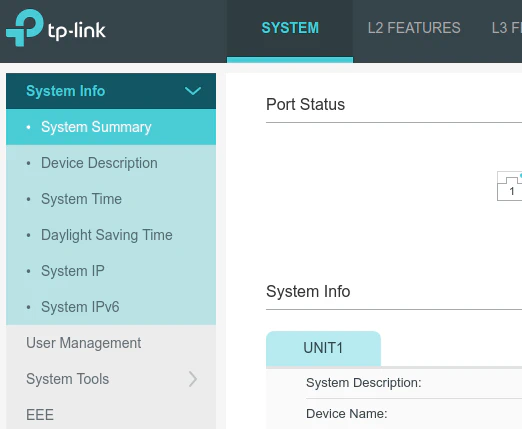
For the newer firmware version you will see the “System IP” on the left menu bar as soon as you log in. It is located in the “System” tab:
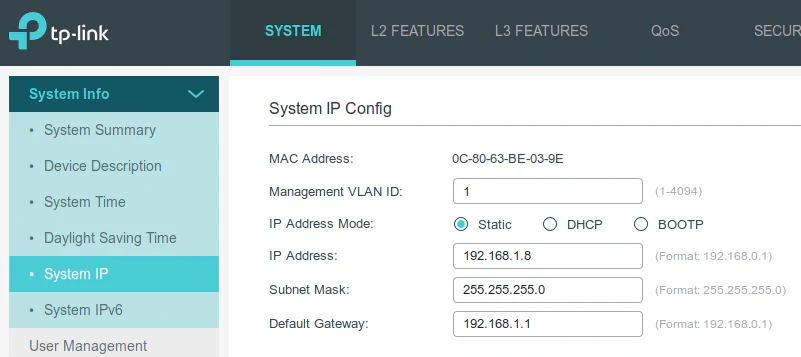
In this example you can see that I set my switch IP address to 192.168.1.8. Once you are done entering the subnet mask and gateway address, click “Apply” to apply the changes.
Switch IP Address on Your Computer
Once you change the switch IP address to your desired network address, you will lose access to the switch if you changed the switch to be in a different subnet than your computer. Simply manually change your IP address to be in the same subnet and once again you will have access to the web administration page.
If you have plugged your switch into your network, you may want to switch your computer back to getting its IP address automatically via DHCP.
Save Settings on Your TP-Link Switch
One last note: do not forget that you need to save your changes so that they stay applied when your switch reboots. In the older firmware, you must click “Save Config” from the left menu bar. For the newer firmware, you must click “Save” in the upper right corner of the web admin page.
Once you are done configuring all of your network settings, it may be a good idea to backup your switch configuration to a file on your computer. If you have firmware updates that messes up your configuration or you have to get a new or replacement switch, you can import the configuration and be up and running more quickly!