Configuring a New Interface on a TP-Link Switch

Table of Contents
After I set up VLANs on my home network, I quickly noticed that I could not access the web administration page on my TP-Link T2600G-28TS L2 managed switch (affiliate link) from a different VLAN even though I had allowed access for my PC via a firewall rule. I could access the web admin page of the switch from the same VLAN (the default VLAN1) so I knew the switch was functioning properly.
I eventually discovered that I needed to create a new interface on the switch for the VLAN which I want to access the web admin page. The new interface will have a separate IP address that resides in the specified VLAN.
Oddly enough I noticed that after I created a new interface on my TP-Link 2600G-28TS switch on VLAN 20, for instance, I could also access the web admin page on the switch’s default interface/IP address, which resides in the management VLAN, if I allowed access via a firewall rule.
It is important to consider the security implications of enabling a new interface on another VLAN. By enabling the new interface on another VLAN, all devices on that VLAN now have access to that interface. Depending on your needs, that may not be desirable. While it may be a disadvantage from a security point of view depending on your level of trust of devices, the advantage is that you do not need to open up holes in your firewall into your management VLAN. I do not know if this advantage outweighs the disadvantage of exposing the web admin to other VLANs. I leave that decision up to the reader.
Creating a New Interface
Now it is time to create the new interface for your switch. I will show how to do this using both the older and newer firmware versions on two different TP-Link switches.
Older TP-Link Firmware
Go to the “Routing > Interface” page. At the top of the page, you will see where you can enter values to create a new interface.
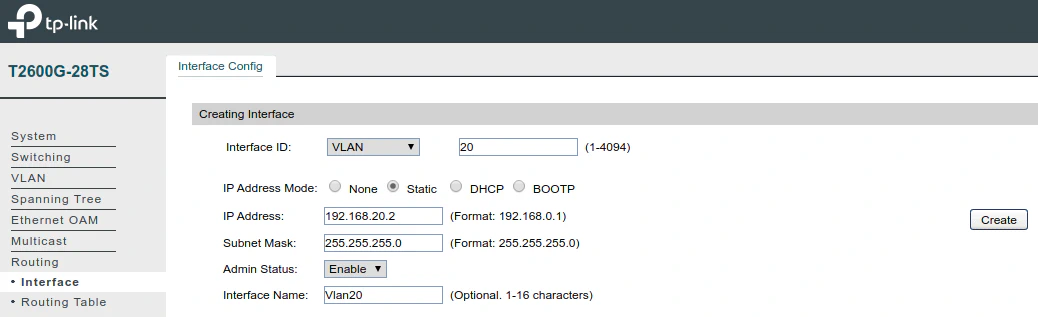
For the “Interface ID”, you should enter the “VLAN ID” where you want the new interface to reside. Set the “IP Address Mode” to “Static”. Enter an IP address within the VLAN subnet address. So if your VLAN subnet IP range is 192.168.20.0-192.168.20.255, choose an IP that will not conflict with any other devices. I would use something like 192.168.20.2 if your router VLAN interface is 192.168.20.1, but you can choose another IP. It should be outside your DHCP IP range configured in your router (such as 192.168.20.100-192.168.20.200). Enter the “Subnet Mask” of 255.255.255.0 if you are using a similar IP range as I am using in this example.
After you click the “Create” button, you should see the new interface below the create interface section of the page:

Newer TP-Link Firmware
Go to the “L3 Features > Interface” page. Click the “Add” button, you will be presented with the “Interface Config” dialog box where you can enter values to create a new interface.
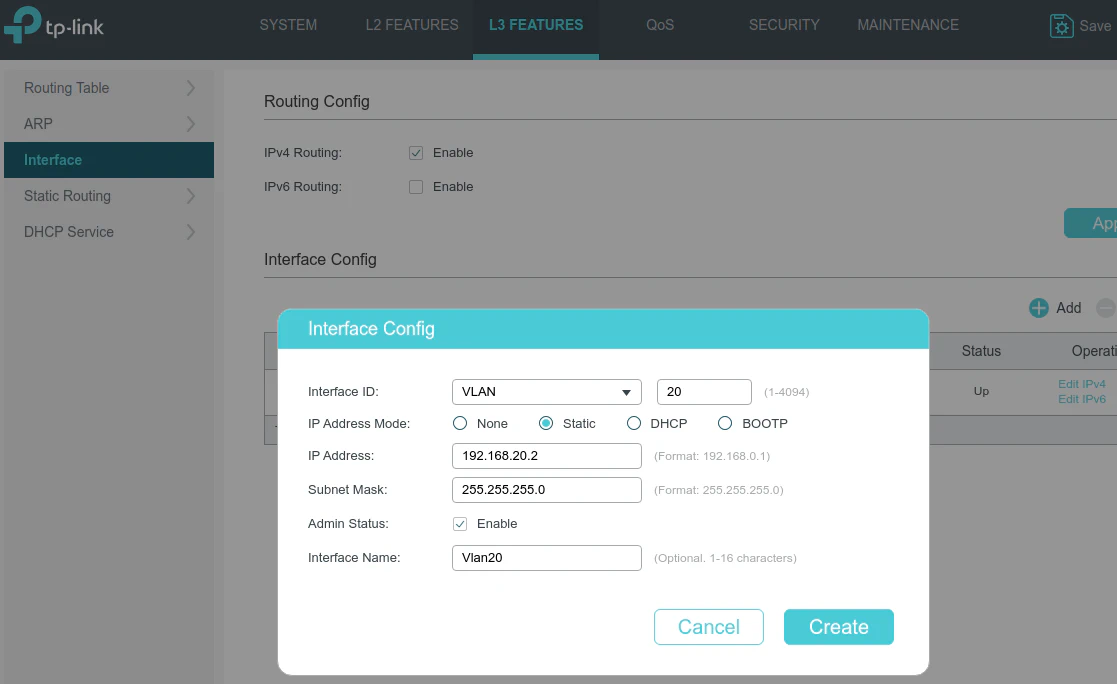
Enter the interface information the same as described in the “Older TP-Link Firmware” section. The newer firmware has the same set of fields as the older firmware.
After you click the “Create” button, you should see the new interface listed in the “Interface Config” section of the “Interface” page.

Accessing the New Interface
Now that the interface is created, you can point your web browser to the new interface’s IP address and you should be able to access the web administration page. I hope you found this basic information useful on how to create additional interfaces in which you may access your web admin page of your network switch!