How to Configure Firewall Rules in OPNsense

Photo by MasterTux from Pixabay
Table of Contents
If you are new to firewalls like I was when I decided to build my own router/firewall, it can take some time to fully understand and feel comfortable implementing firewall rules. Before attempting to build my own router, I tried to do my research so I would know what I was getting myself into. In particular, I read several posts and watched some videos on how to create firewall rules since that is one of the biggest reasons I was taking on such a project – to implement greater security in my home network.
The process of creating firewall rules seemed simple enough until I sat down to write my own rules. Starting with a blank slate can be challenging when you are newbie trying to get your feet wet, but over time I developed a decent set of rules that restricts much of the network traffic within my home network without sacrificing usability. You will know that you have done a great job when your family rarely mentions having connectivity issues while using devices on your home network.
One of the first things you should do when you have decided to take the plunge is to spend some time to think about what you want to achieve by building your own router/firewall. For myself, I knew that I wanted to separate my home network into several logical networks (via VLANs). A few questions I had to ask myself: What services do I want to block or allow within my network and outside my network? Which VLAN should I put each device into? How do I restrict as much network traffic as possible without making it difficult to use my network?
The Default OPNsense Firewall Configuration
OPNsense automatically creates a web administration anti-lockout rule and an “allow all” rule for IPv4 and IPv6 by default for the LAN interface when you set up your LAN/WAN interface upon installation of OPNsense. These rules prevent you from locking yourself out of the web administration pages on your router as well as allow unrestricted Internet access for your network. The default firewall configuration should allow your OPNsense router to behave like a typical consumer-grade router. Plug devices directly into the router (or into a switch connected to the router), and they will just work. If the “allow all” rule is disabled or removed, all traffic to the Internet and other local networks will be blocked except for access to the OPNsense web administration pages.
To see the default rules, go to the “Firewall > Rules > LAN” page:

Rule Processing Order
The firewall rule processing is designed to block all traffic by default: no rules = block all traffic. Rules are processed from the top to the bottom of the list so the order of the rules in the list matters. When the network traffic matches any rule whether it is an “allow” or “block” rule, no subsequent rules are processed. The first match wins and all the rules below it are ignored. This means you must put some thought into the proper order of the rules. You cannot simply add them randomly and expect them to work as you expected.
When creating firewall rules, it is useful to consider putting the most specific rules at the top of the list and the most general rules at the bottom of the list. When you do this, the more specific network traffic is allowed or denied first while the network traffic which does not match any of the specific rules will be handled by the broader rules. The broader rules are like “catch all” rules which can either allow or deny all other unspecified network traffic. In more restrictive environments, a “deny all other” rule may be at the bottom while in a home environment, an “allow all other” rule may be more appropriate (with the understanding that it is less restrictive and secure).
Creating Rules
Now let’s start writing some rules!
Allow Only Specific DNS Servers
One of the first few rules you may want to create for added security is to only allow the DNS servers specified by your router. This allows you to control the DNS servers used by your home network and prevents users and devices from using other external DNS servers or running their own DNS servers within your network. It is especially important to do this if you wish to run your own DNS servers or you are using external DNS servers that provide content filtering/blocking. These DNS firewall rules will prevent users/devices from going rogue and bypassing the filtering/blocking you have implemented for your network.
I am using the LAN interface in this example, which is the default interface in OPNsense for the internal LAN network. You may substitute this interface for any other interface. This applies to all of the rule examples in this article.
Note: You will need to repeat the following steps for allowing specific DNS servers to every VLAN/interface that is connected to the Internet. If you have several VLANs/interfaces, you may wish to create a group for your rules. Groups are processed before the rules for each interface. Your rules will be easier to maintain if you make proper use of groups.
To add the DNS server protection, add the following two rules:
1. Allow the internal DNS server
| Option | Value |
|---|---|
| Action | Pass |
| Protocol | TCP/UDP |
| Source | any |
| Source Port | any |
| Destination | LAN address |
| Destination Port | 53 (DNS) |
| Description | Allow internal DNS |
Select “Pass” for the allow rule. Choose the source address and source port of “any” represented by *. This captures all traffic on the LAN interface that is going to the specified destination. For the destination address, select the LAN address. For the destination port, choose port 53 which is used by the DNS service.
The LAN address is used as the destination since the DNS service is advertised on each interface’s IP address. The interface’s IP address is also used as the gateway address for devices on that network. When you look at the DHCP information for each device, you will see the LAN address as the gateway server and the DNS server. For my configuration, it is the 192.168.1.1 address.
The DNS IP address can be different than the gateway IP address depending on your network configuration but for this example, I am assuming it is the same since we are using the DNS server configuration in OPNsense and not an external DNS server. Since I am using two Raspberry Pi DNS servers (using the Pi-hole software) in my home network, I am using two different DNS server IP addresses that is not the same as the gateway IP address.
2. Block any external DNS server
| Option | Value |
|---|---|
| Action | Block |
| Protocol | TCP/UDP |
| Source | any |
| Source Port | any |
| Destination | any |
| Destination Port | 53 (DNS) |
| Description | Block external DNS |
Select “Block” for the deny rule. Once again the source address and port needs to be set to “any” device on the LAN network. For this block rule, the destination needs to be “any” because we want to block any attempts to use any other DNS server. Select port 53 for DNS like with the allow rule.
Remember that due to the rule processing order, any attempts to access the specified DNS server in the “allow” rule above will be successful and rule processing stops for that request. However, if a device is trying to access an external DNS server, it will reach the “block” rule since the “allow” rule will not pass which denies access to that DNS server.
The rule list should look like the following:

It should be safe to add these rules to the top of your list. If you are in the LAN interface, you cannot move any rules above the anti-lockout rule, but it is perfectly ok to put the rules underneath that rule. The first rule allows your local DNS server to be accessed while the second rule blocks access to all other DNS servers regardless if they are local or remote.
Allow Access to Interface Gateway Address
When you have more than one VLAN/Interface on your network, you will want to ensure access to other networks are blocked except for the few exceptions that you have allowed. Because of the way we are going to set up the rules in this example, you will need to allow network traffic within each VLAN/interface to access its own gateway IP address, which is the same as the interface’s assigned IP address. If we do not do this and we block all private IP addresses, it will block access to the Internet and other services. I hope as we work through this example, you will understand the reasoning behind this rule.
You may decide to block access to only the VLANs you have configured on your network by specifying each individual VLAN network address, which means you would not need the “allow” rule for the interface gateway address. However, if you add any new VLANs, you will need to remember to add them to the “block” rule. Otherwise, your other networks will have full access to your new network since we plan to have an “allow all” rule at the bottom of our rule lists! Therefore, it is safer to add a rule that blocks all private IP addresses for each VLAN/interface and add the above “allow” rule to allow access to the interface gateway IP address. If you create a new VLAN, by default access is blocked until you allow it. This option is safer because it forces you to create the “allow” rule rather than allowing access by default. You do not want to find out later that you (or anyone else!) have full access to network resources that you should not have. You will see how we configure the “block all private networks” rule further in this article. I just wanted to mention this caveat in advance to hopefully avoid potential confusion (and hopefully I am not adding more confusion).
To allow access to the interface’s gateway IP address:
| Option | Value |
|---|---|
| Action | Pass |
| Protocol | any |
| Source | IOT net |
| Source Port | any |
| Destination | IOT address |
| Destination Port | any |
| Description | Allow access to gateway |

Allow Local Services across VLANs/Interfaces
If you are using VLANs or multiple interfaces with different subnets and you are running a local server such as Plex Media Server, then you may want to allow access to your server from devices on other network(s). In order to achieve this, go to the interface in which your client device resides. Then we need to allow access to port 32400 (the default port for Plex). You would pick the the network of the interface you selected as the source and on the destination you would enter the server IP address (or you can use an alias) and enter port 32400. This rule provides network access from your IoT network to your server which lives in a different network (VLAN) so that you can now watch Plex from your phone or your favorite media player.
| Option | Value |
|---|---|
| Action | Pass |
| Protocol | TCP |
| Source | IOT net |
| Source Port | any |
| Destination | 192.168.10.10 |
| Destination Port | 32400 |
| Description | Allow access to Plex Media Server |

This rule allows any device on the IO network to access the Plex Media Server at address 192.168.10.10 on port 32400. This assumes the Plex Media Server is in a different VLAN network than the IOT network. Otherwise if they are in the network, you would not need a firewall rule since you would already have access to the server.
I highly recommend becoming familiar with aliases especially when you need to refer to certain things more than once. In the example above, you could create an alias for the Plex Media Server so instead of typing
192.168.10.10, you could use the alias “MediaServer” or whatever name you choose for your server.
Another example could be a web server running Wordpress or Nextcloud. For this example, you would want to allow port 443 assuming you are running a secure site (I am sure you are!). You can put these allow rules for your local network services somewhere in the middle of your rule list and you should be ok.
| Option | Value |
|---|---|
| Action | Pass |
| Protocol | TCP |
| Source | IOT net |
| Source Port | any |
| Destination | 192.168.10.10 |
| Destination Port | 443 (HTTPS) |
| Description | Allow access to web server |

You may be thinking that you could simply have all your devices on the same network and configure a firewall on the server to have a similar level of isolation between your devices. While this may be true to a certain extent (and I certain encourage firewalls at the device level as an extra layer of security), there are advantages to controlling the network traffic at the router firewall level rather than at the individual device level. One such benefit is being able to limit the communication between a large number of devices quickly and efficiently. All devices located in one network can be blocked from accessing devices in another network without needing to configure each individual device. Individual device or network access may be granted as needed. This configuration can be centralized in one place – the router’s firewall (in less complex networks such as your home network as configuration management in a larger enterprise may be less centralized).
Block Access to Other VLANs
Once you have defined access to all of your local network services across your VLANs, you will likely want a rule to block access to your other VLANs. By default, access to other networks will be blocked unless you have an “allow all” catch-all rule at the bottom of your rule list. Since you will want to have an “allow all” rule to allow any traffic that you have not specifically blocked, you will need a rule to block traffic between the VLANs in your network. Otherwise, every device in your network can communicate with any other device in your other VLANs, which defeats the purpose of having separate networks.
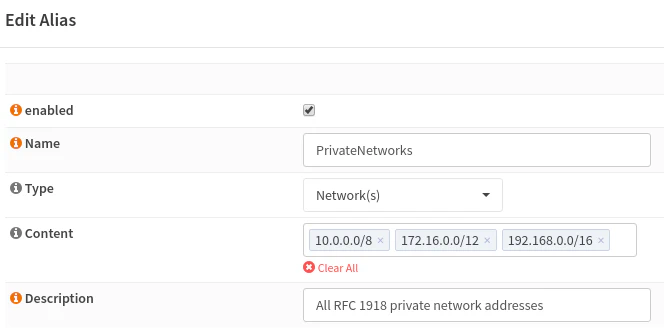
One easy way to accomplish this especially if you have several VLANs is to create an alias that has all of the private IP address ranges in it. You can use that alias for every VLAN’s firewall rules. You will not need to specify the individual IP range of every VLAN in your network. The private IP range block is nice since it has the added benefit of preventing any other unknown private networks from being created in your network. This may not be an important benefit for most home users but perhaps you could be worried about roommates from standing up their own rogue network(s) within your network.
Go to “Firewall > Aliases” to set up a new alias. The private IP networks alias should look like this:
The block all private IP networks rule (do this for every interface but remember to change the source for each interface):
| Option | Value |
|---|---|
| Action | Block |
| Protocol | any |
| Source | LAN net |
| Source Port | any |
| Destination | PrivateNetworks |
| Destination Port | any |
| Description | Block access to all other private networks |

Remember that you if you need to allow traffic for specific devices or VLAN networks, you have to create rules above the “block all private IPs” rule. If you do not put them above this rule, your traffic will be dropped before it reaches your “allow” rule.
Finally, the “Allow All” Rule
For home network usage, I believe it is reasonable to have an “allow all” rule at the bottom of the rule list. The reason is that this rule will allow all traffic that has not been specifically blocked to pass through the firewall including traffic on the local network or the Internet. Such a rule likely represents what most users would expect to happen: allow/block certain things and allow everything else so things “just work.”
If you want to run a stricter home network, you may want to only allow certain outgoing ports but you will need to have a solid understanding of everything that you need to access on a day-to-day basis. I personally have not spent the time to determine every single outgoing port that I need to allow access and quite frankly, I am sure my household would not be happy while I am troubleshooting what is being blocked when they are trying to use their phone, media player, etc. Some devices such as the iPhone uses a bunch of different ports for different purposes. You may find yourself adding quite a few ports and port ranges. So be prepared to spend some to fine tune what you need if you wish to go that route.
Note: Having an “allow all” rule at the bottom of the list may not necessarily be appropriate in a more a restrictive environment where all network traffic must be heavily controlled and monitored. Perhaps it is more appropriate in that scenario to have a “block all” as the default rule at the bottom of the list and allow only specific network traffic. A “block all” rule is implied if the traffic does not match any of the specified rules in the list, but you can still add such a “block all” rule if it helps you understand that is what is happening during rule processing.
Summary
Below is a brief description of what we have created. These rules could be applied to a single VLAN/interface such as an IOT VLAN which has limited access to another VLAN which has a Plex Media Server and a web server. You could use this as a template for other VLANs with varying permissions for each network:
- Allow the local DNS server
- Block all other DNS servers
- Allow access to the interface gateway address
- Allow access to the Plex Media Server in your server network
- Allow access to the web server in your server network
- Block access to all other private networks/VLANs
- Allow access to all else (default “allow all” rule)
I hope this how-to was helpful to get you started writing some rules. When I first started, I did not know where to begin. Over time my ruleset has grown more fine-grained and complex as I have become more comfortable and knowledgeable of how to work with the firewall rules.