How to Configure VLANs in OPNsense

Table of Contents
For the uninitiated, VLANs are Virtual Local Area Networks. Think of them as logically separate networks that are similar in concept to physically separated networks. The biggest difference is that you do not need to put network devices on physically separate switches or other network hardware. VLANs are both economical and convenient. It is economical since you do not need to purchase extra hardware and convenient since your network devices can be physically located anywhere yet still be grouped in logically separate networks.
Before we can configure VLANs in OPNsense, you will need to configure all of the interfaces on your router that you plan to use. One interface needs to be used for the WAN which provides the Internet connection from your modem/router and at least one other interface needs to be used for your LAN for your internal network devices. Although you can use a single interface for the WAN/LAN connection (which reminds me of the dial-up Internet connection sharing days…), it is recommended to have at least two network ports/adapters on the device you have OPNsense installed.
The OPNsense software walks you through setting up a WAN and LAN interface when you first install it. You have the option to configure it later, but it makes sense to at least set up those two interfaces since that is the bare minimum that you will typically use. The setup process makes it convenient by prompting to plug in a network cable to the port you wish to enable the WAN or LAN to help detect the proper network interface.
Create New VLAN Interface
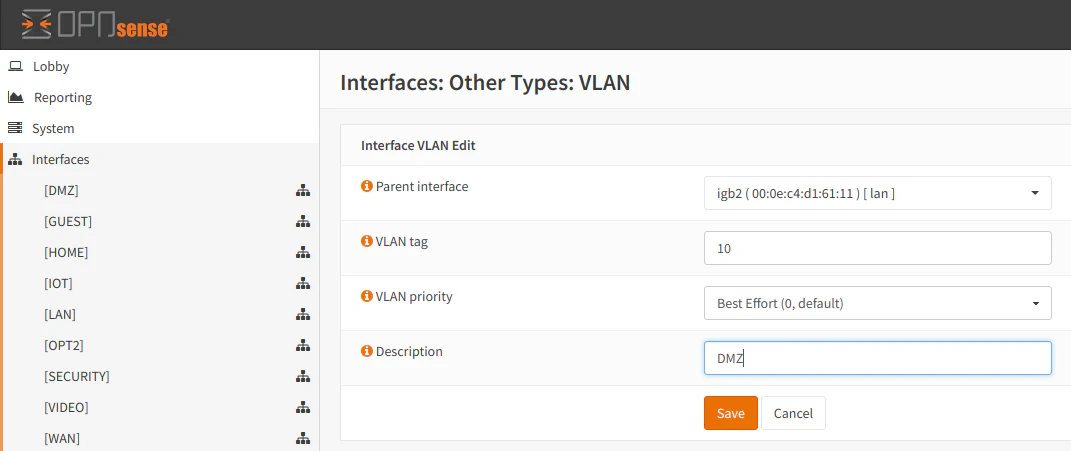
To configure VLANs, you must go to “Interfaces > Other Types > VLAN”. Click “Add” to add a new VLAN. The first option you need to select is the parent interface. This is the physical port where the VLAN should reside. For a home network, you will most likely have a single switch plugged into the router for extra ports. You would want to select the port on the router where your switch is connected as the parent interface. You may have previously defined this interface as “LAN”. You need to give it a tag number (something other than 1), the priority of the VLAN traffic, and a short description of the VLAN. Click “Save” to create a new VLAN.
The next step is to assign a new logical interface for the VLAN. The physical interface for the VLAN was already selected when you selected the parent interface. Select the newly created VLAN beside the “New interface:” text and click the “+” button. Click “Save” to save the changes.
The VLAN parent interface may not necessarily have to be a physical interface since I noticed that I could select my OpenVPN interface as the parent interface, but for the most part, it is easy to think of the VLAN parent interface as the physical interface in which you want your VLANs to traffic to reside.
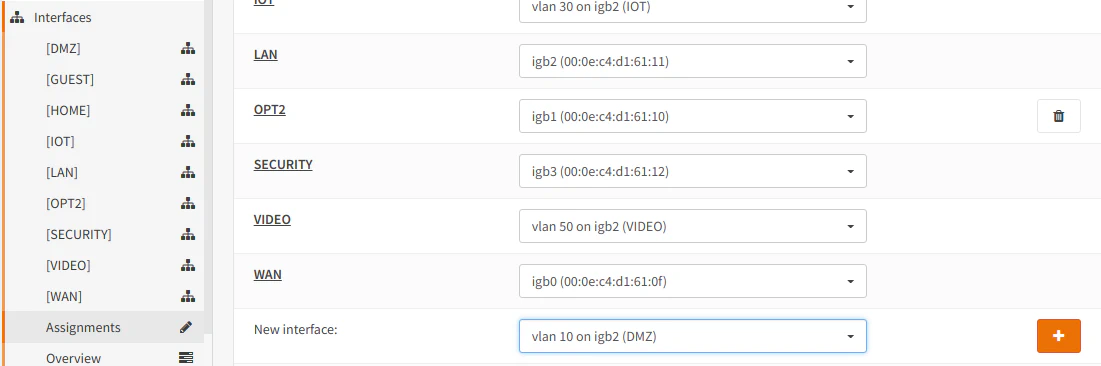
The interface will show up in the list of assigned interfaces. You can see in my case it is called “OPT8” by default. You may see “OPT2” or some other number depending on the number of interfaces you already have defined:

It will also show up in the “Interfaces” section in the navigation panel:

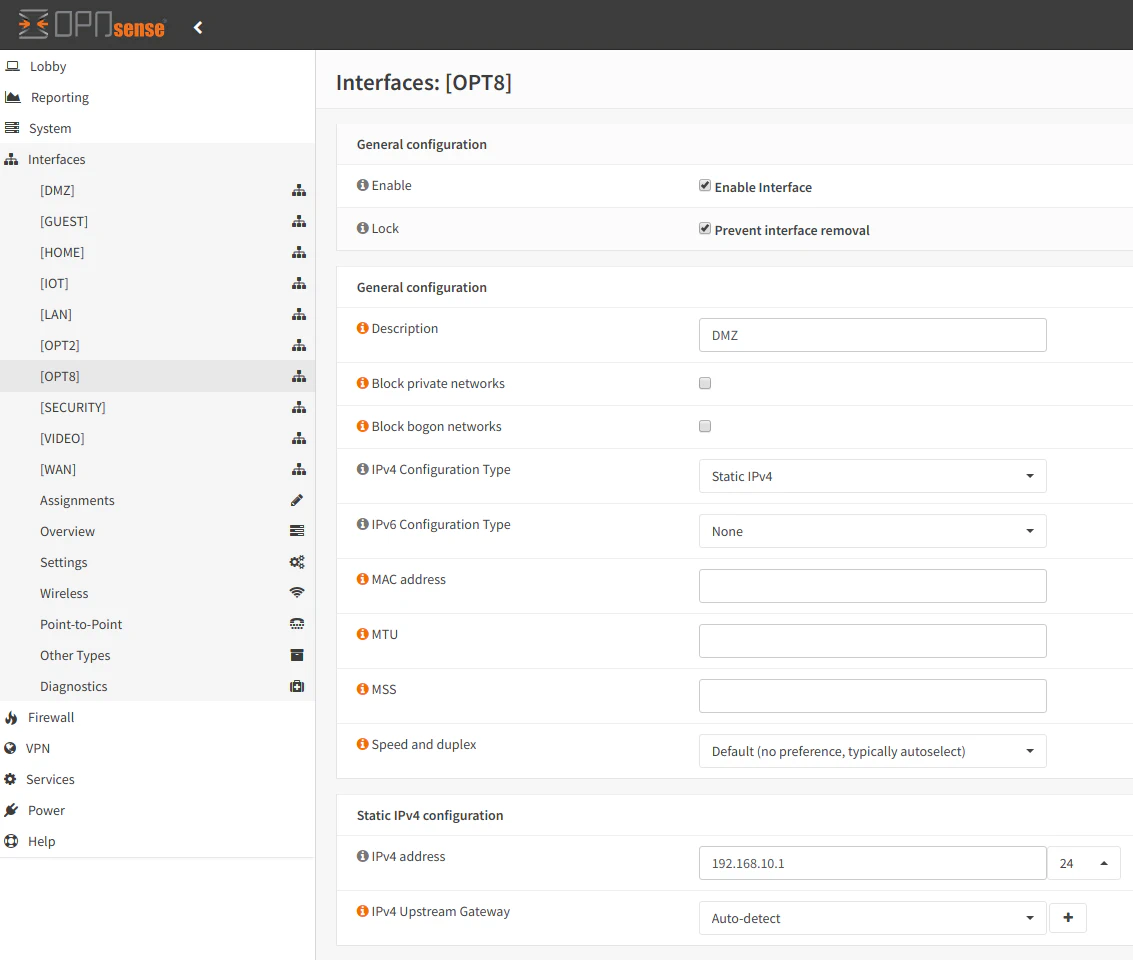
Once you click on the new “OPT8” interface (or whatever your interface was named), you can then enable it, prevent it from being removed (unless you later uncheck the option), and give it a proper interface name. I usually name the interface the same name as my VLAN to keep the names consistent. You should select “Static IPv4” for your VLAN unless you are using the VLAN for other purposes which is beyond the scope of this article. After selecting this option, a new “Static IPv4 configuration” section will be displayed at the bottom of the page. In the “IPv4 address” box, enter the IP address you wish to use for the interface. Typically, you would simply assign it a xxx.xxx.xxx.1 address. For instance, I am using 192.168.10.1. It is easier to remember that a .1 address is the gateway IP address for the VLAN rather than a randomly assigned address – much like how most consumer-grade routers will default to something like 10.0.0.1, 192.168.0.1, or 192.168.1.1.
Enable DHCP on VLAN Interface
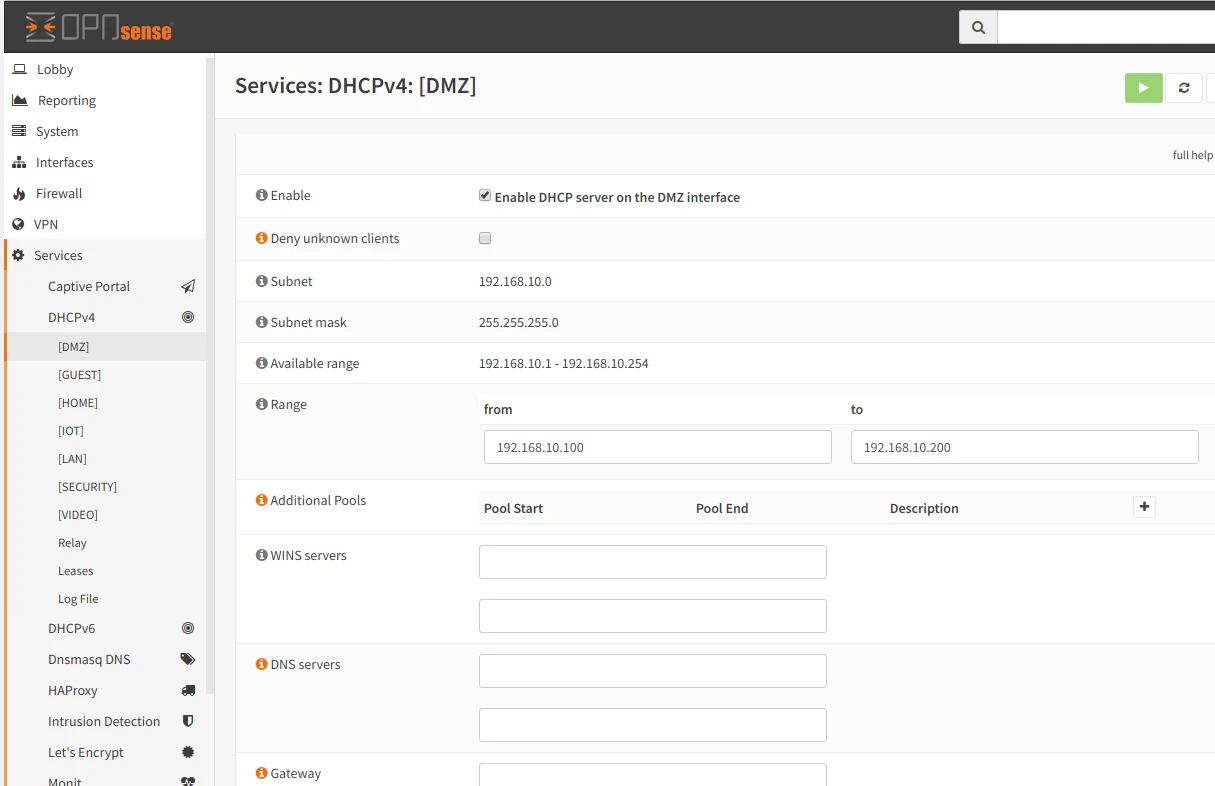
After enabling the VLAN interface, you will need to enable DHCP services on the interface in order for devices on the VLAN to obtain a IP address automatically. Go to “Services > DHCPv4 > [DMZ]” or whatever you named your interface. Click the “Enable DHCP server on the DMZ interface” checkbox. Then enter a range of IP addresses that you wish the clients in the VLAN to use. In the example below, I used the range 192.168.10.100-192.168.10.200. You do not need to enter any other settings unless you wish to use different gateway or DNS servers (or other more advanced settings).
If you have read another article I wrote, you will notice that I changed the default DNS on my VLANs to make use of the Pi-hole DNS filtering server while at the same time my global external DNS servers are set to the OpenDNS servers to provide content filtering for my family. This is one practical use of specifying the DNS servers in the VLAN interface settings.
Add the Appropriate Firewall Rules
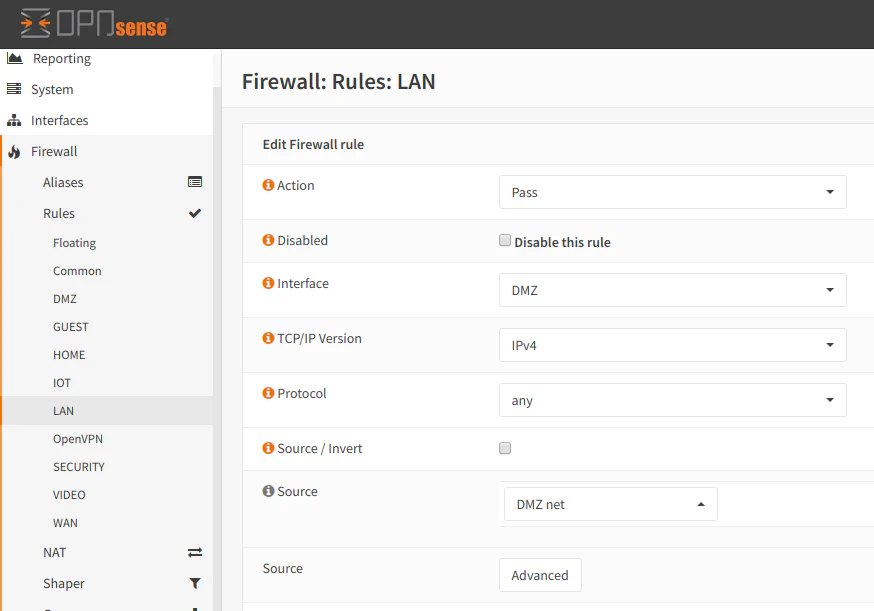
Now that you have created and enabled a new VLAN, you will need to set up firewall rules in order for data to flow out of your VLAN. By default, all network traffic for a newly created interface is blocked so you will need to create a few rules to allow the desired traffic on that particular network. To get up and running quickly, you may clone the same basic rules that were created when the LAN interface was initially generated during the OPNsense install. There are 3 rules: the anti-lockout rule which cannot be removed (it keeps you from locking yourself out of the web administration pages), an allow all IPv4 rule, and an allow all IPv6 rule. You may clone both of those rules if you wish by clicking on the far right icon beside the rule:

Then you can change the interface from LAN to your VLAN interface. In our example that is the DMZ interface. Also you will need to change the source to DMZ net to allow all of your devices on that network to access other parts of your network and the Internet:
It is important to note that if you simply use and copy the default rules generated for the LAN interface for your new VLAN, it will have access to other VLANs in your network. So I do not recommend doing this unless you are simply testing network connectivity since it defeats the purpose of segmenting your network. You can still keep the “allow all” rule if you put it at the bottom of your firewall rule list and you block all unwanted traffic in rules above the “allow all” rule.