Install Pi-hole on Proxmox and Use OPNsense Unbound DNS as Upstream DNS

Photo by DebbiSmirnoff from iStock
Table of Contents
Several years ago I wrote some guides on setting up Pi-hole using Portainer on a Raspberry Pi. Since that time, I have decommissioned Pi-hole in favor of managing all ad blocking/tracking (as well as other security features) using Zenarmor in OPNsense.
The primary reason of removing Pi-hole from my network was to simplify the maintenance of my network infrastructure and to minimize the number of places that I need to look when something legitimate was being blocked on my network. At one point, I also had Suricata running along with Zenarmor and Pi-hole so I had to check 3 places when something was being blocked! Now I only need to look at Zenarmor.
Pi-hole remains popular among the homelab community so I wanted a fresh look at this topic as well as use a different approach by installing Pi-hole in a container on Proxmox.
Overview of DNS Configuration
For this guide, I am going to assume DNS will configured in the following way:

I will be configuring the DHCP settings in OPNsense to assign the Pi-hole DNS server as the DNS server for each network. Pi-hole will then use Unbound DNS running on OPNsense as its upstream DNS server.
This configuration will allow you to see individual clients within Pi-hole and preserves the ability for local hostnames to be resolved via Unbound DNS on OPNsense since it is the upstream DNS server.
Note
If you make Pi-hole the upstream DNS server for Unbound DNS on OPNsense, you will simply see the OPNsense router as the only client in Pi-hole so you lose the ability to see the DNS queries on individual clients on your network.
Create CT/LXC in Proxmox
On the Proxmox web interface, click on “Create CT” to create a container to use for Pi-hole.

Enter an unused “CT ID” number as well as the “Hostname” used for the container. Finally, enter the “Password” for the root user of the container. Click “Next”.

Choose the “Storage” where your container template is stored (you need to download a CT template before you can create any containers).
I will be using the Ubuntu 22.04 template in my example. You may use a lighter weight Linux template, but I am personally comfortable with Ubuntu/Debian Operating Systems. Even with using Ubuntu, the resources used by the container is still very minimal as you will see once Pi-hole is up and running.
Click “Next” to continue.

Choose the “Storage” location for the container if you have more locations besides the default “local” location.
The container defaults to 8 GB of disk space, but you can set it a bit higher if you want. Note that you can easily allocate more space later without needing to recreate your container or do anything special inside the container for the additional space to be recognized.
Click “Next”.

For the “CPU”, you can enter 2 cores. Pi-hole is lightweight so you might be able to get away with 1 core, but I noticed that when Pi-hole first was importing the list of domains to block that it displayed a warning message about exceeding 100% CPU usage. Depending on the speed of your system, you may or may not need to use 2 cores. I did not see the warning message when using 2 cores for the container.
Click “Next” to continue.

For “Memory”, you should be able to set this to 256 MB. If you want to keep things as tight as possible, you may even set it as low as 128 MB, but keep in mind that if the container is only using 100 MB of RAM and you have it set to 512 MB of RAM, the 412 MB of unused RAM can still be used by other containers/VMs. You just have to be careful not to overprovision your resources too much.
Click “Next”.

On the “Network” section, you will need to select the “Bridge” for the network where you want to locate Pi-hole. In my example, I am placing it on the LAN network, which I am using as the management LAN where all of the network infrastructure is located.
For “IPv4”, select “DHCP” since it will be assigned to the static IP that was reserved in OPNsense. If you wish to use “IPv6” as well, you can select “SLAAC”. I have noticed that even though I am using DHCPv6 on my network, selecting “SLAAC” for Proxmox containers allows the containers to properly get an IPv6 address assigned.
Click “Next” to proceed.

The final section is the “DNS” section. You will need to enter the DNS server of the LAN network such as 192.168.1.1 so the container itself can reach DNS. By default, the container will use the Proxmox host DNS server, which will not work if your container is located on a different network than your Proxmox host system unless you allow it via firewall rules in OPNsense.
Click “Next”.

Finally, click “Start after created” and then “Finish” in order to create and start the new container.

You should see the container being generated and a “TASK OK” when it is done. Click the “X” to close out the box.

On the “Console” section on the Pi-hole container, login as the root user using the password you entered when you created the container. I will assume you are logged in as root for the remaining portion of this guide.

Update OS Software in the Container
After the container has been created and is running, you should update the Operating System software. Those familiar with Debian-based Linux distributions will recognize the commands to update the OS via command line.
apt update
apt dist-upgrade
Tip
If you see the message “packages have been kept back”, you can simply use the apt install command and copy/paste all of the packages that are listed as “kept back” after the apt install command. This will include additional dependencies that the “kept back” packages require to function properly.
Before you can install Pi-hole using their installation script, you will need to install curl using the following command:
apt install curl
Set Static IP in OPNsense for Pi-hole
Before installing Pi-hole, a static IP address should be reserved in OPNsense for Pi-hole since it is important the IP address does not change because DNS for the network will fail to resolve.
In the Proxmox web interface, you will be able to see the MAC address from the “Network” section.
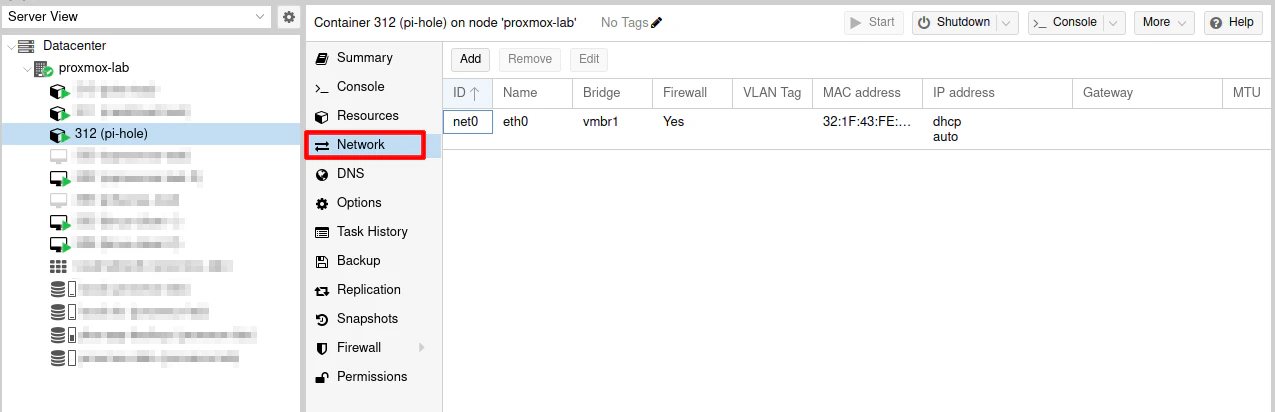
Copy the value in the “MAC address” box.

Go to the “Services > DHCPv4 > [LAN]” page and click on the “+” button to add a new DHCP static IP reservation.

Paste the MAC address in the “MAC address” field. Enter 192.168.1.10 for the IP address and use something like pi-hole for the “Hostname”. You may enter an optional description if you like. Click the “Save” button at the bottom of the page.

Click “Apply Changes” when you are done for the changes to be persisted.
Either restart your container in Proxmox or you can use the following commands to refresh/renew the IP address:
dhclient -r
dhclient
Verify that the IP address shows 192.168.1.10 when you run the following command:
ip a
Install Pi-hole
Now is the time to install Pi-hole! The installation script provided by Pi-hole makes the installation process straightforward.
I personally appreciate non-Docker installation options when I am using containers in Proxmox since the applications are already isolated in its own system container so there is no need for an application container on top of that.
While on the “Console” section of the container and logged in as the root user, enter the following command to get started:
curl -sSL https://install.pi-hole.net | bash
You will see the installation script running.

You are now installing a “network-wide ad blocker”! Press the “Enter” key to continue.

Press the “Enter” key to continue after being prompted about the project being funded by donations.

You will see a message about needing to set up Pi-hole with a static IP address. I already mentioned doing this in OPNsense so that your container will be ready to go with the static IP address ahead of time. You can, of course, set the static IP address later if you wish.
Select the “Continue” optin with the arrow keys and press the “Enter” key.

Use the down arrow key to highlight “Custom” since in the example I am implementing, the OPNsense Unbound DNS service will be used as the upstream DNS provider. Press the “Enter” key once you have “Custom” selected.

Enter the IP address of the Unbound DNS server IP address. If you are on the default LAN as I am using in my example, enter 192.168.1.1 and press the “Enter” key to continue.

Press the “Enter” key to proceed.

You will need at least one blocklist in Pi-hole, and it comes with one by default if you select “Yes” and press the “Enter” key.

Pi-hole gives you the option to run without the web interface if perhaps you prefer using the command line and want to minimize resource usage even further (perhaps also to minimize security risks as well by not exposing a web interface).
However, I would say that most everyone will want to install the web interface since it provides the pretty graphs and stats that everyone loves about Pi-hole.
Press the “Enter” key on the “Yes” option to continue.

With the web interface, you will need a web server to serve up the web pages. Fortunately, Pi-hole can install the lighttpd web server for you to keep things simple.
Press the “Enter” key on the “Yes” option.

Most likely you will want to enable the query logging so you can see the details about the queries occurring on your network. If you wish to save on writes on a system using microSD cards, you could disable this option to minimize writing data, but I think that limits the usefulness of Pi-hole since you sometimes need to dig into the queries to see exactly what is being blocked if you wish to allow or block specific domains.
Select the “Yes” option and press the “Enter” key to continue.

To have full visibility on your home network, you can leave this at the default of “Show everything”. If this was installation was for a business for a public WiFi network, for instance, you may want to hide clients/domains to increase privacy for your customers.
Press the “Enter” key on the “Continue” option.

Finally, you have arrived at the final screen of the installation. You will see your IPv4 address as well as the autogenerated password for the web interface. I did not blur out the password because this is just a demo that I will be deleting after completing this guide.
Press “Enter” to close the installer.

Even though there were several prompts, the installation process is pretty straightforward. Most of the prompts just required pressing the “Enter” key" since the default options were fine or they were simply informational.
Log into Pi-hole
At this point, you can log into Pi-hole to ensure it is up and running. Nothing will be using the Pi-hole at the moment, but you can keep the page open so you will start to see queries go through Pi-hole after completing this guide.
Go to the following web address: http://192.168.1.10/admin
You should see the Pi-hole login page.

After entering the auto-generated password, the Pi-hole Dashboard is displayed. Note that there are 0 total queries, which is to be expected. You should also see the number of domains on the adlists.

Set Pi-hole as DNS in DHCP for LAN
In order for your LAN network to use Pi-hole, you need to set the DNS server to be used on the “Services > DHCPv4 > [LAN]” page. In the “DNS servers” box, enter 192.168.1.10 for the IP address of the Pi-hole server.
Be sure to click “Save” at the bottom of the page.

You may skip the next section if you only have a single network.
Multiple Networks Pi-hole Configuration (Optional)
If you have multiple local networks/VLANs, you will need to do a couple of extra steps to ensure Pi-hole works properly for those networks.
Pi-hole Settings
The first setting you need to change in Pi-hole is the “Interface settings”.
You will need to select “Respond only on interface eth0” to allow Pi-hole to respond to requests from other networks. By default, the “Allow only local requests” allows only DNS requests from the same network/subnet where Pi-hole is located (in my example, the LAN network).

If you scroll down the page to the “Advanced DNS settings” section, you may uncheck the “Never forward non-FQDN A and AAAA queries” and “Never forward reverse lookups for IP ranges” so that you do not prevent any local hostnames from being looked up.
Since Unbound DNS on OPNsense is the upstream DNS server for Pi-hole, Unbound will respond with the local hostnames/IPs. If you were using external DNS servers upstream to Pi-hole, you would want to leave these options checked so that local hostnames/IPs are not forwarded to those external upstream DNS servers.

Set Pi-hole as DNS in DHCP for Other Networks
Just like I demonstrated with the LAN interface, go to the “Services > DHCPv4 > [IOT]” page (or another interface of your choice). Enter the Pi-hole DNS server 192.168.1.10 in the “DNS servers” box.
Click the “Save” button at the bottom of the page to persist the changes.

OPNsense Firewall Rules
Once you have made the changes to the Pi-hole settings, you will need to update or add firewall rules to allow access to the Pi-hole DNS server. I am going to assume you already have existing networks with a firewall rule to allow DNS on each interface such as in the screenshot below.
Click on the pencil icon to edit the DNS firewall rule.

Set the “Destination” to the Pi-hole DNS server IP address of 192.168.1.10/32 or you may create an alias called Pihole if you wish.

Verify DNS is Using Pi-hole
To verify you have a proper configuration, you may log into the Pi-hole web interface to view if DNS lookups are now going through Pi-hole.
Remember that you will need to release and renew DHCP leases via command line, clicking disconnect/reconnect, or rebooting the devices on your network in order for DHCP to assign the Pi-hole DNS server to all of the clients.

On the dashboard page, you should notice the individual devices sending queries to Pi-hole.

You can now enjoy using Pi-hole on your network!