How to Install Ubuntu MATE 20.04 LTS (64-bit) on the Raspberry Pi 4
Photo by Ubuntu MATE from https://ubuntu-mate.org/
Table of Contents
When I decided to do a fun project with my old Raspberry Pi 3B+, I purchased the 4GB model of Raspberry Pi 4 to have as a replacement (update: now they have an 8GB model that would be nice to have). Since I am working from home due to COVID-19 at the time of this writing, my main PC is completely utilized for work during the weekdays via a VPN connection. I thought it would be convenient if I had a second computer at my desk so that I can listen to background music from my Plex Media Server or use it for personal things such as banking, shopping, paying bills, and browsing the web during lunch.
I have been wanting to try out the Raspberry Pi 4 ever since it was released due to the large performance improvements over previous generations at the same price point (except for models with extra RAM, of course) so this was the perfect opportunity to see if the Raspberry Pi finally has enough horsepower to run as a full desktop. Even though previous models can run a full desktop environment, it is not the best experience. It may be ok for very light usage. The older models perform reasonably well without graphical interfaces for a variety of services such as Docker, Pi-hole, UniFi Controller, etc.
After I spent some time experimenting with several different Linux distributions/desktop environments, I finally settled on a combination that suited my needs. I feel like I re-imaged my microSD card around a dozen times. The first OS that I tried was Manjaro Linux – the KDE Plasma version. Since I enjoy running Kubuntu on my desktop PC, I thought I would give Manjaro a try since they had a Raspberry Pi image readily available. The installation was smooth and everything seemed to function properly, but the performance was not the greatest. That is likely not the fault of the Manjaro dev team. I think KDE Plasma is too heavy or not optimized enough for the Raspberry Pi 4 hardware. I decided to look for other options.
I am more comfortable with Debian based operating systems like Ubuntu. I tried using Raspbian Lite and installing the KDE desktop environment on top. I think this approach was worse than using KDE on Manjaro. Perhaps this is due to running a 32-bit OS since there is not a 64-bit version of Raspbian yet. One thing I did like about using Raspbian and installing a desktop environment on top is that the raspi-config utility is available for tweaking settings on the RPi (I will explain why it was important for me to have raspi-config, but fortunately there is a command line workaround). Since Raspbian is Debian rather than Ubuntu, installing some of the software I wanted to use was a little more difficult since they were not available in the default Debian repositories.
That lead to me to look into Ubuntu, which was my first real Linux distro that I learned how to use in 2005 when Ubuntu was still pretty new. I have used Ubuntu or a flavor of Ubuntu for my servers and desktops ever since. When I looked at Ubuntu’s website, it was nice to see they had a page dedicated to the Raspberry Pi, but only Ubuntu Server is available for download. This is great if you want to maximize the resources of the RPi since no graphical interface is installed. However, if you want a desktop environment, it appears you are out of luck… until you click on the download for the Ubuntu Server image (or perhaps you saw an article written about it). At the bottom of the page, it states you can then install the desktop environment of your choice. Once you know this is possible, you will realize that this is a smart way to do it. Ubuntu provides the base OS on which you can install any desktop environment on top. The various Ubuntu distros do not necessarily have to provide their own images for the Raspberry Pi unless they want to do it for convenience to their users. Having a prepackaged distro with everything installed is not only easier for the novice users, but it is also quicker than waiting for the desktop environment to download and install.
Advantage of Running Ubuntu 20.04
Before continuing, I wanted to state a few advantages I noticed when taking the approach of installing Ubuntu Server and then installing Ubuntu MATE.
-
You can use the latest version of Ubuntu, which is now 20.04 LTS. The LTS versions of Ubuntu are supported for much longer than all the releases in between. I usually stick with LTS versions because they are stable and they continue to receive updates until well beyond the next LTS release. Newer Ubuntu versions also have newer Linux kernels which helps improve hardware support.
-
You can use the 64-bit version of Ubuntu. The Raspberry Pi 3 supports 64-bit but on the Ubuntu download page, it states that the Raspberry Pi 4 can take better advantage of 64-bit programming and may actually have some measurable performance gain. Ubuntu cites the Raspberry Pi foundation as the source of this information (meaning they probably did not actually test if the performance is greater).
-
Some software is more up to date than what you would find on Raspbian or perhaps other distros. Firefox is one example. Raspbian has the Firefox ESR release which is a long term support version. While it still receives security updates, it will be lagging in features compared to the latest version. When running Ubuntu MATE 20.04, the latest Firefox version is available. Also the latest version of Chromium is available. I noticed during installation using the typical
sudo apt install chromium-browserinstall command that it actually installs the snap package, which makes getting the latest version even easier especially as Ubuntu 20.04 starts aging. They usually freeze feature updates the old repositories and only include bug or security fixes.
Parts List
If you do not currently have a Raspberry Pi 4, I have compiled a basic list of parts you may consider in order to build your own Raspberry Pi 4 desktop. Below are affiliate links on Amazon:
- Raspberry Pi 4 (4GB model)
- Raspberry Pi 4 case (there are many others you can choose from but this is one of the nicer looking ones that is also affordable)
- Micro HDMI cable
- MicroSD card (there are many options but only choose a fast, quality microSD card for best performance)
- Power cable or the PoE hat if you have a PoE network switch
All in one kits (4GB) or (8GB) are available if you prefer that option.
Download Ubuntu Server 20.04 LTS 64-bit for Raspberry Pi 4
The Ubuntu MATE website has images you may download for the Raspberry Pi, but they do not list the Raspberry Pi 4. Also, they do not have 20.04 released at the time of this writing. You may want to try those older images if you do not want to be at the cutting edge with the latest version. When I tried their 64-bit image for the Raspberry Pi 3 on the RPi 4, I was having trouble getting it to boot properly. Part of my issue may have been due to using a cheap HDMI/USB switch box which required me to switch the video interface to the RPi 4 when I first booted up or nothing would show on the screen. It did not detect a monitor was physically connected even though it was not the active screen (which I think some switch boxes may work that way). Linux in general does not like to run headless when you have a desktop environment installed which is why you need a monitor connected or a dongle (affiliate link) that emulates a monitor if you wish to do remote desktop without a monitor attached.
Fortunately, there is another way to install Ubuntu MATE! You can install Ubuntu Server and then add the Ubuntu MATE desktop on top of it. This allows you to use the latest Ubuntu version but running the Ubuntu MATE desktop which is a fairly lightweight desktop environment (DE) compared to others. After trying some other options, I must say that it runs quite well! You can tell you are not running a powerful desktop, but it is really not that bad at all. I am quite pleased with the performance of the $55 computer (not counting the accessories). If you are going to run a full desktop, it makes sense to get the 4GB model (affiliate link) since that gives you more room to run heavier apps including web browsers which love to suck up RAM.
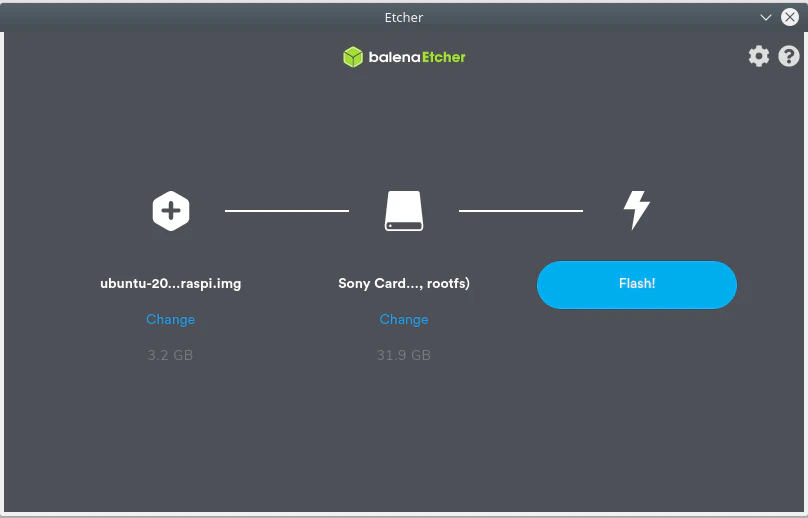
To download the Ubuntu Server image, go to the Ubuntu Raspberry Pi page which they have conveniently created recently. Click “Download 64-bit” under the Raspberry Pi 4. It will download as a “.xz” file. If you are using an imaging program such as Etcher, which I recommend, then you do not need to extract the file. I did not realize it supported that file format, but that will save you some time since you do not need to extract the .img file.

Image the MicroSD Card
Once you have downloaded the compressed image, you will need to image your microSD card. It is recommended you purchase the fastest microSD card for optimal performance. I like using Etcher to image my microSD cards. Using Etcher is not difficult so I will not include detailed screenshots. Essentially you just pick your compressed image file, your card reader, and then click “Flash!”. It will copy the image and validate it. Once it is finished, install the microSD card into your Raspberry Pi 4’s microSD slot. Then turn it on to boot it up!
Log into Ubuntu Server and Install Ubuntu MATE
After a few moments, you will arrive at a login prompt. Enter the username “ubuntu” and the password “ubuntu”. It will prompt you to change your password (which is a good security practice) so you will need to enter “ubuntu” as your current password and then you can enter your new password twice.
Note: It is important to note that Ubuntu Server does not have the wireless interface enabled by default which was mentioned to me by a reader of this site. You must either use an Ethernet connection, which is the easiest install option, or you will have to enable the wireless interface. See the wireless section below this section for more details before you continue further with the installation.
Once you are logged in, you check for updates before installing Ubuntu MATE. To get the latest updates, enter the following commands. You only need to enter the second command if there are any updates available:
sudo apt update
sudo apt dist-upgrade
To install Ubuntu MATE, enter the following command:
sudo apt install ubuntu-mate-desktop
This will take a little while because it has to download and install a lot of packages. During the installation process, you will be prompted for the display manager of your choice: gdm or lightdm. I do not think it matters which one you choose. I ended up choosing lightdm based on an installation guide I read and when I was reading about the differences between the two. I have read where gdm is tied to gnome so if you want to use a desktop environment other than gnome, you may need to use lightdm or some other display manager. Since Ubuntu MATE is a fork of Gnome 2, either display manager may be ok to use.
There are two important things to note that I discovered:
-
When installing Ubuntu MATE on top of Ubuntu Server, you are not presented with a wizard to walk you through the initial setup like it would if you are installing on a desktop PC or perhaps if you use the official Ubuntu MATE image. That is not a huge issue since you can change your settings after you log into Ubuntu MATE.
-
When you first log into Ubuntu MATE, the default session is set to “Ubuntu” instead of “Ubuntu MATE”. You will need to change the session by clicking on the icon beside the username/password prompt in order to log into the Ubuntu MATE desktop environment. I did not realize that it did not default to Ubuntu MATE. I made the assumption that it would default to it since I did not have any other desktop environment installed before installing Ubuntu MATE. If you do not change the session, it will default to the newer Gnome 3 (which I personally do not really like). The performance seemed more laggy than Ubuntu MATE as well.
That is essentially all you need to get started with Ubuntu MATE! I have been pleased with the performance so far. The desktop is more responsive than others I have tried, and I noticed that YouTube videos, for instance, seem to run smoother for me. Ubuntu MATE feels responsive enough that I almost forget that I am using an affordable, credit card sized computer rather than a budget desktop PC.
Now that Ubuntu MATE is installed, I want to include some optional things you may want to consider tweaking or installing in case you may be interested.
Enabling the Wireless Interface (If Not Using Ethernet)
If you wish to use a wireless connection to install the Ubuntu MATE desktop without needing an Ethernet connection, there is a way to enable the wireless connection. It requires a little bit of command line tweaking (following this guide), but it is not overly difficult. After logging into Ubuntu Server, enter the following command to determine the name of your wireless interface:
ls /sys/class/net
You will receive the following output:
eth0 lo wlan0
More than likely, your wireless interface will be wlan0. You will need that info when you enter your WiFi information. To determine the netplan filename which needs to be edited, enter the following command:
ls /etc/netplan
For Ubuntu Server on the Raspberry Pi, the filename should be 50-cloud-init.yaml, but it does not hurt to check before editing the file. If the file opens in the text editor with no contents, then you will know you do not have the correct filename. There should be a default “ethernets” section in the file.
To edit the netplan file, enter the following:
sudo nano /etc/netplan/50-cloud-init.yaml
Now you will need to modify the contents of the file to include a wireless section called “wifis” below the “ethernets” section. The spacing and indentation is critical for the configuration to work properly. If you add 4 spaces for each level of indentation rather than tabs, you should be ok. I was able to get it to work on the first attempt. Substitute the SSID and password for your wireless router below. You need to include the quotation marks around the SSID and the password.
# This file is generated from information provided by the datasource.  Changes
# to it will not persist across an instance reboot.  To disable cloud-init's
# network configuration capabilities, write a file
# /etc/cloud/cloud.cfg.d/99-disable-network-config.cfg with the following:
# network: {config: disabled}
network:
    ethernets:
        eth0:
            dhcp4: true
            optional: true
    version: 2
    wifis:
        wlan0:
            optional: true
            access-points:
                "YourSSID":
                    password: "YourPassword"
            dhcp4: true
To save the file, press “Ctrl + O” and then “Enter” to write the file contents. Then “Ctrl + X” to exit the editor. All that is left is to apply the netplan changes by entering:
sudo netplan apply
You may check that your wireless interface has an IP address by entering:
ip a
You will see output like the following (FYI, I changed my MAC addresses so I am not revealing the actual ones):
1: lo: <LOOPBACK,UP,LOWER_UP> mtu 65536 qdisc noqueue state UNKNOWN group default qlen 1000
    link/loopback 00:00:00:00:00:00 brd 00:00:00:00:00:00
    inet 127.0.0.1/8 scope host lo
       valid_lft forever preferred_lft forever
    inet6 ::1/128 scope host
       valid_lft forever preferred_lft forever
2: eth0: <NO-CARRIER,BROADCAST,MULTICAST,UP> mtu 1500 qdisc mq state DOWN group default qlen 1000
    link/ether af:16:52:64:f8:79 brd ff:ff:ff:ff:ff:ff
3: wlan0: <BROADCAST,MULTICAST,UP,LOWER_UP> mtu 1500 qdisc fq_codel state UP group default qlen 1000
    link/ether be:86:12:6a:e8:70 brd ff:ff:ff:ff:ff:ff
    inet 192.168.30.123/24 brd 192.168.30.255 scope global dynamic wlan0
       valid_lft 7138sec preferred_lft 7138sec
    inet6 fe80::dba6:326f:fe67:a844/64 scope link
       valid_lft forever preferred_lft forever
The wlan0 interface in my example has the IP address of 192.168.30.123. You should now be connected to your wireless network so that you may proceed with installing the Ubuntu MATE desktop! This should prove helpful for those who do not or cannot easily connect physically to the network yet want to build their own Ubuntu MATE 20.04 desktop.
One final note is that I noticed on another page that the author had an issue where the wireless settings would not persist after some time. If you refer to the note in the
50-cloud-init.yamlfile, it does say that the settings do not persist across an instance reboot. However, I rebooted my RPi a few times without issue. If you are having issues with the wireless settings persisting, you may need to create an additional config file that is described in the note in the50-cloud-init.yamlfile. Since you only need wireless to install Ubuntu MATE, this may not be an issue because once you have the desktop environment installed, you can easily configure your wired/wireless settings via the GUI. Also if you installed the Ubuntu MATE desktop using Ethernet, you can easily enable WiFi afterwards. This may be an easier option for some – just use Ethernet to get the Ubuntu MATE desktop installed and then switch to wireless. You would not have to tweak any configuration files via command line with that approach.
Installing the Ubuntu MATE Welcome and Software Boutique Applications
As pointed out in the comments on this page, installing Ubuntu MATE on top of Ubuntu Server does not install the Ubuntu MATE Welcome or the Software Boutique applications by default. The good news if you like having those applications is that you may install them easily. These applications have been packaged as “snaps” so they can be installed using the snap command.
For the Ubuntu MATE Welcome application, open the MATE Terminal and enter:
sudo snap install --classic ubuntu-mate-welcome
And for the Software Boutique application:
sudo snap install software-boutique --classic
You may need to reboot to see these applications appear in the menu.
Changing the Default Layout
One nice feature about Ubuntu MATE is that it provides you with the option to change the layout of your desktop to suit your preference. They have layouts that mimic Windows, macOS, Gnome 2, Unity, etc. Keep in mind they are not perfect recreations but they are arranged in a similar layout. I think this is a good idea and adds to the customization capability of Ubuntu MATE. With the Raspberry Pi 4, there is the added advantage of having a desktop layout similar to what you prefer but also lighter weight at the same time. You get a good approximation with good performance – a great combination for resource constrained hardware like the Raspberry Pi.
To change the layout, click on the “Applications” or “Menu” button (depending on your current layout) on the main panel and type “tweak” to quickly find the MATE Tweak application. Click on the “Panel” tab on the left side. You will see a dropdown for a panel layout at the top of the dialog box. Select your desired choice.

Changing the Default Audio Output
By default, if you are using an HDMI connection to your monitor, the audio will be sent over the HDMI cable. That is not what I want because I do not have speakers built into my monitor. I would like to use the stereo output jack on the RPi. An easy way to change the default output is to use the raspi-config utility. When installing Ubuntu Server instead of Raspbian, that utility is not available (perhaps there is a port of it that will work in Ubuntu). Fortunately, the audio can be switched to the stereo output by using the following command:
amixer cset numid=3 1
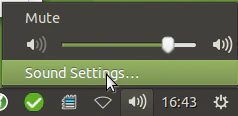
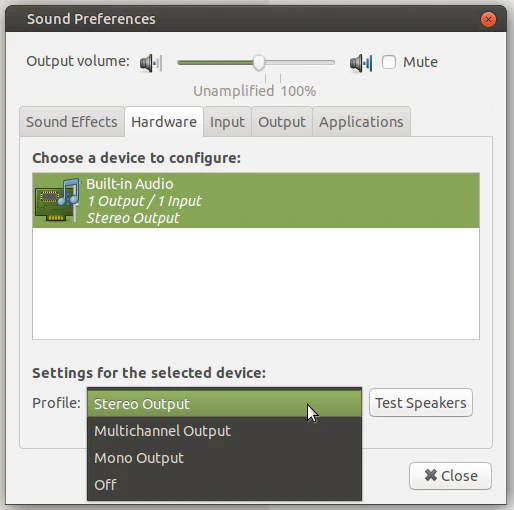
I noticed that the audio was pretty quiet even though it was set all the way up. I discovered that if I changed the audio profile from multichannel to stereo, the audio plays at a normal volume level. To change the setting, click on the audio icon in your system tray and click “Sound Settings”.
Then go to the “Hardware” tab and change the selection from “Multichannel Output” to “Stereo Output”.
Enabling the Firewall
I often talk about cyber security on this site and how to configure firewalls. Therefore, I feel like it is import to include a firewall section. The ufw (Uncomplicated Firewall) comes installed by default in Ubuntu. I noticed with Ubuntu MATE that the graphical interface is also installed, which is convenient if you like using GUIs. I will show both ways to enable the firewall. Both ways are very simple.
To enable ufw via command line, enter the following command:
sudo ufw enable
You can check on the status of the firewall to ensure it is enabled. A list of currently active rules is also displayed:
sudo ufw status
It will show something like the following if you have rules enabled:
Status: active

To                         Action      From
--                         ------      ----
8080/tcp                   ALLOW       Anywhere
22/tcp                     ALLOW       Anywhere
8080/tcp (v6)              ALLOW       Anywhere (v6)
22/tcp (v6)                ALLOW       Anywhere (v6)
By default there will be no rules in the list. The firewall blocks/denies all incoming requests but allows all outgoing requests. Most users should be fine with that default configuration unless you are hosting something on your computer and you want other devices on your network (or the Internet) to access. In that case, you will need to add some rules to allow access. I do not want to get into all the details of adding rules to ufw in this how-to.
To enable the firewall using the graphical interface, click on the “Applications” or “Menu” button (depending on your current layout) on the main panel and start typing “firewall”. You should see a search result for “Firewall Configuration”. When you click it, you will be prompted for your administrator password. You will see the “Status” toggle button at the top. Simply click it to turn on the firewall. There will be a slight delay while the firewall is being enabled.
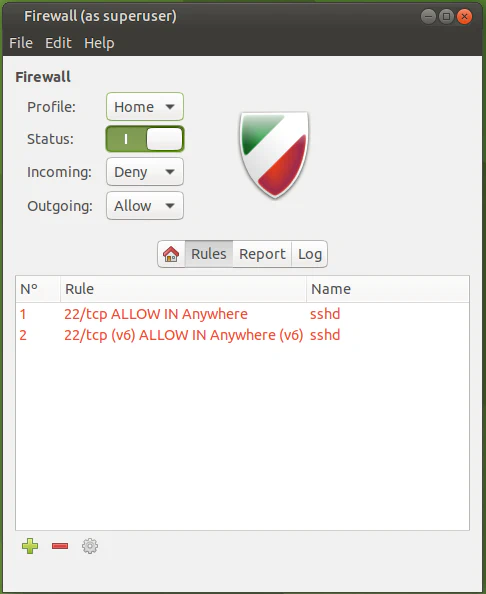
The default “Rules” tab shows all the currently active rules. It will be empty until you add rules.
If you click on the “Report” tab, you will see a list of all the running network services and the ports they are using. You can add new rules directly from the “Report” tab, which I find convenient. It saves on typing. It will bring up a dialog box where you can further customize the rule before adding it. You will notice when a firewall rule exists for a given service/port, it will highlight it in red so you know it is allowed through the firewall.

Installing Visual Studio Code
For the developers out there which may like VS Code, the open source community has made an ARM version that will work on the Raspberry Pi 4 so you do not have to manually download and compile the application (unless you enjoy doing that), which makes me happy since I have enjoyed using that editor to edit the content of this website. I am actually using VS Code on my Raspberry Pi 4 as we speak. It works reasonably well. You can even download your preferred plugins as you would on other platforms. The instructions for installation can be found on this page, but it is really quite simple. Enter the following commands in the terminal:
sudo -s
. <( wget -O - https://code.headmelted.com/installers/apt.sh )
When it is finished installing, you will notice that you cannot type “visual studio code” in the search to find the application. That is because it is renamed to “Code - OSS” by the maintainer of this package. If you want, you can rename the shortcut to be “Visual Studio Code”, which I did so that it is easier to find when I need it. To rename the shortcut (called a launcher), right click on the shortcut in the menu and click “Edit properties”. Then change the “Name” to the name you desire.
Update 05/06/2020: A Note on Stability
After using this set up, I noticed that the system would hang periodically – especially if it was idle for a while. Occasionally I would switch from my PC to the RPi using a HDMI/USB switch box, and the system would be hung. I thought that to be unusual since it runs great while I am using it. Certain things are little bit slow or have some lag time, which is to be expected on lower powered device (after all, it is not running a powerful mobile/desktop CPU). I made certain to turn off all power saving options like “suspend” mode since I suspect those would not do well with the RPi.
I did a few quick searches on it and thought maybe it was crashing due to running out of RAM. There is no swap file or swap partition installed by default when you image Ubuntu Server on your microSD card. In general, it is probably a good idea to not use a swap partition on a microSD card because they are not as durable as SSD or traditional HDDs. However, with the 4GB model of the RPi, you may not need to use the swap space as often as the lower RAM versions of the RPi so it may not add a bunch of wear and tear to your microSD card.
I recalled that Ubuntu has supported swap files for some time now (since 17.04) so I thought that would be easier to enable a swap file than creating a separate swap partition. You also have the flexibility of resizing the file which is less hassle than resizing partitions. Files are just easier to manage than disk partitions. I came across an article on how to enable a swap file in Ubuntu. The instructions are pretty simple to follow, but I will briefly summarize here for convenience.
First, check if swap is enabled. It should be disabled since that is how the Ubuntu Server Raspberry Pi image has been configured, but it does not hurt to check:
sudo swapon --show
If nothing is displayed, that means it is disabled. Next, create the swap file and set the permissions so only the root user can access the file. In the example, it is set to 2G for a 2GB swap file (you may change that value):
sudo fallocate -l 2G /swapfile
sudo chmod 600 /swapfile
Now the swap space needs to be set up and enabled:
sudo mkswap /swapfile
sudo swapon /swapfile
Finally, you will want to add the swap file to /etc/fstab so that the system will use continue to use the swap file after the system is rebooted. Open with a text editor:
sudo nano /etc/fstab
and add the following line at the bottom of the file:
/swapfile swap swap defaults 0 0
To check if the swap file is enabled, use the following command:
sudo swapon --show
That is all you need to do! So far after a few days of using a swap file, I have not noticed any crashes when idling. I left a web browser with several tabs open to keep the memory utilization higher as a test. While this may not solve the problem entirely (I am hoping it does!), it is quite possible that adding the swap file adds some stability when the system is running low on RAM. With only 4GB of RAM and opening several web browser tabs, it does not take long to reach 4GB. I have noticed that general usage of the RPi seems to only use a few hundred megabytes of swap space so hopefully it is not thrashing the memory card too badly. For me, it is worth having the added stability. If you are concerned with longevity of your microSD card, perhaps make a backup image so you can restore your RPi quickly if necessary.
Conclusion
Overall, I am pleased with this combination of OS/desktop environment. It seems to perform better than other options I tried, and I have the familiarity of the Ubuntu platform. I am able to run most of the common software that I run on my desktop with decent performance. However, not all the software I would like to use has ARM versions, which is disappointing. Most of that software is proprietary so they either do not have the resources or the desire to compile arm64 versions of their software. This is why open source software is awesome – most of the common software I want to use has been compiled and/or ported to arm64 and therefore will run on the Raspberry Pi 4!
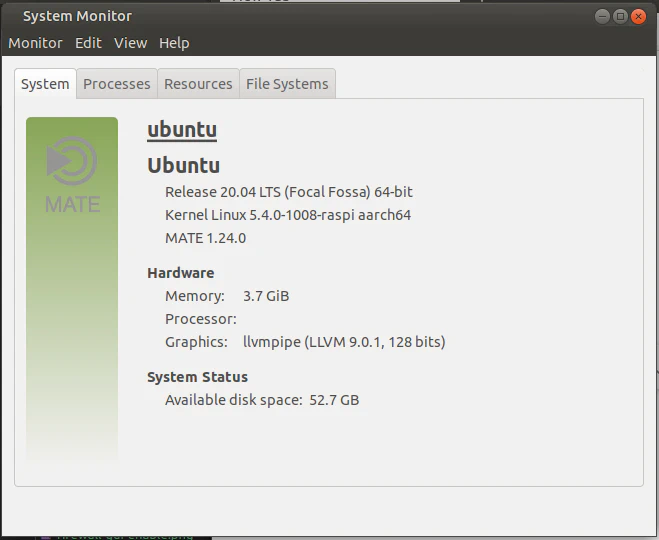
Evidence of successful installation!: