Grandstream GWN7806/GWN7806P Managed Network Switches

Table of Contents
For the last several years, I have been using 3 TP-Link managed switches in my server rack: the T2600G-28TS (affiliate link) , T2600G-28MPS (affiliate link) , and T1500G-10MPS (affiliate link) . The reason I had 3 switches is that I started off with a 24 port non-PoE switch (T2600G-28TS), which met my needs at that time. Before I moved to a new house, I knew I would have less than 24 Ethernet drops installed by the builder.
Later I got an 8-port PoE switch (T1500G-10MPS) since I had a couple of wireless access points and a couple of Raspberry Pi computers I was powering via PoE. Eventually I started adding security cameras around my house. I quickly used up the 8 ports of PoE capacity so I bought a 24 port PoE switch (T2600G-28MPS) to have plenty of additional capacity.
Fast forward several years later and I have found myself wanting to consolidate the two 24 port switches into a single 48 port PoE switch and ideally at the same time upgrade to 10G network interfaces for my servers and PC.
As I have been working toward finishing building out my basement, I have added 20 additional Ethernet drops. That brings my total Ethernet drops to 36. That total is not counting the exterior runs for my cameras or devices within my rack which are connected to the switches.
I prefer to have all of my wall drops connected to my switches so that I do not have to plug in or swap cables on my patch panels every time I want to connect something new to my network. In addition, having enough ports for all of the drops ensures that I have enough capacity to connect as many devices as drops that are available in my house. I am currently using almost half of the wall drops, and I plan to use more once my basement is completely finished.
You might see where this is heading– I need more capacity than a single 48 port switch. I thought about opting for a 24-port switch, but then I realized the price difference of the 48 port non-Poe switch was about $50 USD more than the 24 port switch because it was on sale. To my delight, there was also another bonus for the extra $50: two additional SFP+ interfaces.
Not all gigabit switches have SFP+ interfaces, but I ended up taking notice of Grandstream GWN7806 and the GWN7806P switches because of their price and the fact that their 48 port switches have not just 4 SFP+ interfaces but 6! To me that made the switches an even greater value especially considering both the PoE and non-PoE versions were on sale at the time I was interested in purchasing the switches. I found the prices to be competitive with more well-known, budget-friendly brands like TP-Link and Mokerlink.
Note
Full disclosure: The Grandstream switches were not sponsored. I purchased both switches with my own funds with the help of Amazon affiliate bonuses. Thank you for your support!
Sharing the information in this unsponsored review is one way I can give back to the homelab and home networking communities.
Unboxing
For the unboxing, I am only going to show images of the PoE switch because the non-PoE switch looks almost identical to the PoE switch. Literally the only noticeable difference I have seen is the model number and description on the upper right corner of the front panel (GWN7806 vs. GWN7806P and L2+ Managed Switch vs. L2+ Managed PoE Switch).
The switch comes with a user manual, power cable, rackmount ears, felt pads (if you prefer to have it sitting on a flat surface), a plastic cable tie (to help prevent the power cable from coming unplugged), and a grounding wire.
It is nice touch that the switches come with the plastic cable tie to help secure the power cord as well as the grounding wire since not all switches come with those accessories.

Build Quality
When lifting the PoE switch out of the box, I immediately noticed how heavy it was compared to the 24 port TP-Link switches that I own. Even the rack ears are a thicker metal than the TP-Link, which helps to keep the switches mounted level without sagging.
TP-Link switches tend to sag a bit when mounted in the rack. The worst offender for me was the 8 port switch because the switch itself is half the width of the rack which makes the rack ears longer. With the thinner metal and perhaps the screws not fastening well, that switch was always slopped downward in the back despite my efforts to fix it multiple times.
As you can see on the front of the switch, nearly the entire front of the switch is covered with network interfaces. Lots of connectivity!
There is also a decent amount of power available for PoE devices. The GWN7806P only has a 400 Watt budget which is definitely plenty for my needs and likely many other’s needs. However, there are 48 port PoE switches with a higher power budget but it comes with a greater price. I think the po

Besides consolidating two 24 port switches, the most anticipated feature is the 6 SFP+ 10 Gbps interfaces. It is very nice that it comes with 6 interfaces instead of 4 since I can connect more 10 Gbps devices to the switch. Since I have two switches, I have 12 SFP+ interfaces! However, in reality I only have 10 interfaces since I have the two switches directly connected.
I had wanted to get an aggregation switch with 2.5/10G interfaces to connect between my OPNsense router/firewall and my 48 port switches. I thought that would be perfect since my OPNsense box at the time had 2.5G interfaces and my switches have 10G interfaces. The aggregation switch would help fit in that gap so I can connect various 2.5/10G devices.
Once I realized I could have essentially 10 SPF+ interfaces available for my other devices, I decided I could get away without needing an aggregation switch for now because I switched my OPNsense box over to another box which has a 10G SFP+ interface so that I could connect it directly to one of my Grandstream switches. Basically for the price of a nice aggregation switch that has PoE, I was able to get both 48 port Grandstream switches. In the future if I move to wireless access points which support 2.5G interfaces, I may need to get a 2.5G switch which has PoE since I only have PoE on 1G interfaces.

On the back of the switch, you should have a label that shows your device information as well as the power socket and the grounding screw.

Management Software
The Grandstream switches can be managed by the built-in web interface, by a locally installed management app, called GWN Manager, or by GWN.Cloud, which is a cloud managed service.
The GWN Manager is similar in concept to the UniFi Controller (aka Unifi Network Server) for those familiar with Ubiquiti products.
I love that the the Grandstream switches come with a built-in web interface because you are not forced to adopt the switches using management software, which is great if you only own one switch. This fact makes it easy to get started right away with configuring the network switch. For doing testing and demonstrations, it is nice to not have to worry about the extra step of adopting/removing devices from the management software just to test something out quickly.
On the flip side, using the management software is really nice when you want a single pane of all of your devices and to be able to push configuration changes to them without needing to log into each individual device. This functionality has made UniFi products popular for those who prefer the ease of managing multiple devices.
One difference with using the GWN Manager instead of the built-in web interface is that you need to set up port profiles if you wish to assign ports to various VLANs. Port profiles make it easier to manage multiple devices because you can have several ports use the same settings. If you update the port profile, all associated ports will use the same configuration values. That way, you do not need to update the settings of a bunch of ports. In general this is very convenient, but I discovered at least one configuration value that you cannot configure via port profiles, which I will explain later.
I do not plan to do an exhaustive walkthrough of both web interfaces in this review (I will do separate guides), but I will highlight a few pages so you can have a general idea of how the interfaces are structured.
Built-in Web Interface
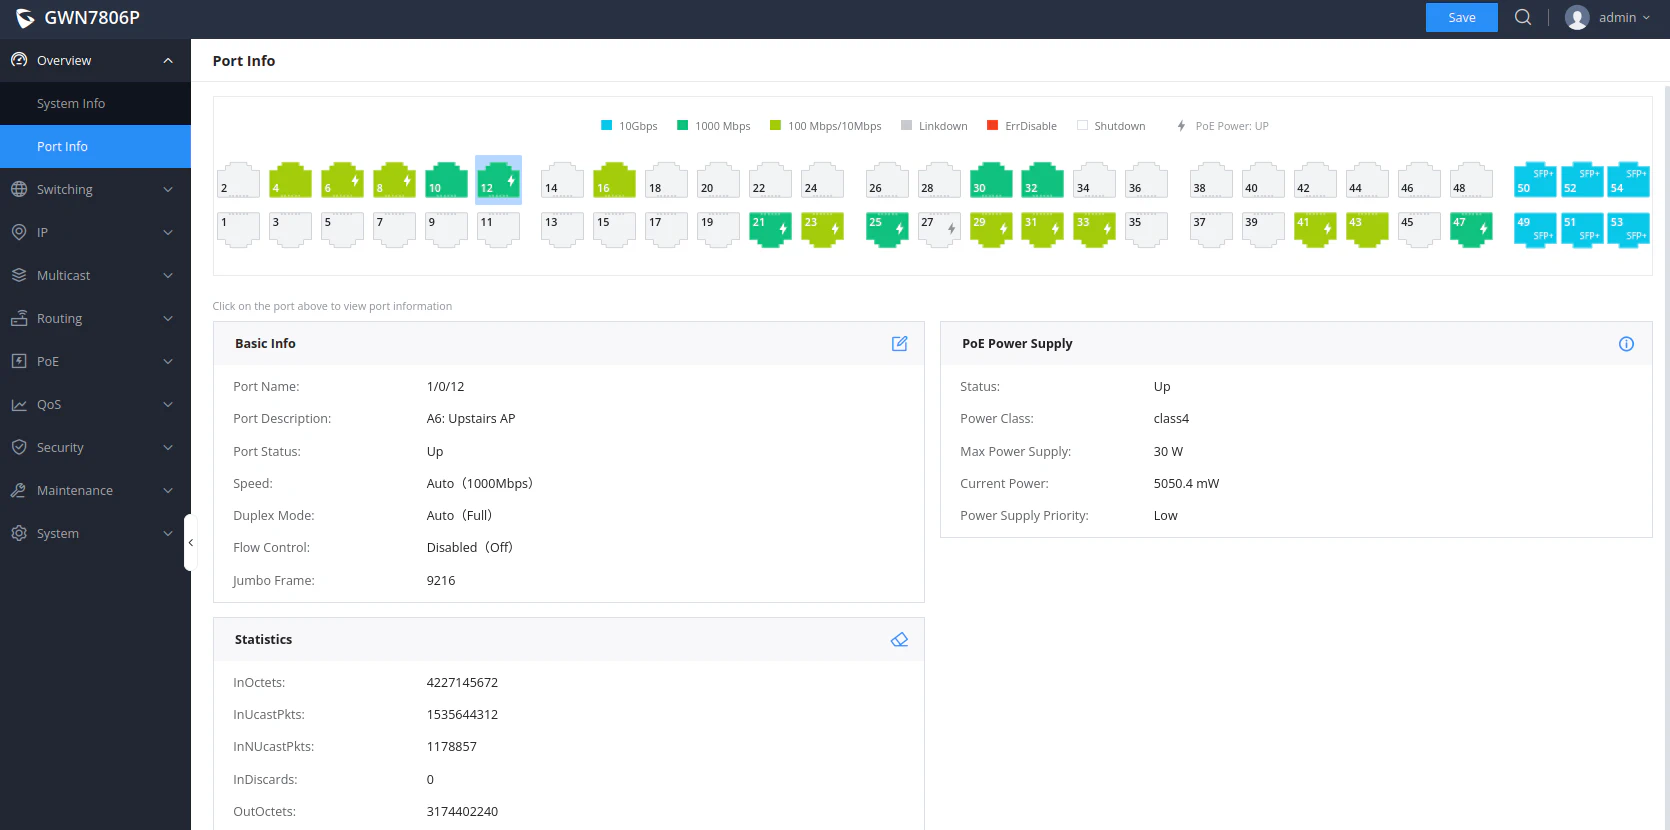
Below is an image of the built-in web interface on the “Overview” page where is displayed after logging in. It has a clean user interface with a good amount of useful information displayed.

The “Port Info” page is useful to view the status of each port and the amount of power being consumed (on the PoE switch only).
GWN Manager
The GWN Manager web interface reminds me of some of UniFi’s web interfaces (both older and newer versions of the UniFi Controller), but they still have their own clean design which varies from UniFi. I found the menu options very approachable once I had a few minutes to become familiar with the interface.
The “Dashboard” page reminds me of an older version of the UniFi controller where it showed the icons of the number of devices from the Internet to the number of connected clients.

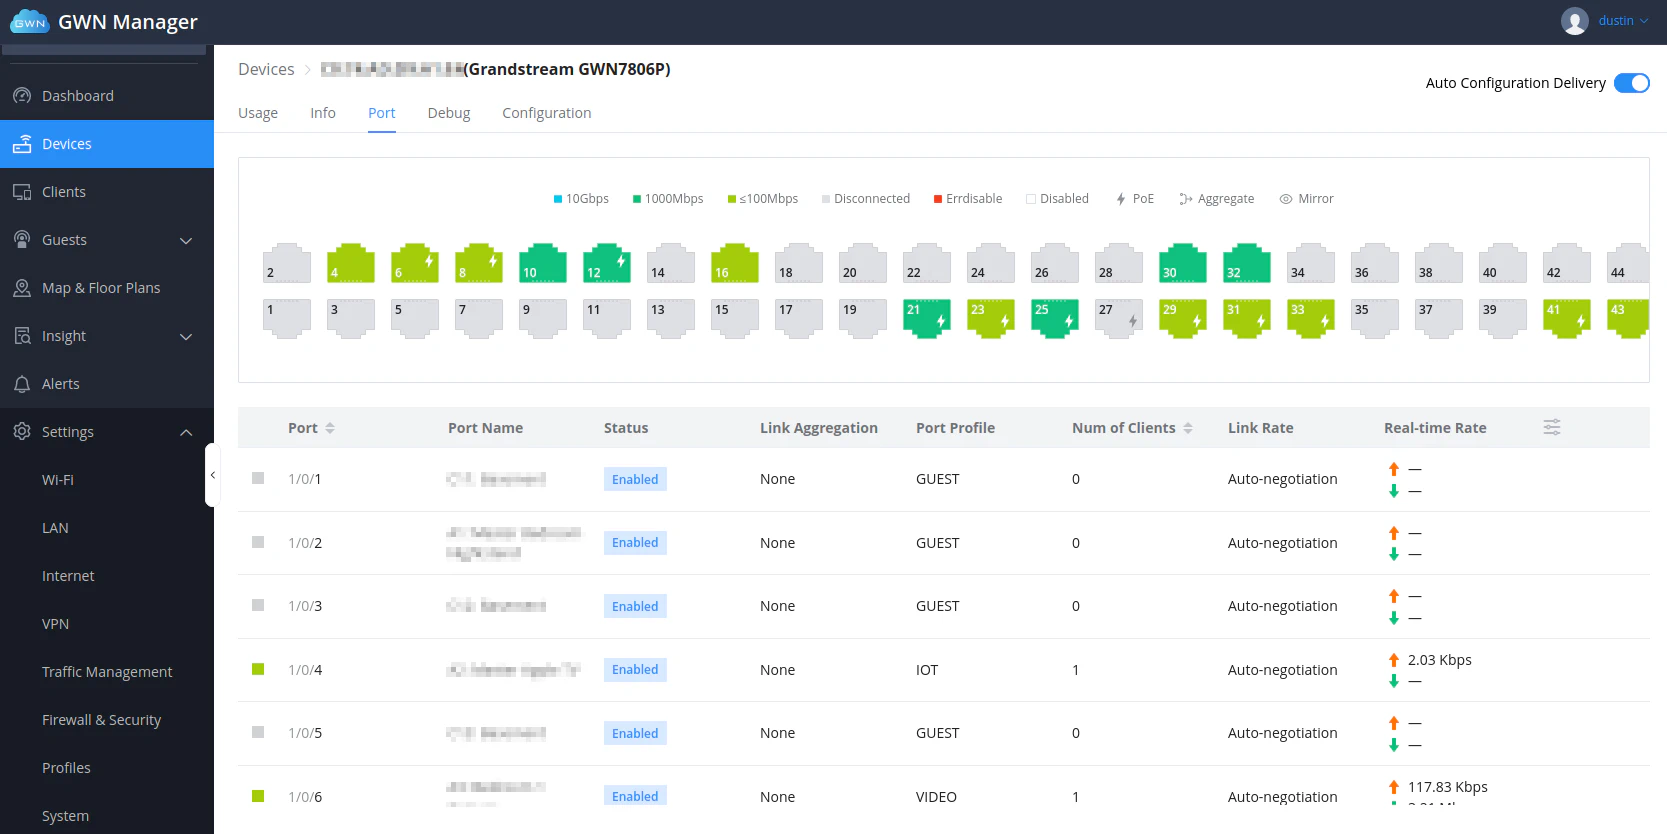
When you select one of your devices, you can view the port information like you can when logging directly into the switch.
With the GWN Manager, you have additional information displayed like the “Real-time Rate” and the “Port Profile” which show the current throughput as well as the VLAN configured for the port via the port profile.
Speaking of similarities to UniFi, compare the Grandstream port information page above to the UniFi port information page:

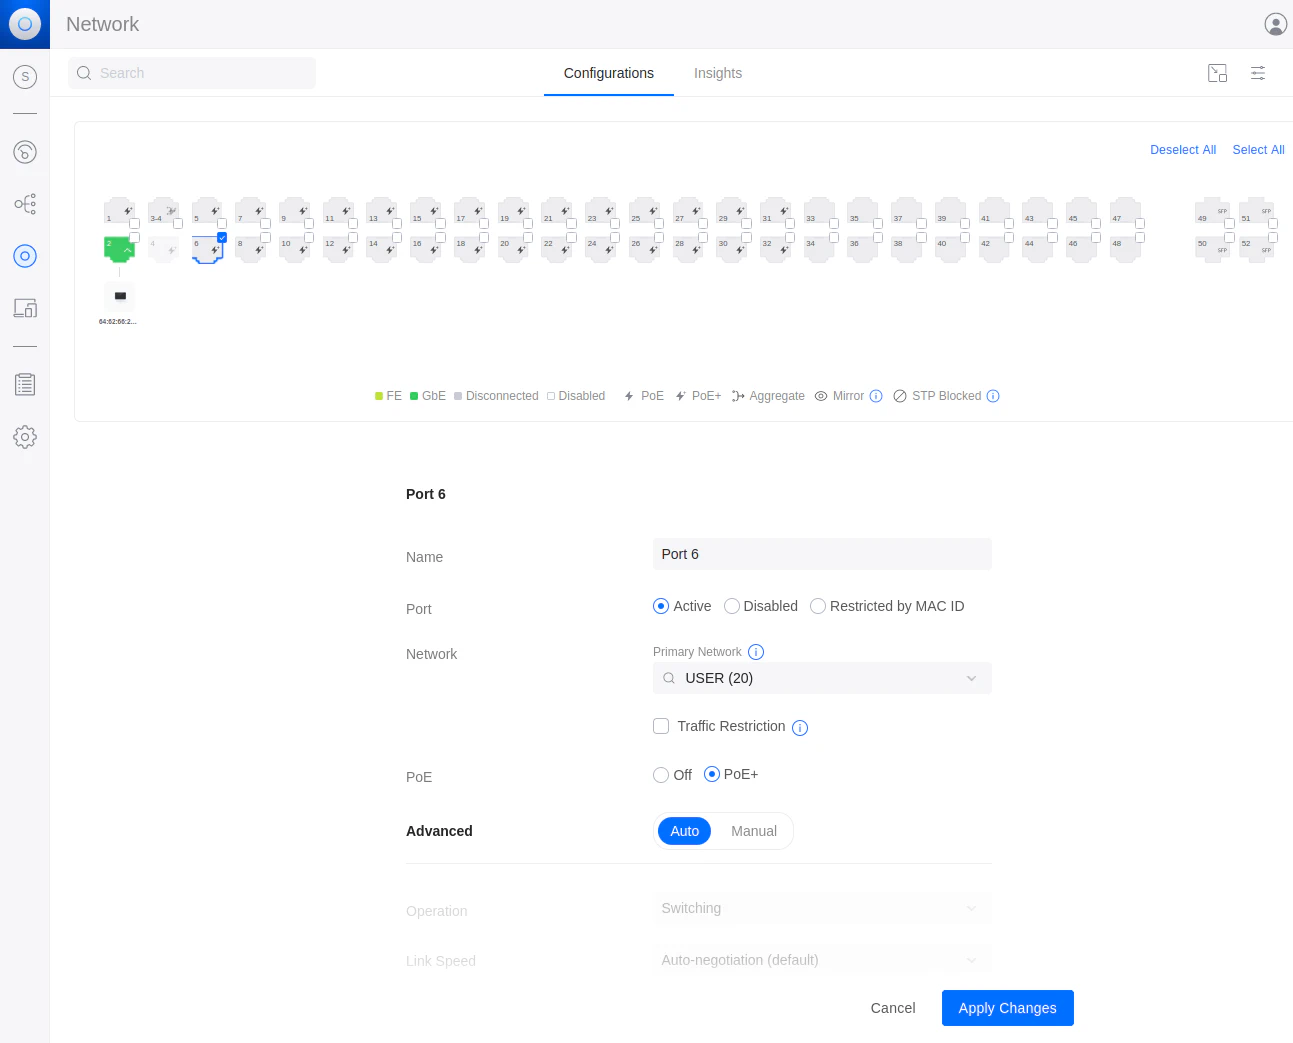
Another example is the port configuration page. When you click on one (or more) of the ports on the port information page, you will be able to edit its settings.

This is what the port configuration edit page looks like on UniFi:
GWN.Cloud
Finally there is the cloud option for managing your Grandstream devices called GWN.Cloud. This is a great option if you wish to remotely manage a network from a different location. While many home users may prefer local management, it is great to have a cloud option in addition to the local options. I personally do not prefer when the only option is cloud-only but as long as I can have local control in addition to optional cloud control, I am good to go!
Home users may wish to use the cloud option if they have multiple locations they would like to easily manage such as other family members/relatives or rental properties. Of course you could accomplish this via VPNs but that requires more effort and technical expertise. Also if the devices are behind CGNAT that would be problematic for VPNs (this could be worked around using an external VPN provider as a relay, for example).
I have not explored their cloud platform yet especially since I currently have no need to use it to manage my devices or anyone else’s devices. From what I have seen from others and screenshots, it looks nearly identical to the GWN Manager so if that is the case, there is nothing else of interest to mention.

Notable Differences
As mentioned earlier, there is one difference that I noticed between the built-in web interface and the GWN Manager. There are certain port configuration options only available in the built-in web interface and not in the GWN Manager. I discovered this the hard way.
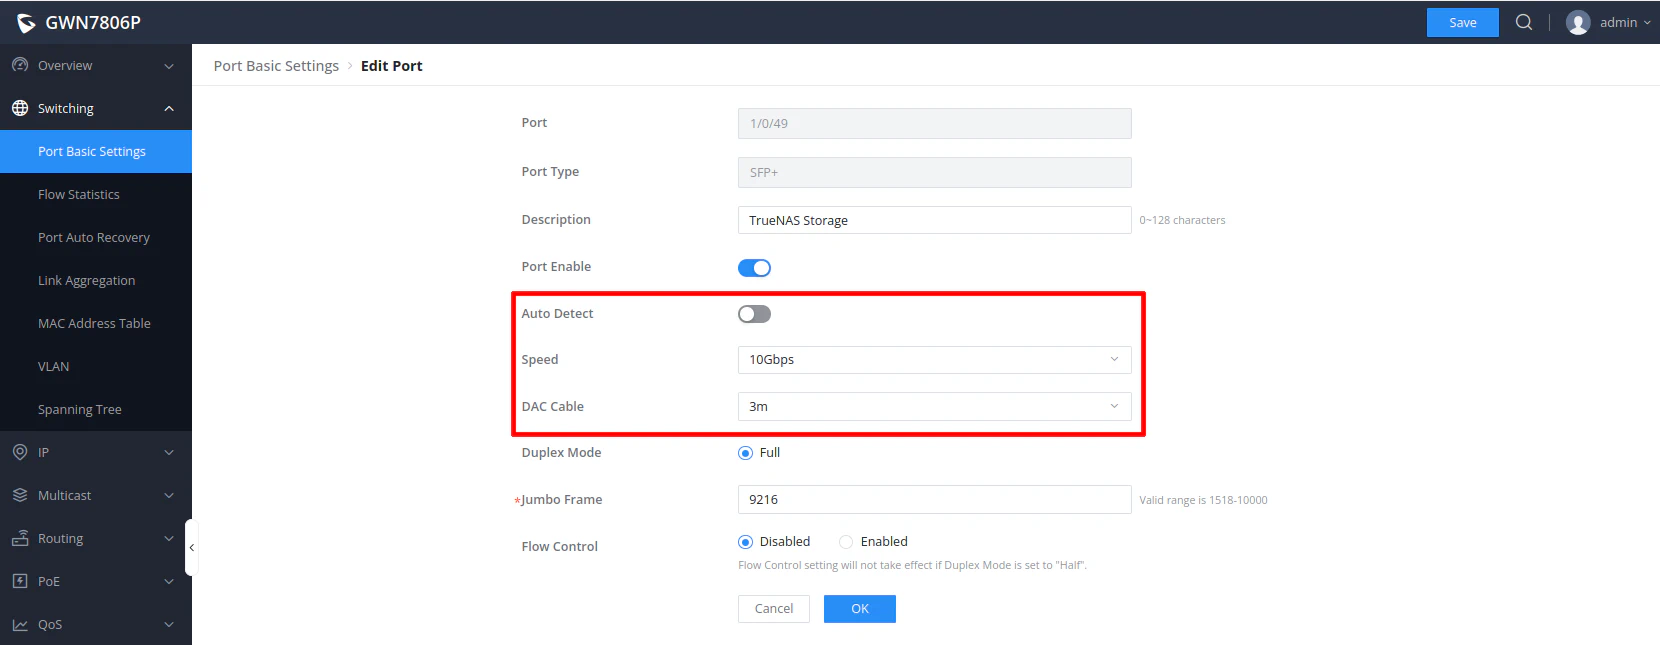
For some reason only on my TrueNAS Scale system which has a 10G SFP+ interface, I had to manually set the link speed. Not only that, I also had to specify the DAC cable length. I figured this out after a few hours of experimentation by trying different DAC cables and a different SFP+ network card. Without those specific configuration values, the link would show as down due to being unable to automatically negotiate the connection.
Below you can see the settings I used via the built-in web interface:
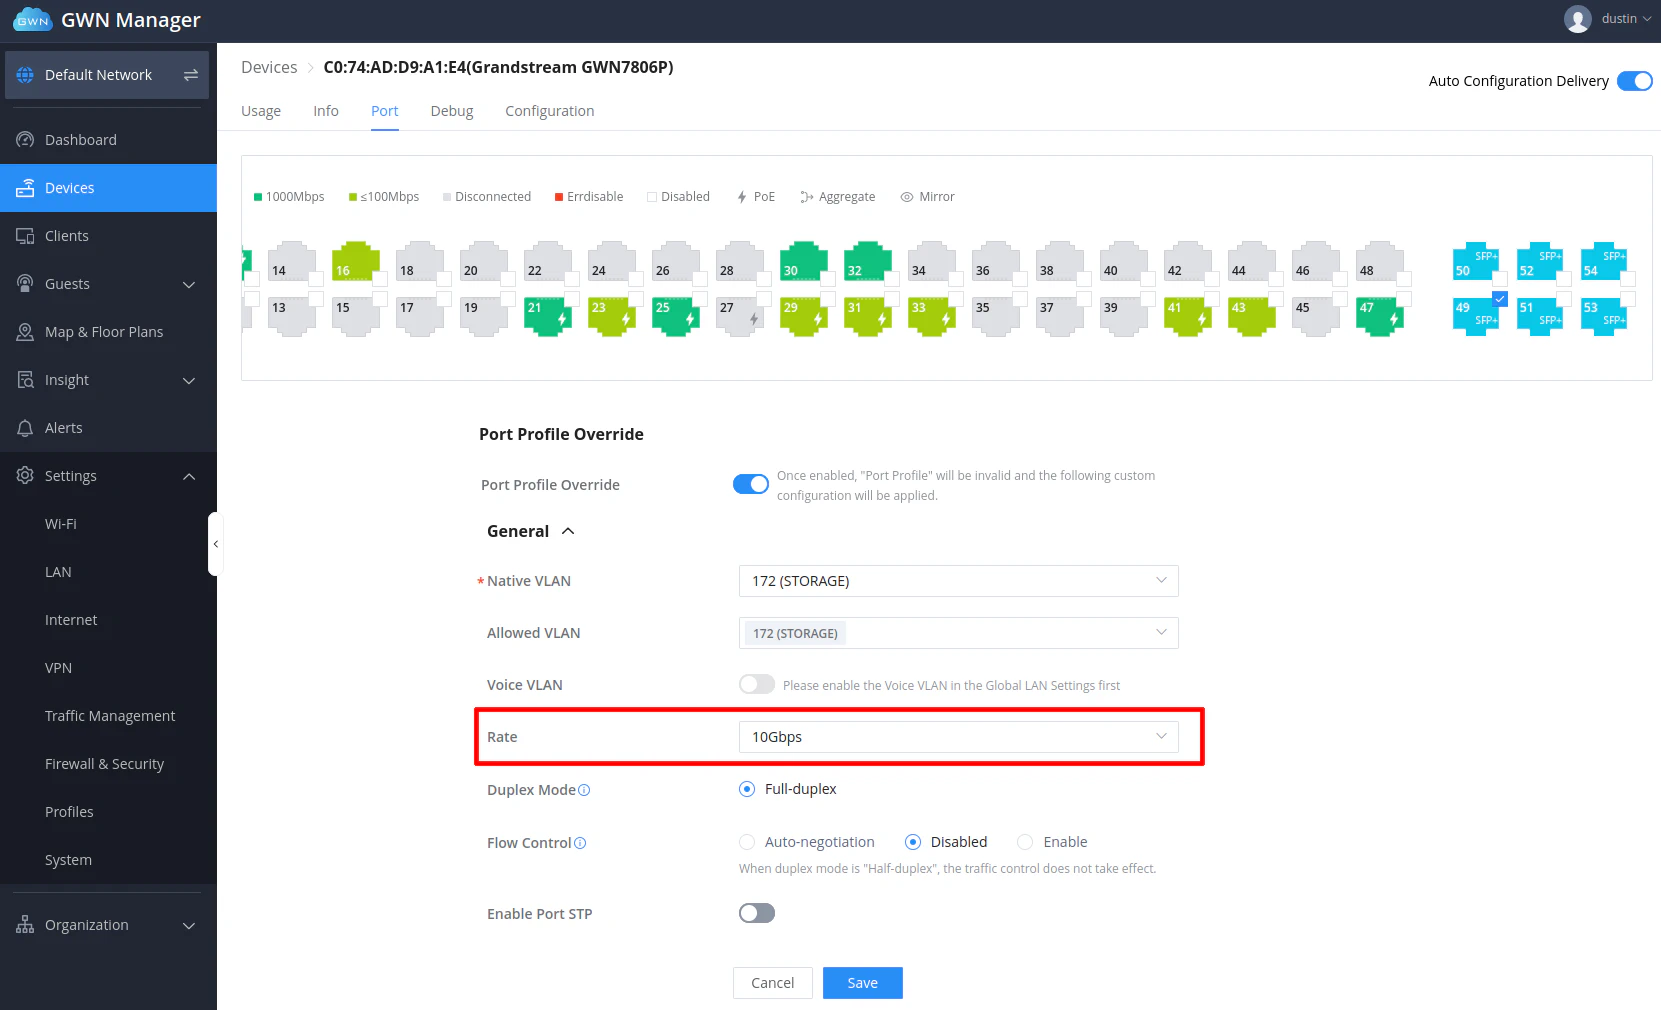
Notice in the GWN Manager, the only option available is the link speed in the “Port Profile Override” section. This is not enough to configuration for the TrueNAS 10G SPF+ interface to establish a connection with the switch. I have no idea why only my TrueNAS Scale system is having that issue since every other Linux based system on my network operates properly with automatic negotiation enabled.
Another difference I noticed is that when you set a port type from “Trunk” (the default) to “Access” using the built-in web interface but then set the port profile from the GWN Manager, it will reset it back to “Trunk”. This issue is not as big of a deal as the first one since it does not break connectivity.
However, I think it is best practice to set ports that only need to belong to a single VLAN to “Access” since I believe in theory it is easier to VLAN hop when the ports are set to “Trunk” because of the potential of the switch allowing all VLAN traffic to pass through. If you are assigning and restricting a port to a particular VLAN, you might be ok even if the type is set to “Trunk”, but you just have to be careful to ensure your port is not set to allow multiple VLANs when you only need to assign a single VLAN.
To be honest, I have not studied the details of VLAN hopping thoroughly, but I have seen it mentioned before by others such as on this Lawrence Systems video. For now, I will leave this as an exercise for the reader to dig deeper into the topic.
I thought it was worth mentioning these differences so you can be made aware of them so you can avoid or work around them if need be. Perhaps in a future update, Grandstream can resolve some of these differences since it hinders me from fully using the GWN Manager to manage the configuration of my switches.
Performance
Network switches typically perform at the advertised speeds. After all, the interfaces are bridged in hardware with dedicated circuitry. Therefore, performance testing switches may not necessarily the most exciting, but it is good to do a few tests to ensure full throughput can be achieved between devices connected to the switch.
When setting up new devices (or new NICs on existing devices) on my network or when I change the network architecture, I like to test the performance of several of my devices on each of my networks especially the devices which have faster 2.5G/10G interfaces. Bottlenecks are more likely to manifest on the faster interfaces due to CPU limitations, routing through the firewall which has IDS/IPS enabled, etc. Through performance testing, I have found and fixed various issues on my network that affected performance such as forgetting to set the MTU to 9000 to enable jumbo frames on my storage network.
I will be using iperf3 to do the basic throughput testing. The first test is for the 1 Gbps interfaces using the default MTU of 1500. As shown below, these are the expected maximum speeds due to the usual overhead network overhead.
[ ID] Interval           Transfer     Bitrate         Retr  Cwnd
[  5]   0.00-10.00  sec  1.10 GBytes   944 Mbits/sec    0   3.15 MBytes
[  5]  10.00-20.00  sec  1.09 GBytes   941 Mbits/sec    0   3.15 MBytes
[  5]  20.00-30.00  sec  1.09 GBytes   932 Mbits/sec  389   3.00 MBytes
[  5]  30.00-40.00  sec  1.09 GBytes   941 Mbits/sec  809   2.38 MBytes
[  5]  40.00-50.00  sec  1.09 GBytes   936 Mbits/sec  349   2.13 MBytes
[  5]  50.00-60.00  sec  1.10 GBytes   942 Mbits/sec    0   2.50 MBytes
- - - - - - - - - - - - - - - - - - - - - - - - -
[ ID] Interval           Transfer     Bitrate         Retr
[  5]   0.00-60.00  sec  6.56 GBytes   939 Mbits/sec  1547             sender
[  5]   0.00-60.06  sec  6.56 GBytes   938 Mbits/sec                  receiver
If you use MTU set to 9000 for jumbo frames, you can squeeze a bit more performance even on 1 Gbps interfaces (approximately 50 Mbps). At 1 Gbps, jumbo frames does not dramatically increase performance as much as 10 Gbps interfaces as will be demonstrated next.
[ ID] Interval           Transfer     Bitrate         Retr  Cwnd
[  5]   0.00-10.00  sec  1.15 GBytes   991 Mbits/sec  1202    227 KBytes
[  5]  10.00-20.00  sec  1.15 GBytes   990 Mbits/sec  1012    288 KBytes
[  5]  20.00-30.00  sec  1.15 GBytes   990 Mbits/sec  1074    288 KBytes
[  5]  30.00-40.00  sec  1.15 GBytes   990 Mbits/sec  1243    271 KBytes
[  5]  40.00-50.00  sec  1.15 GBytes   989 Mbits/sec  1271    367 KBytes
[  5]  50.00-60.00  sec  1.15 GBytes   990 Mbits/sec  1244    367 KBytes
- - - - - - - - - - - - - - - - - - - - - - - - -
[ ID] Interval           Transfer     Bitrate         Retr
[  5]   0.00-60.00  sec  6.92 GBytes   990 Mbits/sec  7046             sender
[  5]   0.00-60.00  sec  6.91 GBytes   990 Mbits/sec                  receiver
As with the 1 Gbps tests, I will test the SFP+ 10 Gbps interfaces using the default MTU value of 1500.
[ ID] Interval           Transfer     Bitrate
[  5]   0.00-10.00  sec  10.9 GBytes  9.37 Gbits/sec
[  5]  10.00-20.00  sec  10.9 GBytes  9.38 Gbits/sec
[  5]  20.00-30.00  sec  10.9 GBytes  9.39 Gbits/sec
[  5]  30.00-40.00  sec  10.9 GBytes  9.36 Gbits/sec
[  5]  40.00-50.00  sec  10.9 GBytes  9.37 Gbits/sec
[  5]  50.00-60.00  sec  10.9 GBytes  9.38 Gbits/sec
- - - - - - - - - - - - - - - - - - - - - - - - -
[ ID] Interval           Transfer     Bitrate         Retr
[  5]   0.00-60.05  sec  65.5 GBytes  9.37 Gbits/sec  7876             sender
[  5]   0.00-60.00  sec  65.5 GBytes  9.38 Gbits/sec                  receiver
If you want the maximum performance on the 10G interfaces, you will need to enable jumbo frames by setting the MTU to 9000. You will gain approximately 500 Mbps when enabling jumbo frames, which is much more significant than the 1 Gbps interfaces.
Note
Please note when using jumbo frames, everything on the same network needs to be set to use jumbo frames (MTU of 9000) so that you do have issues with fragmented frames.
Modern hardware perhaps can handle this situation better (I accidentally had one machine set to MTU of 1500 and did not notice any immediate issues).
The best place to use jumbo frames is for an isolated storage backend network, which is where I am making use of jumbo frames.
[ ID] Interval           Transfer     Bitrate         Retr  Cwnd
[  5]   0.00-10.00  sec  11.5 GBytes  9.90 Gbits/sec   24   1.86 MBytes
[  5]  10.00-20.00  sec  11.5 GBytes  9.90 Gbits/sec    1   2.12 MBytes
[  5]  20.00-30.00  sec  11.5 GBytes  9.89 Gbits/sec    2   2.12 MBytes
[  5]  30.00-40.00  sec  11.5 GBytes  9.90 Gbits/sec    1   2.12 MBytes
[  5]  40.00-50.00  sec  11.5 GBytes  9.90 Gbits/sec    2   2.12 MBytes
[  5]  50.00-60.00  sec  11.5 GBytes  9.90 Gbits/sec    0   2.12 MBytes
- - - - - - - - - - - - - - - - - - - - - - - - -
[ ID] Interval           Transfer     Bitrate         Retr
[  5]   0.00-60.00  sec  69.1 GBytes  9.90 Gbits/sec   30             sender
[  5]   0.00-60.00  sec  69.1 GBytes  9.90 Gbits/sec                  receiver
Power Consumption
For power consumption, I used a basic energy monitoring Z-Wave plug so I could watch the power usage over time on a nice little graph in Home Assistant.
Unfortunately, I did not take the time to check the idle power consumption of the PoE switch before setting it up in my rack (I guess I was too excited to get it set up). Of course, the power usage will vary depending on the number of PoE devices you have plugged in. Since it is capable of 400 Watts of PoE, that would be near the approximate maximum power consumption.
However, I did plug my non-PoE switch into the energy monitoring plug and found the wattage to be about 20 Watts with about a dozen devices plugged into the Ethernet ports and 3 devices plugged into the SFP+ interfaces. I imagine the PoE switch’s idle power consumption would be nearly identical if no PoE devices are connected to the switch.
Based on the measurement I got for the non-PoE switch it is apparent that the 48 port switch uses more power than a switch with fewer ports especially fanless models but overall not the worst amount of power consumption. I imagine the fans are contributing to a good portion of the power consumption since they tend to run continuously in my server closet. My server closet stays about 73-75 degrees Fahrenheit, which is not terribly hot for an enclosed server closet that has an exhaust fan to vent out excess heat.
Temperature and Noise Levels
Both of the Grandstream GWN7806/GWN7806P switches have built-in fans so the temperature of the switches stay pretty regulated between 35-42 degrees Celsius (from what I have noticed glancing at the “Overview” page on occasion). I do not have a thermal gun to test the outside temperature of the switches, but they definitely feel cool to the touch.
The web interfaces of both switches display the running temperature on the dashboard of the web interface. You can also see the current status of the fans to know if they are running or not as shown in the image below.

The fact that both switches have fans comes at a cost of noise. The PoE switch especially produces more noise than the non-PoE switch when you start connecting more PoE devices to the switch and temperatures start to rise. They both have the same fans but the fans in the PoE switch will generally need to run more frequently and at higher speeds depending on the power consumption of the PoE devices connected to the switch.
When you first turn on the switches, be prepared for a decently loud noise as the fans spin up at full speed, but to be honest, it is not as loud as booting enterprise grade servers (and possibly even other enterprise grade switches). Since I have a dedicated server closet with a solid core wooden door, the noise in my office is not too loud but I can certainly hear everything running in my rack. They produce more noise than my TP-Link PoE switches.
One suggestion to lower noise levels is to use low noise fan adapters (affiliate link) which can reduce fan noise by reducing the voltage to the fan thus slowing down the fan speed. This should not cause issues unless you are using the switch in an area which is not ventilated well. Also note that you have the potential for voiding the warranty of your switch since you have to remove a void warranty sticker in order to open up the chassis of the switch.
I think it is interesting that the non-PoE switch has fans but perhaps that switch also builds up excess heat since there are so many interfaces packed into the switch. Also SFP+ interfaces can generate a good bit of heat, and these switches come packed with 6 SFP+ interfaces which many other 48 port switches do not have. I imagine the fans would help increase the longevity of even the non-PoE switch by reducing the average temperature inside the switch.
Where to Purchase?
Many of Grandstream’s products are sold by independent wholesalers who are authorized sellers, which is why you will not find their full product line available on Amazon. The Grandstream GWN7806/GWN7806P switches, for example, are not available on Amazon at the time of this writing.
Therefore, if you are interested in purchasing Grandstream products, you will have to find a wholesaler in which to purchase products. This means you will likely have to purchase from an online store that you have never heard of on a website which does not look very modern. However, the wholesalers are officially authorized sellers of Grandstream products so it is not like a giant company like Amazon where they are unable to easily verify the authenticity of every single 3rd party seller on the platform. I think you can still experience good customer service (probably better than Amazon if you can talk to actual human beings about your order), and you may end up supporting a smaller company in the process.
I ended up purchasing the switches on IP Phone Warehouse because when I searched for the switches they had sales that caught my attention. (I do earn any affiliate income from IP Phone Warehouse. I just wanted to mention where I was able to get the devices on sale).
At the time of this writing, the PoE switch is $469.99 USD rather than the suggested retail price of $649.99 USD. This is actually about $45 USD cheaper than the 48 port non-PoE TP-Link switch (affiliate link) which only has 4 SFP+ interfaces (I have seen that TP-Link go as low as $499 but the Grandstream is still $30 USD cheaper).
The non-PoE switch at $287.99 USD is an incredible price considering the 48 port TP-Link switch is over $200 USD more and has fewer SFP+ interfaces. Even other brands like MokerLink (affiliate link) are still about $70 USD more expensive.
There is one caveat: shipping costs are high. I paid $22.37 USD for shipping (and it arrived relatively quickly). However, I was not charged sales tax like on Amazon so that helps to offset the shipping costs.

I do not always list the prices of products I review since prices can vary over time, but I thought I would share the current prices to demonstrate the value of Grandstream. For the price, their products seem really well built. They feel much more substantial and better quality than my old TP-Link switches (even the thickness of the rack ears is much greater on the Grandstream so it mounts level in my rack).
Instead of getting a single $799 USD aggregation switch such as the QNAP QSW-M2116P-2T2S-US (affiliate link) or the QNAP QSW-M1208-8C (affiliate link) , I was able to get two 48 port switches with 12 SFP+ 10 Gbps interfaces. I now have plenty of 10G connectivity as well as consolidated 3 switches down to 2 switches and I also have extra 1G interfaces for future expansion should I need it (I can see myself using several more interfaces within my rack if experimenting with multi-system clusters in the future).
Overall, I am quite pleased with my purchases of the Grandstream switches. They could very well be a great, budget friendly alternative to UniFi products depending on your needs. Grandstream also has VOIP and other products similar to UniFi that you may consider if you are interested in buying into their ecosystem for your home or business.