Backup Your Data to Backblaze B2 with Duplicacy from a Proxmox LXC Container

Photo by LoboStudioHamburg from Pixabay
Table of Contents
After I migrated my home server to use Proxmox, I began searching for a new offsite, cloud backup solution. I was using CrashPlan, and my discounted subscription expired. I wanted to know if I could keep the offsite backup costs a little lower than $10 per month (even though that is not a huge expense to ensure your most important files are protected) and also run a lighter weight service. I did not want to create a virtual machine with a full blown operating system just so that I can run the CrashPlan application. I was looking for either a command line tool or a tool that exposed a web interface to configure the backups. In either case, I would only need to run something like Ubuntu Server which does not have a desktop environment installed by default. It is much lighter weight to run. Of course, there are other Linux options if you want an ultra light weight OS. I like using Ubuntu since I am most comfortable with it since I have been using it since 2005 shortly after it was initially released.
Duplicati was the first backup software that I thought would meet my needs for using Backblaze B2. I like that it is free software. It seemed to work well for a while. Then I ended up encountering an issue with a file that may have been corrupt or some other issue. The data and database became out of sync. I tried repairing and correcting the issue. After trying several things such as rebuilding the database, I gave up on it and it shook my confidence of being able to reliably retrieve my data from the cloud (technically, Duplicati v2.0 is considered beta so perhaps it is not production ready). Since the data is stored as encrypted chunks of 50MB (or whatever you set it to), I have to use the software to be able to restore the data. My data set was so large that recreating the database took way too long (I let it run for over a week and it was only halfway done rebuilding the database). I do not want to have to wait a few weeks to build the database on a new machine if for some reason I had to restore from scratch because it could take another week or two to download the full data set.
There are a couple of command line tools like Restic and Duplicity (so many Dupli… apps!) that work with Backblaze B2, but I really enjoy having a web interface for configuration and monitoring the status of backups. I like having a good balance of both worlds. Therefore, my ideal software backup tool should provide the ability to run commands but also expose a web interface for configuring backups.
Since I have been using Proxmox, I especially prefer having a web interface exposed for the services I run versus having a desktop app because I do not need to run a full blown virtual machine with a desktop environment. It makes the services much more light weight since I can run it in a container that uses minimal resources.
After looking through the few applications that are free, I decided to expand my search to a paid application since I am willing to pay a small, reasonable fee to have a reliable and secure backup/restore process. Some backup solutions are little pricy, but I came across Duplicacy and it seems very reasonable to me – a one time fee of $20 and $5 per year afterwards. That is not much more than one month’s worth of Backblaze B2 storage for me. I am still saving money over using the $10 per month I would have spent on CrashPlan (and I am not locked into the CrashPlan ecosystem). They give you 30 days to try it out so you can see if it will work for your needs. If you have more than one computer, each additional computer’s license is discounted, which is nice.
I prefer to aggregate all of my important files from my PC, laptop, and mobile devices to my server (via Nextcloud) and then upload those files to an offsite backup rather than have each device directly perform the offsite backup. That provides me with a second copy on my local network while simplifying the offsite backup process.
Duplicacy has migrated from a desktop app to a nice looking web interface. It seems to have all the basic features I am looking for: web and command line interfaces, encrypted deduplicated backups, create multiple datasets, create multiple schedules for backups and other operations, and file revisioning. I find the lock free deduplication algorithm to be very interesting as well. It seems like a solid, clean approach that is not overly complex and as prone to error. They also designed it to allow multiple devices to backup to the same storage without causing conflicts and they also state that you can take advantage of deduplication if two users have some of the same files.
After re-uploading my entire cloud backup after switching from Duplicati, the backups and restores both seemed very fast and efficient. I am pleased with the tool so far.
Create LXC Container
In an effort to minimize duplication, please refer to my Duplicati how-to to learn how to set up a LXC container if you do not currently know how. The basic idea is to download a LXC template for your Linux operating system of choice or reuse any existing LXC template to create a container for Duplicacy. When creating the container, you allocate the necessary resources as with any container. The minimum amount of resources will be similar to the Duplicati how-to. If you find needing more or less resources, you can easily change it later.
After using Duplicacy for a short while, I quickly realized that 512 MB is not enough for the container. I tried 512 MB because when the backup is idle, it hardly uses any resources but the memory usage exceeded 512 MB during a backup of a large dataset. This caused my backup to fail after a short while. You will notice a “signal: killed” in the logs when this happens. The total usage seems to hold steady around 600 MB for my dataset so 1 GB should be a good starting point for allocating RAM.
I am assuming in this how-to that you have local data inside the container you wish to backup or bind mounts/NFS shares that are configured for backup purposes.
Install Duplicacy
Log into the LXC container as the root user.
Note: I am using the root user in this example. You may want to create a separate user for increased security. I actually tried running as another user but could not get the service running properly. My time is limited so I did not want to spend a lot of time figuring that out when I got it to run easily as the root user. Since I am running a dedicated, unprivileged LXC container for the sole purpose of backing up data, I am not quite as concerned with running my backup software as a separate user because the container itself is already isolated. I imagine running as a non-privileged user on an unprivileged LXC container would increase security even more. I do not plan to expose access to the container from the Internet or to any of other VLANs so it will be relatively isolated – basically the container can communicate out to Backblaze but nothing can access it directly from other networks. On each LXC container, I enable ufw (Uncomplicated Firewall) to further restrict access only to ports I am using for the services I run on my network (defense in depth).
To download Duplicacy in your container, run the following command using the latest version for Linux found on the Duplicacy download page:
wget https://acrosync.com/duplicacy-web/duplicacy_web_linux_x64_1.5.0
Next, change the file permissions to limit access to only the root user:
chmod 700 duplicacy_web_linux_x64_1.5.0
For convenience, create a link to the original file using a more friendly name such as “duplicacy-web”. Creating a link to the original file will help you easily remember the version you downloaded since the original filename is preserved. Linux often does this when linking to binary files when you install various versions of libraries/applications so that the binary can be executed without needing to add version numbers.
ln -s duplicacy_web_linux_x64_1.5.0 duplicacy-web
Enable Remote Access
At this point, both the duplicacy_web_linux_x64_1.5.0 file and the link duplicacy-web should be in the /root folder (the default home folder for the root user). Now, a settings file needs to be created in order to allow non-local access to the web interface. If you do not create the settings file, you can only access the web user interface via 127.0.0.1 (localhost). Since you are running Linux without a desktop environment, you cannot access the web interface by default. The settings file overrides this default behavior to all access to the page via a web browser on another device.
mkdir .duplicacy-web
nano .duplicacy-web/settings.json
Enter the following data into the settings.json file:
{
    "listening_address": "0.0.0.0:80"
}
Create a Systemd Service
Duplicacy does not have a Linux installer since it can be directly executed after downloading the file. Even though it is easy to run Duplicacy by simply executing the file, I imagine most users will want a continual backup and will want Duplicacy to always be started when rebooting the system/container. Fortunately, it is easy enough to create your own systemd service file. I found the comments made on the Duplicacy forum helpful as well as the need to add a user to the service file.
Create a systemd service file by entering the following command:
nano /etc/systemd/system/duplicacy.service
Enter the following information in the duplicacy.service file. Be sure to use the link to your Duplicacy executable file, which is “duplicacy-web” in this example (if you update the version of Duplicacy, you would only need to update the link rather than the service file). Also the working directory should be set to the “.duplicacy-web” folder in the root user’s home folder so that the settings.json file you created will be recognized by Duplicacy. Otherwise, it may use some other location and not apply the settings properly. You will know if the settings.json file settings are used because remote access to the web interface will function properly.
[Unit]
Description=Duplicacy backup software

[Service]
ExecStart=/root/duplicacy-web
WorkingDirectory=/root/.duplicacy-web
User=root
Restart=on-failure
RestartSec=30

[Install]
WantedBy=multi-user.target
All that is lef is to enable and start the Duplicacy service:
systemctl enable duplicacy
systemctl start duplicacy
Accessing the Duplicacy Web Interface
If everything has been set up correctly, you should be able to access the web user interface by going to the IP address assigned to your LXC container. For instance, http://192.168.1.100. You may also use hostnames if you prefer to use that instead.
The first time you view the page, you will be prompted to enter a password to access the web interface.
Dashboard Page
You should see a dashboard similar to the following after logging in for the first time:

As you can see, Duplicacy has a nice, clean looking dashboard. Below is a fully populated dashboard to give you a sense of what it will look like once you have some backups defined, scheduled, and completed.
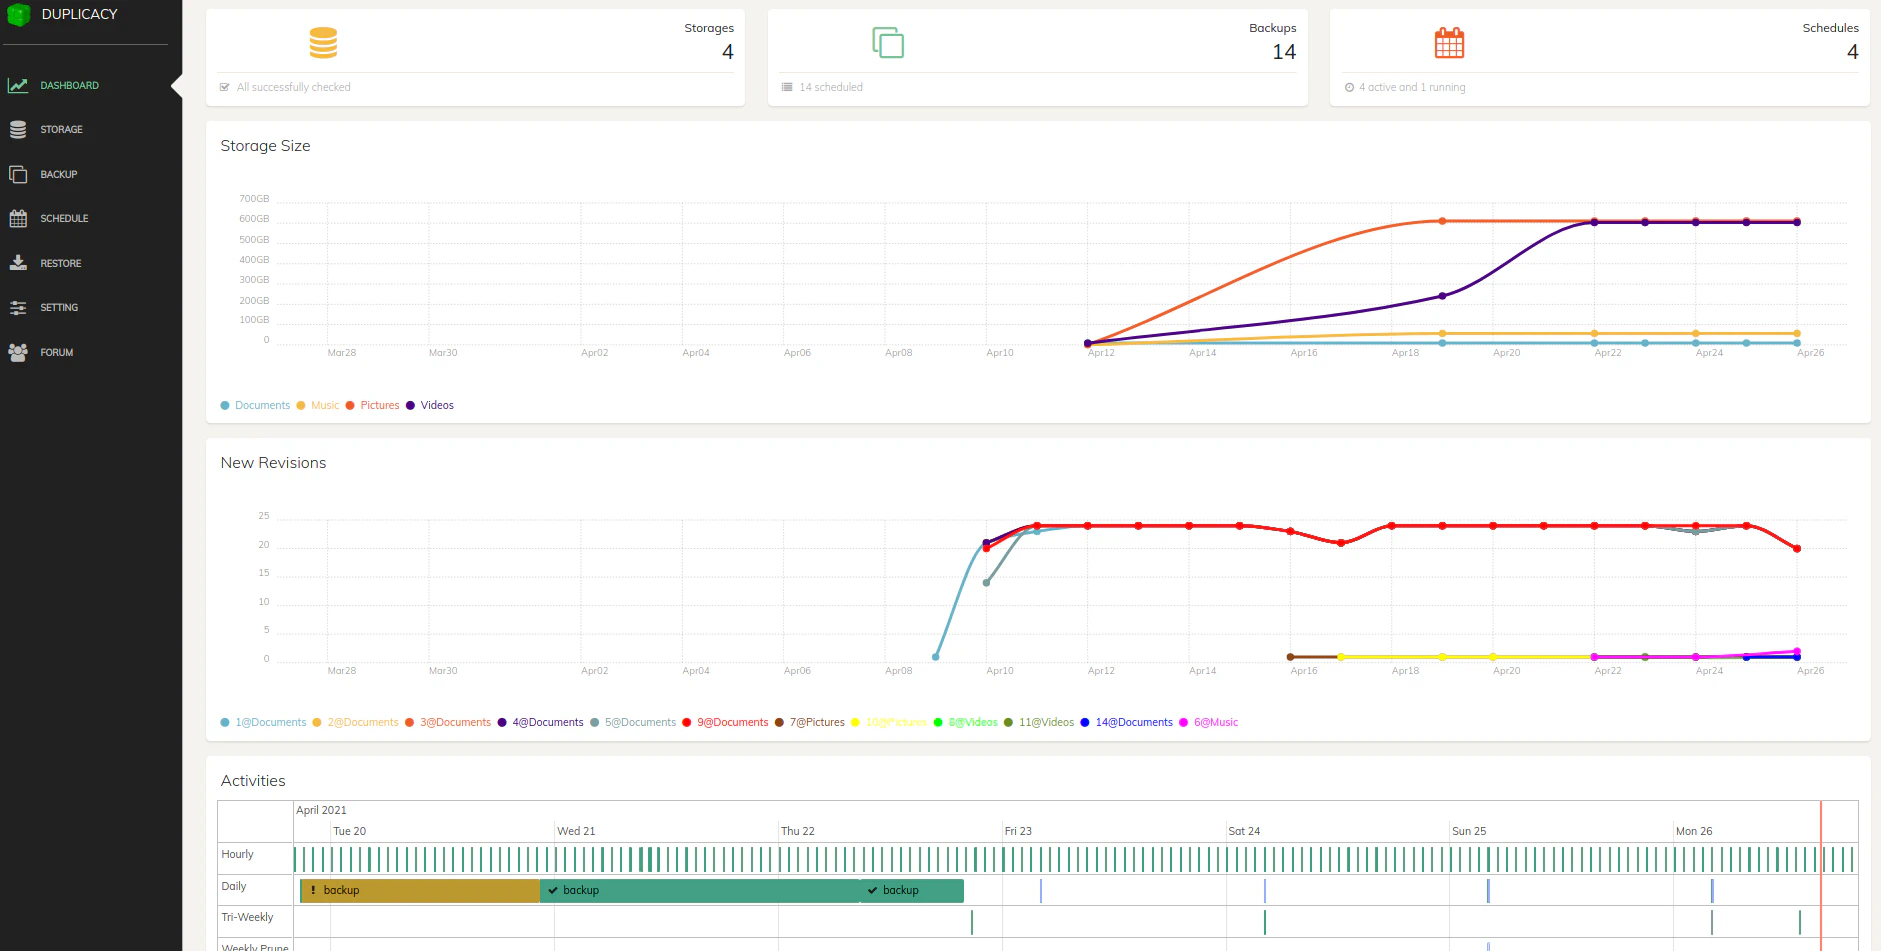
One subtle detail that I found useful was the fact that below the listed number of backups you have defined, it shows the number of backups you have scheduled. I happened to notice that I only had 12 out of 14 backup locations scheduled a few days after I set up everything. Without seeing this information on the dashboard, I may not have realized that I missed adding a few backup locations to the schedule, which would have been very bad if I actually needed to recover the data but realized that I never backed it up in the first place!
Settings Page
A word of caution…on the “Setting” page, you will notice there are options to enable HTTPS. With the method of installation I have described, I had trouble enabling HTTPS. When I enabled it, I lost access to the web interface. I read on their “Guide” page that behind the scenes it is using Let’s Encrypt certificates so that may be why I was having trouble. You would need to use a publicly accessible domain name and allow access through the firewall in order for the certificate to be automatically validated. If you already have port 80 forwarded to another web server (which I do), this may be problematic unless you have a proxy that can forward to the proper server (container/vm) based on domain names. That adds another layer of complexity.
Since I am not hosting my Duplicacy web interface on the Internet, I wish I could just enable a self-signed certificate so at least the traffic to the web administration is encrypted. However, I mentioned before that access to the web interface will only be performed from a machine within the same VLAN – all other inbound network access is blocked. HTTPS is not quite as crucial in that scenario since access is greatly limited. If a malicious user is already on the same VLAN network, I likely have a bigger issue to worry about. A reverse proxy could be used if you wish to have HTTPS enabled for the web interface without using the built-in Let’s Encrypt functionality but communication between the proxy and the Duplicacy container would not be encrypted.
Storage Page
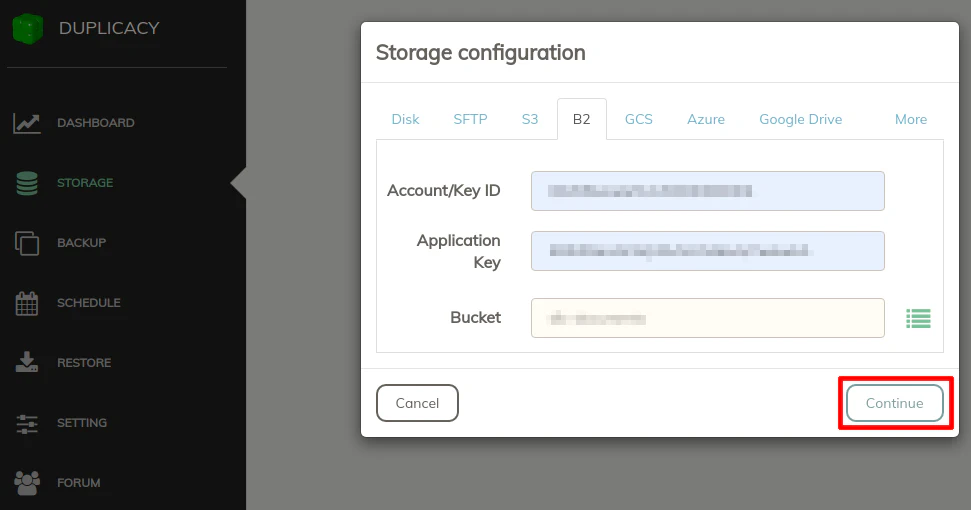
The first thing you need to add is your storage backend(s) that you plan to use for backup. In this example, I am using Backblaze B2 storage to demonstrate the backup process. When you click on the “Storage” page, it will display a box to add storage locations when you do not have any locations defined. Click on the “B2” tab for Backblaze B2 storage.
Enter the “Account/Key ID” of your B2 bucket. The “Application Key” is the secret key generated when you create your B2 bucket. You will only see that key once and cannot retrieve it. I like to store those keys in my password manager for safe keeping in case I need to set anything back up again. I do not have to delete and recreate any buckets to get a new key (which could be very time consuming if you have to upload a lot of data again on a slow connection!). The key ID of your bucket can still be viewable on the “App Keys” page on Backblaze after you create the bucket.
I like to create separate app keys for each bucket to limit access in case a key gets compromised.
The buckets in which the app key has access will be listed when you click the list icon. Select a bucket to add to your storage.
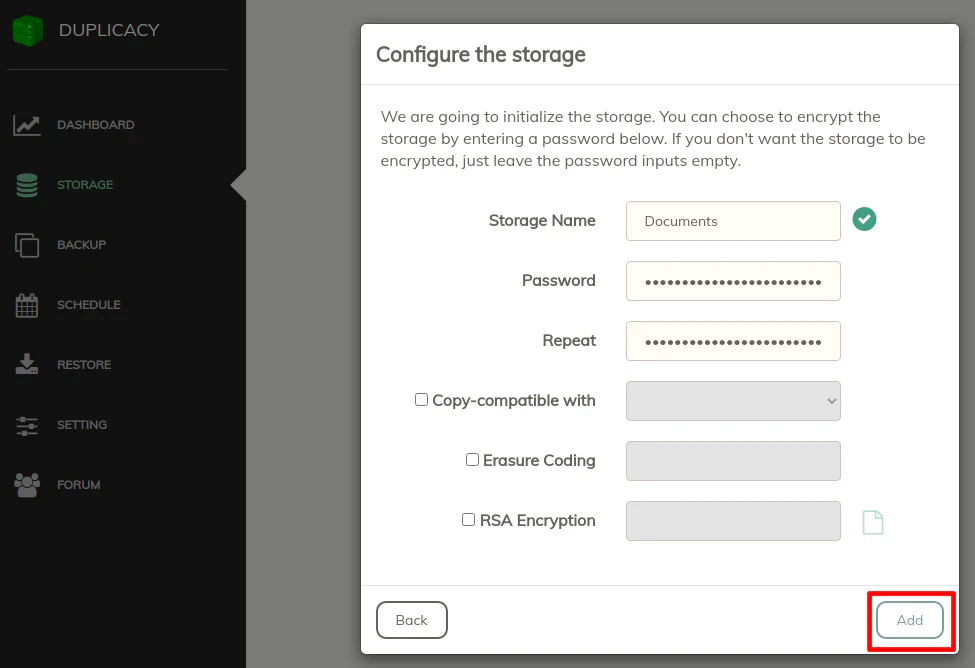
Once you have the bucket selected, you can give it a “Storage Name” which will be displayed in the web interface. If you want your storage to be encrypted, which is a great idea for security, enter a password. I suppose if you have data that is not sensitive and/or data you wish to have easier access or perhaps public access, then you may not want to encrypt it. You could be using Backblaze B2 buckets for other purposes besides backing up data. For the most part, I imagine if you are backing up your personal data, you would (and should) encrypt your data.
If you want to use a RSA key in addition to a password, you could provide the key to further increase security. For my personal needs, I consider a strong generated password as sufficient.
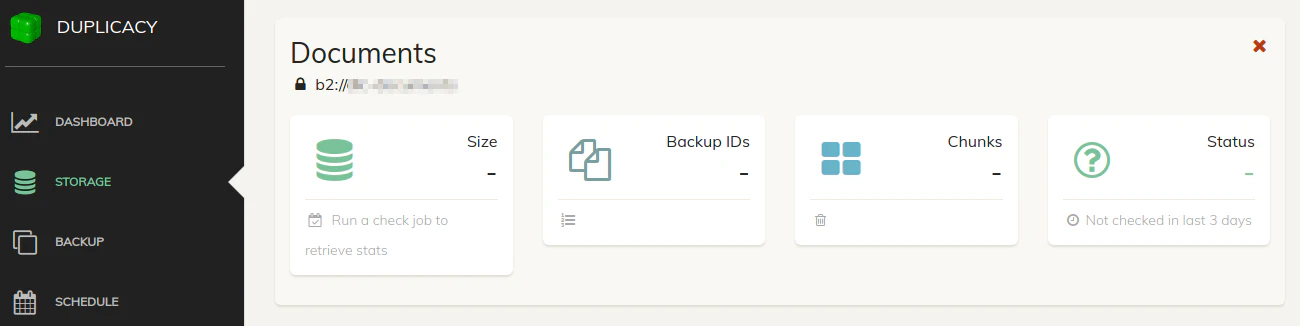
After adding the storage location, you will see it listed:
For my backups, I decided to create a separate B2 bucket for each type of dataset (Documents, Pictures, Music, and Videos). Even though it is easy enough to throw everything in one bucket, it is nice being able to see how large each dataset is in the dashboard. If the data is mixed together, you will not be able to easily know how much space each type of data is using. This can be helpful if you are looking to keep the size to a minimum to save money since you will know which datasets are the largest. It also helps you see how each dataset is growing over time.
Backup Page
With the backend storage defined, you may now add the datasets you wish to backup. Depending on how you have your files organized, you essentially will be picking the folders you wish to backup. You can only select one folder per backup, but you can create multiple backups if you have multiple folders to backup. You may even add a folder that contains some files you do not want to backup and then later exclude them from the backup. This may be a better way to go than to create a backup for each folder when you have a lot of folders to backup.
What I decided to do was to reorganize my local folder structure to sort files into high, moderate, and low priority folders. All of the folders in the high priority folder gets backed up locally and offsite, the moderate folder gets backed up only locally, and the low priority folder gets backed up locally if there is available space to back it up (and if I lose the only copy because of lack of space, it is not a big deal). The reason I decided to reorganize my files is to ensure that I have everything backed up offsite without having to dig through all my folders to hand select a few specific folders. I do not have to worry about missing something.
Click the “+” button to create a new backup location. Then select a folder by clicking the folder icon. Choose one of your configured storage backend(s). Give your backup location a unique “Backup ID”. It can be a simple number or text.
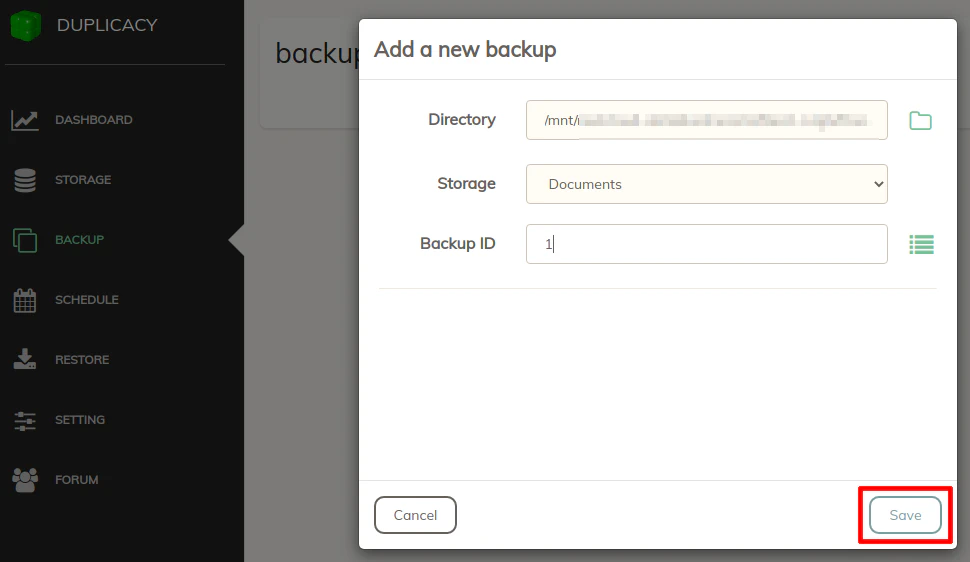
Once you have a folder selected, click the “Save” button and you will see it appear in your backup list:
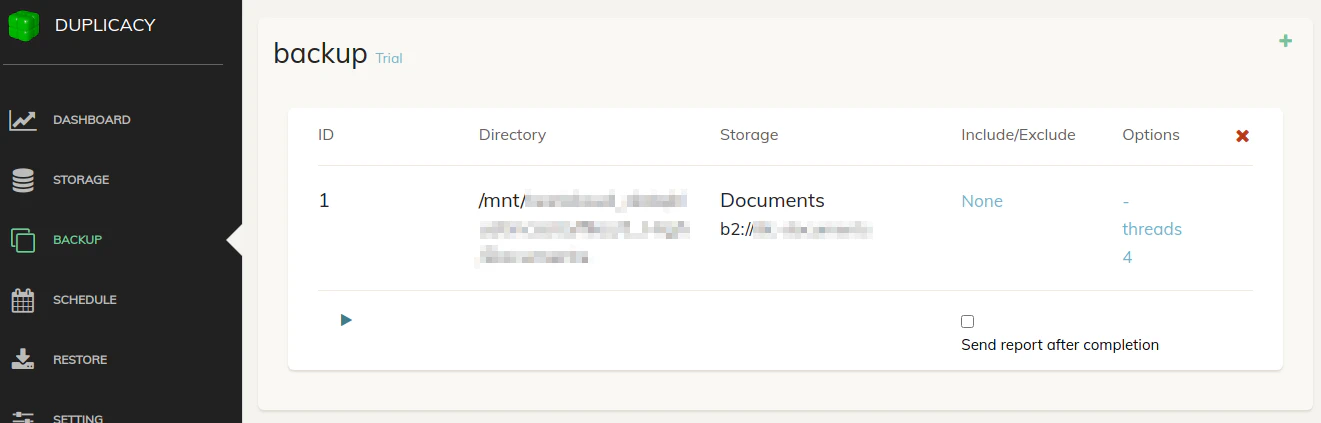
If you decide you wish to include/exclude certain files/folders from the backup location you just saved, click on “None” in the “Include/Exclude” column to bring up the follow dialog box:

Select the file/folder and then click the “Include” or “Exclude” button and the files/folders will appear in the right hand side in a list.
If you want to manually run your backups, you can click the play button on the list of backup locations on the “Backup” page. You may want to do this the first time you backup your data or you may create a schedule and manually run the schedule rather than wait until it is time for it to run at its normal time.
Schedule Page
On the Schedule page is where you can define one or more schedules to run your backups. More than likely, you will want your backups to be automatically performed so that your data is regularly backed up. The basic process in Duplicacy is to create a schedule and then add backup and other jobs to the schedule. This allows you to fully customize your backup process to meet your needs.
In this example, I am going to create a schedule that runs hourly (which I use for my documents – other files I backup on a daily or less frequent basis). As you can see, I very creatively named the schedule “Hourly”. The starting time does not have to be midnight, but it can be set to any hour during the day since it is going to be run hourly. If you want the schedule to fire sooner than later, you may end up setting the time to the nearest hour. If you include minutes, you could have the schedule run at 1:30, 2:30, etc. I have every day of the week selected so it runs every hour 24/7.
If you want to limit the amount of time the schedule runs, you may enter it. However, I noticed that the user interface limits the time to 99:59, but I am not sure if that time is 99 minutes 59 seconds or 99 hours 59 minutes. I do not think I saw it mentioned in their brief documentation.
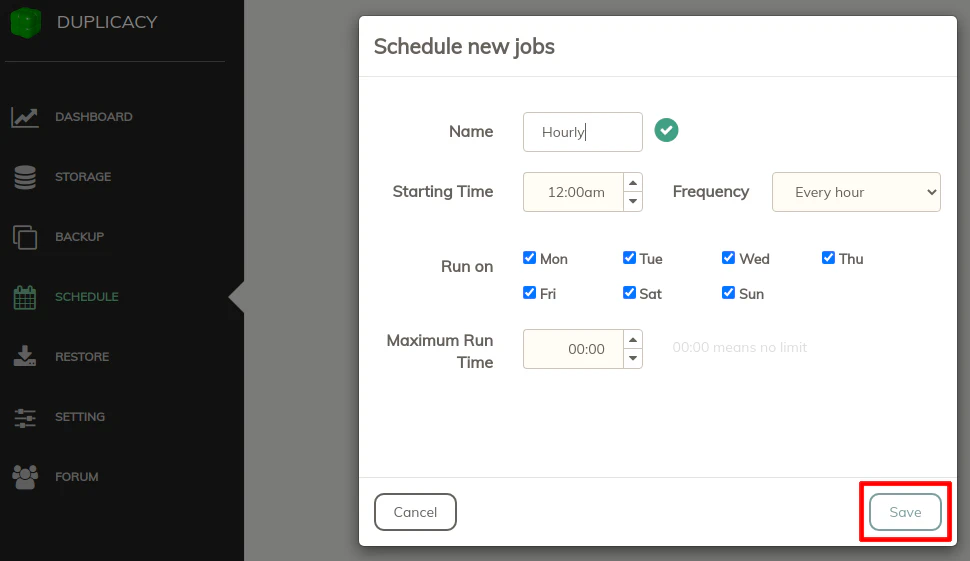
Once you click the “Save” button, you will see the schedule in the list:

To add jobs to the schedule, click on the “+” icon in the upper right hand corner of the schedule. To schedule a backup job, the “Type” should be set to “Backup”. In the “Backup” box, all of the backup locations you have defined should appear in the list. Choose one of the backups. The “Path” and “Storage” boxes will autopopulate based on what you configured on the “Backup” page. You may set the jobs to run in parallel if you like by checking the box at the bottom of the dialog box. For my backups, I left it unchecked to force the backup jobs to run in the order of the jobs on the schedule (so you can prioritize backups in that way). I do run other operations in parallel though so it is a useful option to select.
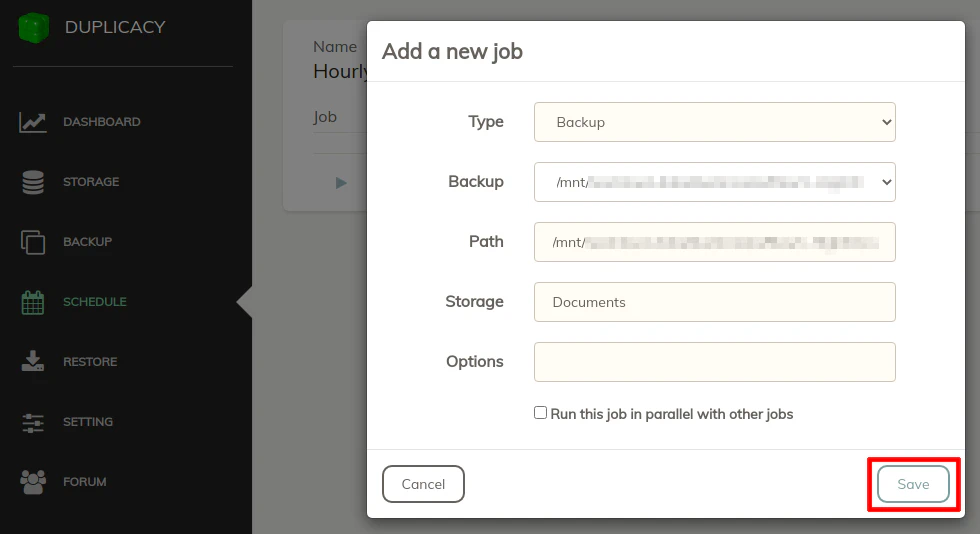
Once you have all the jobs entered, you can see them in a list on the “Schedule” page:
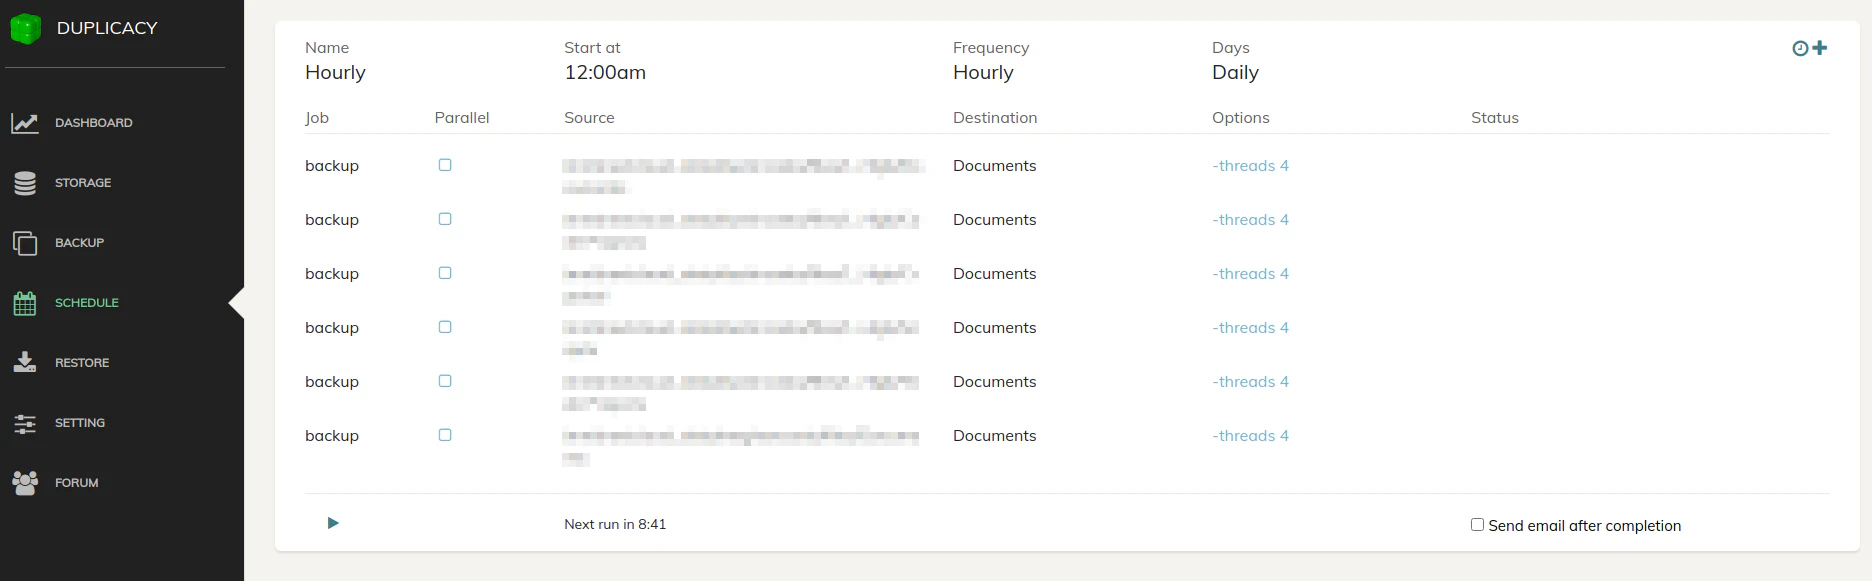
You can see a countdown to when the schedule will be run next and you have a play button to manually run a schedule just like on the “Backup” page. You may also have an email sent each time the schedule is run or only when there is a problem if you check the “Send email after completion” box. A dialog box will appear where you can enter email credentials. You have to enter the credentials per schedule which could be tedious if you have quite a few schedules defined. However, you can use different email accounts for different schedules.
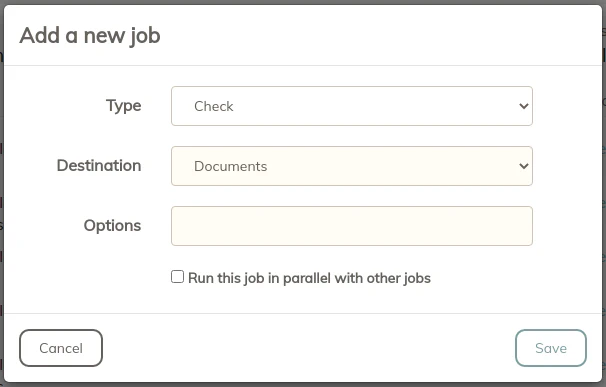
In order for the statistics on the “Dashboard” and “Storage” pages to be updated, you need to add a “Check” job to your schedule. I have added a “Check” job after my daily and less frequent backups but not my hourly one. I figured I do not need that frequent of an update to the dashboard. You will notice you will only need to pick the storage location to check. If you have more than one storage you wish to update, you can add more jobs.
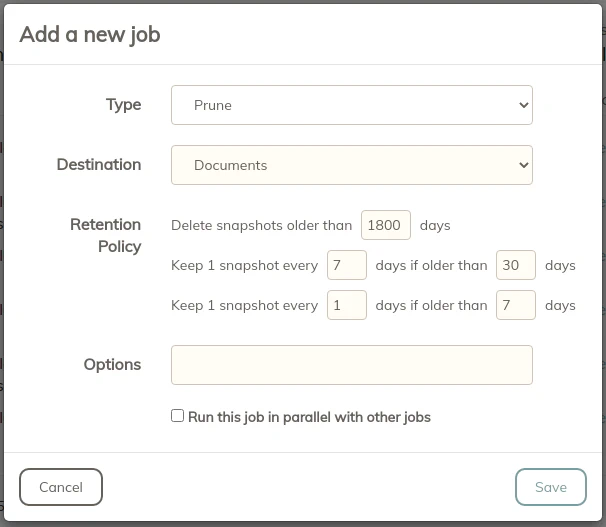
The “Prune” operation is important in order to reduce the number of revisions you will be producing with your backups. Revisions do not increase space significantly unless the data has changed. There are a number of options you can set to keep your revisions to a minimum. Set the values according to how important your data is and how often it is updated. “Prune” operations can be done less frequently than “check” operations since you only need to clean up old revisions periodically.
I run both the “check” and “prune” jobs in parallel since they run on separate storage locations (separate B2 buckets) and therefore should not interfere with each other.
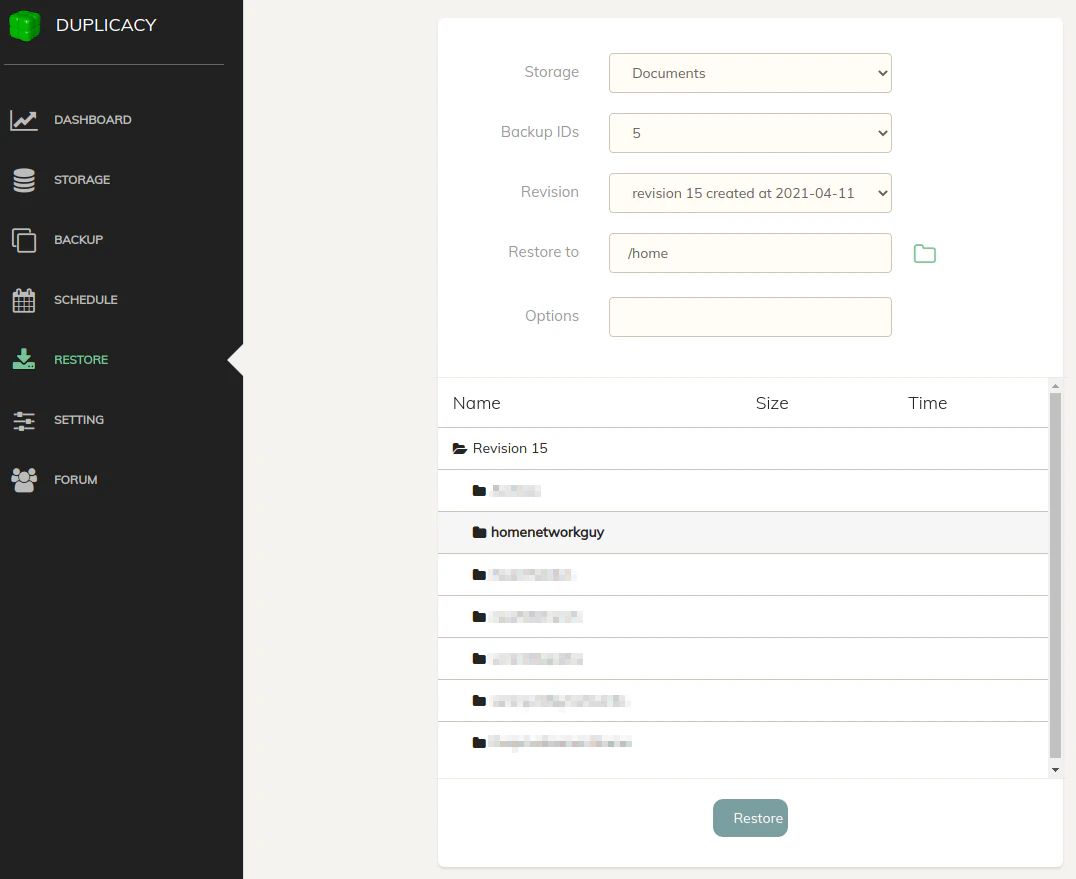
Restore Page
The “Restore” page is where you can recover files you have in storage. Since the files are split into chunks so it can be deduplicated and since those chunks are encrypted, the only way to restore your files it to use the “Restore” interface. That is why it is important you do not lose or forget any of your keys/passwords. Otherwise, your backup data is useless! I highly recommend you try restoring some of your data after you back it up to ensure that you can recover your files so you will be ready when you need it.
The Duplicacy documentation states that the restore functionality of Duplicacy does not require a license key. That is a nice feature because it means you could restore your files on a different system or more than one system than the system in which you have licensed for backups. Your server performing the backup could have one license and then all of your other systems could in theory restore the data in your backup without needing to pay for separate licenses.
To restore files, you will need to pick one of the “Storage” backends that you configured such as our B2 bucket example. Then choose the “Backup ID” of the dataset you wish to restore (descriptive IDs come in handy for restoring files). If you forget which ID is associated with the datasets, you can view them on the “Backup” page. When you pick the “Backup ID”, you will need to wait while the revisions are being retrieved. If you have quite a few revisions it could take longer to list them. Once it has loaded, select the point in time (“Revision”) you wish to restore files. Finally, you can select a folder where to restore the files by clicking the folder icon or by typing a path in the “Restore to” box.
You will notice below the “Options” box that you will see “Revision” plus your revision number. If you click on that, you will see a list of your files to restore. You can only select one folder to restore at a time, but you can restore the entire dataset by just clicking the Revision heading. It will turn bold when you have it selected. Simply click “Restore” to start downloading your files.
Optional Tweaks
There are a couple of things you may want to consider doing after you have a working installation.
Limit Network Bandwidth
One thing I found very useful with using a LXC container in Proxmox is that I could set a limit on the network bandwidth. When backing up large datasets for the first time or if you added a bunch of data to your dataset, ideally you would not want all your upload bandwidth to be utilized by the backup. I set the throttle to about 2/3 of my overall bandwidth. The remaining 1/3 does not seem to slow down my Internet since most data is downstream. You may adjust the limit by going to the network settings of the container. Keep in mind the value is referring to Megabytes not Megabits so you need to divide your Megabits by 8 to get a Megabyte value (so to allow 8 Mbps upload, you need a value of 1 for 1 MBps). What I like about this feature in Proxmox/LXC is that I do not need to worry about throttling my bandwidth at the router level or applying any Quality of Service controls. It is just so easy to throttle the container.
If you understand and prefer using QoS controls on your router or other device, that is arguably is better overall for your network, but I thought I would mention the quick and easy way to limit network bandwidth in Proxmox. For setting simple network limits, it is still better than letting the container utilize your entire upstream bandwidth.
This leads us to another useful idea. The bandwidth limit on the container is for both the upstream and downstream traffic much like a full duplex Ethernet port. So if you set the limit to 1 MBps, you can only upload at 1 MBps and download at 1 MBps. Therefore, it would not be a good idea to restore any files from this container since it will take much longer due to this artificial limitation. That leads us to my second suggestion…
Run a Second LXC Container for Restoring Files
I suggest that it would be a good idea to create a second container with Duplicacy installed but solely used for restoring files (if you choose to limit the upstream bandwidth as mentioned in my first suggestion). The way the Duplicacy licensing is structured, you may restore files without needing a license so you would not have to worry about buying a second license just to restore files (assuming Duplicacy would treat the second container as a different machine).
Rather than start from scratch with setting up another Duplicacy container, you may want to clone the container and tweak a few things. If you clone a fully setup Duplicacy instance, you will have to delete all schedules on the “Schedule” page and all backups on the “Backup” page since they are not necessary in order to restore files. You only need to have your storage backend(s) you configured on the “Storage” page so that you can select the files you wish to retrieve. If you know what you want to have a separate container for restoring files, it would be less tweaking if you made a clone right after you configure your storage backend(s). You will need to make sure you remove any network bandwidth limits so that you can download your files at full speed.
I performed a test recovery and it seemed to download pretty fast. It is important that you verify you can recover some of your files before you actually need to do a real recovery. Otherwise, you may get into trouble if you realize your backups did not store/retrieve properly. Getting more familiar with the process is helpful so that you do not have to figure it out on the fly when you really need a retrieve a backup.
Conclusion
Overall I am pretty satisfied with using Duplicacy to backup my data to Backblaze B2. I like that they have transitioned to a web interface so that you can run the backups headless while having a nice UI to configure and view the status of updates. From a technical standpoint, I like the idea behind their lock free deduplication process, which seems to be rather unique. I read their explanation of other backup tools, and it is interesting to see how the different approaches compare. I certainly feel like it is a good $20 investment for the first year and $5 per year afterwards and I am not even being sponsored for a favorable review!