Accessing Your Home Network with Your Own OpenVPN Server on OPNsense

Photo by TheDigitalArtist from Pixabay
Table of Contents
A VPN server can provide an encrypted connection to your home network. It is a great way to remotely access your network since it provides a high level of security. Once you are connected to the VPN server, you essentially become a part of the network in which you are connected. This is different than using an SSH server because you are not directly connecting to a single machine on your network. Instead, you are just another end user on the network. Depending on the configured firewall rules, the VPN users may either be isolated to their own virtual network or they may be allowed to communicate with other devices on the network.
When you are working remotely not only do you have a secure connection to your home network but you also can use the VPN if you are on an untrusted public WiFi network. You can enjoy the same security/privacy protections you have put into place on your home network (like DNS filtering, DNS over HTTPS, intrusion detection, etc).
If you are running more advanced router software like OPNsense, it has built-in VPN functionality. You do not need to host a VPN service on a separate server on your network unless you have an underpowered router in which case it would be a good idea to use a more powerful machine. I like the idea of running the VPN on the router for my home network since it is already sitting on the perimeter of my network, and it has enough computing power to easily handle the task.
Hardware Considerations
Before setting up a VPN server in OPNsense, keep in mind that you should have hardware in your router which is capable of handling encryption to prevent potential performance bottlenecks on lower-end hardware. If you have hardware with AES-NI capability, you will be able to take advantage of hardware level encryption which greatly reduces the burden on the CPU. Even though you may not need to support very many users for a home network, your network throughput could be reduced if the router cannot keep up.
Create a Certificate Authority (CA)
If you are using OpenVPN, you likely will want to use certificates in addition to username/password since it adds an extra layer of security (if you want a third factor for authentication or an alternate second factor, you could set up a one time passcode (OTP) in addition to the username/password and certificate). A certificate authority is required in order to issue certificates. If you do not already have one set up for other purposes (such as using Let’s Encrypt with HAProxy) or you want to create a separate certificate authority just for OpenVPN, go to the “System > Trust > Authorities” page to create a new one. Click “Add” to proceed.

Add a “Descriptive name” for your Certificate Authority (CA). For the “Method”, select “Create an internal Certificate Authority”. Stronger key lengths are better but of course require more computational power. If you have a lower end device, you may want to select a lower number. The default key length is 2048 bits. I don’t think you would want a setting much lower than that to lower the likelihood of your key being bruteforced. Setting it to a stronger 4096 bit length should be fine for most reasonably powerful hardware. For the “Digest Algorithm”, the default is SHA256. The comments are the same as the key length. A stronger algorithm requires more processing power. I set it to SHA512 on my mini-PC router. It seems to run fine with 4096 bit keys and a SHA512 digest especially since I am mainly the only VPN user and the hardware in that PC is decent for a home router.
I set the “Lifetime (days)” to 10 years, but I do not really know how important this is. Since it is a self-signed certificate authority, our internal network apps are going to throw warnings about it being self-signed, but the certificates will still function properly and provide protection. If you notice any certificates change from what you have generated, then you will know there could be a problem with a man-in-the-middle attack.
As for the rest of the fields, you can put whatever information you like. I made up information for this example. Click “Save” to finish setting up the certificate authority. You should see the new certificate authority in the list of “Authorities”.

Create a Certificate for OpenVPN
Now we need to create a certificate for the OpenVPN service. On the “System > Trust > Certificates” page, click “Add” to create a new certificate. You may notice that there is already one certificate in the list. That certificate is used by the web admin page you are currently using. It was created upon the OPNsense installation since HTTPS is enabled by default (which is a good thing).
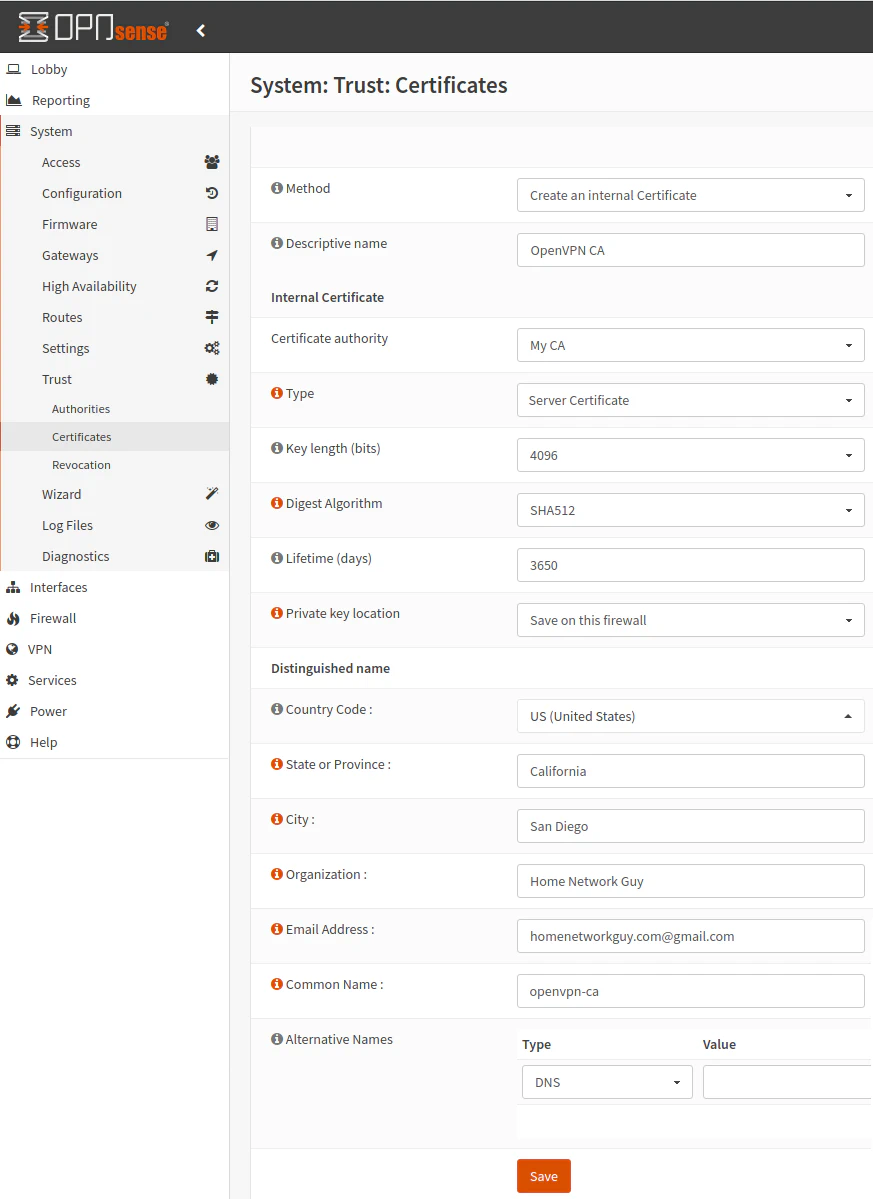
For the “Method” choose, “Create an internal Certificate”. Add a useful “Description name” such as “OpenVPN CA” to indicate the certificate is for the OpenVPN service and not for one of the VPN users. The “Certificate authority” should be automatically populated to the correct CA if you only have one CA defined. If you have more than one, make sure select the CA that you are using for your VPN service.
For the “Type” of certificate, select “Server Certificate” since this certificate is for your OpenVPN service. For the “Key length”, “Digest Algorithm” and “Lifetime (days)”, you can set it to the same as the Certificate Authority: 4096 bits, SHA512, and 3650 days, respectively. You may also give it a “Common Name” such as “openvpn-ca”. Click “Save” to generate the certificate.
Adding VPN Users
For users to make use of your VPN service, they will need user accounts. The “System > Access > Users” page shows a list of users, and you can click “Add” to create a new user account.
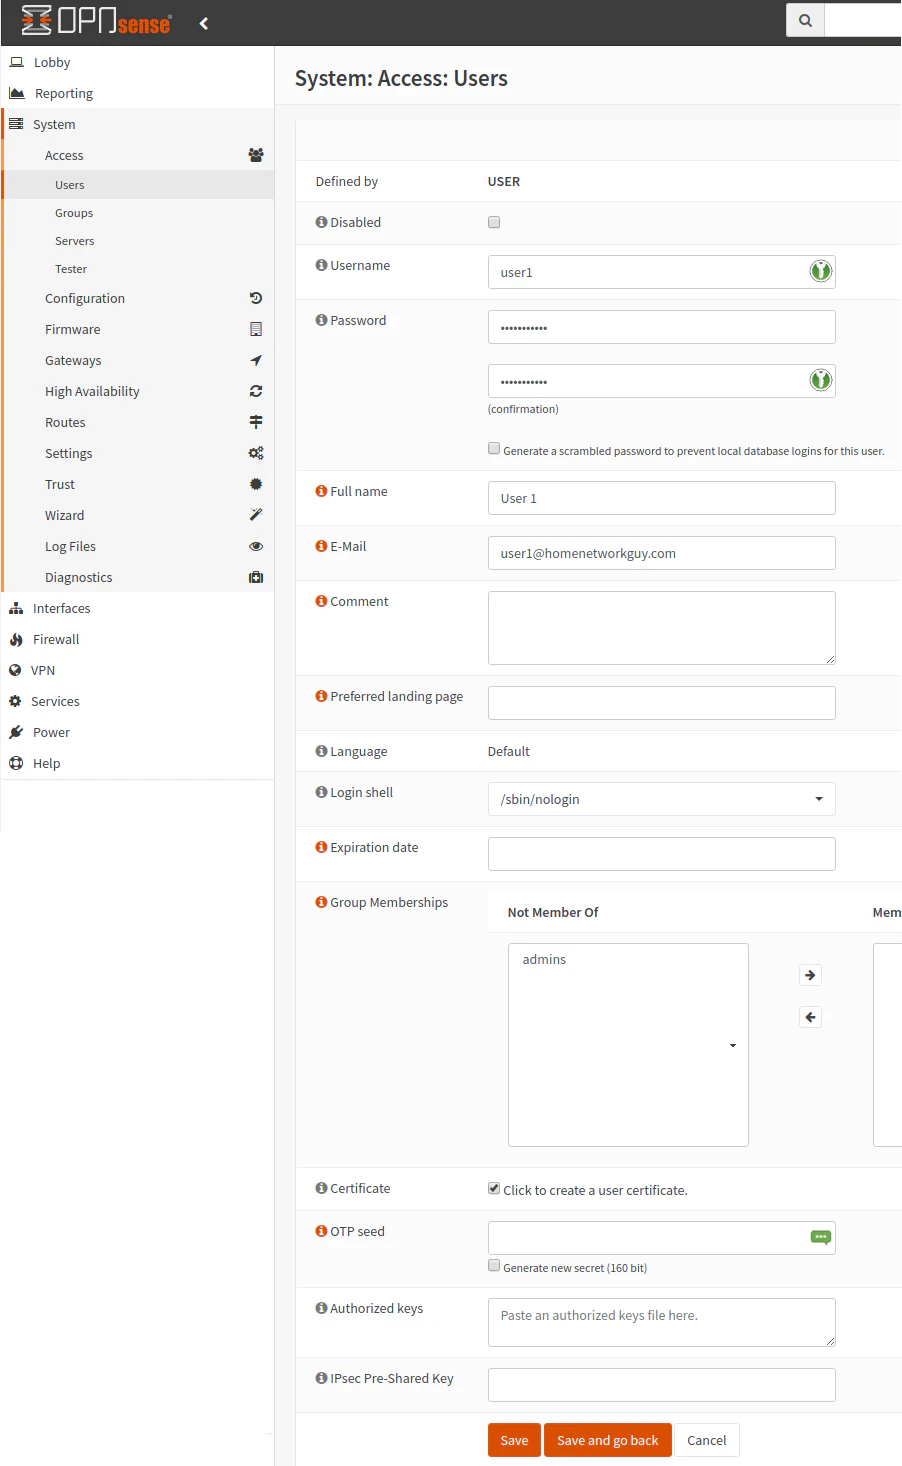
Enter the unique username and password for the account as well as other basic user information. You may leave the “Login shell” as “/sbin/nologin” if the user account is only going to be used for VPN access. This setting prevents the user from logging into the web administration page of OPNsense.
Make sure you have checked the box “Click to create a user certificate” so that a certificate can be created at the same time creating the user account. This saves an extra step of having to go back to edit the user account to add a certificate.
If you wish to add an additional factor of authentication beyond a password and a client certificate, you may generate an OTP (One Time Password) key which you will be prompted for when logging into the VPN service. There is a checkbox below the “OTP seed” box to generate the key automatically. I think for a home network usage, especially when using mobile devices, a password and a certificate should be sufficient for solid security. I am not sure what a third factor will buy you in terms of security. However, you may be able to choose to use OTP and a password instead so that you still have two factors of authentication. I have not tried that configuration so it will no be included in this example. I wanted to make you aware of that option.
After you click “Save” to create the user, you will be taken to a page to create the certificate for the user.
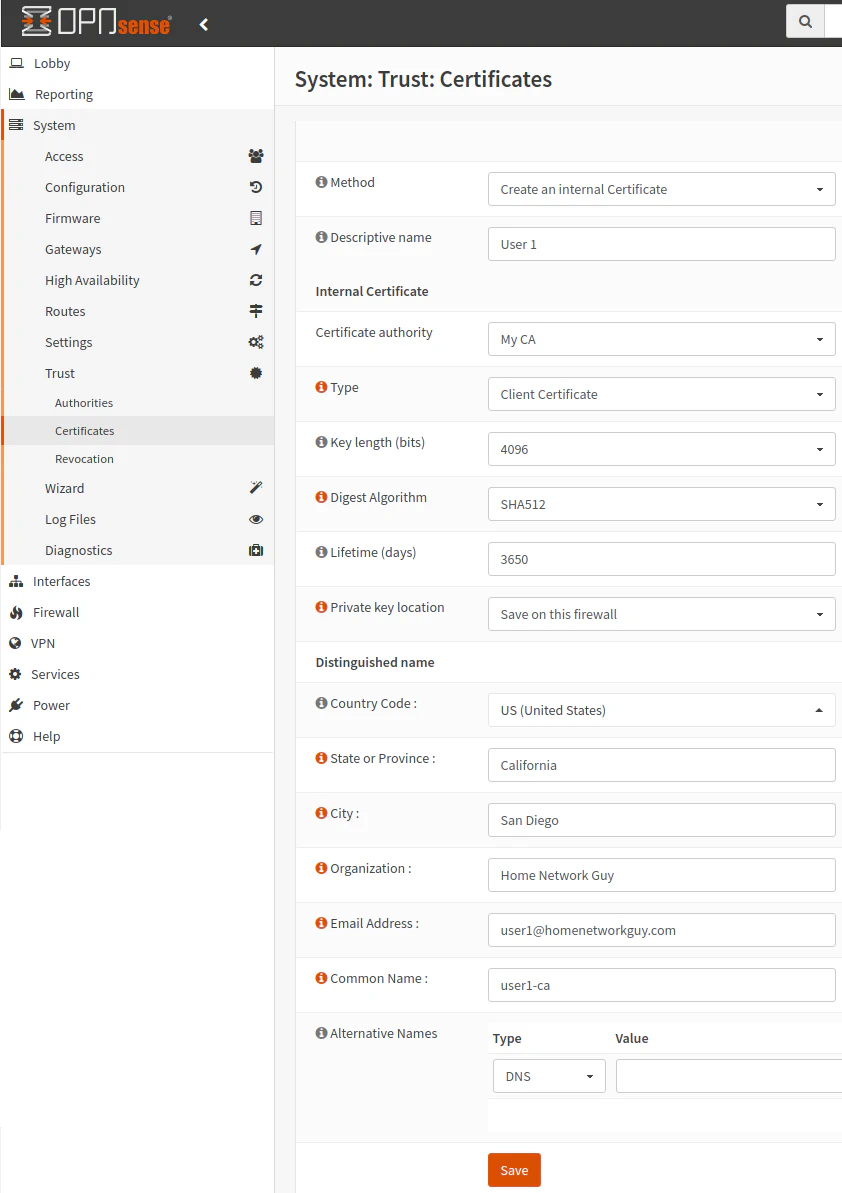
As with the other certificates, for the “Method” choose “Create an internal Certificate”. It may be helpful to make the “Descriptive name” the name of the user. It can contain spaces so it does not have to be exactly the same as the username. Use the “Certificate authority” that was created for OpenVPN. It should be selected by default if it is the only CA you have created. For the “Type” of certificate, select “Client Certificate” since you are creating it for a user connecting to the OpenVPN service.
Like with the Certificate Authority and server certificate, the “Key length”, “Digest Algorithm” and “Lifetime (days)” may be set to 4096 bits, SHA512, and 3650 days. I do not think these values need to be the same as the other certificates. Perhaps if you have a lower-end device you may want lower strengths for performance reasons, but I do not know the real world impact since I have not personally tested it.
Finally, add all of the usual values that were setup when creating the other certificates. The “Common Name” can be set to something similar to the username if you like. Click “Save” to create the user certificate.
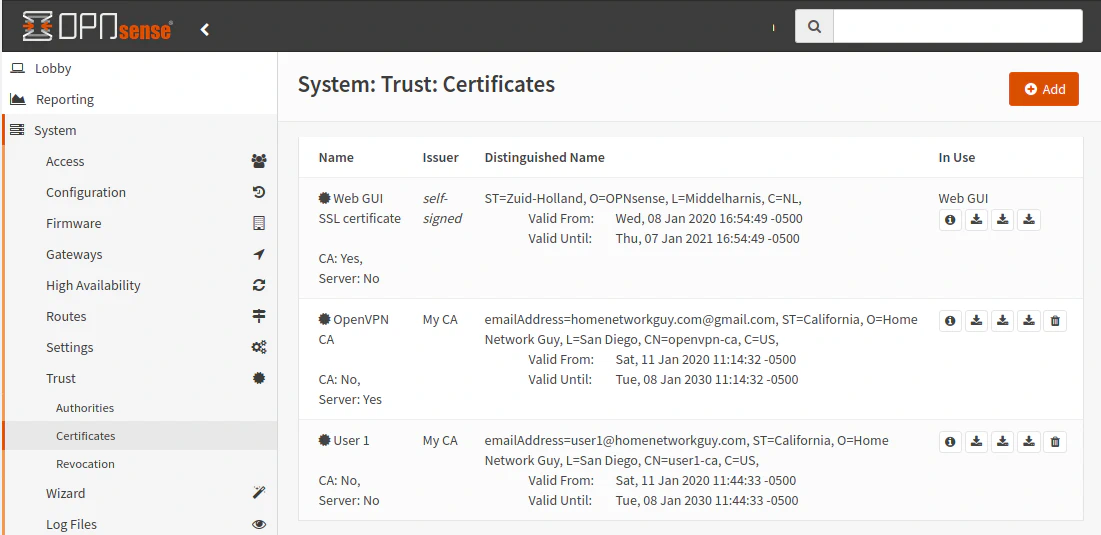
You should have the following certificates:
Create the OpenVPN Service
After creating all of the desired users and certificates, it is time to create the OpenVPN service. Go to the “VPN > OpenVPN > Servers” page and then click the “Add” button. I will walk through the configuration on this page with several separate screenshots since it is quite long. Fortunately, not all of the settings need to be modified to create the OpenVPN service.
You may notice on the OpenVPN Servers page that there is a button to use a setup wizard to configure an OpenVPN server. This may be more convenient to some users, but I like walking through the process as I have outlined which is similar to the OPNsense documentation. I believe it helps to know all of the steps especially when you need to make changes later such as adding new users/certificates. You will know which configuration pages to visit and understand the process necessary to establish a proper functioning VPN service.
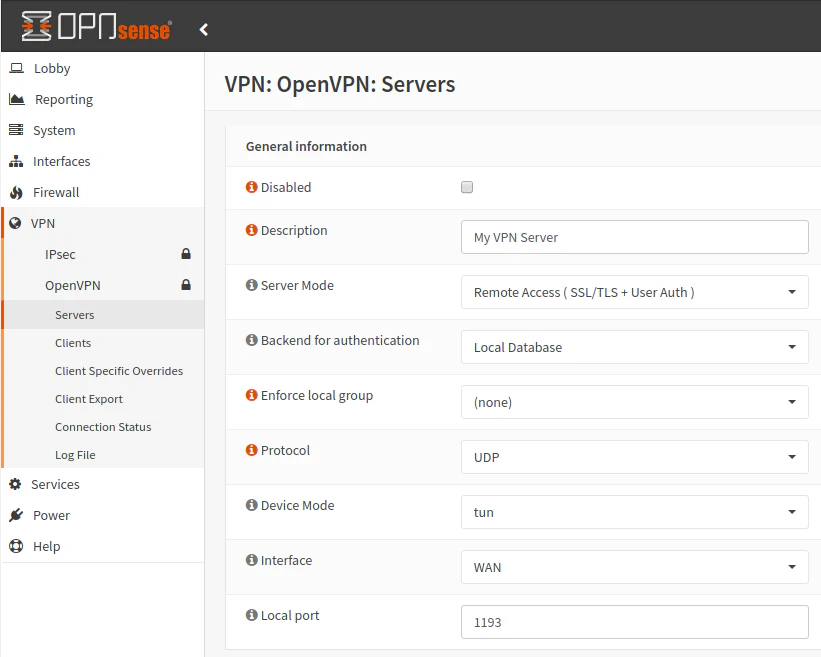
Enter the “Description” for the OpenVPN service. It does not need to be fancy unless maybe you are running multiple instances of OpenVPN and you are using them for different purposes. For the “Server Mode”, choose the “Remote Access (SSL/TLS + User Auth)” option if you wish to use client certificate and password authentication. You may choose to use a one time password in addition to certificates or instead of using certificates. See the OPNsense documentation for more details on how to use a password + TOTP configuration. The “Backend for authentication” option should be set to “Local Database” since the users are created on the same server as the OPNsense router. If you were using any external servers for user authentication, you would select that server. The “Local port” is defaulted to 1194, but I changed it to 1193 in this example. You may change it to some other random port if you prefer not to use default ports.
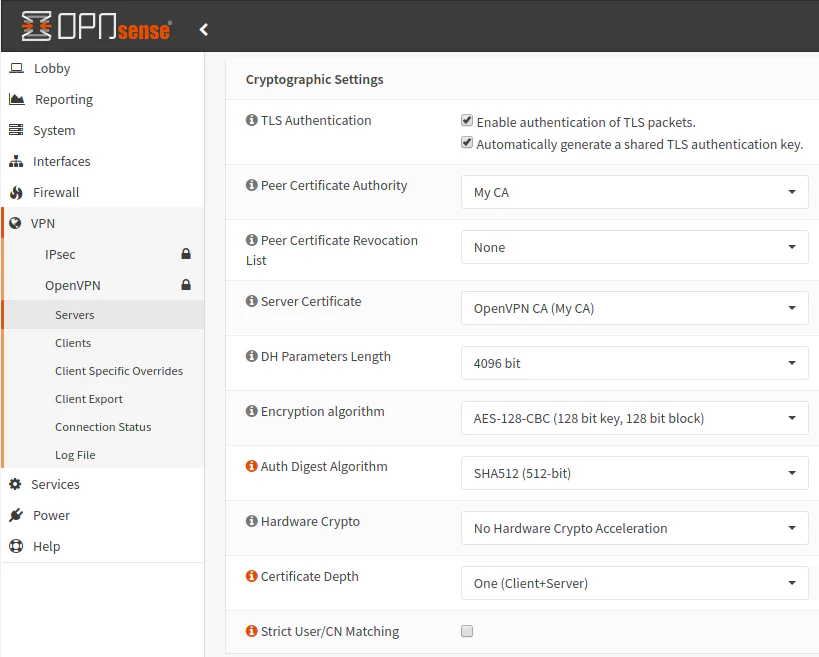
Leave the two “TLS Authentication” checkboxes enabled, which is their default values. For the “Peer Certificate Authority” dropdown, choose your Certificate Authority we created earlier. Similarly, for “Server Certificate” choose the certificate we created in a prior step. For “DH Parameters Length”, “Encryption algorithm”, and “Auth Digest Algorithm”, you may choose stronger values than the default if you desire stronger encryption especially if you have the horsepower to turn up the default values (most modern machines should be able to handle higher values). I chose “4096 bit”, the default “AES-128-CBC” algorithm, and “SHA512” for this example.
I have noticed that the “Hardware Crypto” value defaults to “No Hardware Crypto Acceleration” even though my router has support for AES-NI. The dropdown has “Intel RDRAND engine” as an option, but I believe that is a software based crypto accelerator. You probably should not select that option. I am not sure if OpenVPN is using the AES-NI instruction set behind the scenes but does not show up as an option in the dropdown. Since it is only myself (and on rare occasions my wife) using the VPN, my router seems to handle the load just fine (along with all of the other services I have running on it).
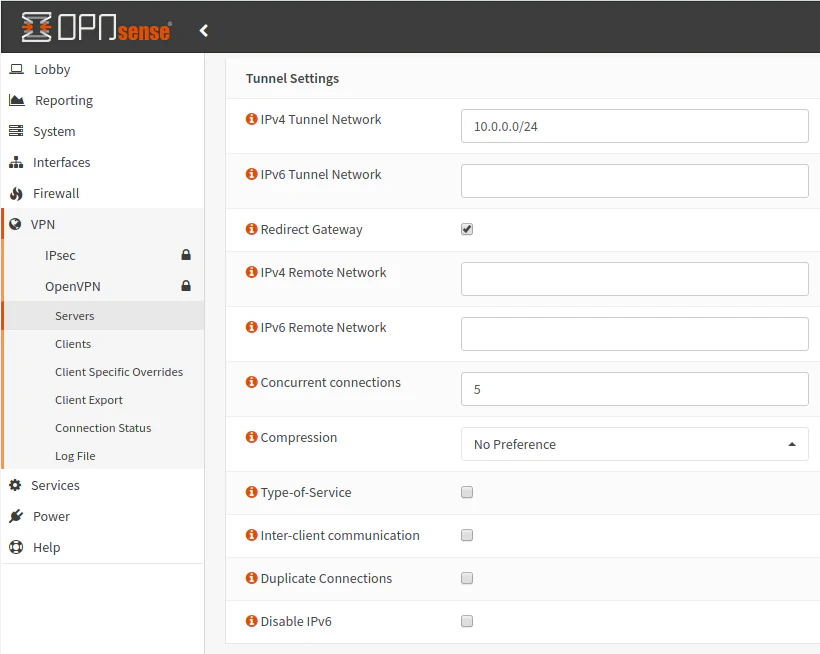
For a basic VPN service, you likely do not need to modify many settings in the “Tunnel Settings”. The most important one you need to set (in fact, you cannot create the VPN service without it) is the “IPv4 Tunnel Network”. Set it to the subnet address that you wish to use for the VPN clients/users. I have set mine to 10.0.0.0/24 which means I can use the IP range of 10.0.0.1-10.0.0.254 which is more than enough addresses for home network use. I have enabled “Redirect Gateway” to ensure all VPN user traffic is redirected through the gateway. I believe this option should force everything through the VPN including DNS lookups so that no network traffic leaks outside of the VPN.
If you have limited bandwidth and multiple users connecting to your VPN, you may want to set a low number for the “Concurrent connections”. The default is no limit. Perhaps it may be a good idea to set it to a low number if you do not need many concurrent connections in case your VPN gets hacked – just in case you get flooded with many concurrent user connections (like a DDoS attack). You may want to choose a “Compression” value other than the default “No Preference”. It may yield better performance if you connecting on a low bandwidth connection such as a cell phone in a remote location.
If you want your VPN users to communicate with one another, you should enable the “Inter-client communication” option. In my network, I leave it disabled since I do not need such connectivity. It is more secure if you do not allow devices on your VPN service to communicate with one another. Essentially this is very similar to a guest network that has client isolation turned on. It allows many users to connect to get access to your Internet connection, but it blocks network level access to all of the devices in that network.
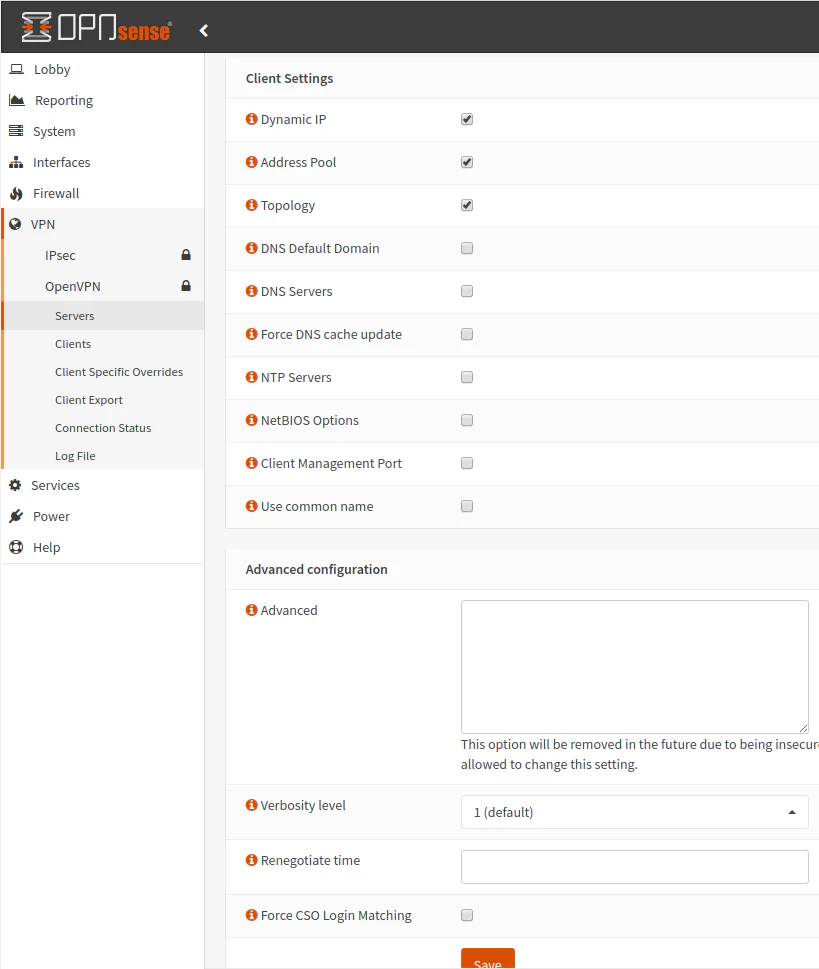
Enable the “Dynamic IP” option if you do not mind to keep the VPN connection alive if your IP dynamically changes. I do not really know when this scenario might occur, but I enabled it because I do not care if my IP changes for my VPN users. I rather maintain the connection instead of being dropped. I have never seen my IP change while I was connected to the VPN service so this option may not be very useful. Leave the “Address Pool” enabled, which is the default value. Enable the “Topology” option so that your devices only receive a single IP and not an isolated IP subnet. I read in OpenVPN’s documentation that you should set the “Topology” option to enabled (called “subnet”) for devices running modern software. The current default for “Topology” is disabled (called “net30”) for compatibility with older Windows OpenVPN clients.
There is nothing else you need to set on this page! Whew! Now you can finally click “Save” to create the service.
Add Firewall Rules
At this point, you will need to add a firewall rule on the WAN to allow remote access if you desire remote access. The default OpenVPN port is 1194. In my example I changed it to 1193. This is not necessary, but I think it may not be a bad idea to change from the default port to avoid being scanned by sites such as Shodan. If there is a known vulnerability and you have the default port exposed, your server will likely show up in the search results. Changing the port number reduces the likelihood of this happening unless the scanners are searching a wide range of ports, which takes much longer to do when scanning the entire Internet. It is similar to changing the default SSH port – you will likely be exposed to less scans and attacks on non-default ports (but of course do not rely on that completely for security!). This is considered “security by obscurity”, which does not guarantee security.
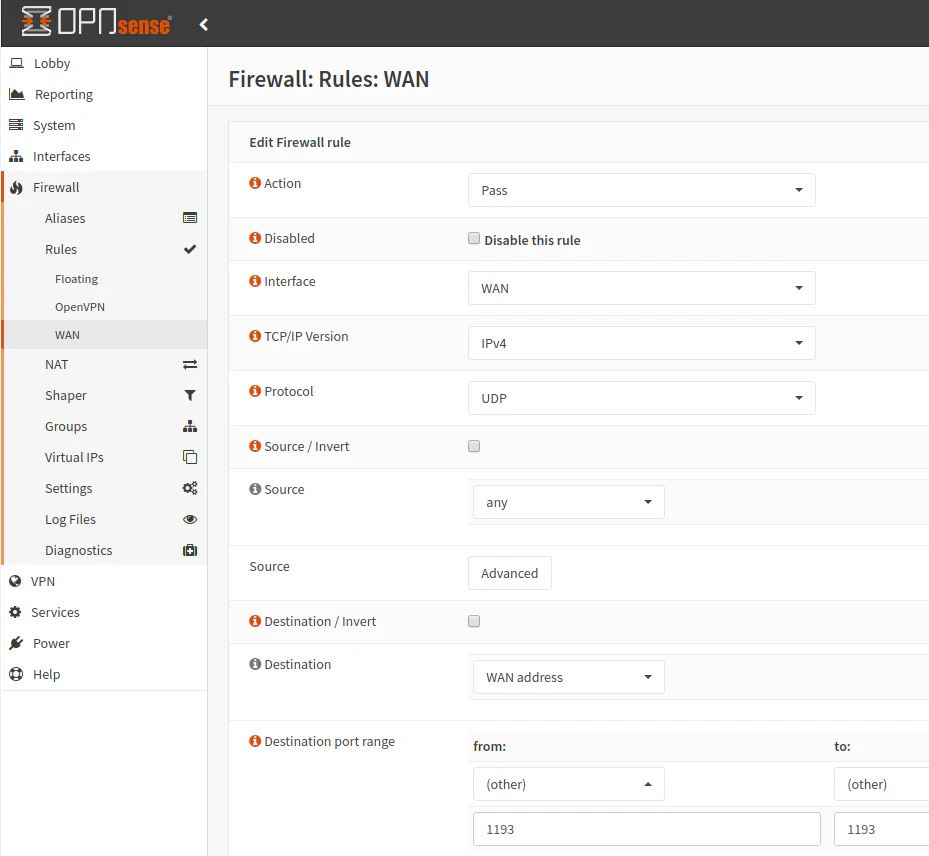
Go to the “Firewall > Rules > WAN” page to add a new rule. For source, leave as the default “any” and for destination choose “WAN address”. Use the port range of 1193 depending on the port number you are using for the OpenVPN service. You may enter a description for the rule if you like. Click “Save” and then apply the changes to the firewall rules. Your OpenVPN service should now be accessible remotely!
If you wish to access any of your local network devices once you are connected to your network via the VPN, you will need to add firewall rules on the OpenVPN group which is generated automatically after you set up a new OpenVPN service. For my home network, the rules for my VPN users are very similar to my wireless VLAN network that all of our phones and other devices are connected to. It is as though I am on that same VLAN network but from a remote location. I have access to my file/media server, my printer, and other network resources. Without those firewall rules, I would not have any access to devices on my network and the VPN network would be like an isolated VLAN. That may be fine for your use case if you just want to take advantage of all of the network security protections you have in place on your home network (such as DNS block lists, Suricata, etc.) while you are on the go. I imagine most users will desire to have access to their network devices while connected to the VPN service, which will require setting up the necessary firewall rules.
For full access to your LAN/VLAN from the VPN, you will simply add an “allow all” rule to the network(s) you wish to have access. Otherwise, you will only add rules to access specific devices and ports/protocols. Since your use case may vary, I will not provide specific examples since you go about doing it in the same manner as you would with any other network.
Export OpenVPN User Profile for iOS Devices
With the OpenVPN service set up, you will need to set up each device you wish to have access to the VPN. Since we created certificates for each user, you will need to export one certificate for each user. In my home network, I only access it remotely using iOS devices (iPhone/iPad) so I am only going to demonstrate how to export the certificate for importing into iOS devices. The OPNsense documentation shows an example for macOS, Windows, and Android devices (in addition to iOS devices) so you can refer to that documentation if you need to set up other devices. You may need to refer to other documentation if you are using different software/devices that are not mentioned since there are a wide variety of VPN client software.
To export the certificate for the user, go to the “VPN > OpenVPN > Client Export” page. You will notice that all of the user certificates should have a linked user account. If it does not, it is either a server certificate or you misconfigured the certificate for the user.
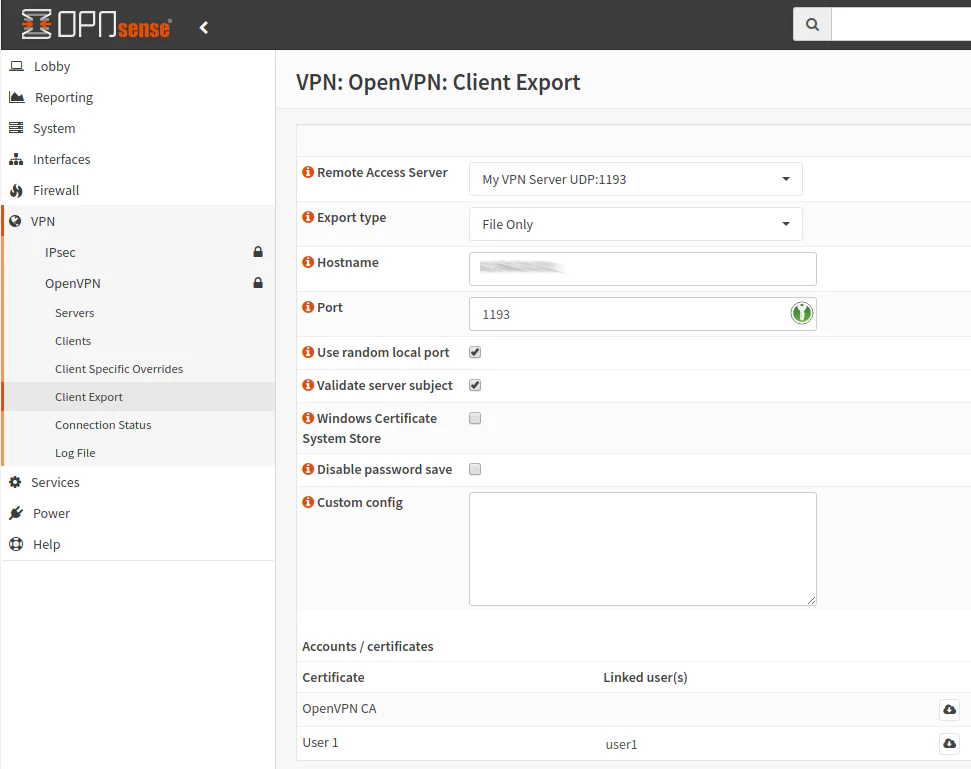
Choose your server if you have created more than one VPN server. For the “Export Type”, choose “File Only” if that is not already your default option. The “Hostname” should already be set to your external IP address. You can change it to be the domain name of your server instead. I just left it using the IP address since mine does not seem to change as long as I am not disconnected from my ISP for a long enough time for my old IP to expire. You will need to update your clients if the IP address changes so a domain name would be the safest option. The “Port” should already be set to the port you used when creating the VPN service. All you need to do now is click the download icon beside the user you wish to export. In our example, the user is called User1. It should download a .ovpn file.
The most straightforward way I found to copy the .ovpn file to your iPhone/iPad is just email it to yourself as an attachment. Then you can open the file in your email client to install it. There may be other ways to do this more efficiently, but this method works well enough.
Importing OpenVPN User Profile on iOS Devices
Before you can import the .ovpn file you just emailed yourself, you need to download the OpenVPN client on your iOS device. The app is called OpenVPN Connect. After installing the app, go to your email client and open the email with the .ovpn attachment.
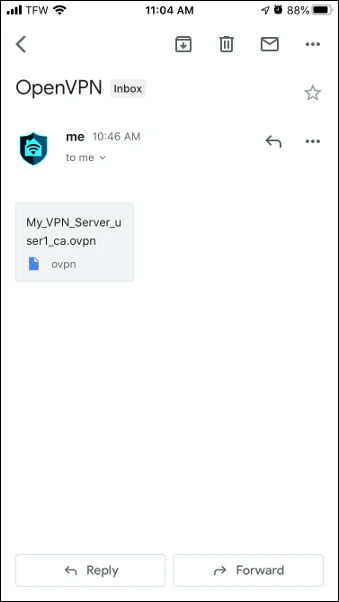
Click on the attachment to see the file attachment.

You will need to click the icon in the upper right corner of the screen which is often use as a “share” button.
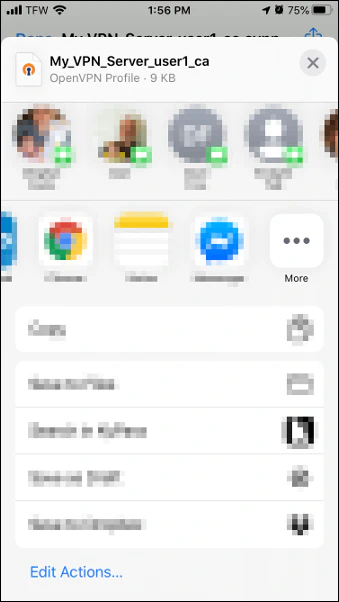
Now you will need to click the “More” button to bring up a list of apps in which to open the attachment into.
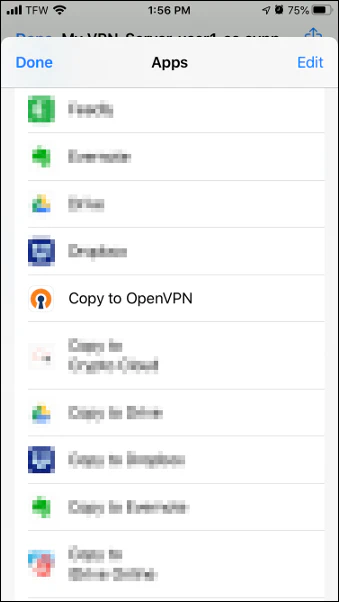
Scroll down to “Copy to OpenVPN” and click on it.
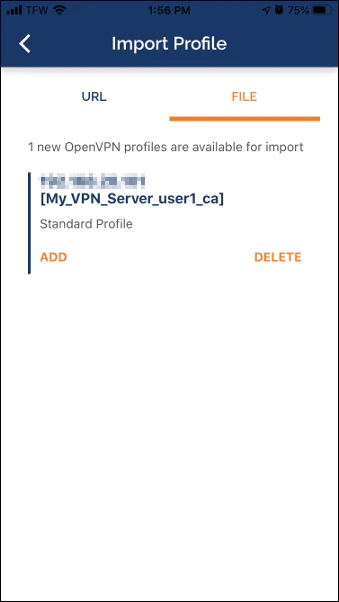
You are now finally in the OpenVPN app! I feel like an older version of iOS it was easier. I recall that I could simply click the attachment and it would ask which app to open it in. I do not know why it takes several steps just to copy the attachment into the app… Ohh well, you should not have to do this very often unless maybe you have a lot of devices to configure.
Click the “Add” button to begin the process of importing the VPN profile.
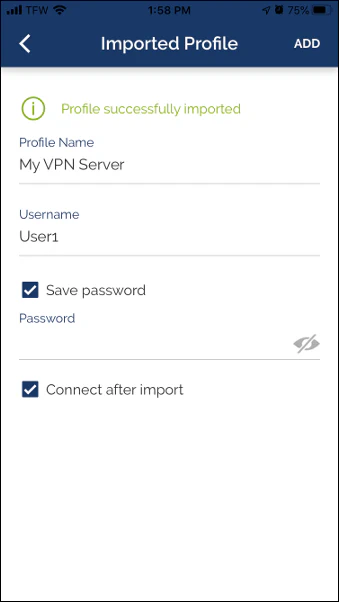
Enter a name for your profile. If you are connecting to more than one VPN server or connecting as more than one user, you may want to enter a more descriptive name for the profile. Enter your username and password. If you do not want to enter your password every time, you can choose to save the password. The nice thing about this option is that you can just click a button to connect to your VPN quickly, and you are still authenticated securely to your home network. If you choose to “Connect after import”, it will try to immediately connect to your VPN server after finishing the importing of the profile. You will know right away if you have everything set up properly. Click the “Add” button in the upper right hand corner to proceed.
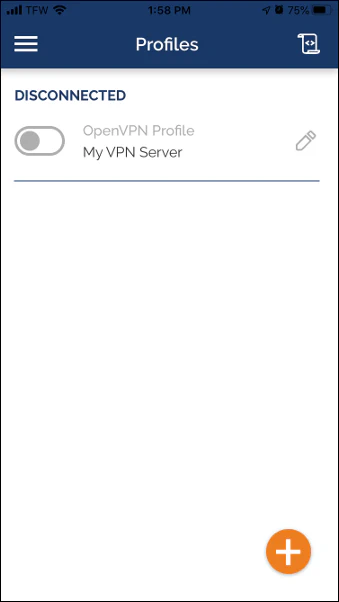
This is the screen you will see when you are disconnected from the VPN. Toggle the button to connect to the VPN. It should look like the following when you are connected successfully:

You should notice “VPN” displayed in the top bar of your phone when you are connected. That is a quick way to know if you are currently connected to a VPN. You may want to check out some of the settings in the OpenVPN app and configure them to your liking.
I hope you found this detailed how-to helpful. It definitely takes a lot longer for me to write the more in-depth articles, but I think the time investment is worth it. I think it is nice to have a complete example described in detail from start to finish (even though I did not attempt to show how to set up a VPN client on a wide variety of devices in an effort to keep the how-to shorter – otherwise it would take me even longer to finish it!).