Unbound DNS Override Aliases in OPNsense
Table of Contents
Unbound DNS provides the ability to create DNS overrides, which allows you to manually configure the IP addresses that are returned by DNS lookups for specific host/domain names. DNS overrides are useful for a split-horizon DNS configuration. You may want the clients inside your network to access the local IP address of a publicly hosted service rather than your external IP address especially if you are using a proxy such as Cloudflare since you will not be able to access your local services if your Internet is down. Also, throughput will be reduced and latency increased since you are being routed through Cloudflare and back to your network.
DNS overrides are also useful when you are running a reverse proxy within your network since you can point multiple hostnames to your reverse proxy IP address. There are two ways you can do this: create one DNS override for each hostname that needs to point to your reverse proxy IP address or create multiple DNS override aliases for a single DNS override entry. In the first instance, if you have several services you are hosting via your reverse proxy, you will have to create quite a few DNS override entries. To make matters worse, you will need to create two entries per host if you are using both IPv4 and IPv6. Changing the host for your reverse proxy requires editing every DNS override entry. However, if you make use of DNS override aliases, you only need to edit one override for the reverse proxy (or two if you are also using IPv6). This is a much more elegant solution for the described scenario.
The web interface for OPNsense for DNS override aliases is very confusing if you are not familiar with how it functions. In fact, I tried to use it a number of times and was frustrated that it did not seem to work. Then I read a tip on the OPNsense forums that caused me to look into it. After trying it out, I figured out what I had done wrong in the past, and I actually had to remove some previous attempts where I created random aliases that I did not necessarily want.
Create the DNS Override Entry
First, you will need to create the DNS override entry before you can assign any DNS override aliases. As I mentioned earlier, there are two main reasons to use DNS overrides: to set a hostname to a local IP address to override your external IP address you have set for a particular hostname/domain name and to set up DNS override aliases for a local reverse proxy where you want multiple hostnames to resolve to the same IP address. I already covered the first scenario in a previous split DNS guide, but in this guide I am going to cover the second scenario. I will be using a reverse proxy example because that is where I find DNS override aliases to be the most useful.
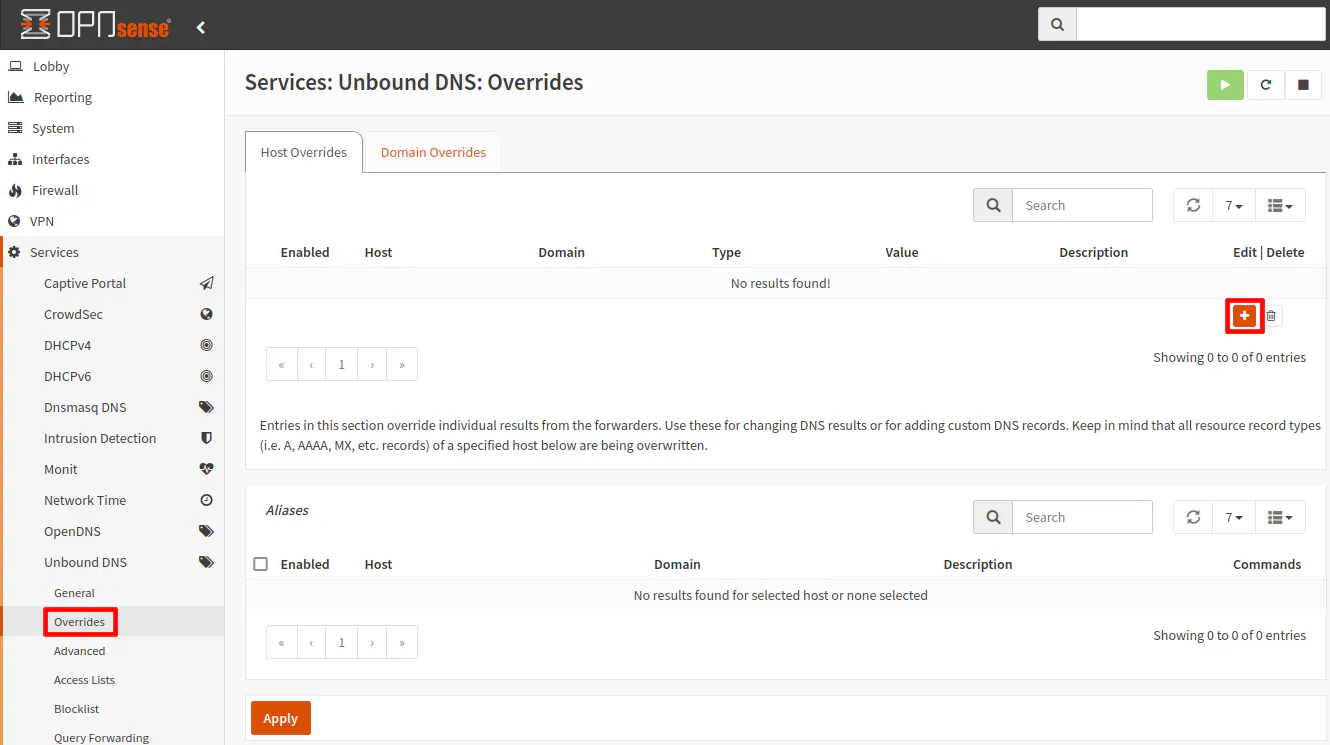
Go to the “Services > Unbound DNS > Overrides” page. Then click on the “+” button in the top section of the “Host Overrides” tab.
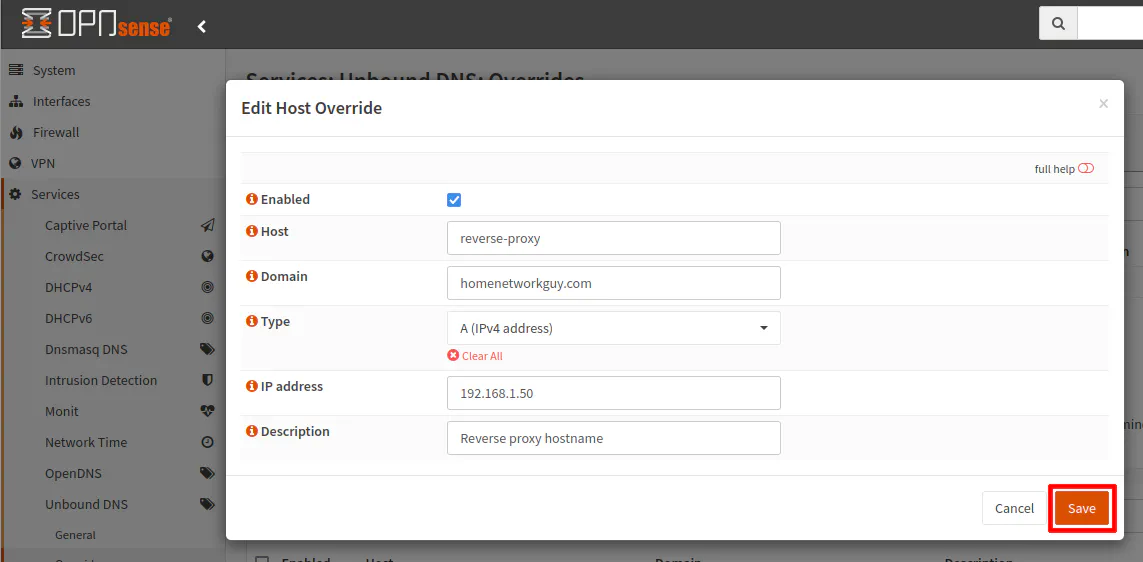
Click the “Enabled” checkbox. Add your “Host” name. In this example, I am going to be using reverse-proxy as the hostname to demonstrate what you may want to do if you are using a reverse proxy. Then use the domain name of your choice. I just use the same domain name that I use for my entire network, but you can use any domain that you like (either one that you own or one that does not exist so you do not cause any issues resolving to a real domain name).
For the “Type”, choose “A” or “AAAA” for a IPv4 or IPv6 address. Then enter the “IP address” of the reverse proxy host. You may enter a “Description” if you like. Click “Save” when you are finished.
Add an Alias to the DNS Override Entry
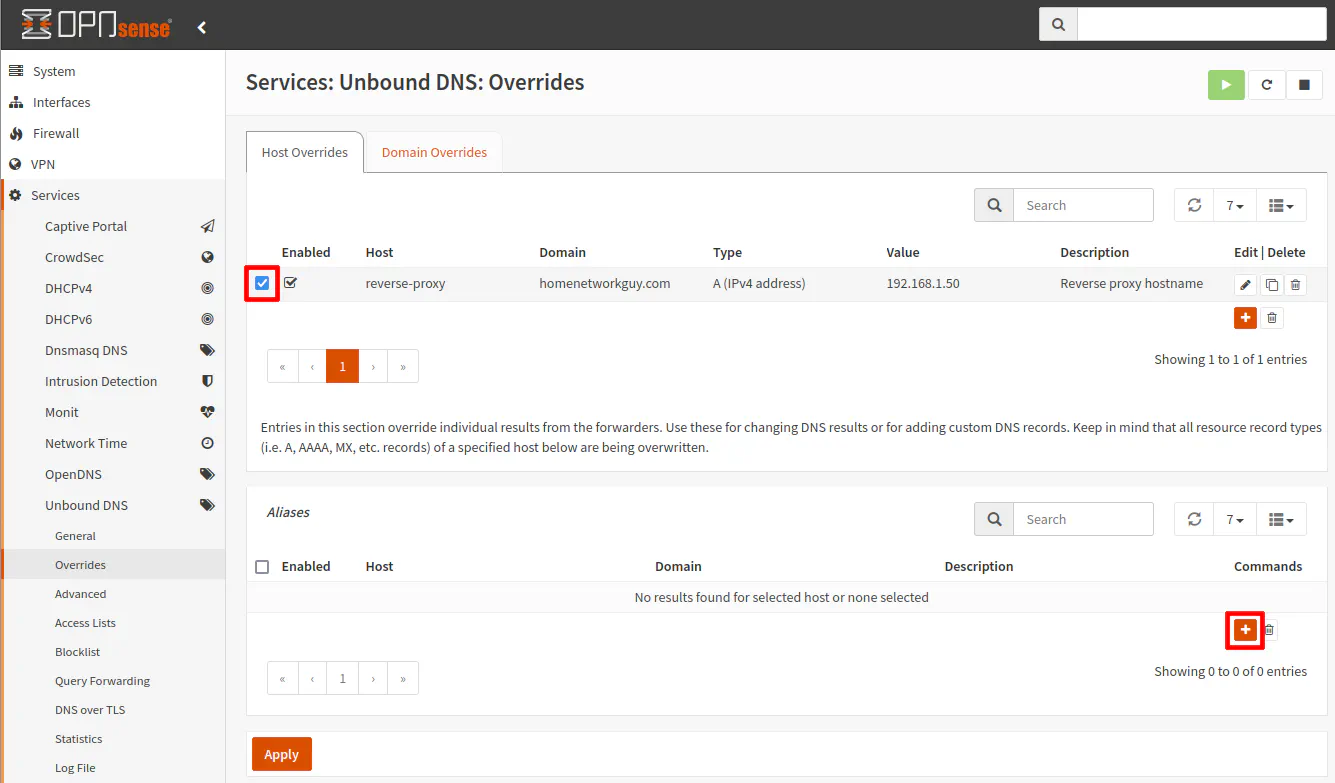
You will see the host override listed in the top section of the “Host Overrides” tab. If the leftmost checkbox of the host override is unchecked, you should check it in order to select the host override in which you want to add the alias.
In the bottom section called “Aliases”, click on the “+” button to add a new alias to the selected DNS override entry.
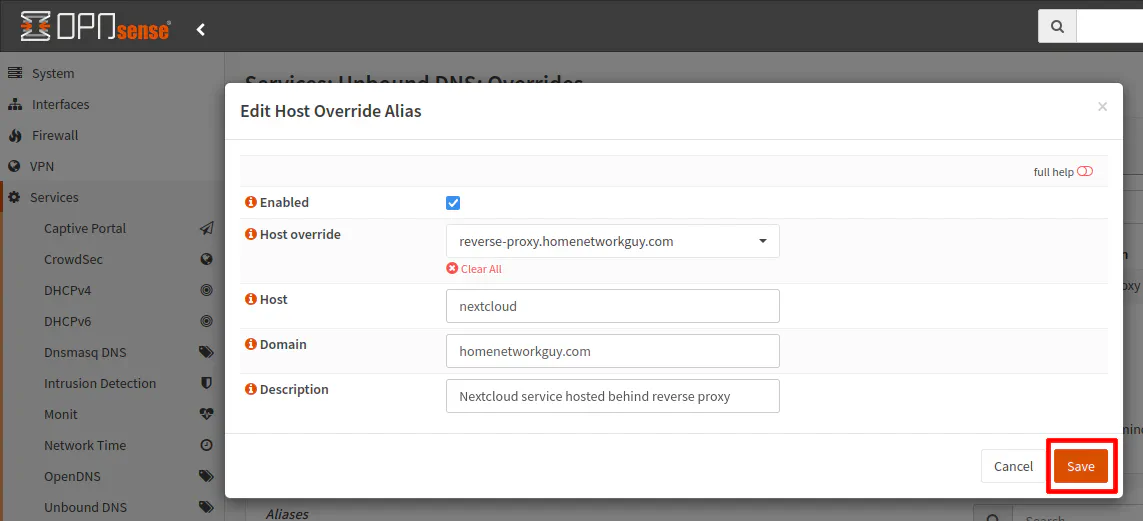
Click the “Enabled” checkbox. The “Host override” dropdown should already be prepopulated with the DNS override that you have selected before clicking the “+” button.
Next enter the “Host” name of the service or ap that is behind your reverse proxy. In this example, I am using nextcloud as the hostname and homenetworkguy.com as the domain name so with this alias, you should be able to access https://nextcloud.homenetworkguy.com which will then use the reverse proxy IP address. Your reverse proxy will then use the hostname to redirect to the proper service/app you have configured.
Add an optional “Description” and click “Save”.
Apply the Changes
Once everything has been saved, you still need to click “Apply” at the bottom of the page in order for the changes to take effect.
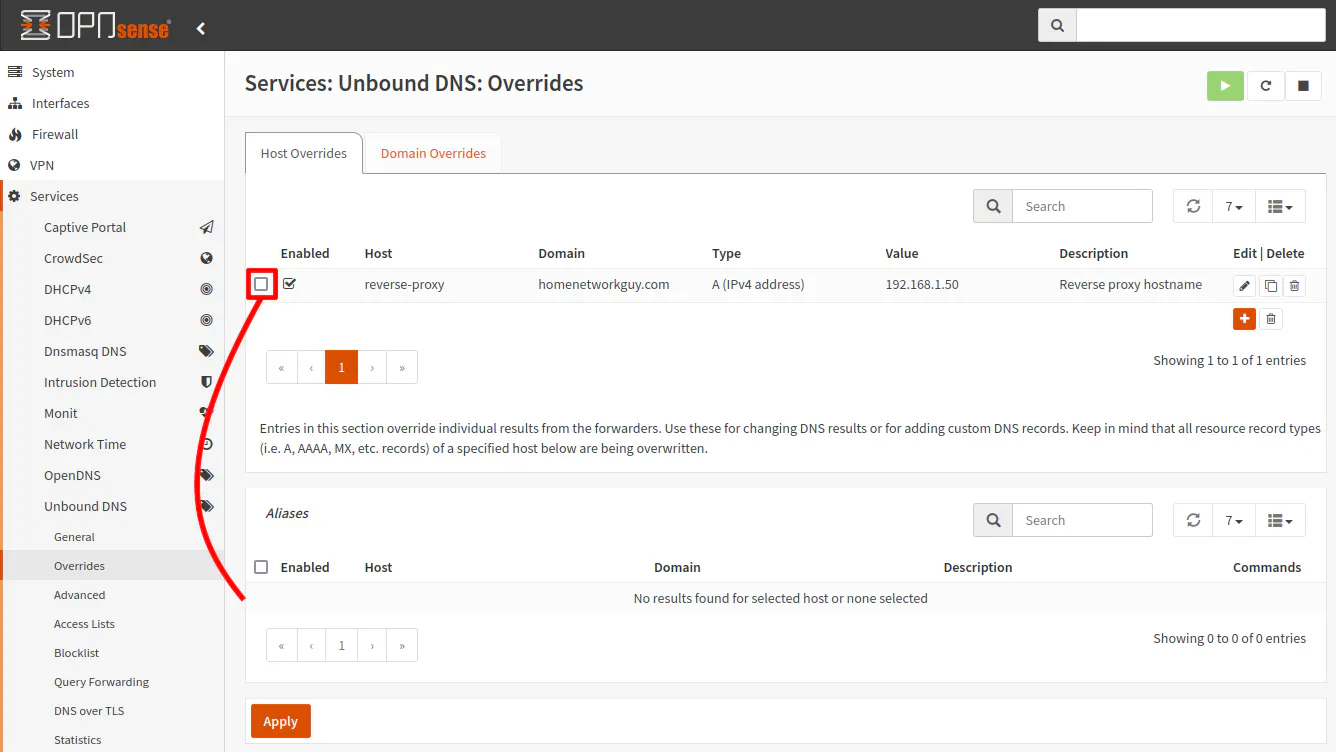
I wanted to point out the confusing aspect of the web interface for new users. If you have the leftmost checkbox selected as shown in the screenshot below, you will see a list of all of the aliases associated with that particular DNS override entry.
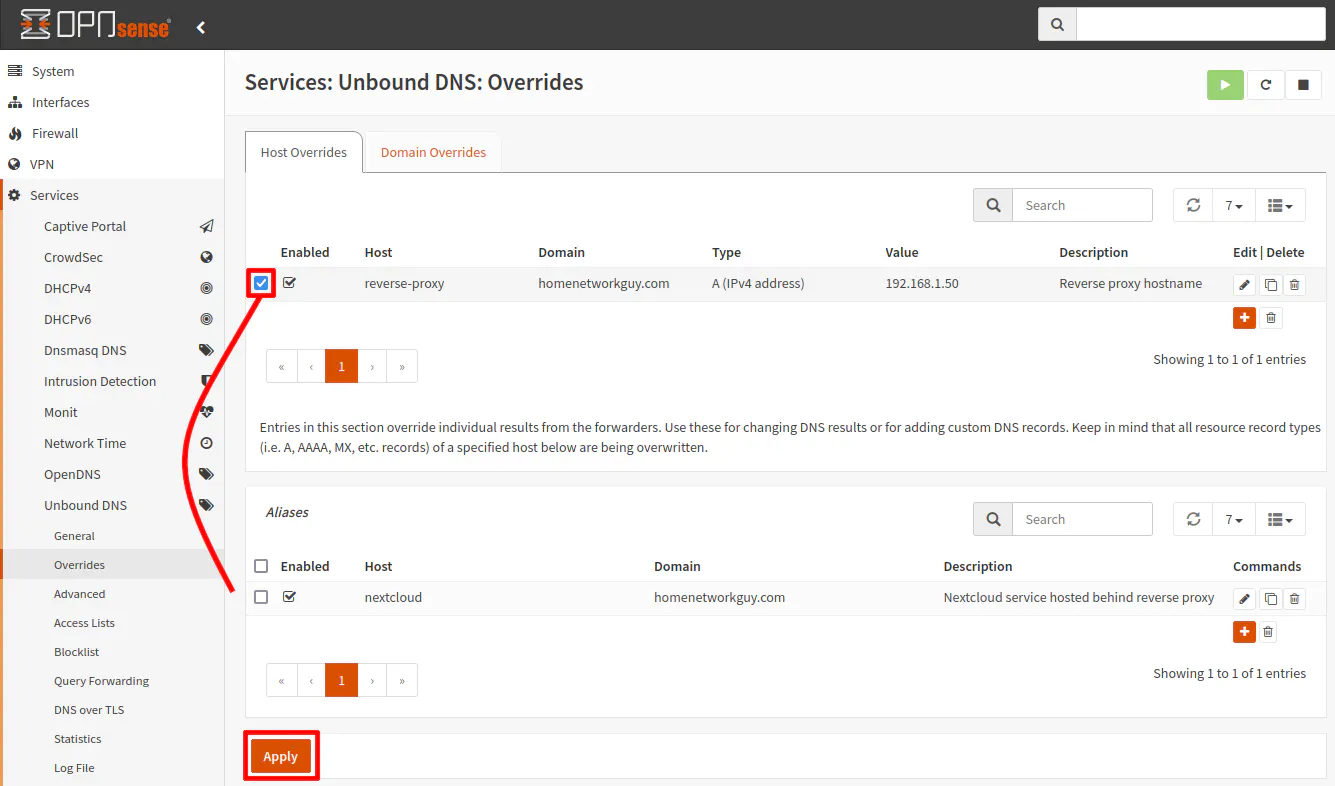
However, if you uncheck that box, the alias(es) are not displayed so it may appear that you do not have any aliases created. It is easy to miss the functionality of the leftmost checkbox because often times, that checkbox is only used when you want to enable/disable/delete more than one row of data, but in the case of DNS overrides, it is used to show the aliases at the bottom of the page for the currently selected alias. Another difference is that you can only select one DNS override entry at one time. There is no way to see the entire list of aliases on this page.
The functionality seems simple once you understand it, but since it differs from the other web interface pages, it is not very intuitive.
