Deploy Nginx Proxy Manager in a DMZ with OPNsense

Table of Contents
The topic of reverse proxies can be difficult or confusing to understand when you are new to the concept. Understanding when you might want to use a reverse proxy may be more difficult than understanding how it functions as you build out a more advanced home network. I had considered using a reverse proxy in my network for a while but did not take the time to explore the idea until now. Often I wrestle with an idea for a while to determine if it is worthwhile before moving full speed ahead with implementation. I like to be deliberate and intentional when introducing changes to my network.
As I deploy more development tools on my Proxmox server, I am discovering that a reverse proxy would be convenient. One of the reasons is the need to generate Let’s Encrypt certificates for each service that supports SSL certificates. Some of the services have built-in support for Let’s Encrypt. For the generation and auto-renewal of certificates to function properly, you need to allow external network access to each service. Since I virtualize each of my services in their own container or VM, they have separate IP addresses/hostnames.
Do you see the issue? You cannot port forward the same external port to multiple internal servers. One way around that issue is to map different external ports to redirect to the appropriate server. If you have several services, you would have to port forward several different ports. Also, that makes your URLs “ugly” by having port numbers. That is not necessarily a terrible thing unless perhaps you are OCD, but it is nice to not have to worry about which port belongs to which service (yes, you can bookmark all the pages if you want to…). There is a better way: a reverse proxy.
A reverse proxy provides a single entry point that can forward requests to all of your internal services. You only need to port forward the external port 80 and port 443 and the proxy can handle the rest. There are several benefits to using a reverse proxy besides a single entry point to your services and centralized management of SSL certificates. Some proxies can provide load balancing and caching to help improve performance by distributing the load across servers or by serving cached data. If the server is underpowered or is under a heavy load, the SSL encryption can occur on the reverse proxy at the edge of your network rather than on the backend server hosting the service(s) via HTTP.
One very important benefit is security. The network traffic does not directly communicate with your internal servers when using a reverse proxy. If someone attempts to hack any of your services, it will be against the reverse proxy which is running in an isolated environment. It is still possible for your internal server to be hacked via the proxy system, of course, so do not think it is a perfect solution to security (since that does not truly exist).
In this guide, I will walkthrough setting up Nginx Proxy Manager and also the network environment in which it will be operating. I think that it is important to consider the operating environment to provide more context on how a reverse proxy can be used. You do not have to architect your network the same way as this guide, but perhaps it will help get you started in the right direction.
Considerations about the Operating Environment
Before continuing, I will describe the environment I will be using as an example. To gain the full security benefit of a reverse proxy when you are hosting services that are accessible to the world, the reverse proxy should be deployed on a dedicated system, container, or virtual machine located in a DMZ network. All of your services should be placed elsewhere in your internal network so they are not directly accessible from the outside world. To further increase protection of your network, the services can be put into their own network to isolate them from other parts of your network. In some ways it is sort of like having an external facing DMZ and an internal facing DMZ. If your reverse proxy is hacked, the breach could be contained to that one system/container/VM in the DMZ. If the attackers break through the proxy and end up hacking any of your internal servers, they are still isolated from other parts of your network. I am going to assume the following networks exist: a DMZ network for the reverse proxy, an APP network to host all of your apps and services, and a LAN network where you will be administrating the proxy and accessing the services.
All traffic including your local network will access the services through the reverse proxy. Directing local traffic to the proxy allows you to take advantage of the benefits provided by the reverse proxy and allow you to continue using the services even if your Internet is down (if you are routing external users through a Cloudflare proxy).
Below is the logical diagram of the scenario I am describing. Note that there are not 3 physical firewalls being used – they are separate LAN/VLANs which have firewall rules restricting access between the networks. As I have mentioned previously, you can see that both internal and external clients will go through the reverse proxy to access the apps/services running on your app server(s). None of the clients have direct access to the services in the APP network, which helps to minimize the attack surface from inside your network.

Some users may have a Docker server already deployed and decide to add Nginx Proxy Manager or another reverse proxy such as Traefik on the same server so that everything is managed together. That may be a reasonable option especially if all your services are running in Docker since the applications are already isolated in containers. It may still be a less than ideal situation in regards to security especially if someone has not configured Docker securely or there is a Docker vulnerability. Docker runs as a root process by default. If a compromise occurs on the host, accessing your other apps would be trivial. I discovered that it is possible to run Docker rootless, but it has some limitations which may or may impact your apps/services.
The method I am describing is useful when you have several services which are not all running in Docker and/or they are located on different parts of your network on different physical/virtual systems. Since I am using LXC/VMs on Proxmox, I do not really need to use Docker unless it is the only officially supported way to install an application (which is the case for Nginx Proxy Manager) because I already have system container and virtual machine isolation. Therefore, installing the reverse proxy on the same Docker server as my other apps is not a viable option for me.
Prepare the Network Infrastructure
Before setting up the reverse proxy, it is important to prepare the network infrastructure. Doing these steps first will lay the foundation which can be built upon. Also, it will divide this guide into 2 main parts – the network configuration and the reverse proxy configuration. If you are not concerned with the network configuration you may skip to the reverse proxy configuration sections. I thought it would be beneficial to provide network infrastructure details to demonstrate a fully functional environment which you may wish to emulate.
Create the DMZ and APP Networks
By default, OPNsense creates a LAN network so for this example, you will need to create a DMZ and an APP network. You could create the networks as VLANs using the spare OPT interface(s) on your firewall appliance or use the LAN interface as the parent interface (Note: I have read that it may be better to put the VLANs on the OPT interfaces since you have to be careful with the firewall rules in regards to tagged and untagged network traffic on the same interface). In an effort to keep this guide at a reasonable length, I am not going to describe the full details for creating VLANs in OPNsense or on your network switch(es). I have written several guides about VLANs if you need more assistance.
Create Firewall Rule to Allow Access to Nginx Proxy Manager from LAN
Access to the Nginx Proxy Manager needs to be allowed from the LAN (and any other network which needs access to the apps/services). Go to the “Firewall > Rules > [LAN]” page, and click on the “+” button to add a new rule.
In rule below substitute the “LAN” network for the appropriate network which you are using. You will need to decide which IP address you plan to use for the reverse proxy and enter it into in the “Destination” field. It is ok to set up the rules before you set up the reverse proxy. For the “Destination Port”, I am using an alias called NPMPorts which includes ports 80, 81, and 443. Port 81 is used as the management port for the Nginx Proxy Manager.
| Option | Value |
|---|---|
| Action | Pass |
| Interface | LAN |
| TCP/IP Version | IPv4+IPv6 (IPv6 is optional) |
| Protocol | TCP |
| Source | LAN net |
| Source Port | any |
| Destination | 192.168.2.50 (or use an alias which may include the IPv6 address) |
| Destination Port | NPMPorts (an alias for port 80, 81, and 443) |
| Description | Allow access to Nginx Proxy Manager administration |
If the LAN is used as your management network, you will need to include port 81, but if you are allowing access from other networks such as an IOT network, you should omit port 81 to block access to the management interface. Also, you may omit port 80 if you have everything hosted via HTTPS unless you need to have port 80 redirected to port 443 (for HTTP to HTTPS redirection).
Create Firewall Rule to Allow Access to App Server from Nginx Proxy Manager
The Nginx Proxy Manager needs to have access to the app server(s) in the APP network so a rule needs to be created to allow that access. I am going to assume that every app/service that is placed into the APP network is allowed to be access by the reverse proxy. It is simple to create a rule that uses “APP net” as the destination rather than create an alias with every IP address of every service in the APP network. Using “APP net” alleviates the need to keep an alias up to date every time you spin up a new service. If all services in the APP network needs to be proxied, then it no less secure than specifying each individual IP address. If you wish to nitpick, there is a small chance that you will forget about using “APP net” and deploy a service in the APP network that you do not want proxied. The risk is minimal since no traffic will be redirected to that service unless it is first set up in the proxy manager.
On the “Firewall > Rules > [DMZ]” page and click on the “+” button to add a new rule.
| Option | Value |
|---|---|
| Action | Pass |
| Interface | DMZ |
| TCP/IP Version | IPv4+IPv6 (IPv6 is optional) |
| Protocol | TCP |
| Source | 192.168.2.50 (or use an alias which may include the IPv6 address) |
| Source Port | any |
| Destination | APP net |
| Destination Port | WebServerPorts (an alias for port 80 and 443) |
| Description | Allow access to app servers |
Create NAT Port Forward Rule to Allow External Network Access
A reverse proxy can be useful even if it is only used internally for all of your self-hosted services, but you will need to allow external WAN access if you wish for your services to be publicly accessible. On the “Firewall > NAT > Port Forward” page, add the following rule.
| Option | Value |
|---|---|
| Interface | WAN |
| TCP/IP Version | IPv4+IPv6 (IPv6 is optional) |
| Protocol | TCP |
| Source | any |
| Source Port | any |
| Destination | WAN address |
| Destination Port | WebServerPorts (an alias for port 80 and 443) |
| Redirect target IP | 192.168.2.50 (or use an alias which may include the IPv6 address) |
| Redirect target port | WebServerPorts (an alias for port 80 and 443) |
| Description | Allow external access to Nginx Proxy Manager |
| Filter rule association | Add associated filter rule (or Pass) |
If you are not going to create Let’s Encrypt certificates using a DNS challenge, you will need to open port 80 so Let’s Encrypt can create the certificate. Otherwise, you only need to open port 443 to the public. In the example above, I am using an alias with both port 80 and 443 since creating certificates via HTTP is the easiest method. You can still host all of your services on port 443/HTTPS and port 80 will only be used for generating and renewing certificates as well as for redirection of HTTP to HTTPS. If your ISP blocks port 80, then you must use a DNS challenge to generate certificates.
Important: If you expose services publicly, security needs to be considered. Some advice you may find is put everything behind a VPN. While that is sound advice, it is not quite as convenient especially if you have others using your service such as family members/relatives/friends (you have to explain to them how to set up a VPN or set it up for them and expect them to actually use it). VPNs can have their own vulnerabilities even though it is often proclaimed as the ultimate security measure. You should also consider using firewall rules and other means to secure your services even if you are using a VPN. Keep in mind that by exposing the reverse proxy rather than the service itself, security is already better than directly exposing the service to the Internet. You could further improve security by using a Cloudflare proxy and only allowing Cloudflare to access your hosted services so external users only see the Cloudflare proxy addresses.
Use Split DNS to Resolve Hostnames to the Reverse Proxy
After configuring your proxy, you will most likely want to use the Unbound DNS override functionality in OPNsense to utilize the split DNS capability so you can redirect clients on your network to the local IP address of the Nginx Proxy Manager rather than your external WAN address. Since I am using a hostname that will be used for external access, the WAN IP address will be used as the IP for that hostname. I found that using the external IP address from within the network does not work properly (perhaps it could be made to work via NAT reflection/outbound NAT rule), but that is ok since a DNS override will resolve the issue.
Because I plan to put my services behind Cloudflare, I would need to use split DNS anyway so that I do not lose access to my local services if my Internet is down. If you set up a Cloudflare proxy (see below), the Cloudflare IPs will be used which means your local traffic will be routed through Cloudflare’s servers and back to your local network.
If you are only using the reverse proxy for local services that you are not exposing to the world and you are using a hostname which is not a real host on your network, you will need to use a DNS override so the hostname can be resolved. You may want to use a hostname that is different than any actual hosts on your network as described in the Determine Hostnames for the Proxy Host and Services section.
Go to the “Services > Unbound DNS > Overrides” page and click on the “+” button to create a new DNS override in the “Host Overrides” section. Enter the “Host” and the “Domain” names in the appropriate fields. Then enter the IP address you are planning to use for the reverse proxy. In my example, I am using 192.168.2.50 for the reverse proxy. You should do this for every hostname for all services you are proxying through your reverse proxy.

Prepare Your System for Nginx Proxy Manager
If you plan to have a dedicated system, container, or virtual machine, you should install the Operating System, create the container from a template, or create the virtual machine with the desired OS installed. I am personally using a LXC container in Proxmox so my instructions are Linux focused, but the general process to install Nginx Proxy Manager is essentially the same for other platforms. You may need to consult the Docker or Docker Compose documentation for more specific instructions on how to install them on your platform of choice.
Set up a Static DHCP Mapping in OPNsense
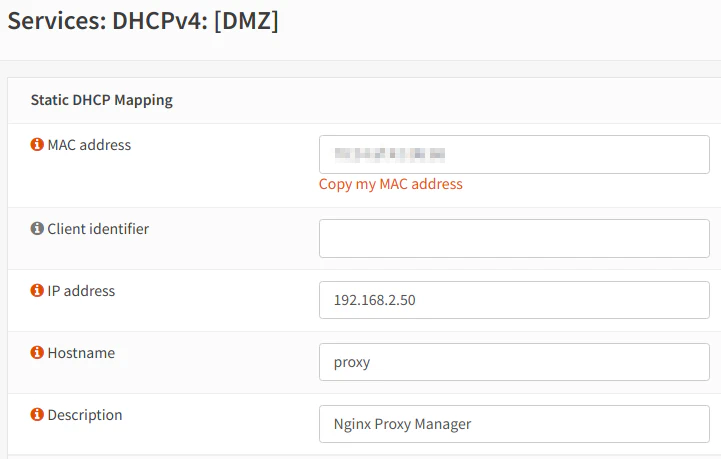
Once your system has been installed (OS, container, virtual machine), you can create a static DHCP mapping in OPNsense to give the system a fixed IP address which will be used for DNS overrides, firewall rules, etc. You may add the static DHCP mapping by navigating to the “Services > DHCPv4 > Leases” page or by going to the “Services > DHCPv4 > [DMZ]” page. On the leases page, you can scroll down the list to find the system and click the “+” button to add the lease. The nice thing about adding a static mapping from the “Leases” page is the MAC address is already prefilled. Otherwise, if you go to the “[DMZ]” page, you will have to enter it manually (or copy/paste the value from console output).
Enter the “IP address” for the proxy manager which is 192.168.2.50 in my example. You may choose the “Hostname” you prefer to use to access the proxy manager service. An optional “Description” may be entered as well.
The lease will not take effect immediately, but if you disconnect/reconnect to the network or reboot the system or container, you will obtain a new lease. If you are using Linux, you can use the following commands to refresh the lease to obtain the static IP address (make sure you are not connecting remotely to the system or you will lose your connection!):
sudo dhclient -r
sudo dhclient
Install Docker
To install Docker on a Linux distro such as Ubuntu, use the following commands:
sudo apt-get update
sudo apt-get install apt-transport-https ca-certificates curl gnupg lsb-release
curl -fsSL https://download.docker.com/linux/ubuntu/gpg | sudo gpg --dearmor -o /usr/share/keyrings/docker-archive-keyring.gpg
echo "deb [arch=$(dpkg --print-architecture) signed-by=/usr/share/keyrings/docker-archive-keyring.gpg] https://download.docker.com/linux/ubuntu $(lsb_release -cs) stable" | sudo tee /etc/apt/sources.list.d/docker.list > /dev/null
sudo apt-get update
sudo apt-get install docker-ce docker-ce-cli containerd.io
Note: If you are installing Docker into a LXC container on Proxmox as I am doing, you will need to enable the container options called
nestingandkeyctl.
If you wish to enable IPv6 in Docker, you will need to edit the /etc/docker/daemon.json file to add the following contents (update the IPv6 prefix for the “fixed-cidr-v6” to the same /64 prefix you use for your DMZ network):
{
  "ipv6": true,
  "fixed-cidr-v6": "2001:db8:1::/64"
}
Restart Docker with the following command:
sudo systemctl reload docker
You can test if IPv6 is functioning properly if you access the administration interface via the IPv6 address in the browser once you deploy the container (yes, you need to include the brackets “[ ]” around the IPv6 address): http://[your_ipv6_address]:81
Install Docker Compose
Use the following commands to install Docker Compose:
sudo curl -L "https://github.com/docker/compose/releases/download/1.29.2/docker-compose-$(uname -s)-$(uname -m)" -o /usr/local/bin/docker-compose
sudo chmod +x /usr/local/bin/docker-compose
Verify installation:
docker-compose --version
It will show the version number:
docker-compose version 1.29.2, build 5becea4c
Create Docker Compose File
Create the docker-compose.yml file with the following contents. You will need to update the passwords in the file to your own unique passwords. Please note that your_password needs to be the same password in both places, but the your_root_password can be and should be a different password:
version: '3'
services:
  app:
    image: 'jc21/nginx-proxy-manager:latest'
    restart: unless-stopped
    ports:
      - '80:80'
      - '81:81'
      - '443:443'
    environment:
      DB_MYSQL_HOST: 'db'
      DB_MYSQL_PORT: 3306
      DB_MYSQL_USER: 'npm'
      DB_MYSQL_PASSWORD: 'your_password'
      DB_MYSQL_NAME: 'npm'
    volumes:
      - ./data:/data
      - ./letsencrypt:/etc/letsencrypt
  db:
    image: 'jc21/mariadb-aria:latest'
    restart: unless-stopped
    environment:
      MYSQL_ROOT_PASSWORD: 'your_root_password'
      MYSQL_DATABASE: 'npm'
      MYSQL_USER: 'npm'
      MYSQL_PASSWORD: 'your_password'
    volumes:
      - ./data/mysql:/var/lib/mysql
Deploy the Docker Container
Now you can start up the Docker container using the following Docker Compose command:
docker-compose up -d
You can check on the status of the Docker container by entering:
docker ps
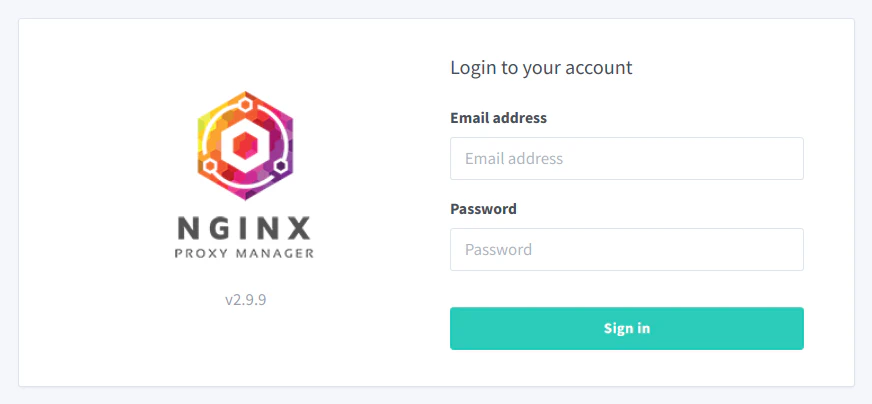
Log into the Nginx Proxy Manager Administration
The default credentials are:
username: [email protected]
password: changeme
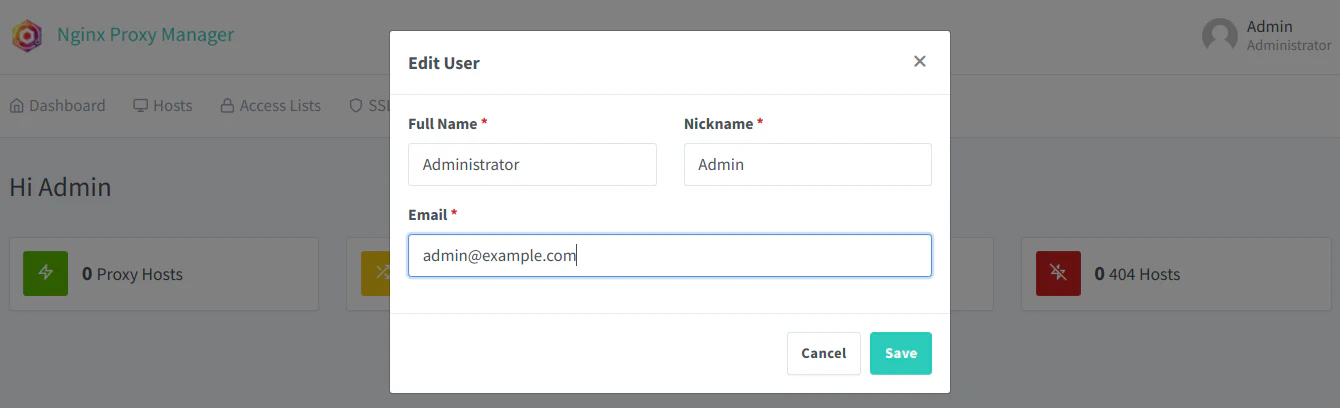
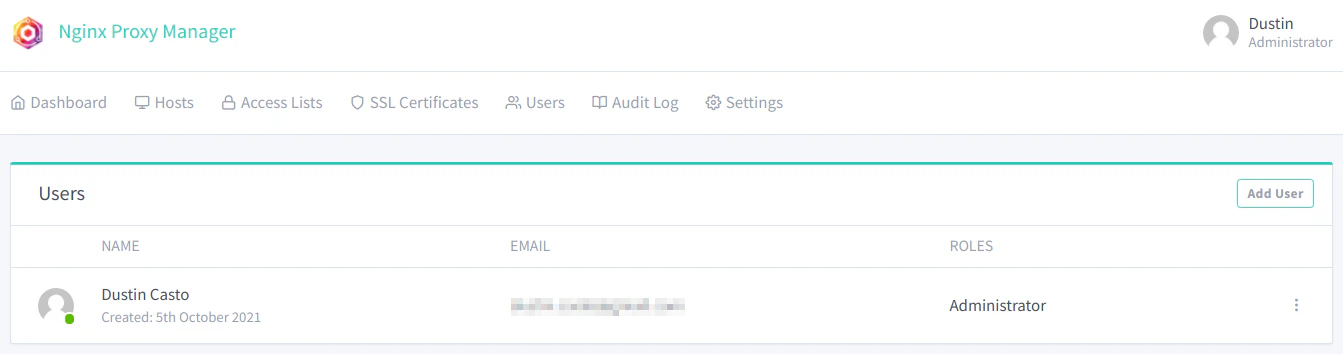
You will be prompted to change your user information.
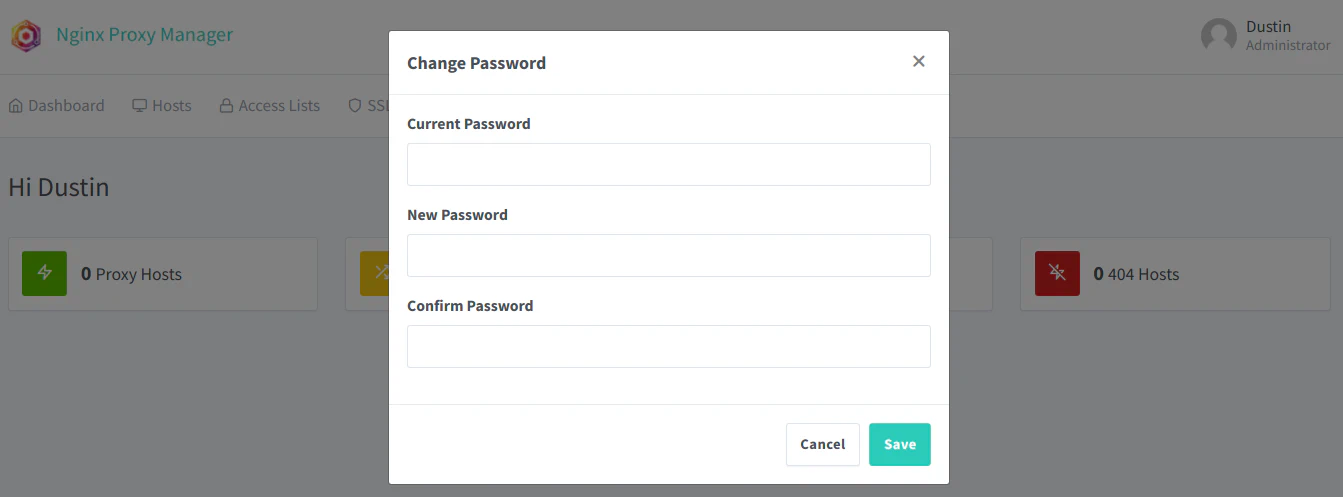
Then you will prompted to change your password.
After changing your administrator credentials, the “Users” page will be displayed.
The proxy is now ready to be configured.
Determine Hostnames for the Proxy Host and Services
A proxy host is the entry point to each service. The network traffic is redirected to the host you have configured for each proxy host. When adding proxy hosts, you will need to choose a hostname for the proxy host. The proxy host can use the same hostname used by the server/container/virtual machine. However, it may be better to use a hostname for the proxy host that you are not using for the service itself. You will be able to refer to your internal servers directly by the hostname when performing operations such as ping which is helpful for troubleshooting network connectivity, for instance.
One possible naming convention could be to use something such as git.homenetworkguy.com as the proxy hostname and gitlab.homenetworkguy.com for your internal server (you can simply use the gitlab hostname within your network and do not have to use the fully qualified domain name). What I like about this naming convention is the fact the proxy hostname is more generic and the internal server is more specific. If you decide to use Gitea instead of GitLab, you can still use the same proxy hostname but simply update the proxy host to redirect to the gitea.homenetworkguy.com hostname. You could also ping either hostname separately if you wanted to test connectivity to the proxy or to the server itself (if you have ping allowed in your network).
Set up the Reverse Proxy Hosts
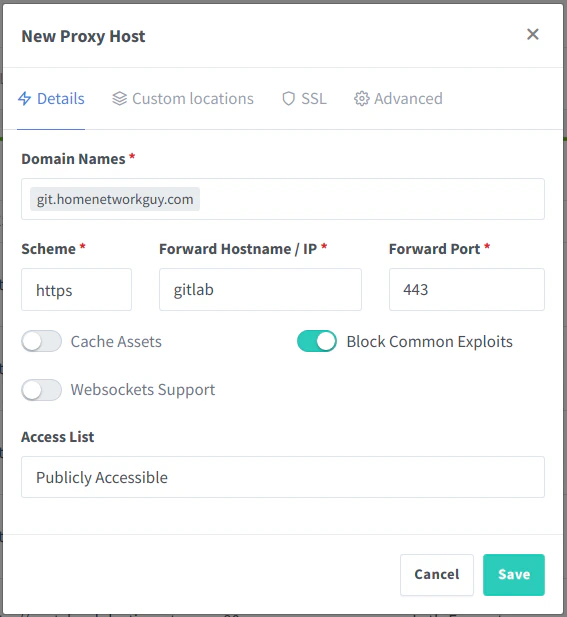
To set up a proxy host, click on the “Hosts > Proxy Hosts” menu to open the “Proxy Hosts” page. Click on the “Add Proxy Host” button.
For the “Domain Names”, enter the hostname(s) which will be the entry point to access your service. As discussed in the previous section, the hostname does not have to be the same as an existing host on your network. If you plan to access the service from outside your home network, you will need to create the hostname/subdomain with your DNS registrar such as Cloudflare.
The “Scheme”, “Forward Hostname / IP”, and “Forward Port” are used to enter the information for the hosted service. You can use either the hostname or IP address. The service you are hosting can be either HTTP or HTTPS. It is important to note that it is possible to have HTTPS enabled for the entry point on the reverse proxy but HTTP on the backend service. This allows you to host a service using HTTPS that may not necessarily support HTTPS out of the box. You may decide if you wish to enable HTTPS on the backend or not so the data arrives at the service encrypted. Since the SSL certificates are managed on the reverse proxy, the backend service most likely would be using a self-signed certificate. Some may prefer to have HTTPS encrypted all the way to the service, but it may be debatable how useful a self-signed certificate is on the backend if the certificates are not being authenticated. You can enable the “Block Common Exploits” option because why not? Not sure why you need to leave that disabled unless perhaps it can cause issues with certain services you are running behind the proxy.
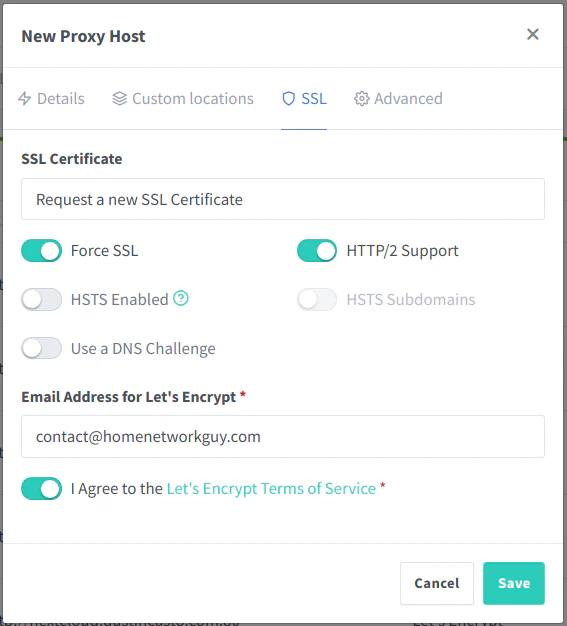
You may request a new certificate at the same time you are creating a proxy host which is convenient. Enable “Force SSL” to always use HTTPS for the service and enable “HTTP/2 Support” to improve performance (you may not notice much difference on a home network with low amounts of traffic). If you want extra security enforcement by the web browser, you can enable the “HSTS Enabled” option. Click the “Save” button to add the proxy host.
You should be careful with the HSTS option. I somehow managed to get my root domain using HSTS and all of my subdomains displayed an error blocking access to my services in the browser. I had to manually clear out the HSTS settings out of my browser for my domain name in order to restore access.
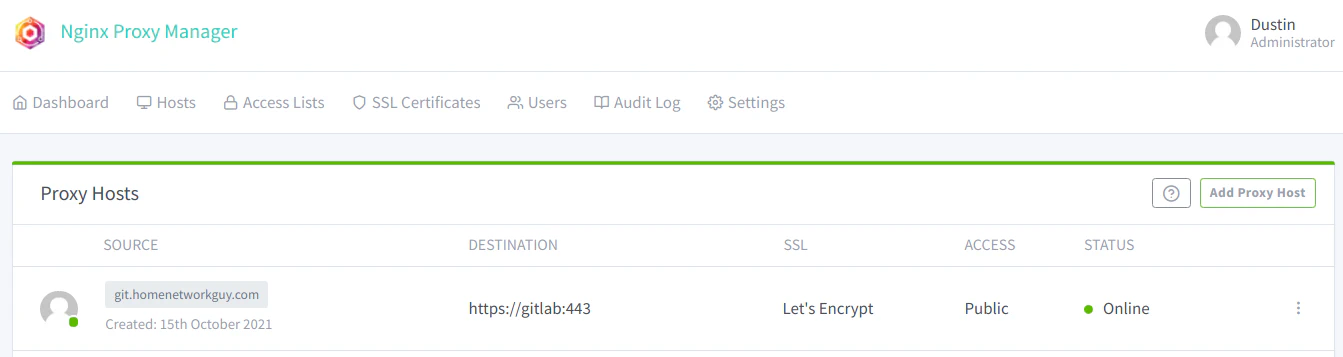
Once the proxy host is added, you will see it listed on the “Proxy Hosts” page.
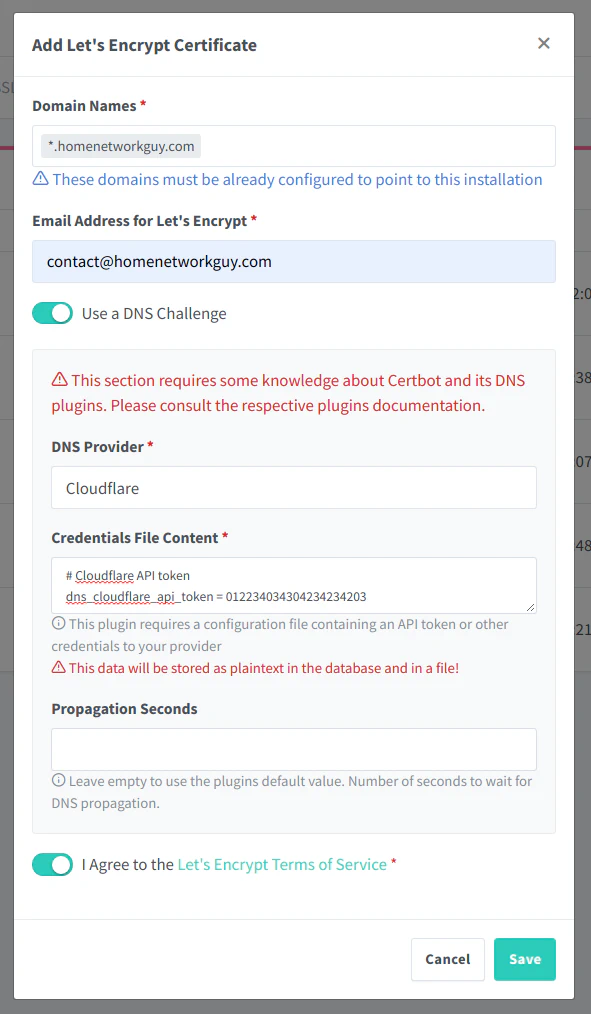
Optional: Setting up a Wildcard Certificate
If you have several subdomains you are using for your apps/services, you may want to set up a wildcard certificate. This will allow you to use the same certificate for all of your hosted services. To set up a wildcard certificate, you will need to use the DNS method of creating a certificate. Depending on the DNS service provider you are using, the steps may vary slightly. In my example, I am going to use Cloudflare since that is the DNS provider I am using. You will need to choose one of the supported providers in the dropdown box and follow the instructions. In general, many of them use an API and require you to enter the API key/token to allow access to your DNS provider.
Enter the domain with the wildcard in the “Domain Names” box. If you want to host something at the room domain, you need to include it in the list. The example shows *.homenetworkguy.com but you can also include the root domain such as homenetworkguy.com as well.
Bonus: Set up Cloudflare
Many users prefer to host their services behind Cloudflare to take advantage of the DDoS protection, caching, and not exposing their WAN IP addresses.
Set up DNS Hostname and Enable Proxy
To set up a Cloudflare proxy, you do not have to have your domain name registered with Cloudflare, but you will need to use the Cloudflare name servers instead of your registrar’s name servers. This allows Cloudflare to intercept the traffic for your domain should you choose to set up a proxy. Once your domain name is set up on Cloudflare (a free account will work just fine for home users), you simply add your hostname and enter your WAN IP address. “A” records are for IPv4 addresses while “AAAA” records are for IPv6 addresses. If your WAN IP is dynamic, you can set up a dynamic DNS client in OPNsense (via a plugin) or on a system you have running on your network.
The difference with using a Cloudflare proxy is shown in the diagram below. As you can see, there is not a radical difference. Instead of directly accessing your external WAN address, external clients will access your services via the Cloudflare proxy. Since we set up split DNS, the internal client will be directed to the Nginx Proxy Manager in the DMZ network rather than be routed through Cloudflare so you can will have access to them even when your Internet is down. You will also gain a slight increase in responsiveness without being routed through Cloudflare.

Set the Cloudflare Encryption Mode
The SSL/TLS Encryption mode in Cloudflare needs to be set to “Full” since Let’s Encrypt certificates are being used by the reverse proxy. To set the mode in Cloudflare, go to the “SSL/TLS” page and clicking the “Full” radio button:
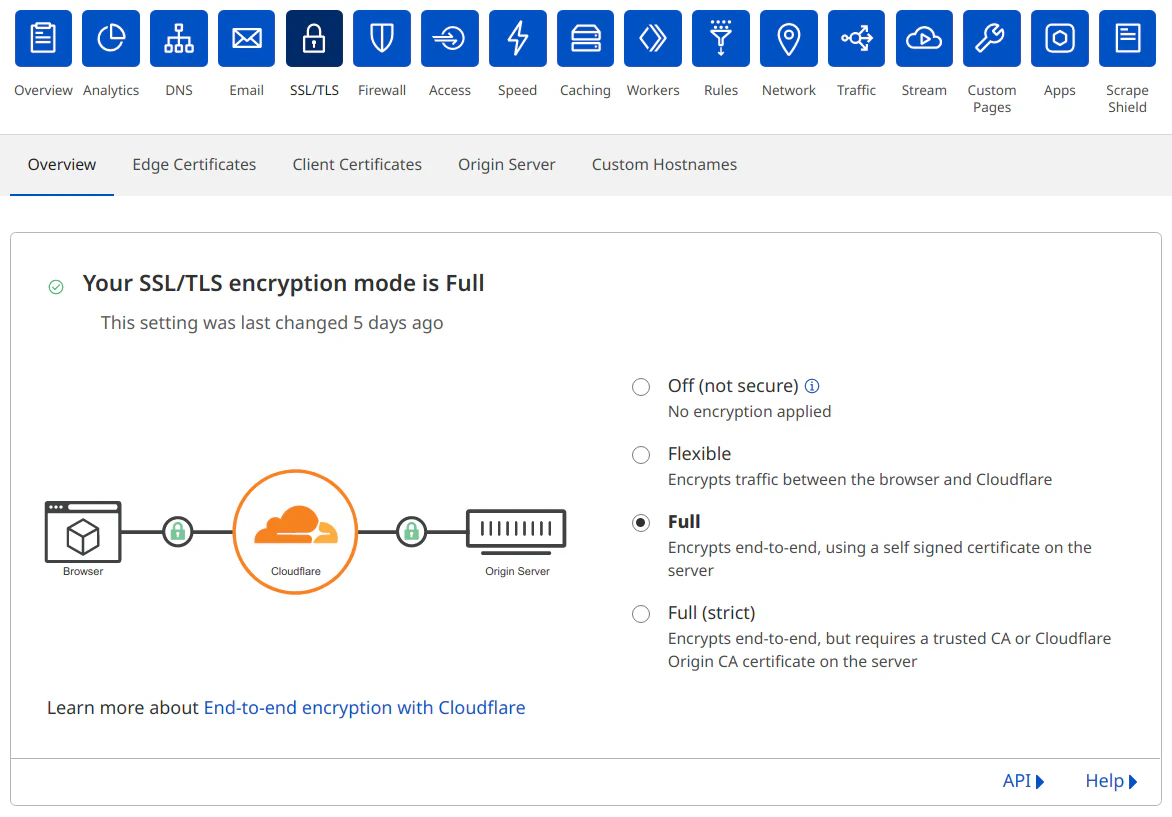
You could use “Full (Strict)” mode and create an origin certificate on Cloudflare which you can load into your reverse proxy to increase the security between Cloudflare and your reverse proxy. However, web browsers may not like accessing the reverse proxy directly with the origin certificate installed since they are designed to be used for authentication by Cloudflare. I had some issues with browsers blocking access (but perhaps I had some HSTS issues going on too). You could try taking that approach, but if you encounter issues with the certificates, using the “Full” mode is a good compromise for allowing both internal and external access to your reverse proxy.
Disable Caching
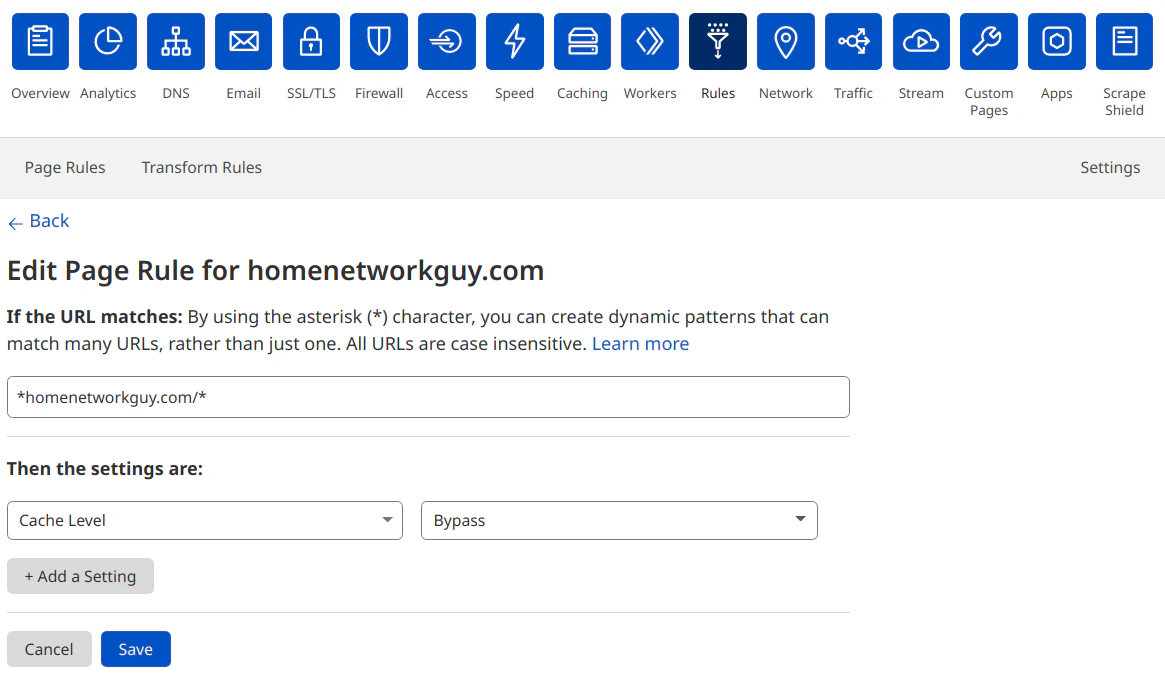
Depending on the services you are hosting, you will need to disable caching because free accounts are only allowed to cache so much data before being banned. Streaming services such as Plex Media Server will definitely need caching to be disabled. I had issues with transferring files in Nextcloud until I disabled the cache (you also need to be careful about enabling certain optimizations since I had trouble with the Rocket Loader feature of Cloudflare in the past).
To disable the cache, go to your domain in Cloudflare and click on the “Rules” page. Then add a rule with your URL you want to disable the cache. If you want to disable it for everything on your domain, use wildcard characters such as *homenetworkguy.com/*. I have seen some examples that suggest using *.homenetworkguy.com/* but that only matches your subdomains and not the root domain. You need to remove the first period to match everything.
Select the “Cache Level” setting with the value of “Bypass” to disable the cache. Click “Save and Deploy” to enable the cache rule.
Lock down IPs to Cloudflare
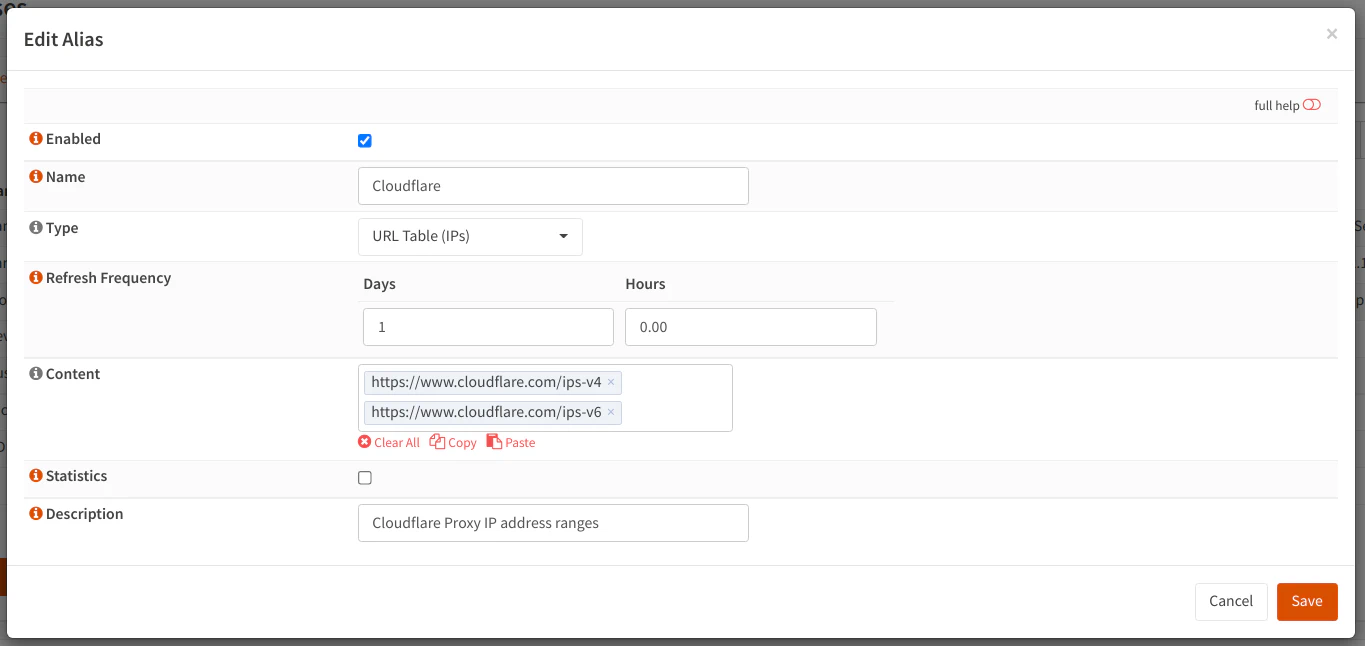
Cloudflare publishes a list of IP address ranges which are used to proxy connections, which makes it very easy to create a firewall rule which only allows Cloudflare IPs to connect to your reverse proxy. I wish more services would publish their IPs so that it is easier to tighten down access. Of course, using certificates and other forms of authentication further protects access to your services.
On the “Firewall > Aliases” page, create a new alias by clicking the “+” button. Enter “Cloudflare” or whatever name you prefer for the alias “Name”. For the “Type”, select “URL Table (IPs)” so that you can enter the URLs published by Cloudflare for their IPs. The “Refresh Frequency” can be set to daily by entering “1”, and the hour of the day can be set in the “Hours” box. You probably do not need to refresh it daily, but it does not hurt to do so. It is not a huge list so it will not take long to download the lists. For the content, enter the URLs https://www.cloudflare.com/ips-v4 and https://www.cloudflare.com/ips-v6 for both IPv4 adn IPv6 addresses. Enter a “Description” if you like.
Once the alias has been created, you can use it in your NAT port forward rule as the “Source” addresses:
| Option | Value |
|---|---|
| Interface | WAN |
| TCP/IP Version | IPv4+IPv6 (IPv6 is optional) |
| Protocol | TCP |
| Source | Cloudflare (the alias you just created) |
| Source Port | any |
| Destination | WAN address |
| Destination Port | WebServerPorts (an alias for port 80 and 443) |
| Redirect target IP | 192.168.2.50 (or use an alias which may include the IPv6 address) |
| Redirect target port | WebServerPorts (an alias for port 80 and 443) |
| Description | Allow external access to Nginx Proxy Manager |
| Filter rule association | Add associated filter rule (or Pass) |
Cloudflare Argo Tunnels
Cloudflare has made Argo Tunnels available on the free tier so anyone can use them. If your ISP blocks port 80, you may want to use an Argo Tunnel so that you can have HTTP to HTTPS redirection. You may also want to use it if you feel it is easier than creating the firewall rules as described in this guide. Cloudflare claims you do not need to set up any firewall rules using Argo Tunnels since you are establishing a direct outbound connection (a tunnel) to Cloudflare. It sounds to me a bit like SSH tunneling. I have not had the chance to experiment with Argo Tunnels, but I wanted to mention that as an option for those who have more restrictive ISPs or for those who like the idea of not having to deal with as many firewall rules.
Conclusion
Reverse proxies can be a very useful tool for hosting multiple services in your network and offer performance and security benefits. The versatility of reverse proxies allows you to use them for both internal or external access to your services. I hope this guide helps increase your understanding of reverse proxies and the benefits of using one. Also, I hope providing the additional context of an example network further aided in that understanding. When I write I strive to include some context because I feel that it can be crucial to gaining a deeper understanding of the topic at hand.