How to Use an OPNsense Router Behind another Router

Table of Contents
There may be instances where you may wish to run an OPNsense router behind another router. For instance, your ISP may make it difficult to use your own modem/router and/or not provide any customer support if you use your own modem/router. If you are renting or your living with your parents, you may not be able to use your own modem/router. Perhaps you would like to set up an isolated homelab network that has minimal impact to your family’s network. While you could accomplish some isolation with VLANs, with a second router you can build an entirely separate physical or virtualized network.
While it is typically not recommended to use another router behind your main router because of double NAT connectivity issues for certain services such as gaming, I wanted to explore the idea further as an interesting learning exercise. I do not necessarily endorse using a second router to use as part of your primary network infrastructure unless for some reason you cannot avoid it or you know what you are getting yourself into due to potential issues it may cause. Now that I have stated the disclaimer, I am going to discuss the most common way to configure OPNsense as a second router: OPNsense in its default configuration with NAT enabled.
Another way to configure OPNsense is to disable NAT and use OPNsense primarily as second firewall. This would be useful if you want to create a DMZ with two firewalls rather than a DMZ with a single firewall. I may write about this topic in the future.
One benefit of this approach is that you do not need to change any configuration settings on the edge router unless you wish to port forward a public facing service to your secondary router. Therefore, all of the configuration in this guide will be focused on the secondary OPNsense router. My primary home router runs OPNsense, but this guide should work with any other ISP or customer owned router. When I refer to “OPNsense” in this guide, you can assume it is the secondary router.
Basic Network Design
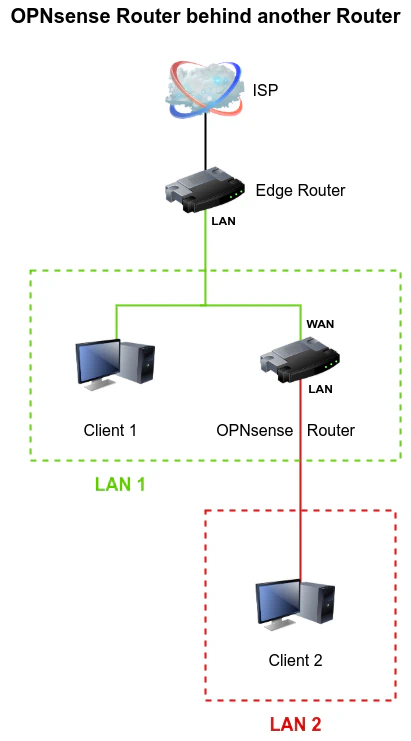
The basic network design I will be using as an example contains two routers as well as at least one client device connected to each LAN interface on each router. The edge router WAN interface is connected to the ISP. Client 1 and the OPNsense router WAN interface is connected to the LAN interface of the edge router. Client 2 is connected to the LAN interface of the OPNsense router.
Info
For brevity of this guide, I am going to assume that you already have OPNsense installed on a physical device with 2 or more interfaces or in a virtual machine with 2 or more physical or virtual interfaces.
The default installation of OPNsense will enable NAT (Network Address Translation) if you have 2 or more interfaces, which is similar to a consumer grade router. You will need to have access to the OPNsense web administration so you will need a device connected to the LAN of the secondary router (such as Client 2 in the diagram above).
Configure OPNsense Router WAN Interface
If you have a default installation of OPNsense with the WAN and LAN interfaces configured in such a way where you can access the OPNsense web administration page from the LAN interface, you will need to configure the WAN interface to operate properly on the LAN of your edge router. By default, private IP addresses are blocked on the WAN interface which is fine when it is your external facing router. However if you wish to route internal, private IP addresses, you will need to allow private IP addresses.
Allow Private IPs and Bogons on the WAN Interface
Incoming traffic from private network addresses on the WAN interface are blocked by default because if your router is public facing, there should not be any private addresses entering your network from outside your network. This default setting is intended to protect you from possible malicious traffic originating outside of your network.
If you wish for Client 1 to access Client 2, this is an important step because not even adding firewall rules will allow incoming private IP traffic through your WAN interface if the following options are not disabled (unchecked).
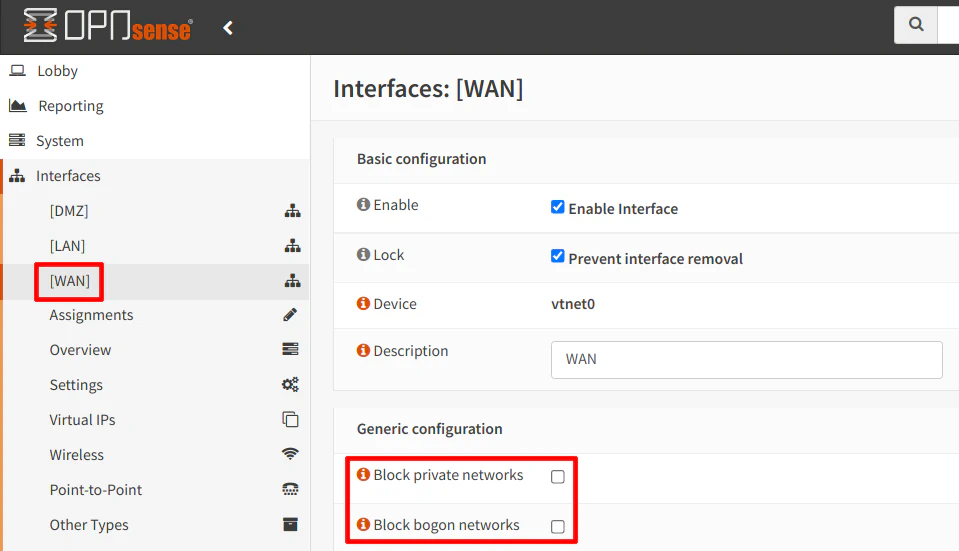
To allow incoming private IP addresses on the WAN interface of the secondary router, go to the “Interfaces > [WAN]” page and uncheck the box “Block private networks”. Do the same for “Block bogon networks”. Allowing bogon networks may be useful to allow multicast and other types of traffic that may reside on your local network(s).
Assign a Dynamic or Static IP Address on the WAN Interface
You have the option to assign the WAN interface a dynamic or static IP address. When using a dynamic IP via DHCP, I discovered an interesting issue. If I tried to access a webpage hosted on Client 2 on the OPNsense router from Client 1 on the edge router, the traffic would reach Client 2. However, when the response data was being sent back to Client 1, it was being routed from the OPNsense router’s WAN interface to the LAN interface on the edge router and was being blocked by my edge router. The WAN interface of the OPNsense router is on the same network as Client 1 and therefore should not be routed to the LAN interface on the edge router. Instead it should have been routed directly to Client 1 with no firewall involvement. Local network traffic is supposed to stay local. I must admit I was stuck on this issue for quite a while.
When you use DHCP on the WAN in OPNsense, it automatically creates a gateway based on the information provided via DHCP. In our example, the gateway is automatically set to the LAN interface of the edge router which is 192.168.1.1. I do not believe you can delete the auto generated gateway when using DHCP (when I tried this, it recreated the gateway after refreshing the page). I believe the underlying issue with using DHCP is that return traffic for connections from the LAN of the edge router is being routed to the edge router gateway rather than directly to the device which is sitting on the same network.
When using DHCP on the OPNsense WAN, I noticed that if you have other VLANs on the edge router network, those clients are able to properly connect to the OPNsense router clients since the traffic can be routed properly to other networks. There only seems to be an issue with clients that are on the same edge router network as the OPNsense router. Perhaps if the default gateway can be removed or some other settings changed that proper two-way communication can occur between the two LANs.
If you use a static IP address and you leave the gateway as “Auto-detect”, a default gateway is not created automatically like with DHCP. I found that the static IP configuration allowed Client 1 to communicate with Client 2 without the return traffic being blocked by the edge router, which is great because you can create rules to allow communication between Client 1 and Client 2 or Client 2 and Client 1.
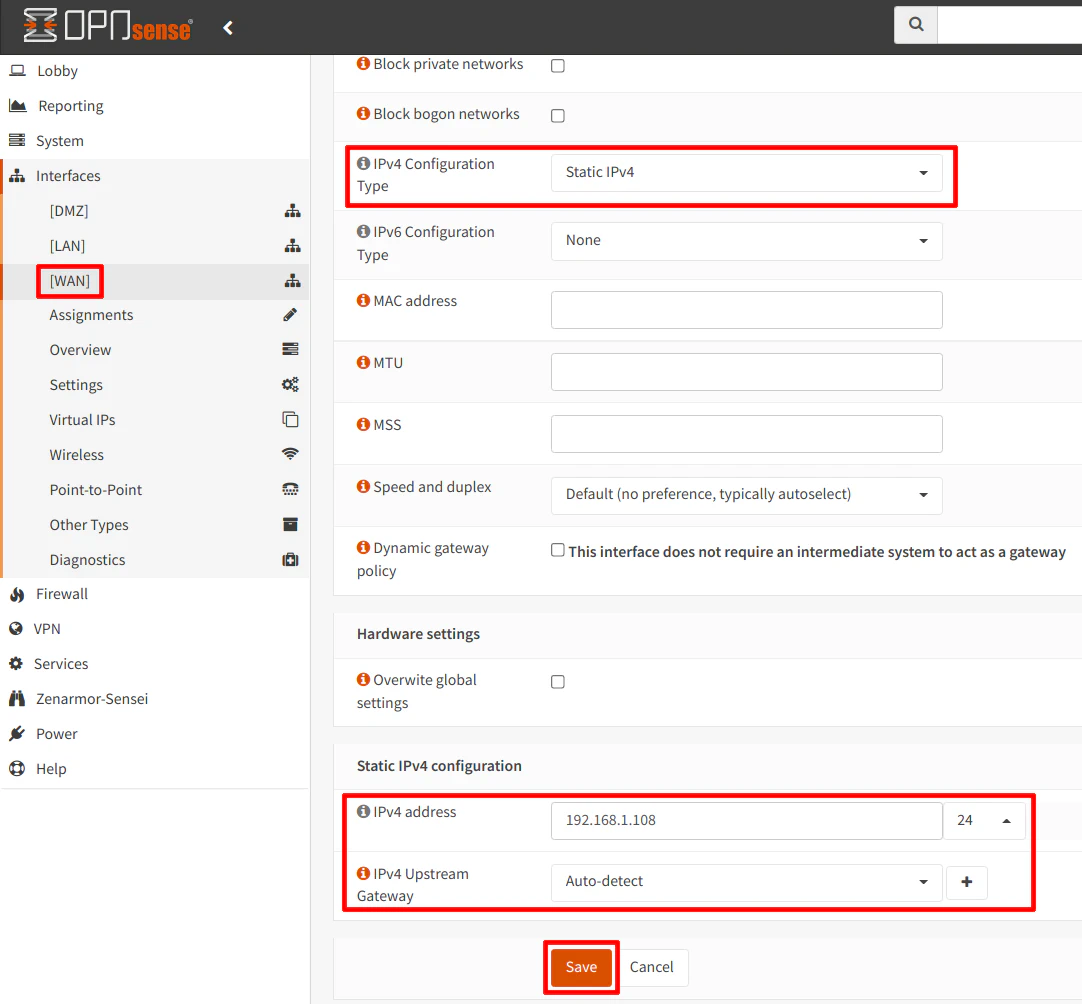
In the screenshot below, I am going to use a static IP configuration since I know that will allow communication to properly occur from the edge router to the OPNsense router, which is important for the examples I will use later in this guide. On the “Interfaces > [WAN]” page, select “Static IPv4” for the “IPv4 Configuration Type”.
At the bottom of the page, the “Static IPv4 configuration” section will be displayed. Enter a static IP address within the range defined for the edge router LAN. I would recommend picking an IP address outside of the range that you are using for DHCP devices (depending on how that is configured on the edge router). If you do not know the range that is set for DHCP, choosing a larger number (up to 254) for the last octet of the IP address may decrease your chances for an IP address conflict. In my example, I used 192.168.1.8. I also chose /24 for the CIDR because the LAN on my edge router is a /24 size network. Do not use /32 unless you do not wish for devices on the edge router to communicate with devices on the OPNsense router.
Set Unbound DNS to Forward Queries to the System Gateway
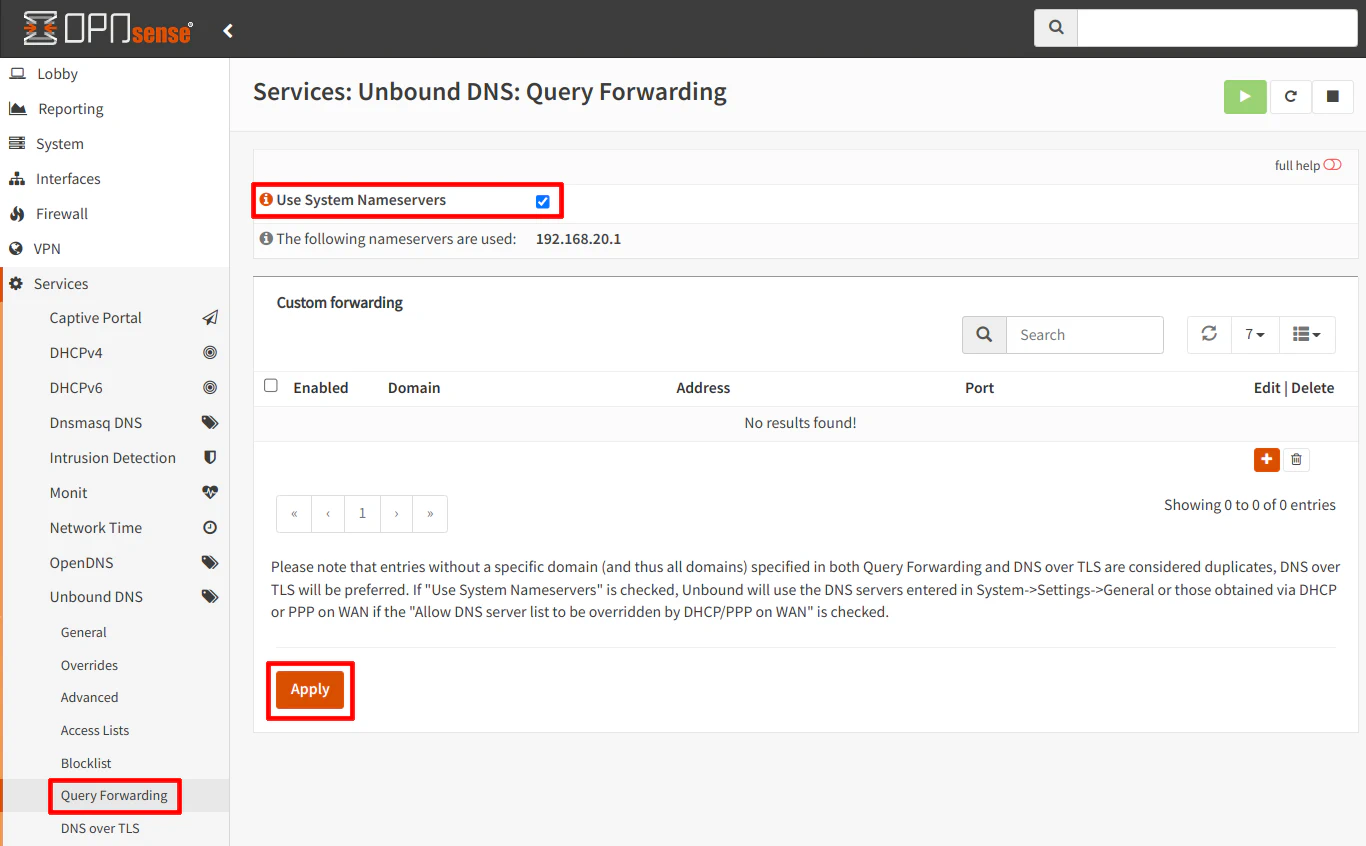
When I was experimenting running an OPNsense router behind another router, I was having some issues with DNS. It seemed as though certain DNS requests worked fine while others would not succeed (perhaps only cached DNS queries were working properly for some reason). I later discovered that DNS seemed to work well when I selected the “Use System Nameservers” option on the “Services > Unbound DNS > Query Forwarding” page.
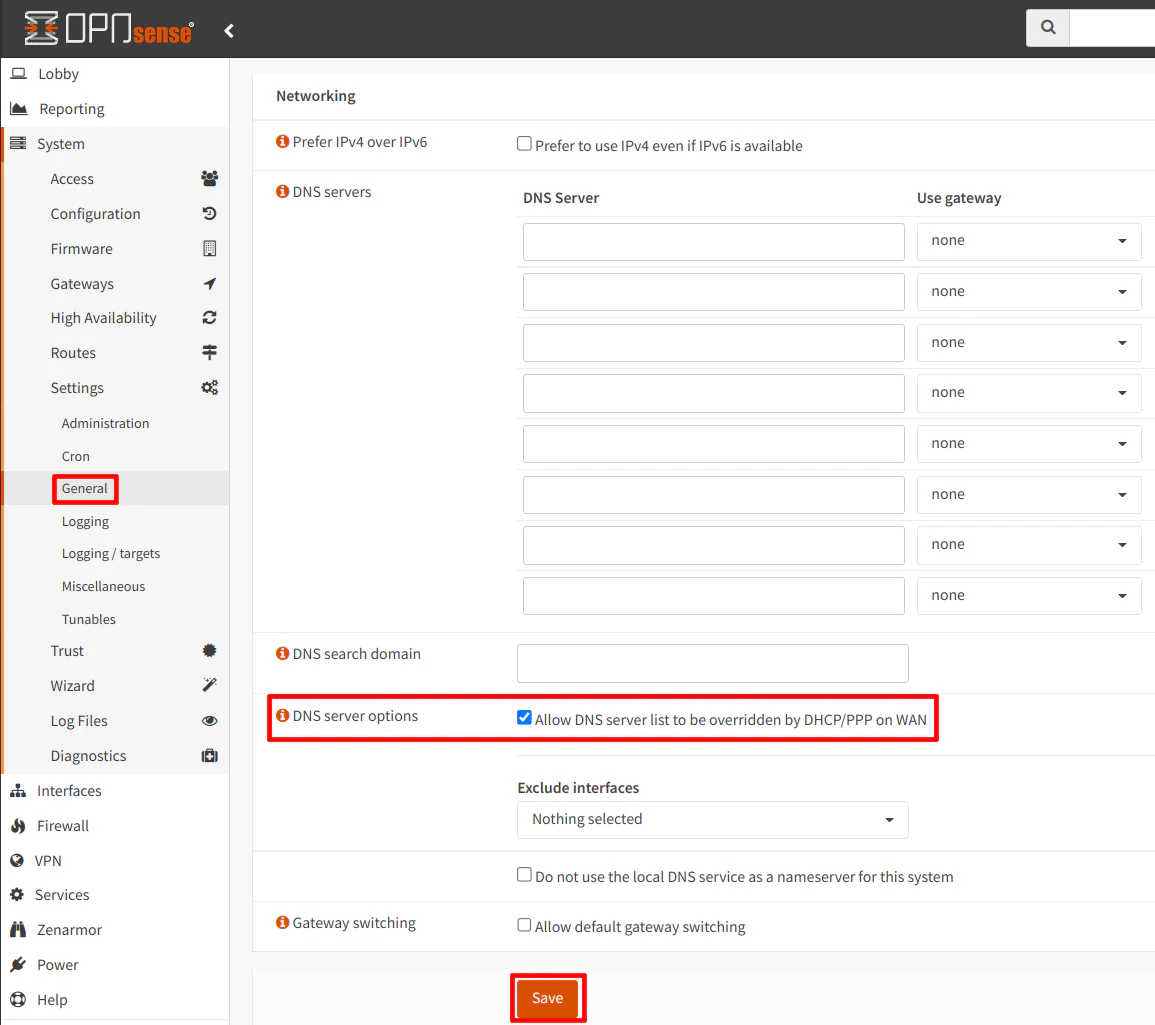
In addition, you should ensure on the “System > Settings > General” page that you have “Allow DNS server list to be overridden by DHCP/PPP on WAN” option checked. This will use the DNS server provided by DHCP for the WAN interface.
Create Firewall Rules to Allow Access Between Clients on Different Routers (Optional)
If you wish to allow access between Client 1 and Client 2 as shown on the network diagram above, you need to follow the examples below. Depending on which direction you want to allow access, you will need to follow different steps.
Allow Client 1 to Communicate with Client 2
To allow Client 1 to communicate with Client 2, a NAT port forward rule is necessary since NAT is enabled in OPNsense. The concept is the same as the public facing edge router.
When you want to access Client 2, you will need to use the WAN IP address or WAN hostname of the OPNsense router rather than the internal IP address of Client 2. The NAT port forward rule will translate the WAN address to the internal LAN address of Client 2.
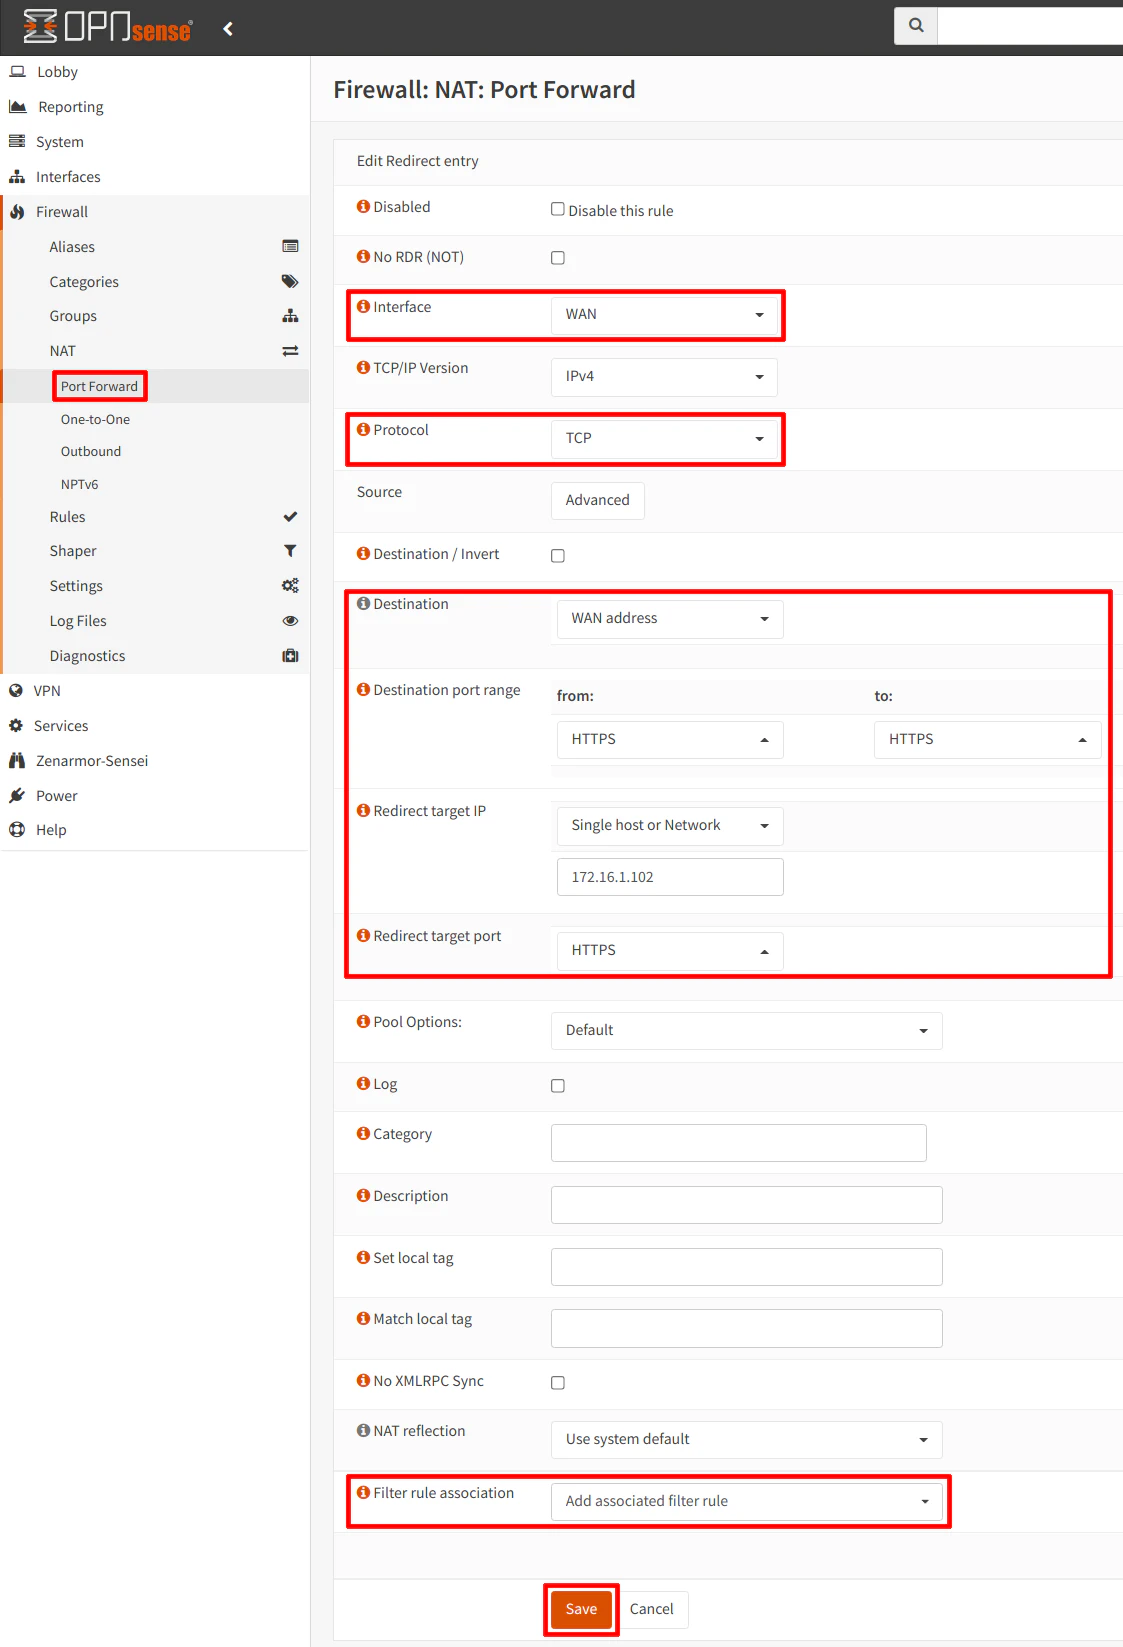
Navigate to the “Firewall > NAT > Port Forward” page and click on the “+” button to add a new NAT port forward rule. You will need to set the “Interface” to “WAN”. The “Protocol” you select depends on what you are forwarding. For the example below with allowing HTTPS connections to an internal web server, select “TCP”.
“Destination” should be set to the “WAN address” since traffic will hit the WAN interface first. In this example, the WAN address is 192.168.1.108, but you can use the built in alias for “WAN address” to mean the same thing (this is the safest option since you may change your interface IP address in the future or it may change automatically if it is assigned via DHCP).
The “Destination port range” should be set to “HTTPS” for encrypted web server traffic (unless the web app is using a non-standard port). For the “Redirect target IP”, this is the internal IP address of Client 2. You will want “HTTPS” for the “Redirect target port” as well. Note that you could use HTTPS (port 443) on the WAN interface but redirect to a different internal port if you like such as port 8443.
Finally, you will want to make sure the “Filter rule association” is set to “Add associated filter rule” or “Pass”. The difference between the two is simply whether or not you want to see the associated WAN rule that is automatically created from the NAT port forward rule. Some users like to see that rule while others may choose “Pass” to minimize clutter of the WAN rules. I personally like seeing the WAN rule since it makes it more visible what your are opening to the outside world. For OPNsense as a second router, perhaps seeing the WAN rule is less important since you are only opening up access to your main network rather than the public Internet.
Allow Client 2 to Communicate with Client 1
The firewall rule to allow Client 2 to communicate with Client 1 is more simplistic than Client 1 to Client 2. All you need is a basic firewall rule for the LAN on the OPNsense router.
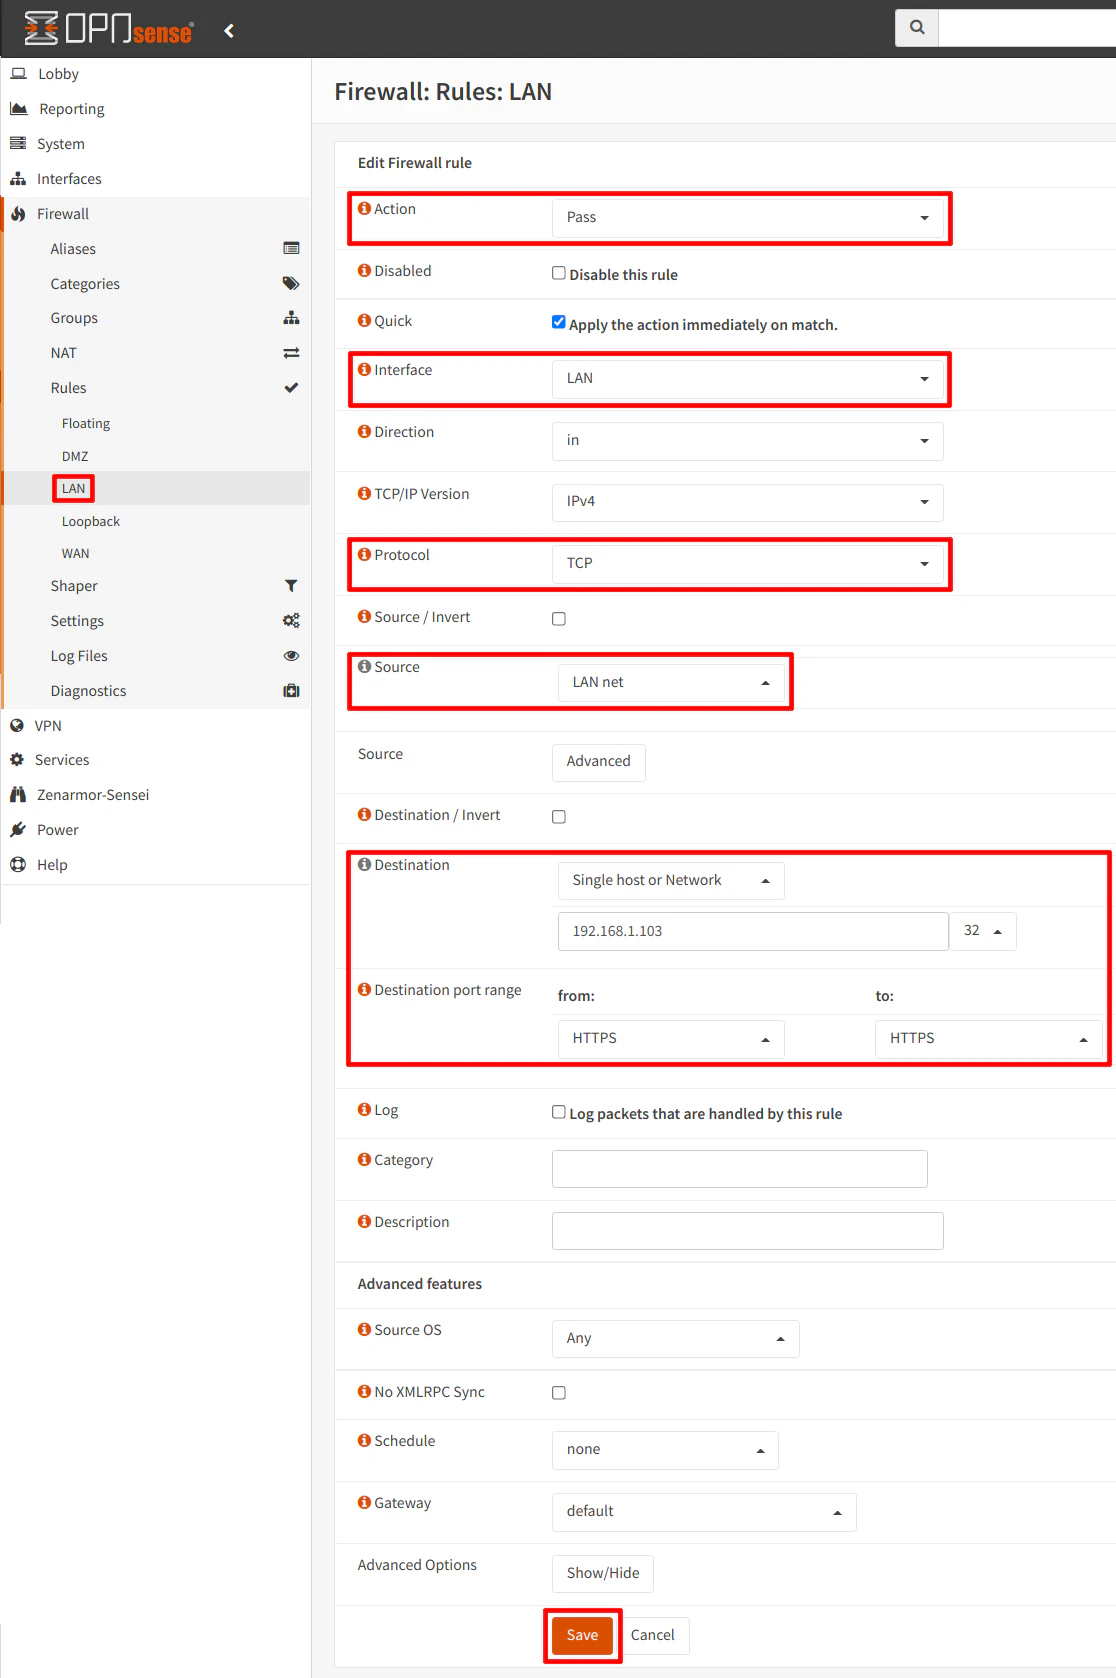
On the “Firewall > Rules > LAN” page, use the following example settings to allow access to a web server on Client 1:
| Option | Value |
|---|---|
| Action | Pass |
| Protocol | TCP |
| Source | LAN net |
| Destination | 192.168.1.103 (any host/network on your main network) |
| Destination Port | 443 (HTTPS) |
| Description | Allow access to Client 1 web server |
In case you prefer a screenshot of the settings:
Please keep in mind that if you are using a default installation of OPNsense where it created a WAN and LAN interface during the installation process, you will most likely have an autogenerated “allow all” rule on the LAN interface. The rule above will allow access to any device/network that you specify, but you will want to block access to all of your other internal networks in order to have an isolated network. This is the same principle you should apply when locking down your network even if OPNsense is your primary and only router (which have been mentioned in other guides on this site). Of course, if you want the LAN network on the OPNsense router to have access to your entire network, you could leave that default firewall rule and you would not need the example rule above.
Conclusion
The original scope of this guide was going to be larger, but I decided to constrain it to a single main concept in an effort to make it easier to digest. I hope you found this information helpful especially if you are considering deploying a second router on your network using OPNsense. My goal was not to outright dismiss the idea or the potential value of running a second router by proclaiming “double NAT!” and simply walking away. In a homelab or other environment where you may not have control of the edge router, you may very well want to utilize a second router.
With the help of some important configuration changes and firewall rules, you can enjoy communication between various devices that are on separate networks (except perhaps apps/services which rely on broadcasts on your local network but that sounds like a topic which may be explored in the future).