A Detailed Comparison between OPNsense 23.1 and pfSense CE 2.6

Photo by Fandi Maulana from iStock
Table of Contents
Over the last several years I have seen many users who are deciding to use OPNsense or pfSense as their home network router software of choice or they are migrating from pfSense to OPNsense. Even though I am not an expert with pfSense since I chose to use OPNsense when I migrated away from consumer grade routers, I thought it may be informative to do a side-by-side comparison of the differences between the two software platforms. There has been 8+ years of development since OPNsense was born so I am personally curious in how the two platforms have diverged over the years.
I put this discussion under the “Reviews” section because I am documenting differences between the two platforms, which is a review of the available features. However, I want to be clear that I am not stating that one platforms is better than the other in this comparison. My goal with this discussion is to show how the platforms have differed over time to help those who may be deciding which software to choose.
If you choose OPNsense, I have written several guides on this website since that is my platform of choice, but if you choose pfSense, you should be able to find the information you need from a variety of other sources.
Note
I will do my best to try to find if both pfSense and OPNsense have the same features but located on a different page in the web UI. However, it may be possible I unintentionally overlook the location of some options especially if they are named differently. If you notice that I missed something, please let me know so that I can update the information.
Web Interface
When I see discussions about the differences between pfSense and OPNsense, the #1 difference that is mentioned is the web user interface. The web interface is the most noticeable difference so it makes sense that it is frequently mentioned. Some users choose OPNsense vs pfSense or vice versa on that difference alone. However, I think there is much more to consider beside the web interface.
Many of the differences I will be discussing will make mention of the user interface differences, but I will also discuss the differences in the functionality offered by the two platforms. Some of the functionality is built into the web interface while other functionality affects the behavior of the system.
The biggest difference with the web interface is the menu. In pfSense, the menu bar is at the top of the page whereas in OPNsense the menu bar is on the left side of the page. pfSense has dropdown menus and OPNsense has collapsible menus.

Another difference I will mention is the search bar in the top header in OPNsense, which you may use to search for the title of any page in the web UI. The search bar will show a list of pages to choose from as you are typing out the page name. This is very useful if you do not know where a page is located in the side menu or you know exactly the page you want to open but wish to access it without clicking through several menus. You can hop quickly between various pages using this feature.

The OPNsense header bar shows the currently logged in user so it is always visible. In pfSense you have to hover the mouse over the “logout” button to see the currently logged in user.
On both platforms, there is a status indicator in the header bar for system notifications: OPNsense shows a bubble which lights up different colors when there is a notification while pfSense shows a bell icon with the alert count.
Dashboard
The “Dashboard” page for pfSense and OPNsense are similar, but the default information displayed has some differences. I will discuss the default layout before moving on to the different widgets you may add.

Dashboard: System Information
The “System Information” widget in pfSense has the following information which is not displayed in OPNsense:
- The currently logged in user (located in the upper right side of the header beside the search bar in OPNsense)
- The built-in CPU crypto information list under the “CPU Type” (AES-NI, etc) (not displayed on the OPNsense web UI)
- The system/BIOS information (to identify Netgate and other hardware)
- Hardware crypto/CPU and kernel mitigation features
- DNS servers (in OPNsense DNS servers are shown on the “Interfaces > Overview” page and expanding the “WAN interface” section – note if you have DHCP enabled on the WAN that these assigned DNS servers will not be used if you configured other DNS servers and you have unchecked the option to allow DHCP servers on the WAN to override the DNS server list on the “System > Settings > General” page)
OPNsense shows the following information on the “System Information” section that is not on pfSense:
- Disk usage (this is a separate widget in pfSense)
Note
One item worth mentioning is that the CE version of pfSense runs on an older version of FreeBSD (v12) than OPNsense (v13). Depending on the hardware you are using with pfSense, you may run into hardware compatibility issues such as drivers for 2.5G network interfaces. pfSense+ runs on a newer version of FreeBSD so if you need newer hardware support with pfSense, you will have to upgrade to pfSense+.
Dashboard: Netgate Services and Support
pfSense has a widget shown by default with information about Netgate support options which are available to you. This can be removed if you are not interested in seeing that information.
OPNsense, of course, does not show that information since they are a different company, but it does not include any widgets advertising their services (they do offer business support to fund their development efforts).
Dashboard: Interfaces
The “Interfaces” widget is almost identical between pfSense and OPNsense. The information shown is the same but the icons are a little different
Dashboard: Gateways
The “Gateways” widget is not displayed by default in pfSense like it is with OPNsense, but it can be added. The information displayed is the same for both.
Dashboard: Other Widgets
With the default installation, pfSense has 22 widgets total while OPNsense has 17 widgets total that you may choose for the Dashboard. The widgets pfSense has which OPNsense does not have are the following:
- Captive Portal Status
- GEOM Mirror Status
- Dynamic DNS Status
- Installed Packages
- SMART Status (available in OPNsense with plugin)
- Wake-on-LAN (available in OPNsense with plugin)
Widgets found in OPNsense that is not available on pfSense are the following:
- CPU usage
- Monit
- System log
Dashboard: Dashboard Layout
pfSense has a fixed, two column layout by default. To change the number of columns in pfSense you cannot do it directly from the dashboard like in OPNsense. You will need to go to the “System > General Setup” page in the “webConfigurator” section. You can choose 1 to 6 columns. There are other dashboard options to configure on that page such as sorting the interface names, but many of the options are for the web interface in general and not just the “Dashboard” page.
OPNsense also allows anywhere between 1 and 6 columns and uses 2 columns by default like pfSense. Many widgets in OPNsense provide the ability to show or hide specific items inside each widget, which is nice if you prefer to have only the information you feel is the most important to display on your dashboard.
I find the column feature useful for large and/or wide screens because you can fill up more of the horizontal space on your screen which means less scrolling. I have set mine to use 3 columns on a 24-inch monitor as shown below, and it fills the page without overcrowding the information.

Menu Options
Both pfSense and OPNsense have similar top-level menus so I will discuss the similar menu options first before discussing the top-level menu options which are different.
Because some of the menu options are in completely different sections in OPNsense when compared to pfSense, I will minimize repeating the differences by stating where something is located in pfSense vs. OPNsense in only one section of this comparison review. For instance, some options are located in the “System” menu in pfSense but in the “Firewall” menu in OPNsense. Therefore, the differences will have been covered in the “System” section when comparing to pfSense.
To keep the comparison straightfoward, I will use the pfSense menu option names in the sections below, but I will mention where to find similar options in OPNsense.
Menu Options: System Menu
pfSense and OPNsense have a “System” menu that contain system-level configuration options.

System Menu: Advanced: Admin Access
In pfSense, the “System > Advanced” menu defaults to the “Admin Access” page. Similar options are available on the “System > Settings > Administration” page in OPNsense.
The “Anti-lockout” option on this page in pfSense is located on the “Firewall > Settings > Advanced” page in OPNsense. This option prevents you from locking yourself out of the web interface so I recommend not disabling it unless you know what you are doing.
I noticed that pfSense has “Login Protection” options which do not exist in OPNsense. From the descriptions of the options, it reminds me of fail2ban. If you want similar brute force protection of the web interface in OPNsense, you could install the CrowdSec plugin. If you install CrowdSec, you can have the added advantage of network wide protection against malicious IP addresses (incoming bad IPs are blocked by default with CrowdSec, but I recommend blocking outgoing connections to malicious IPs as well).
In OPNsense I noticed a few options that I could not find in pfSense. You can select which interfaces that the web UI and SSH listen on. The OPNsense documentation recommends caution when changing the listen interface since there are certain scenarios where it may be problematic.
OPNsense includes the option of two factor authentication for logging into the web interface. pfSense does not have this option even via 3rd party plugin as far as I am aware.
System Menu: Advanced: Firewall & NAT
pfSense has the “Firewall & NAT” settings under the “System > Advanced” menu rather than the “Firewall” menu like in OPNsense. I know these options are technically system level firewall options, which is perhaps why they are in the “System Menu” in pfSense, but I can understand why these settings are available on the “Firewall > Settings > Advanced” page in OPNsense since these settings affect the overall behavior of the firewall.
Some of the “Packet Processing” options on the pfSense page are found on the “Firewall > Settings > Normalization” page in OPNsense.
I do not believe the “VPN Packet Processing” section exists in OPNsense as well as the “State Timeouts” section.
In OPNsense, some of the options on the “Firewall > Settings > Advanced” page are found on other pages in pfSense such as “Allow IPv6” which may be found on the “System > Advanced > Networking” page. The “Gateway Monitoring: Skip rules”, “Multi-WAN: Sticky connection”, and “Schedule States” options are located on the “System > Advanced > Miscellaneous” page in pfSense.
OPNsense has an “Anti DDOS: Enable syncookies” option which pfSense does not. I do not have personal experience with this option, but it may be useful for preventing DDoS attacks on the firewall. However, I do not know if there are negative consequences for enabling this option.
System Menu: Advanced: Networking
This page in pfSense has IPv6 options as well as various network interface options.
Several of these options are available in other areas in OPNsense. The “Allow IPv6” option is on the “Firewall > Settings > Advanced” page while “Prefer IPv4 over IPv6” option is on the “System > Settings > General” page in OPNsense. Some of the IPv6 DHCP options are available on the “Interfaces > Settings” page.
As for the hardware offloading options in OPNsense, they are found on the “Interfaces > Settings” page.
System Menu: Advanced: Miscellaneous
The options in the “Proxy Support” section in pfSense are not available in OPNsense unless perhaps a plugin enables such options. I have not tried to run OPNsense behind a network proxy so I have not spent any time researching this functionality.
The “Power Savings”, “Cryptographic & Thermal Hardware”, and “RAM Disk Settings” options can be found on the “System > Settings > Miscellaneous” page in OPNsense.
Options for “Schedules” and “Gateway Monitoring” can be found on the “Firewall > Settings > Advanced” page in OPNsense.
System Menu: Advanced: Tunables
Both pfSense and OPNsense have a page for tunables which are various parameters you may use to tweak various system behaviors. They are considered “advanced” options so you must be careful when you tweak values from the defaults.
The “System > Advanced > System Tunables” page in pfSense is found on the “System > Settings > Tunables” page in OPNsense. One difference worth noting on the OPNsense page is that there is an extra column for “Type”, which is great information to have displayed. You know right away if an option is a runtime or boot-time option. Runtime options can be applied without rebooting the system while boot-time options require a reboot.
OPNsense also allows you to enter the value of “default” for the options, and it will set the options to the default value. This is convenient since you do not have to look up what the default value is in the documentation.
System Menu: Advanced: Notifications
There is a “Notifications” page in pfSense which has options for sending notifications to various services such as email, Telegram, Pushover, and Slack. This is a nice feature which is not available in OPNsense. However, OPNsense comes with the Monit service installed by default so it is possible to send notifications through that service.
Monit is more than just a notification service since it can watch processes on the system and restart any process that goes down. At the time of this writing, I have not spent much time learning more about Monit, but it is on my long todo list.
Menu Options: Interfaces Menu
As shown in the screenshot, you will see that the “Interfaces” menu is a bit different between the two platforms. The biggest difference is that most of the extra OPNsense menus are located as various tabs on the “Interface Assignments” page in pfSense. For both platforms, whenever you assign a new interface, the interface name will be displayed in the menu so that you can configure additional options for each interface.

Interfaces Menu: Interface Assignments
Below you can see that the tabs on pfSense are similar to the menu options on OPNsense. OPNsense groups some of the interface types under the “Other Types” menu such as VLANs, LAGGs,and bridges.

One notable difference on assigning interfaces is that on OPNsense, you are able to set the “Description” of the interface directly from the “Interfaces: Assignments” page, which is convenient. In pfSense after you create a new interface, you have to click the interface name (such as OPT1) to open the interface’s page in order to change the description.

Interfaces Menu: Interface Groups
In pfSense, grouping interfaces occurs under the “Interfaces” menu while in OPNsense, it is located under the “Firewall” menu. You could make a case as to why this page should be located under “Interfaces” or “Firewall”.
It makes sense to be included under “Interfaces” since it is technically a grouping of interfaces, but on the other hand, the sole purpose of grouping interfaces is to apply the same firewall rules to a group of interfaces so that you do not have to repeat the same rules on multiple interfaces. Therefore, placing it under “Firewall” makes sense too. In my mind, I consider “interface groups” as “firewall rule groups” so I personally like that it is located under the “Firewall” menu in OPNsense.
The interface groups work the same on both platforms, but one user interface difference you will notice with OPNsense is that OPNsense will group all interfaces under the interface group in the “Interfaces” menu. You may like this feature if you want to know which interfaces belong to each group without going to the “Firewall > Groups” page.

However, if you rather see all of the interfaces listed without them being grouped, there is an option when you create the interface group to prevent the grouping. The option is a checkbox located at the bottom of the page.

Menu Options: Firewall Menu
The pfSense and OPNsense “Firewall” menu contains several of the same options, but once again there is a page which is classified differently between the two platforms. The “Virtual IPs” page is under “Firewall” in pfSense, but it is under “Interfaces” in OPNsense. OPNsense considers virtual IPs to be interface configuration and pfSense considers it to be firewall configuration.
The firewall “Schedules” page is under the “Firewall > Settings” page in OPNsense.
OPNsense also includes a “Log Files” and “Diagnostics” page in the “Firewall” menu. In pfSense, that information is located under the “Status” and “Diagnostics” menus on the top menu bar.

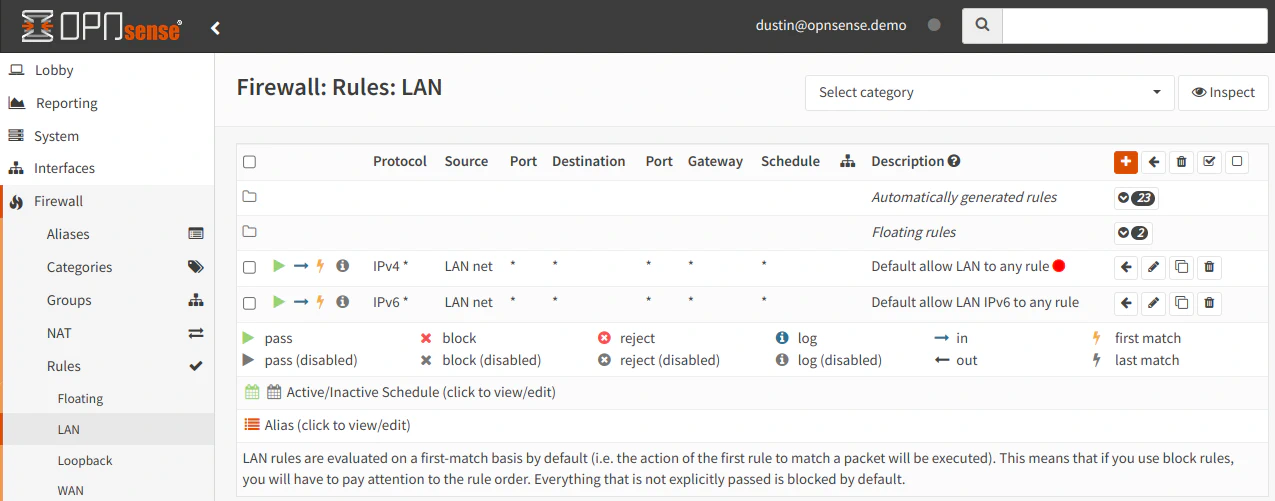
You will notice that OPNsense has menu option for “Categories”. Categories may be assigned to rules in OPNsense, which may be used to filter rules in the rule list. You may find this functionality very helpful if you have interfaces with a lot of rules and you only want to display certain types of rules. This is essentially a visual grouping of rules as opposed to functionally grouping the rules like with interface groups.
Below I have tagged one of the two rules with a category to show what it looks like in the list. The rule with the red dot besides the “Description” is the tagged rule.
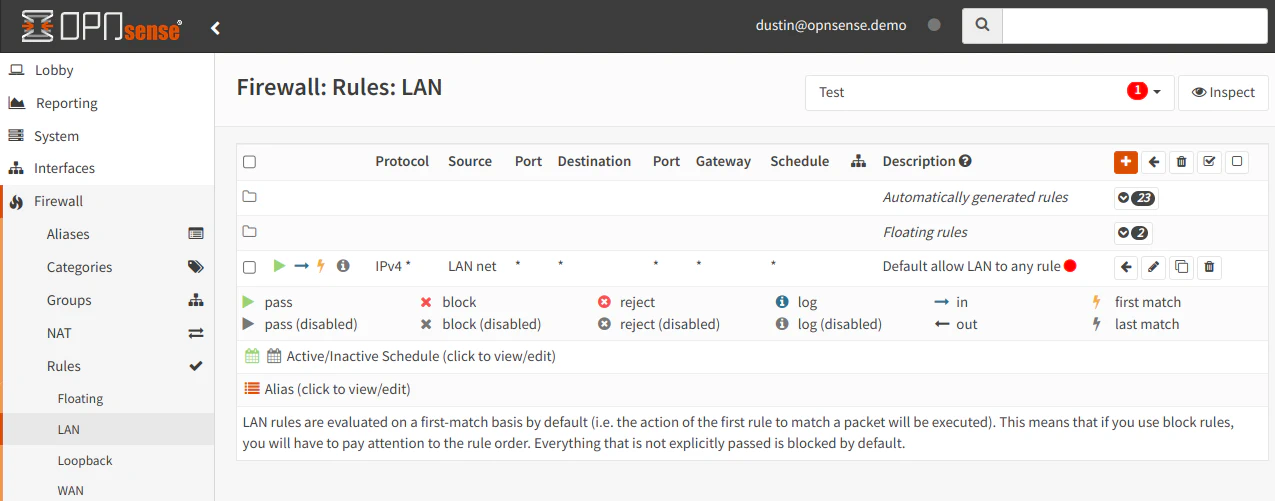
There is a dropdown at the top of the page which allows you to select categories. When I select the category called “Test”, you will see that only the one rule is displayed.
One feature I like and use frequently with OPNsense is the “Live View” page under the “Firewall > Log Files” menu. This page shows the rules that are currently being executed in real time. I actually use this page often to determine what is being allowed or blocked when testing new rules or troubleshooting why access is being allowed or denied.
The page has options where you can apply a variety of filters and you can even save commonly used filters as templates, which is great. The templates feature is a fairly new addition, I believe, since I actually did not notice that option until writing this review. At the time of this writing, I have not spent as much time on the “Live View” page since I have not needed to do a lot of deeper troubleshooting of firewall issues.

pfsense has a “Dynamic View” page under the “Status > System Logs > Firewall” page, which shows rule execution in real time like OPNsense. However, the functionality of the page is very basic in comparison.

Menu Options: Services Menu
As shown in the screenshot below, many of the default services are the same between the two platforms.

Services Menu: Auto Config Backup
pfSense has “Auto Config Backup” options in the “Services” menu if you wish to automatically backup configuration offsite to Netgate’s servers. OPNsense, on the other hand, offers Google Drive as an option for offsite configuration backup. Additionally, you may also backup to Nextcloud via 3rd party plugin.
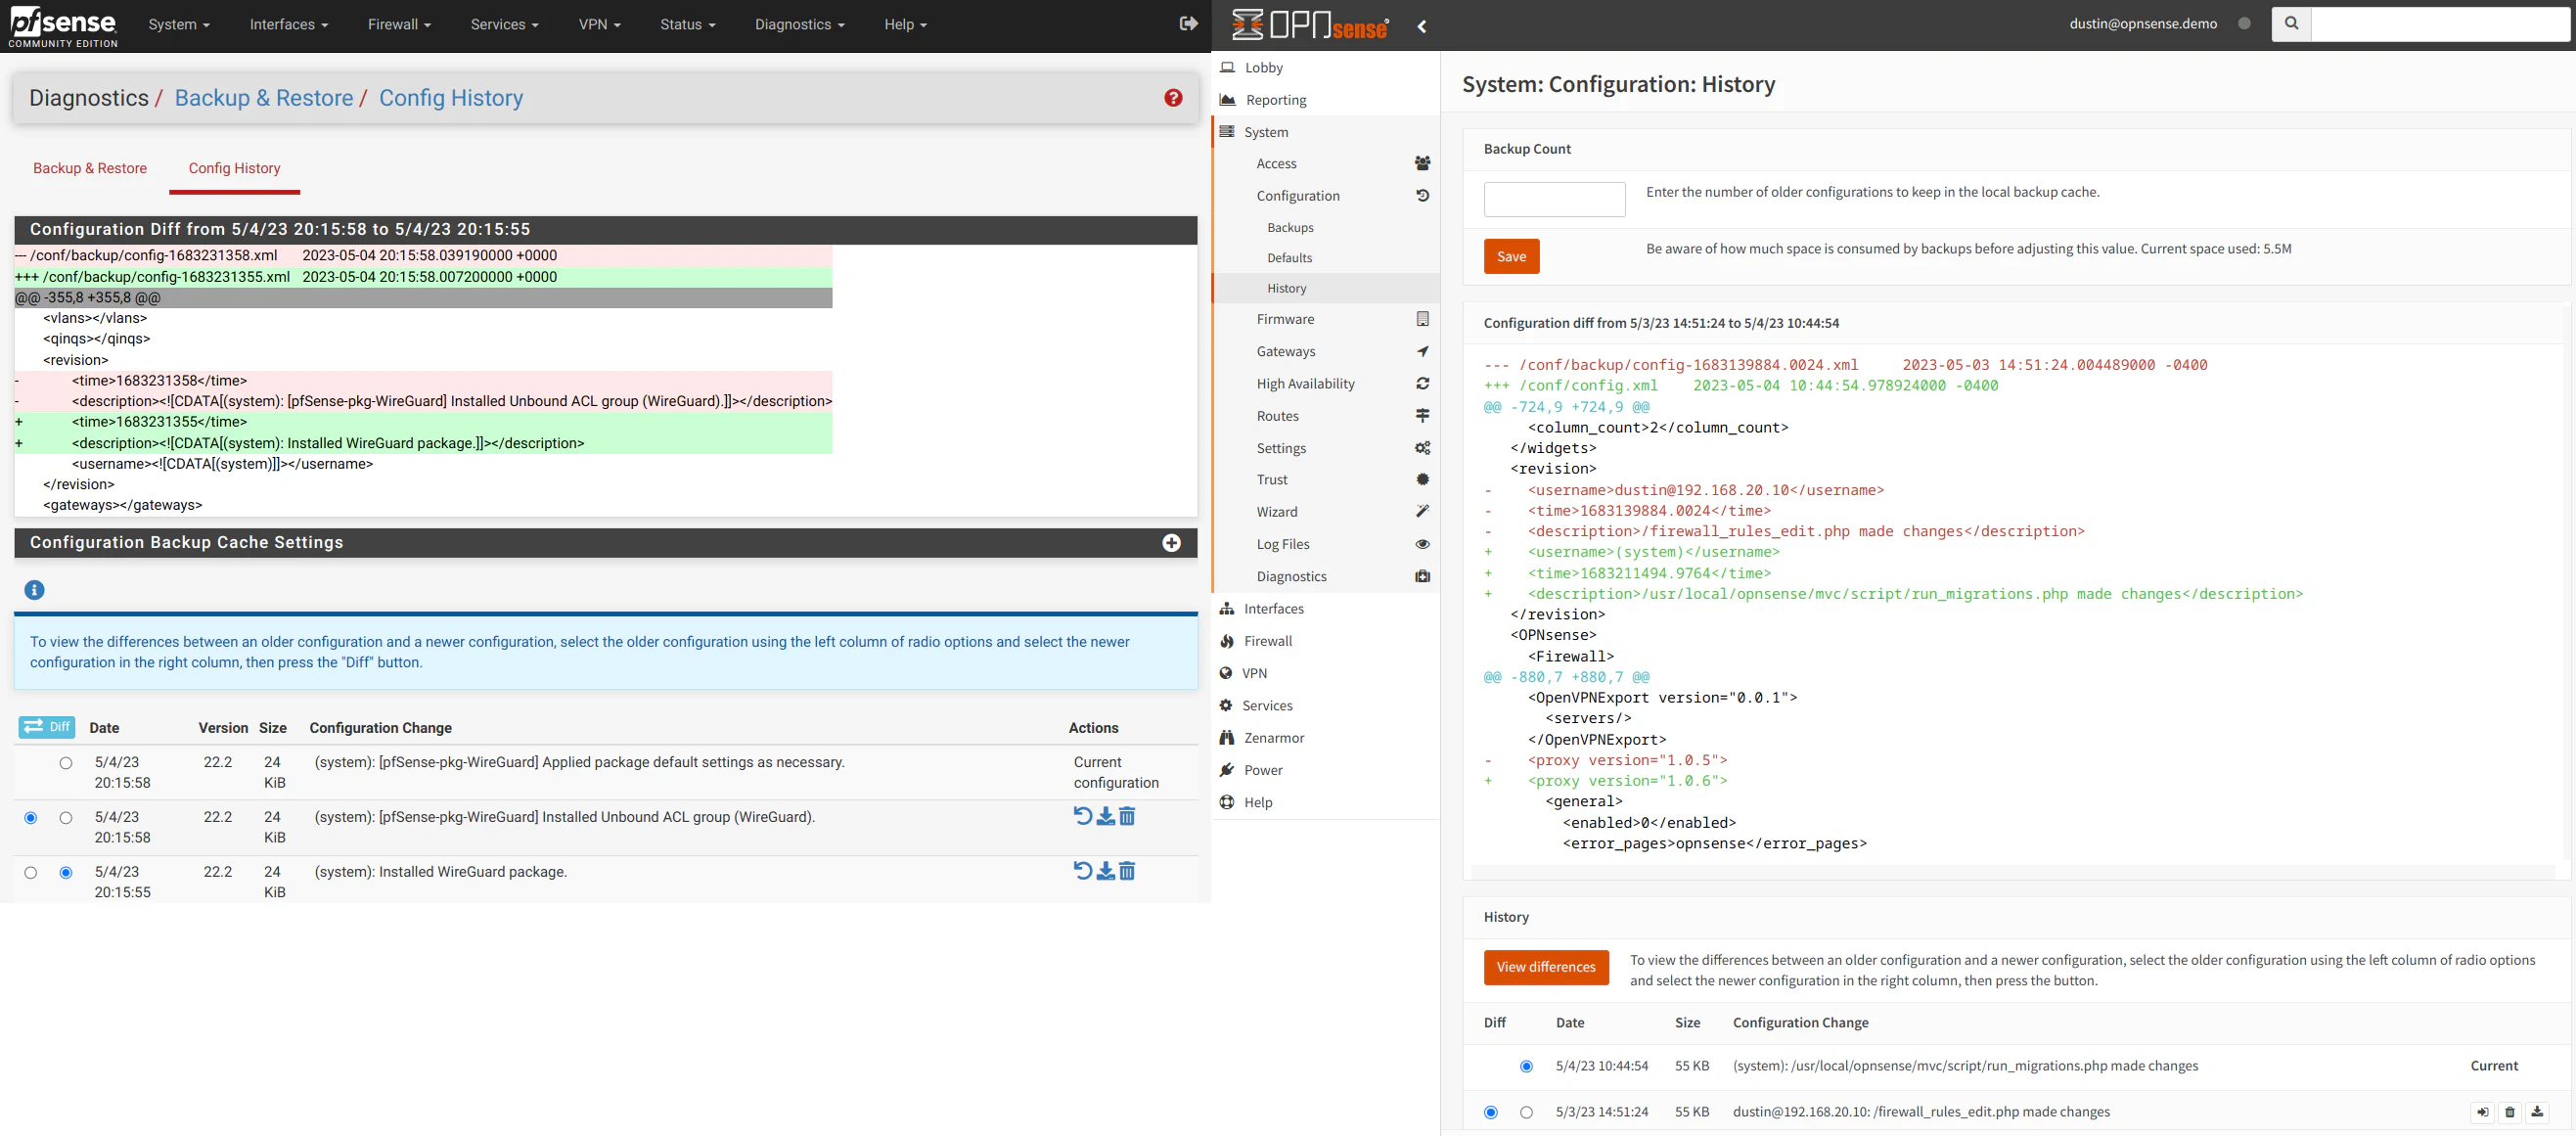
If you wish to perform a manual configuration backup/restore on both platforms, the options are found on the “Diagnostics > Backup & Restore” page in pfSense and the “System > Configuration > Backups” page in OPNsense.
Both pfSense and OPNsense by default automatically track the history of configuration changes and provide a nice user interface to view and restore configuration changes directly from the web interface. The interface includes a color coded diff of the configuration XML so you can see all of the details.
Services Menu: DHCP Relay, DHCPv6 Relay
pfSense includes menu options for DHCP and DHCPv6 relays, but in OPNsense these options are located under the DHCPv4 and DHCPv6 menus respectively.
Services Menu: DNS Forwarder, DNS Resolver
In pfSense, the DNS resolver uses “Unbound DNS” while the DNS forwarder uses “Dnsmasq”, which is why some of the settings between the two pages are similar. At first I thought both features were using Unbound DNS and the pages simply duplicated some of the same options. However, after enabling each service separately (you cannot run both at the same time), I was able to see that two different DNS services were being used.
The settings for the “DNS Forwarder” are found on the “Services > Dnsmasq DNS > Settings” page in OPNsense, and the settings for the “DNS Resolver” are found on the “Services > Unbound DNS” pages in OPNsense.
Unbound DNS is the default DNS service on both platforms, and you may use Unbound DNS as a DNS forwarder. You do not need to use Dnsmasq unless it has features you wish to utilize.
Services Menu: PPPoE Server
Both platforms support connecting to a PPPoE server as a client to obtain Internet/network access. However as far as I know, only pfSense has the feature to function as a PPPoE server. If you need such functionality, you will need to use pfSense unless there is some way to do this in OPNsense as well.
Services Menu: Dynamic DNS, IGMP Proxy, SNMP, UPnP, and Wake-on-LAN
These features in pfSense are available in OPNsense as plugins. They are not installed by default.
Services Menu: Intrusion Detection, Monit, OpenDNS, and Web Proxy
OPNsense has several menu options under “Services”, which are not available in pfSense by default.
“Intrusion Detection” is simply what OPNsense generically calls Suricata since it is an intrusion detection/prevention service. pfSense also has a Suricata plugin to offer similar functionality.
Monit is a monitoring service installed by default in OPNsense that you may want to use for external monitoring of OPNsense.
If you use external DNS servers such as OpenDNS, OPNsense has OpenDNS built-in so you can make use of that feature if you like.
OPNsense has “Web Proxy” functionality included. I believe you can obtain similar functionality in pfSense using the “squid” package. I do not currently use any web proxies on my OPNsense system so I am not as familiar with that functionality.
Menu Options: VPN Menu
The VPN menu is nearly the same but OPNsense does not include L2TP under the VPN menu. If you need to use L2TP, you need to go to the “Interfaces > Point-to-Point > Devices” page in OPNsense and select “L2TP” as the “Link Type”.

If you install the WireGuard VPN service on either platform, a menu option for WireGuard will appear in the VPN menu shown above.
Menu Options: Help Menu
The “Help” menu options between the two platforms are quite different since the help options are specific to each platform. The “Documentation” and “User Forum” links are the only options which are similar in name but of course link to the respective platform’s help pages and forums.

Menu Options: Other Menus
In this section I will discuss the high level menu options which differ between pfSense and OPNsense. Often each platform has an equivalent feature but located elsewhere. I will try to list the locations the best I can, but if I overlook something, please let me know in the comments below or submit feedback via the contact form.
pfSense: Status Menu
pfSense groups all of the status pages into one “Status” menu. In some ways I like this since it requires less clicking than in OPNsense, but it also makes the menu larger so I sometimes find myself scanning through the menu looking for the page that I want (to be fair, I have not used pfSense on a regular basis so I am not as familiar where all the options are located).
In OPNsense even though the status pages are grouped in the same menu as their related features, you can jump to such pages more quickly by using the search bar in the header of the web interface as I have described earlier if you are having trouble locating certain status pages.

Out of the box, pfSense has a “Traffic Graph” page under the “Status” menu, but it is rather basic. You can only select one interface at a time.

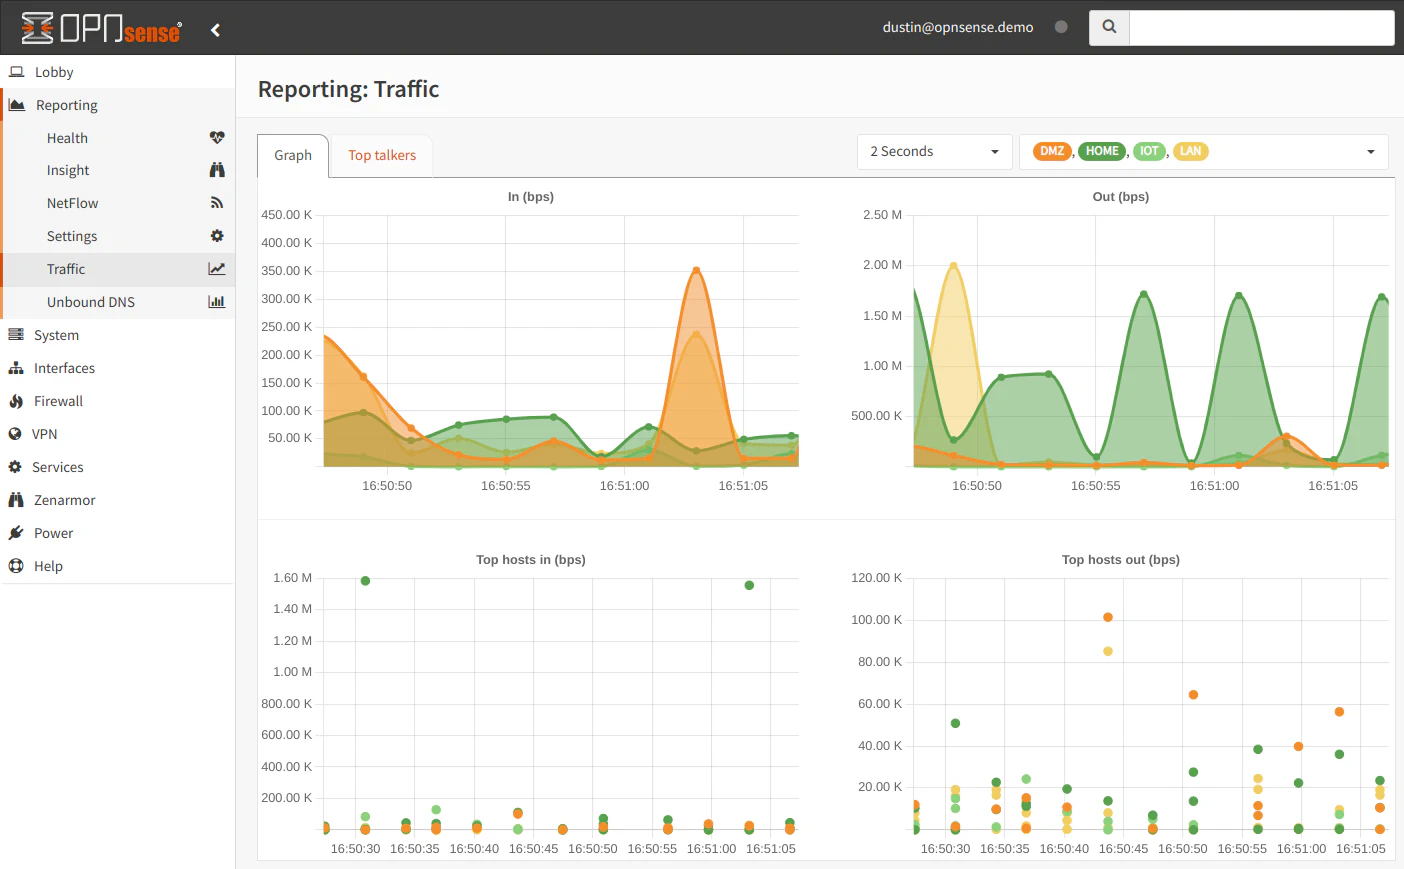
OPNsense on the other hand has several reports built-in by default. On the “Reporting > Health” page, you can select a number of reports. The screenshot below shows the “Traffic” report for one of my interfaces. This page only allows selection for one interface at a time like with the pfSense traffic graph.
There are other options you can view as well: the packets per second, quality of the WAN interface connection (delay/packet loss), various system information (states, temperature, etc), and traffic for all of the interfaces you have configured to monitor.

On the “Insight” page, you can see all of the monitored interfaces combined on one graph as well as pie charts showing the top ports and source IP addresses. The pie charts only show one interface at a time unlike the traffic graph at the top of the page.

If you want to view real-time traffic, you can go to the “Traffic” page. There are options to select the refresh duration and to select the interfaces to display. I really like this graph when doing throughput testing and to watch current bandwidth usage. Being able to overlay multiple interfaces is nice feature too.
A new addition to the built-in reporting in OPNsense is the “Unbound DNS” report. It shows the overall Unbound DNS statistics as well as the top allowed/blocked domains. Blocked domains will only be displayed if you are using the DNSBL (DNS block lists) functionality that is built into Unbound DNS. This functionality is still in the early development stages, but I am glad the report was added because it helps fill in some of the functionality provided by pfBlockerNG in pfSense.

As you can see, OPNsense has quite a bit of reporting that is built-in. For pfSense, you would need to install a plugin such as ntopng (which is also available on OPNsense) to have better reporting or use external monitoring tools.
pfSense: Diagnostics Menu
Similar to the “Status Menu”, the “Diagnostics” menu contains all of the diagnostic related pages (as well as other options that I would not necessarily considered “diagnostics” such as rebooting and shutting down the system).
I think having the diagnostic pages in one menu is convenient, but that menu is even longer than the “Status” menu so similarly I have to scan through the menu to find what I am looking for (once again, I am not as familiar with the location in pfSense so over time I would likely become more comfortable finding pages quickly).

In OPNsense as with the status pages, the diagnostic pages are grouped with the related features, typically under submenus called “Diagnostics”. Most of the network tools in the pfSense “Diagnostics” menu are found under the “Interfaces > Diagnostics” menu.
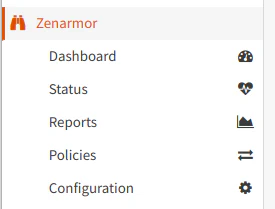
OPNsense: Zenarmor Menu
This menu option is actually provided by a third party plugin, but I wanted to mention it because it may be the only plugin in OPNsense which creates top-level menu options. All other plugins which I have tried create menu options underneath the default top-level menus. Below is what the Zenarmor menu currently looks like at the time of this writing.
OPNSense: Power Menu
OPNsense has a separate menu for the power options so they are easy to locate. In pfSense, the “Reboot” and “Power Off” options are found under the “Diagnostics” menu and are called “Reboot” and “Halt System”.
Most of the time I only reboot my OPNsense box when there is a firmware update which requires an update. On some occasions, I simply use the physical power button if I need to shut off the system since a quick press initiates a graceful shutdown (unlike holding the power button for 4+ seconds).

Plugins/Packages
In this section, I will list the various plugins which are found on pfSense and OPNsense along with comments on where you may find equivalent functionality on each platform. This information may be useful to you if you are considering migrating from one platform to the other. Because there is so much functionality available in all of the plugins, I do not plan to go into great detail for each plugin but will discuss the differences at a high level.
Several plugins have already been mentioned in previous sections since pfSense and OPNsense have chosen to include different plugins/features for the base installation by default.
OPNsense has two tabs on the “System > Firmware” page: one for plugins and one for packages. Plugins often imply there is a user interface configuration page to allow fine grain control of a feature or set of features whereas packages are various software and utilities with few dependencies where a full blown plugin may not be necessary. Packages are available via the traditional package manager found on FreeBSD.
In pfSense, every add-on is considered to be a package regardless of how it is integrated into pfSense.
One feature I like about the OPNsense plugins and packages page is the search bar. It is similar to the search bar in the upper right hand corner of the header bar. When you search for plugins or packages, only the matching entries will be displayed. This allows you to quickly find a plugin or package of your choice.

Common Plugins/Packages
There are many plugins that are common between the two platforms, which can help make for an easier transition especially when you are mostly using the similar plugins.
- acme
- apcupsd
- bind
- freeradius
- frr
- ftp-proxy
- haproxy
- iperf
- lcdproc
- lldpd
- ahavi/mdns-repeater
- net-snmp
- node_exporter
- nrpe
- ntopng
- nut
- siproxd
- stunnel
- telegraf
- tftp
- tinc
- vmware
- vnstat
- wireguard
- zabbix-agent
- zabbix6-agent
- zabbix62-agent
- zabbix4-proxy
- zabbix5-proxy
- zabbix6-proxy
- zabbix62-proxy
Plugins/Packages Only in pfSense
Below are the plugins that are only available on pfSense, but I do mention if there are alternatives in OPNsense or it is already built in functionality.
- arping (but some ARP information is available on “Interfaces > Diagnostics > ARP Table” page in OPNsense)
- arpwatch (but there is a possible alternative called OPNarp is available in the community repository)
- Backup
- bandwidthd
- cellular
- Cron (but functionality is built into OPNsense on the “System > Settings > Cron” page)
- darkstat
- Filer
- haproxy-devel
- LADVD
- Lightsquid
- mailreport
- mtr-nox11
- Netgate_Firmware_Upgrade (for Netgate specific hardware)
- nmap
- Notes
- openvpn-client-export (but functionality is built into OPNsense on the “VPN > OpenVPN > Client Export” page)
- pfBlockerNG (but much of the functionality can be implemented in other ways in OPNsense)
- pfBlockerNG-devel
- pimd
- RRD_Summary (OPNsense has several RRD reports built-in which may offer similar functionality)
- Service_Watchdog
- Shellcmd
- snmptt
- snort (but the Snort ruleset is available for Suricata in OPNsense)
- softflowd
- squid (but web caching can be done with other plugins in OPNsense)
- squidGuard
- sudo (but is enabled by default in OPNsense – settings located on the “System > Settings > Administration” page)
- suricata (but functionality is built into OPNsense on the “Services > Intrusion Detection” pages)
- syslog-ng (but functionality is built into OPNsense by default)
- System_Patches (but custom system patches can be installed via command line)
- Tailscale (but can be obtained via the OPNsense community repository)
- zabbix-agent4 (OPNsense does not have this version of the Zabbix agent)
- zabbix-agent5 (OPNsense does not have this version of the Zabbix agent)
- zabbix-agent54 (OPNsense does not have this version of the Zabbix agent)
- zabbix-proxy (OPNsense does not have this version of the Zabbix proxy)
- zabbix-proxy54 (OPNsense does not have this version of the Zabbix proxy)
- zeek (but can be obtained via the OPNsense community repository)
Plugins/Packages Only in OPNsense
Below are the plugins only available in OPNsense, but I mention some alternatives or if the functionality is already built into pfSense.
- os-api-backup
- os-c-icap (but may be a part of squid package in pfSense)
- os-cache (but may be a part of squid package in pfSense)
- os-chrony
- os-clamav (but may be a part of squid package in pfSense)
- os-collectd
- os-crowdsec
- os-ddclient (but dynamic DNS functionality is built into pfSense)
- os-debug
- os-dmidecode
- os-dnscrypt-proxy
- os-dyndns (but dynamic DNS functionality is built into pfSense)
- os-etpro-telemetry (not sure if this telemetry ruleset is available in pfSense – let me know in the comments if it is or not)
- os-firewall
- os-git-backup
- os-google-cloud-sdk
- os-grid_example
- os-helloworld
- os-hw-probe
- os-igmp-proxy (but functionality is built into pfSense)
- os-intrusion-detection-content-et-open
- os-intrusion-detection-content-et-pro
- os-intrusion-detection-content-pt-open
- os-intrusion-detection-content-snort-vrt
- os-maltrail
- os-munin-node
- os-netdata
- os-nextcloud-backup
- os-nginx
- os-openconnect
- os-postfix
- os-puppet-agent
- os-qemu-guest-agent
- os-radsecproxy
- os-realtek-re
- os-redis (ntopng in pfSense includes Redis so it is not available as a separate plugin in pfSense)
- os-relayd
- os-rfc2136 (but functionality is built into the “Services > Dynamic DNS” page in pfSense)
- os-rspamd
- os-sensei-agent
- os-sunnyvalley (repository for Zenarmor – can be installed in pfSense manually)
- os-shadowsocks
- os-smart (but functionality is built into the “Diagnostics > S.M.A.R.T. Status” page)
- os-sslh
- os-tayga
- os-theme-cicada (theme is OPNsense specific)
- os-theme-rebellion (theme is OPNsense specific)
- os-theme-tukan (theme is OPNsense specific)
- os-theme-vicuna (theme is OPNsense specific)
- os-tor
- os-udpbroadcastrelay
- os-upnp (but functionality is combined with NAT-PMP on the “Firewall > NAT” page in pfSense)
- os-virtualbox
- os-web-proxy-sso
- os-wireguard-go (pfSense only has WireGuard-kmod and OPNsense has both WG-kmod and WG-go versions)
- os-wol (but functionality is built into the “Services > Wake-on-LAN” page in pfSense)
- os-xen
- os-zerotier
OPNsense Community Repository
The OPNsense community has created their own community repository which may be installed to have even more plugins available. You may find the complete list on the Routerperformance website.
Warning
One word of caution with the community plugins (and any 3rd party plugins including Zenarmor) is that certain OPNsense updates can temporarily break plugins since the OPNsense team is unable to test every plugin that they do not maintain themselves. This likely applies to 3rd party plugins on pfSense as well, but I do not have personal experience with such issues.
Conclusion
While there is much more that could be compared, I hope you found this comparison between pfSense and OPNsense useful in your evaluation of the two platforms.
After digging deeper into the differences, I believe it is safe to say that there are some functional differences that go beyond simply the web interface. Ultimately, you will have to decide which platform will meet your needs the best for your home network.