Gowin Solution R86S-U4 2.5/10G Mini-PC

Table of Contents
In a previous review, I took a look at the R86S-P2 and the R86S-B3 models by Gowin Solution (see their international website).
The R86S originally had 3 different series models: the “B”, “P”, and “G” series. Within each series there were various configurations to choose from. The “B” series is fanless, has the slowest CPU of all the models, and only has 2.5G interfaces. The “P” series has a faster CPU than the “B” series, a fan, and only has 2.5G interfaces. The “G” series has the same or faster CPU than the “P” series, 2 fans, and has both 2.5G and 10G interfaces. The higher end models of each series (except for the “B” series) includes WiFi 6 and Bluetooth.
I have been interested in the “G” series model ever since Gowin sent me an email about it in 2022 since it was the first mini-PC I had seen with multiple 2.5G and 10G interfaces. In my opinion, that is the perfect combination of interfaces for many homelab/home network enthusiasts. However to ground expectations before getting too excited – this system will not be able to max out the 10G interface bandwidth if you are running CPU intensive services such as IDS/IPS services or VPNs.
Several months after the release of the “G” series, Gowin made a new revision: the “U” series. This series has a few notable differences compared to the “G” series which I will discuss in detail in this review. I learned a lot of interesting things while reviewing this unit so this review should be more interesting than my last R86S review especially if you plan to purchase and run OPNsense on it.
Unboxing
As mentioned in the last review, the packing of the Gowin R86S is quite nice. It is packaged in a nice little black box. There is a foam insert that holds the R86S and accessories in place for protection during shipping. I like when manufacturers package their products well.

The contents include the R86S-U4, the power brick with removal plate (to swap out depending on your country), a screwdriver, WiFi antennas (for models which have WiFi), and a micro HDMI to HDMI cable.

Note
The screws on the case are tiny hex sockets so if you plan to open it, be sure to keep the included screwdriver unless you have precision tools available. I found it very difficult to remove the screws on the bottom of the device since they seem to be machine tightened. Be careful not to strip the screws since I almost did that trying to remove the bottom plate.
Build Quality and Features
My first impression of the R86S is that the build quality is nicer than I expected based on the product images. Since the chassis is metal and acts as a heat sink, it has more weight than one might think it would have given its size. The “U” and “G” series models are chunkier than the other models which only have 2.5G network interfaces but the overall size is still quite compact. The device still is small than my hand but it might be a little bit too thick to carry around in your pocket (if you decide to use it as a travel router).
On the front of the R86S “U” and “G” series models, there are three 2.5G Ethernet ports and 2 10G SFP+ interfaces. This combination of interfaces is quite unique for mini-PC network appliances, which is why I find this device to be appealing for home network enthusiasts. There is also a USB 3.0 port as well as a 12V USB-C power socket on the front of the device. The older R86S models use the barrel style power socket instead of USB-C so this is a new change with the “U” series.
Unlike the “P” series models which has only one fan, the “U” and “G” series models have two fans. One near the top and one which is internal to cool the 10G interfaces.
The fans are not very noisy but you can hear them as you get within 5-6 feet or so in a room that is not completely silent (my PC is louder than the R86S). In a completely silent room, you may be able to hear the device faintly further away. Because this model has two fans, it is noticeably louder than the “P” series which only has one fan.
If you were hoping for a silent, fanless mini-PC with high speed network interfaces, it unfortunately may be difficult for a manufacturer to design a fanless mini-PC with 10G SFP+ interfaces because they tend to generate a lot of heat.

On the left side of the R86S-U4 like other R86S models, there is another USB 3.0 port, a TF (microSD) slot, the power button, and the power LED.
New to the “U” series is the inclusion of an extra USB 2.0 port which is nice for connecting keyboard/mice dongles that do not need a high speed USB port. That was one minor complaint received on the older models since you can utilize two USB ports easily especially when using a USB flash drive to install an OS so Gowin responded to the feedback and included an extra USB port.
Another change was moving from a standard HDMI port to a micro HDMI port. Likely this was done to save space for the extra USB port. Even though there appears to be plenty of room on the outside chassis, the layout on the motherboard probably would make it more difficult to squeeze more larger sized ports on it. Because of this change to a micro HDMI port, Gowin includes a micro HDMI to HDMI cable in case you do not have such a cable on hand like you might with a standard HDMI cable. I think it is great they included that cable because I would have had to go digging around my Raspberry Pi cables to find an HDMI adapter.
Also you can see the WiFi antennas since the “U4” model comes equipped with WiFi 6/Bluetooth. The WiFi module only supports AP (access point) mode so you cannot use it for creating ad hoc networks so you cannot use it like a consumer grade WiFi router. I discuss this more in the “Wireless” section below.

The bottom of the R86S-U4 has a removable plate where you can add NVMe storage.
Adding NVMe storage is about the only thing you can upgrade on this system. You may be able to add a separate WiFi module in the “U1” and “U2” models like you can with the other R86S series without the 10G interfaces, but installing it may be more difficult because you do not have access to the WiFi module from the bottom because of the 10G interfaces are on the bottom. Instead, you would have to take more of it apart to install it. For this reason if you want WiFi, I recommend getting the “U3” or “U4” models so you do not have to install the module yourself if you do not feel comfortable installing it.

To give you a general idea of size, you can see the R86S-U next to the R86S-P and a Raspberry Pi 4 Flirc case (affiliate link) . The R86S-U looks deeper than the R86S-P but that is just the camera angle. It has the same width and depth but a different height.

Hardware Specifications
The R86S-U series comes equipped with either the N5105 (U1 and U2) or the N6005 CPU (U3 and U4).
You may get the R86S with 8-32 GB of DDR4 RAM depending on the model you purchase. The U4 I am reviewing comes with 32 GB of RAM. Keep in mind that the RAM is soldered onto the motherboard so you cannot replace the RAM in this system. That is likely one of the tradeoffs of having such a small device with a lot of features packed into it.
All of the R86S models feature a PCIe 3.0 x4 NVMe storage slot so you can take advantage of very fast storage especially when compared to the eMMC storage. Not all mini-PC router/firewall appliances are equipped with NVMe storage so this is a great feature that offers extra performance. When using a quality NVMe drive such as a Samsung NVMe drive, you can take full advantage of the PCIe 3.0 x4 bandwidth (as shown in the “Performance” section).
One change with the “U” series model is that the 2.5G interfaces use the Intel i226v chipset instead of the i225v chipset. I personally have not experienced issues with the i225v chipsets but there are users who will not even consider purchasing any hardware unless it is equipped with the i226v chipset because of the issues that plagued the earlier revisions of the i225v chipset. I believe the issue was mostly an issue if using cheap, poor quality network switches. I have also heard some users say even the i226v has some issues. For those who really want i226v interfaces, this change should be a welcome change.
| Hardware | Option |
|---|---|
| CPU | Intel Celeron N6005 (4 cores, 4 threads) |
| Memory | Micron 32 GB LPDDR4X |
| Storage | 128 GB EMMC |
| Storage | NVMe PCIe 3.0 x4 (optional) |
| Storage | TF card (microSD) |
| Network | Intel i226v 2.5G |
| Network | Mellanox ConnectX-3 SFP+ 10G |
| WiFi/BT | WiFi 6/Bluetooth module (U3 and U4 models only) |
Enabling the 10G Interfaces in OPNsense
When I first installed OPNsense on the R86S-U4, I was disappointed when I saw the 10G interfaces were not supported by OPNsense out of the box. After some quick research, I found that you can simply enable the kernel module driver for the Mellanox SFP+ interfaces.
Log into the console either directly via monitor/keyboard, via SSH, or via USB serial console. At the shell (command line prompt), open the following file using the command below (you can use vi instead of ee if you are one of those people, haha):
ee /boot/loader.conf.local
Then enter the following:
mlx4en_load="YES"
Press “Esc”, press “Enter” twice to save your changes.
Reboot OPNsense and you should now see the 10G interfaces to assign! When I saw how easy it was enable the 10G interfaces, I was very happy because I have been wanting to test this system for quite a while.
Performance
The moment most are waiting for – performance! The R86S-U (and the R86S-G) models have 2.5G Ethernet and 10G SFP+ interfaces so there will be more testing conducted in this review than my other hardware reviews.
In addition, since this is the first time testing a 10G interface, I will provide performance metrics for both the default MTU of 1500 and the MTU set to 9000 (aka jumbo frames). For 10G interfaces, maximum performance typically cannot occur unless jumbo frames are enabled on every device on the 10G interface/network.
I am using iperf3 to test the basic network performance. This tool will help demonstrate the raw performance versus the IDS/IPS performance.
No IDS/IPS Enabled
To get a baseline of maximum performance, I like to test with no IDS/IPS services enabled so I can discover the raw throughput through the firewall. The CPU utilization with no IDS/IPS services running is minimal – typically less than one CPU core.
Tip
After experimenting with various configurations, I noticed the throughput take a decent hit when Netflow is enabled on the 10G interfaces but only when the MTU is set to 1500. Most likely this is due to processing a lot more packets (since they are much smaller). When the MTU is set to 9000, performance on the 10G interfaces is not affected by Netflow.
I am going to assume for the 10G tests that Netflow is disabled (under “Reporting > Netflow”) so maximum performance may be achieved when testing the MTU of 1500. By default Netflow is turned off so if you are testing on a new installation of OPNsense, you should not have to worry about this performance drop.
No IDS/IPS: 10G (MTU set at default 1500)
The default MTU value on network interfaces and devices is 1500. With the defaults and Netflow disabled, performance is about 9.3 Gbps (so almost 9G counting the network overhead), which is not too bad. This is an example of how much MTU affects the throughput of interfaces faster than 2.5G.
[ ID] Interval           Transfer     Bitrate         Retr  Cwnd
[  5]   0.00-10.00  sec  9.67 GBytes  8.31 Gbits/sec   33   3.00 MBytes
[  5]  10.00-20.00  sec  9.74 GBytes  8.37 Gbits/sec  1034   3.00 MBytes
[  5]  20.00-30.00  sec  9.74 GBytes  8.37 Gbits/sec  291   2.34 MBytes
[  5]  30.00-40.00  sec  9.74 GBytes  8.37 Gbits/sec  835   3.00 MBytes
[  5]  40.00-50.00  sec  9.69 GBytes  8.32 Gbits/sec  121   2.30 MBytes
[  5]  50.00-60.00  sec  9.55 GBytes  8.20 Gbits/sec  110   2.77 MBytes
- - - - - - - - - - - - - - - - - - - - - - - - -
[ ID] Interval           Transfer     Bitrate         Retr
[  5]   0.00-60.00  sec  58.1 GBytes  8.32 Gbits/sec  2424             sender
[  5]   0.00-60.04  sec  58.1 GBytes  8.32 Gbits/sec                  receiver
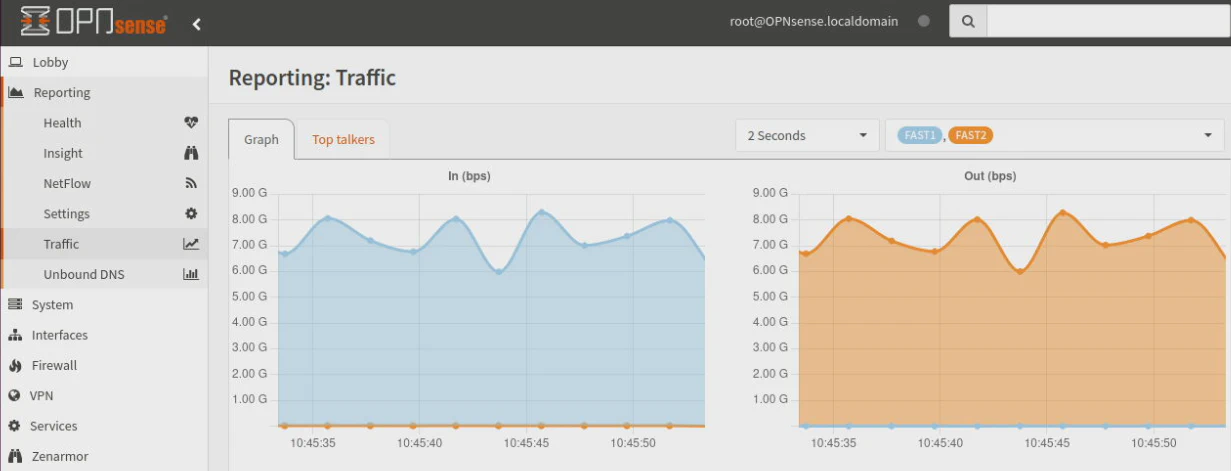
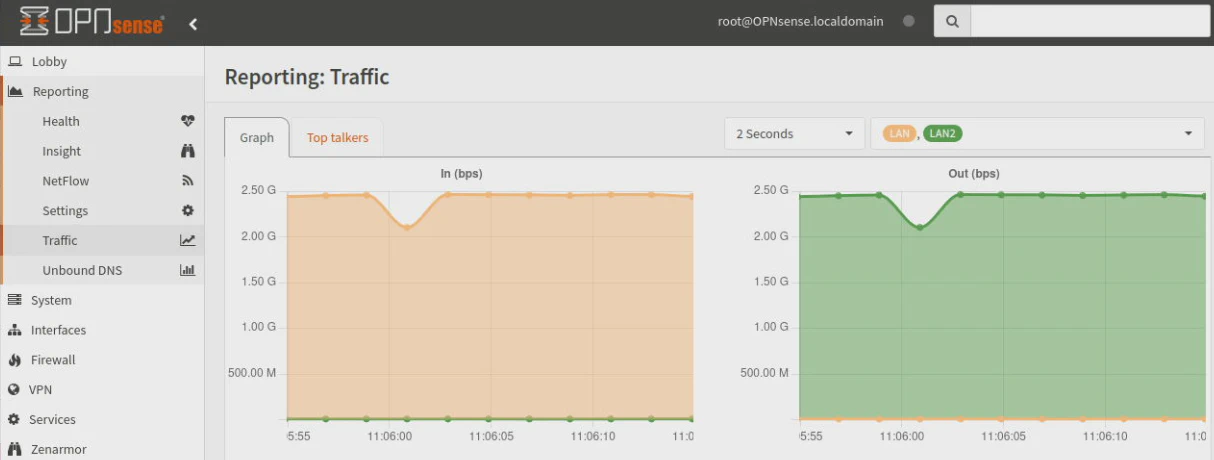
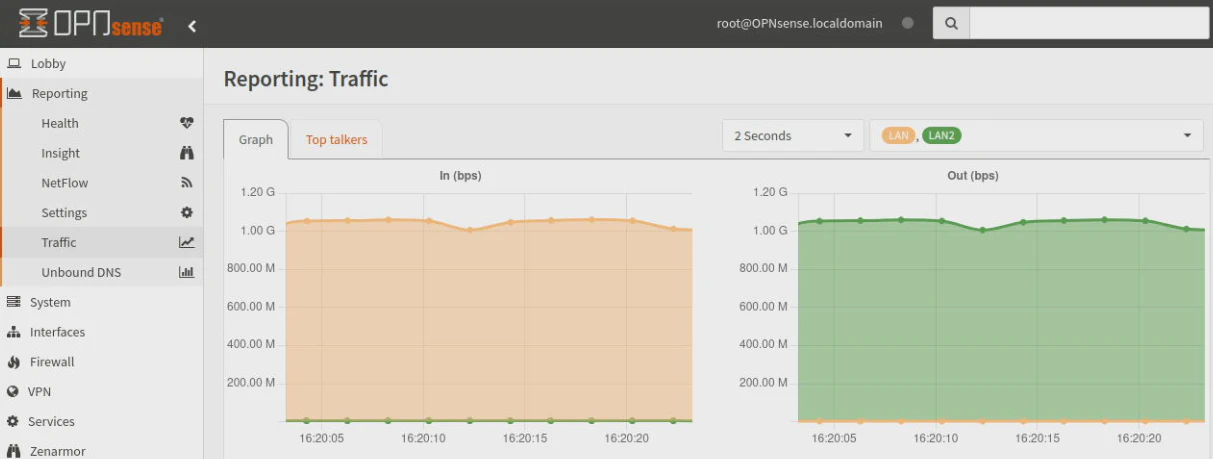
Normally I include an image of the traffic graph along with the iperf3 results, but I noticed the mere act of viewing the traffic graph actually caused throughput to drop to like 6.8-7 Gbps or lower!
Even more interesting is the fact that this drop did not occur in the next test with the MTU set to 9000. My best guess is that there are a lot more packets to process with the MTU set to 1500 instead of 9000 since each packet is smaller.
As you can see in the screenshot below, the performance drops while viewing the traffic graph even with Netflow disabled. The average throughput of this test was 6.9 Gbps: a 1.4 Gbps drop! When switching configuration back and forth during testing, I have seen throughput drop as low as 5.4 Gbps with Netflow enabled!
No IDS/IPS: 10G (MTU set to 9000)
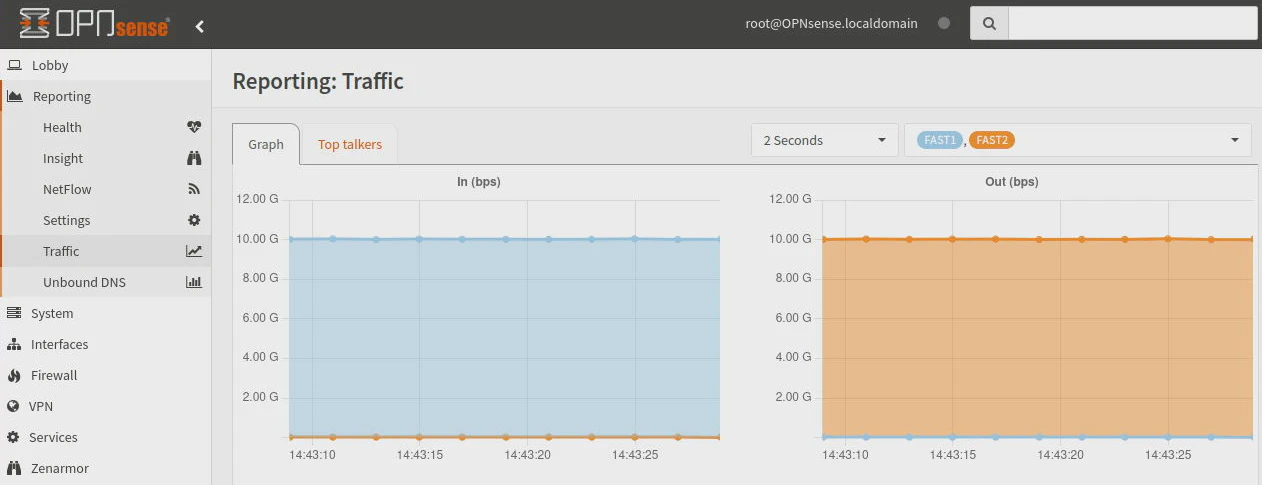
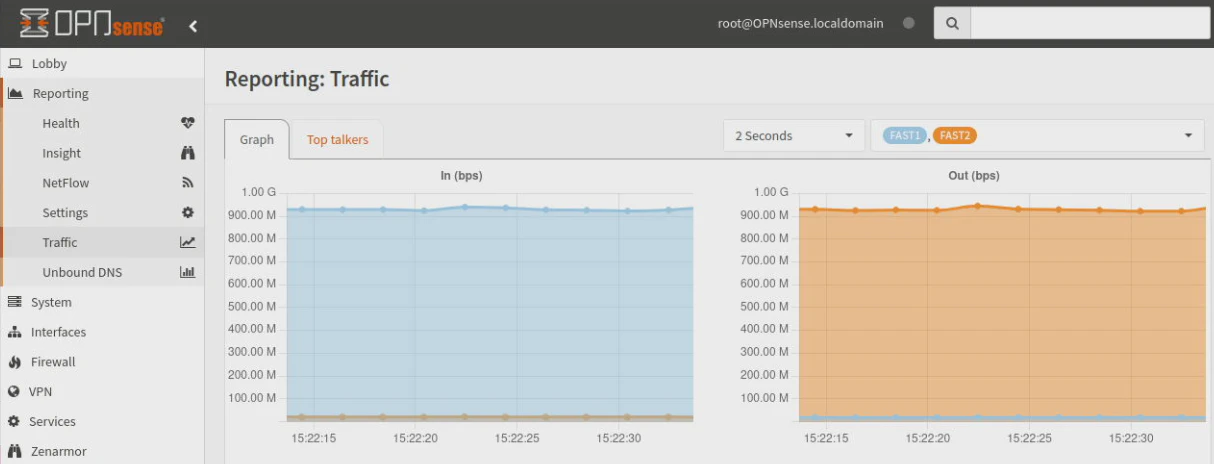
If you wish to have the full 10 Gbps bandwidth on the SFP+ interfaces, you must set the MTU to 9000 on the interfaces as well as every device connected to the SFP+ interfaces. As you can see below, the R86S-U4 has no problems routing 10 Gbps across both interfaces! Basic routing does not require as much CPU as IDS/IPS/VPNs, etc.
The interesting thing is that the CPU overhead is less when processing jumbo frames than the default frame size since there are much less packets to process since they are larger.
In addition as mentioned above, Netflow does not seem to hinder the 10G performance with the MTU set to 9000 like it does when it is set at the default of 1500.
[ ID] Interval           Transfer     Bitrate         Retr  Cwnd
[  5]   0.00-10.00  sec  11.5 GBytes  9.90 Gbits/sec   18   3.04 MBytes
[  5]  10.00-20.00  sec  11.5 GBytes  9.89 Gbits/sec    3   3.04 MBytes
[  5]  20.00-30.00  sec  11.5 GBytes  9.90 Gbits/sec   15   3.08 MBytes
[  5]  30.00-40.00  sec  11.5 GBytes  9.90 Gbits/sec    0   3.08 MBytes
[  5]  40.00-50.00  sec  11.5 GBytes  9.90 Gbits/sec    0   3.08 MBytes
[  5]  50.00-60.00  sec  11.5 GBytes  9.90 Gbits/sec    0   3.08 MBytes
- - - - - - - - - - - - - - - - - - - - - - - - -
[ ID] Interval           Transfer     Bitrate         Retr
[  5]   0.00-60.00  sec  69.1 GBytes  9.90 Gbits/sec   36             sender
[  5]   0.00-60.04  sec  69.1 GBytes  9.89 Gbits/sec                  receiver
The traffic graph in this example was a solid 10G (and performance was unaffected by viewing the traffic graph), which is great if you want to route full 10G with no IDS/IPS enabled on the interfaces.
Warning
At the time of this writing, both Suricata and Zenarmor cannot be used on interfaces that have the MTU set to 9000.
No IDS/IPS: 2.5G
There is no problems running at full 2.5 Gbps with no IDS/IPS enabled.
[ ID] Interval           Transfer     Bitrate         Retr  Cwnd
[  5]   0.00-10.00  sec  2.74 GBytes  2.36 Gbits/sec    0    793 KBytes
[  5]  10.00-20.00  sec  2.74 GBytes  2.35 Gbits/sec    0    793 KBytes
[  5]  20.00-30.00  sec  2.74 GBytes  2.35 Gbits/sec    0   1.15 MBytes
[  5]  30.00-40.00  sec  2.74 GBytes  2.35 Gbits/sec    0   1.15 MBytes
[  5]  40.00-50.00  sec  2.74 GBytes  2.35 Gbits/sec    0   1.82 MBytes
[  5]  50.00-60.00  sec  2.74 GBytes  2.35 Gbits/sec    0   1.82 MBytes
- - - - - - - - - - - - - - - - - - - - - - - - -
[ ID] Interval           Transfer     Bitrate         Retr
[  5]   0.00-60.00  sec  16.4 GBytes  2.35 Gbits/sec    0             sender
[  5]   0.00-60.04  sec  16.4 GBytes  2.35 Gbits/sec                  receiver
Zenarmor Enabled
Zenarmor tends to perform much better than Suricata, but the two IDS/IPS platforms take different approaches to monitoring network traffic. I am testing with the native netmap driver, but I also tested the emulated netmap driver. The interesting thing is that the emulated mode seemed to perform just as well on both the 10G and 2.5G interfaces. Some work has been made to improve emulated performance recently so perhaps that is why the emulated mode seems to be working quite well compared to the native driver.
As you see below, the impact to throughput is much less than Suricata (shown in the next set of tests). However especially with 10G, there is still a significant performance penalty to running Zenarmor on a device such as the R86S. As mentioned earlier, in order to maximize throughput on 10G+ interfaces with IDS/IPS or VPNs, you will certainly need a more powerful system. That is why I recommend not using Zenarmor or Suricata on the 10G interfaces in this system if you wish to maximize throughput.
Zenarmor: 10G
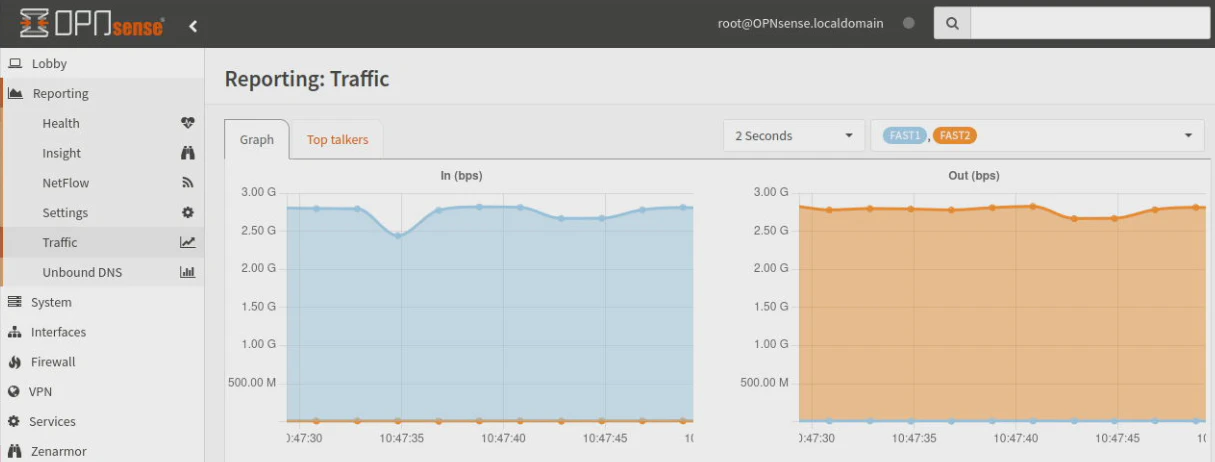
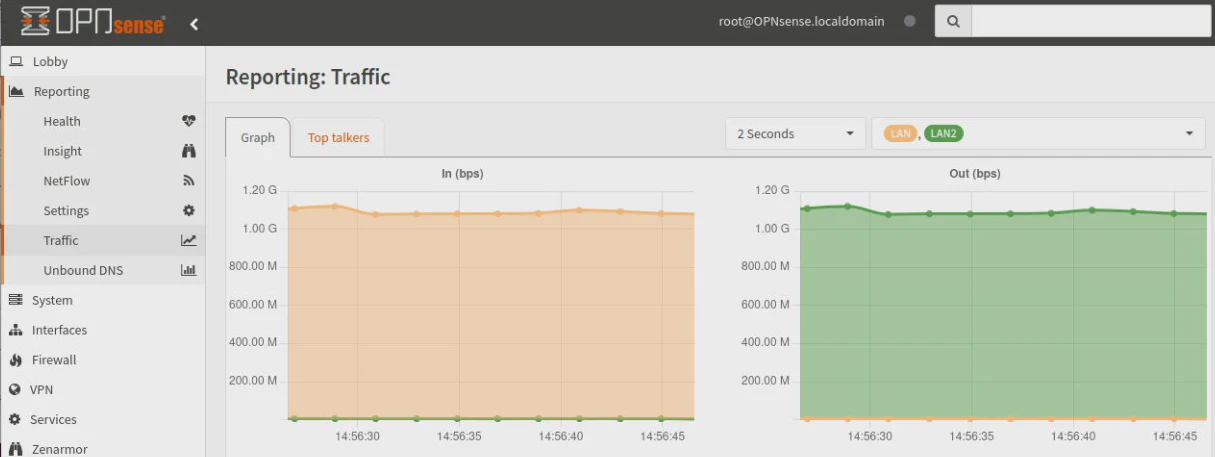
The impact to performance is less than Suricata but you are still limited to about 3-3.1 Gbps when running Zenarmor on the 10G SFP+ interfaces.
[ ID] Interval           Transfer     Bitrate         Retr  Cwnd
[  5]   0.00-10.00  sec  4.00 GBytes  3.44 Gbits/sec  838   2.47 MBytes
[  5]  10.00-20.00  sec  4.27 GBytes  3.67 Gbits/sec  470   2.39 MBytes
[  5]  20.00-30.00  sec  3.40 GBytes  2.92 Gbits/sec  981   2.17 MBytes
[  5]  30.00-40.00  sec  3.39 GBytes  2.91 Gbits/sec  236   2.65 MBytes
[  5]  40.00-50.00  sec  3.37 GBytes  2.90 Gbits/sec  678   2.29 MBytes
[  5]  50.00-60.00  sec  3.33 GBytes  2.86 Gbits/sec   42   2.63 MBytes
- - - - - - - - - - - - - - - - - - - - - - - - -
[ ID] Interval           Transfer     Bitrate         Retr
[  5]   0.00-60.00  sec  21.8 GBytes  3.12 Gbits/sec  3245             sender
[  5]   0.00-60.05  sec  21.8 GBytes  3.11 Gbits/sec                  receiver
Zenarmor: 2.5G
[ ID] Interval           Transfer     Bitrate         Retr  Cwnd
[  5]   0.00-10.00  sec  1.60 GBytes  1.38 Gbits/sec  1042   1.85 MBytes
[  5]  10.00-20.00  sec  2.74 GBytes  2.35 Gbits/sec    0   2.59 MBytes
[  5]  20.00-30.00  sec  1.75 GBytes  1.50 Gbits/sec  1164   2.47 MBytes
[  5]  30.00-40.00  sec  2.72 GBytes  2.34 Gbits/sec  853   1.85 MBytes
[  5]  40.00-50.00  sec  2.73 GBytes  2.34 Gbits/sec    0   2.63 MBytes
[  5]  50.00-60.00  sec  2.74 GBytes  2.35 Gbits/sec  343   2.09 MBytes
- - - - - - - - - - - - - - - - - - - - - - - - -
[ ID] Interval           Transfer     Bitrate         Retr
[  5]   0.00-60.00  sec  14.3 GBytes  2.04 Gbits/sec  3402             sender
[  5]   0.00-60.06  sec  14.3 GBytes  2.04 Gbits/sec                  receiver
Suricata Enabled
To determine the worst case performance with Suricata, I enabled all of the rulesets. In practice, you should only enable the rules that are applicable to your network to minimize the amount of rules that need to be processed. For instance, if you are not running a FTP server, you would not need the ET open/emerging-ftp ruleset.
Suricata: 10G
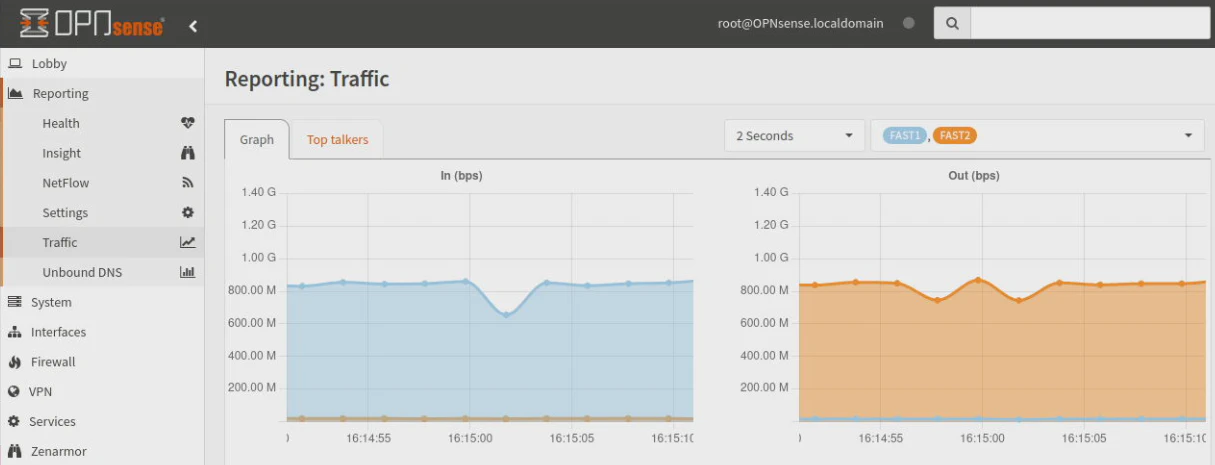
Throughput drops quite significantly with Suricata enabled. In fact, it is slightly less than 1 Gbps. Part of the reason is the limited CPU in many mini-PCs, but netmap which both Suricata and Zenarmor use also does not take advantage of all of the available CPU cores in the system.
[ ID] Interval           Transfer     Bitrate         Retr  Cwnd
[  5]   0.00-10.00  sec  1.07 GBytes   923 Mbits/sec  107    663 KBytes
[  5]  10.00-20.00  sec  1.08 GBytes   924 Mbits/sec   49    755 KBytes
[  5]  20.00-30.00  sec  1.08 GBytes   928 Mbits/sec   54    628 KBytes
[  5]  30.00-40.00  sec  1.07 GBytes   923 Mbits/sec   54    725 KBytes
[  5]  40.00-50.00  sec  1.08 GBytes   925 Mbits/sec   71    590 KBytes
[  5]  50.00-60.00  sec  1.06 GBytes   908 Mbits/sec   62    658 KBytes
- - - - - - - - - - - - - - - - - - - - - - - - -
[ ID] Interval           Transfer     Bitrate         Retr
[  5]   0.00-60.00  sec  6.44 GBytes   922 Mbits/sec  397             sender
[  5]   0.00-60.05  sec  6.44 GBytes   921 Mbits/sec                  receiver
When Suricata is running on both 10G interfaces, performance is almost half as running Suricata on one interface, which is to be expected when processing the rulesets on both interfaces. Note that typically you would only run Suricata on one interface: the WAN interface. I thought it would be interesting to show the performance drop when running it on multiple interfaces.
[ ID] Interval           Transfer     Bitrate         Retr  Cwnd
[  5]   0.00-10.00  sec   524 MBytes   439 Mbits/sec   71   1.25 MBytes
[  5]  10.00-20.00  sec   520 MBytes   436 Mbits/sec   10   1.42 MBytes
[  5]  20.00-30.00  sec   510 MBytes   428 Mbits/sec  210   1.14 MBytes
[  5]  30.00-40.00  sec   521 MBytes   437 Mbits/sec    6   1.24 MBytes
[  5]  40.00-50.00  sec   524 MBytes   439 Mbits/sec    5   1.20 MBytes
[  5]  50.00-60.00  sec   506 MBytes   425 Mbits/sec   12   1.18 MBytes
- - - - - - - - - - - - - - - - - - - - - - - - -
[ ID] Interval           Transfer     Bitrate         Retr
[  5]   0.00-60.00  sec  3.03 GBytes   434 Mbits/sec  314             sender
[  5]   0.00-60.06  sec  3.03 GBytes   433 Mbits/sec                  receiver

Suricata: 2.5G
Similar to the 10G interfaces, Suricata reduces bandwidth significantly. It is actually slightly slower than the 10G interfaces but overall very close in performance due to the limitations of the CPU, netmap, etc. Suricata was only enabled on one of the two interfaces in this test.
[ ID] Interval           Transfer     Bitrate         Retr  Cwnd
[  5]   0.00-10.00  sec  1.24 GBytes  1.07 Gbits/sec  119    567 KBytes
[  5]  10.00-20.00  sec  1.24 GBytes  1.07 Gbits/sec   45    792 KBytes
[  5]  20.00-30.00  sec  1.26 GBytes  1.08 Gbits/sec   60    781 KBytes
[  5]  30.00-40.00  sec  1.26 GBytes  1.08 Gbits/sec   45    776 KBytes
[  5]  40.00-50.00  sec  1.26 GBytes  1.08 Gbits/sec   51    755 KBytes
[  5]  50.00-60.00  sec  1.25 GBytes  1.08 Gbits/sec   50    738 KBytes
- - - - - - - - - - - - - - - - - - - - - - - - -
[ ID] Interval           Transfer     Bitrate         Retr
[  5]   0.00-60.00  sec  7.52 GBytes  1.08 Gbits/sec  370             sender
[  5]   0.00-60.04  sec  7.52 GBytes  1.08 Gbits/sec                  receiver
With both interfaces enabled in Suricata, like with the 10G tests, performance is decreased almost by half.
[ ID] Interval           Transfer     Bitrate         Retr  Cwnd
[  5]   0.00-10.00  sec   619 MBytes   519 Mbits/sec   82    574 KBytes
[  5]  10.00-20.00  sec   614 MBytes   515 Mbits/sec   19    576 KBytes
[  5]  20.00-30.00  sec   596 MBytes   500 Mbits/sec   18    585 KBytes
[  5]  30.00-40.00  sec   601 MBytes   504 Mbits/sec   22    771 KBytes
[  5]  40.00-50.00  sec   609 MBytes   511 Mbits/sec   36    773 KBytes
[  5]  50.00-60.00  sec   591 MBytes   496 Mbits/sec   22    754 KBytes
- - - - - - - - - - - - - - - - - - - - - - - - -
[ ID] Interval           Transfer     Bitrate         Retr
[  5]   0.00-60.00  sec  3.54 GBytes   507 Mbits/sec  199             sender
[  5]   0.00-60.06  sec  3.54 GBytes   507 Mbits/sec                  receiver
Zenarmor + Suricata Enabled
For this test, I enabled Zenarmor on one interface and Suricata on the other interface since they both cannot run on the same interface at the same time due to limitations with netmap. Typically you would run Suricata on the WAN and Zenarmor on the LAN.
One thing that is interesting about running both Zenarmor and Suricata is that the CPU stays pegged around 50% which indicates that both Zenarmor and Suricata are competing for the same 2 cores (the Zenarmor team has indicated to me that is likely what is happening based on what I am seeing). Because of this, throughput will take a hit when running both services. It is too bad that the services cannot be distributed better across the cores because it is possible much higher throughput could be available even for these lower power CPUs if the entire CPU was being fully utilized.
Zenarmor + Suricata: 10G
The performance dropped about 100 Mbps compared to the Suricata 10G test with enabling Zenarmor also. Zenarmor does not have as much of a performance impact but since the two services are fighting over the same two CPU cores, performance takes a small hit.
[ ID] Interval           Transfer     Bitrate         Retr  Cwnd
[  5]   0.00-10.00  sec  1.02 GBytes   872 Mbits/sec   82    581 KBytes
[  5]  10.00-20.00  sec  1.01 GBytes   867 Mbits/sec   33    574 KBytes
[  5]  20.00-30.00  sec   969 MBytes   813 Mbits/sec   33    742 KBytes
[  5]  30.00-40.00  sec   941 MBytes   790 Mbits/sec   44    626 KBytes
[  5]  40.00-50.00  sec   969 MBytes   813 Mbits/sec   28    781 KBytes
[  5]  50.00-60.00  sec   925 MBytes   776 Mbits/sec   30    656 KBytes
- - - - - - - - - - - - - - - - - - - - - - - - -
[ ID] Interval           Transfer     Bitrate         Retr
[  5]   0.00-60.00  sec  5.74 GBytes   822 Mbits/sec  250             sender
[  5]   0.00-60.05  sec  5.74 GBytes   821 Mbits/sec                  receiver
Zenarmor + Suricata: 2.5G
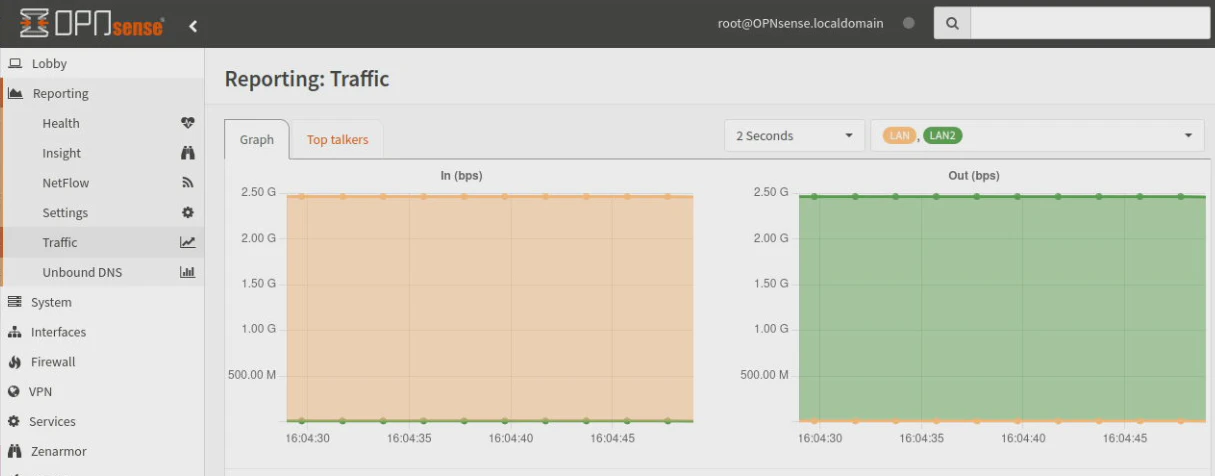
In the same manner as the 10G interfaces, the 2.5G interface performance dips about 100 Mbps as well when both services are enabled.
[ ID] Interval           Transfer     Bitrate         Retr  Cwnd
[  5]   0.00-10.00  sec  1.17 GBytes  1.00 Gbits/sec   65    687 KBytes
[  5]  10.00-20.00  sec  1.12 GBytes   962 Mbits/sec   28    721 KBytes
[  5]  20.00-30.00  sec  1.17 GBytes  1.00 Gbits/sec   24    812 KBytes
[  5]  30.00-40.00  sec  1.17 GBytes  1.00 Gbits/sec   30    649 KBytes
[  5]  40.00-50.00  sec  1.11 GBytes   957 Mbits/sec   29    683 KBytes
[  5]  50.00-60.00  sec  1.05 GBytes   903 Mbits/sec   39    658 KBytes
- - - - - - - - - - - - - - - - - - - - - - - - -
[ ID] Interval           Transfer     Bitrate         Retr
[  5]   0.00-60.00  sec  6.78 GBytes   971 Mbits/sec  215             sender
[  5]   0.00-60.05  sec  6.78 GBytes   970 Mbits/sec                  receiver
Wireless
On the R86S-U4, the wireless module is actually detected in OPNsense unlike the “B” and “P” series models I used in the past. However, the wireless module does not support ad hoc wireless mode so you cannot use it to create a WiFi network as you would with a consumer grade router.
I recommend using dedicated wireless APs since you can locate them in more ideal locations and deploy multiple APs to ensure full coverage of your home. Gowin informed me that future models will include a wireless module which supports creating WiFi networks (however wireless support in OPNsense, for example, is limited due to FreeBSD driver/feature support).
To test WiFi performance, I used Ubuntu which recognizes the wireless hardware out of the box. I performed the same iperf3 test that I used for the wired interfaces. I was able to get about 450 Mbps on a WiFi 6 access point.
The wireless performance may vary depending on the wireless access point used and the amount of interference you may receive from nearby wireless signals.
[ ID] Interval           Transfer     Bitrate
[  5]   0.00-10.00  sec   529 MBytes   443 Mbits/sec
[  5]  10.00-20.00  sec   556 MBytes   466 Mbits/sec
[  5]  20.00-30.00  sec   525 MBytes   440 Mbits/sec
[  5]  30.00-40.00  sec   525 MBytes   440 Mbits/sec
[  5]  40.00-50.00  sec   539 MBytes   452 Mbits/sec
[  5]  50.00-60.00  sec   558 MBytes   468 Mbits/sec
[  5]  60.00-60.04  sec  2.02 MBytes   429 Mbits/sec
- - - - - - - - - - - - - - - - - - - - - - - - -
[ ID] Interval           Transfer     Bitrate
[  5]   0.00-60.04  sec  3.16 GBytes   452 Mbits/sec                  receiver
Storage
All R86S models come equipped with eMMC and NVMe storage. You can also use microSD cards (via the TF slot) that may be useful if you are using the R86S as a low power desktop/server and you wish to flash microSD cards.
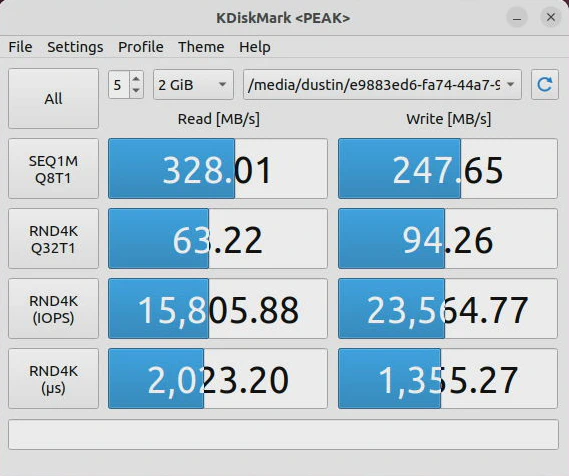
eMMC storage is more reliable and much faster than microSD storage, but eMMC does not perform as well as a SATA SSD. High quality SSDs can reach peak read speeds of approximately 550 MB/s. When I tested the eMMC storage, it reached a peak of ~330 MB/s for reading and ~250 MB/s for writing so it is about half the speed of a good quality SSD.
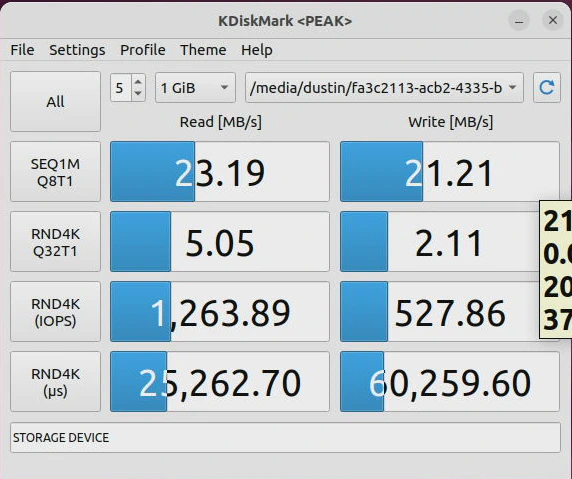
The microSD storage only gets slightly above 20 MB/s so you can see the huge performance difference compared to eMMC and other faster storage options. Performance can vary depending on the type of microSD card you are using.
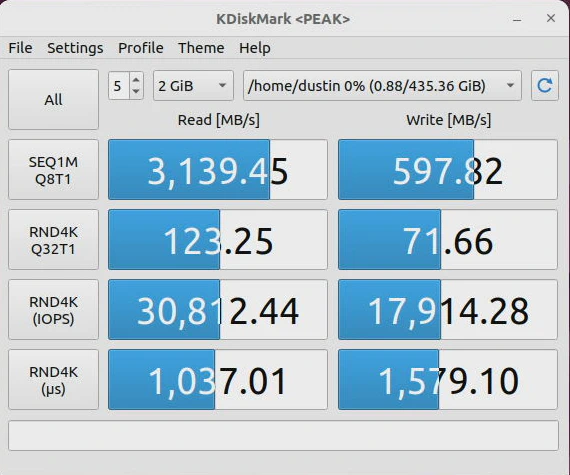
The R86S supports PCIe 3.0 x4 NVMe storage so I tested a NVMe drive to see if it could take full advantage of the PCIe bandwidth. On my previous R86S review, I used a Samsung 970 Evo Plus NVMe drive (affiliate link) , and it was able to saturate the PCIe 3.0 x4 interface at ~3,500 MB/s read and ~3,100 MB/s write speeds.
Unfortunately, I am using that NVMe in my PC so I was only able to test using a slower Crucial NVMe drive (affiliate link) (Crucial makes higher end NVMe drives, but all I needed was a small capacity slower model). Because of using this slower NVMe drive, I am not able to demonstrate the full speed of the NVMe storage interface on the R86S-U4. I am sure it will also max out on the “U4” if I had a faster NVMe. I will try to update this benchmark in the future if I get a chance to test with a faster NVMe drive.
Power Consumption
To monitor power consumption, I used an energy monitoring smart plug that is connected to Home Assistant. This allow me to see real-time power usage over time on a graph. I am not sure about accuracy of the energy monitory plug, but it should provide a good idea of general power consumption.
The idle power consumption on the R86S-U4 is about 13-14W and that is with most of the network interfaces populated. Unplugging the SFP+ cables seemed to drop the wattage nearly 2W. During testing IPS/IDS performance, the wattage jumped to 25-26W at 50% CPU utilization. When I booted the system, the wattage surged to about 24-25W.
The energy consumption on the R86S-U4 is certainly a bit higher than the other models without the SFP+ interfaces. Although the TDP of the Intel N6005 is 10W, you will be idling a few Watts above that with all the network interfaces connection
Temperature
To view the system temperatures, I added the thermal sensors widget to the OPNsense “Dashboard” (I had to set the thermal sensor hardware to “Intel Core CPU on-die thermal sensor” on the “System > Settings > Miscellaneous” page to see the CPU temperatures). Since I do not currently have a heat gun, I cannot measure the outside temperature of the R86S.
For the R86S-U4, the temperature range was between 38-55C. When idling, the temperature stayed between 38-42C and under load it was sitting at around 51-55C, which is pretty good because some of my other fanless mini-PCs sometimes peak in the 70-73C range under load.
The device does not feel too hot to the touch even under a heavy load. Since it has two fans inside, I do not worry about this device overheating even when using SFP+ DAC cables.
Where to Purchase?
Gowin is currently working on their international website where orders can be placed directly through them. You can find the R86S-U4 for purchase on AliExpress (affiliate link) , but at the time of this writing Gowin expressed that those are from resellers without authorization to sell their products.
Whenever Gowin officially sells their products on their website, I will update this page with the relevant information. I hope to include affiliate links if you are interested in purchasing this device which will help support me creating content. I greatly appreciate all support by my audience!