Remote Control a PC or Server with the TinyPilot Voyager

Table of Contents
Remote administration tools such as Remote Desktop, VNC, etc. are great for controlling systems without needing to be physically present. There is only one big problem: all of these tools require a functional operating system to be present in order to function. You may think, ‘Yes, of course you need to have the operating system installed first.’
While it is usually simple enough to administrate your system(s) while you are at home, what if you encounter issues that are not easily resolved when you are away from home? If your system will not boot properly into the operating system, you will not be able to fix your machine remotely… or can you?
What if you could remotely see the screen and use the mouse/keyboard as though you were standing in front of the machine? That would be awesome, right?! Well it is possible with the TinyPilot Voyager (see the newer Voyager 2a (affiliate link) ) using what is called KVM over IP.
You can boot into the motherboard BIOS or see the system’s boot sequence as the operating system loads – all within a web browser using HTML 5. No browser plugin or system software needs to be installed. That is pretty slick. Even more slick is the ability to remotely mount a bootable disk image to install an operating system onto the remote system. For home users, that means you could install an OS remotely on a system located in your dungeon (aka basement) from the comfort of your couch upstairs or while you are sitting in a hotel room with nothing else better to do.
A new version of the TinyPilot has been released since the release of the original TinyPilot Voyager– the Voyager 2a. Please check out my review of the Voyager 2a as the original model has been retired and is no longer available for purchase.
How Did I Discover TinyPilot?
At some point while browsing random technical articles, I came across the concept of using the Raspberry Pi for KVM over IP. The purpose of KVM over IP is to mimic a KVM (Keyboard, Video, and Mouse) switch but provide the keyboard, video, and mouse functionality over the network. I cannot recall if I came across TinyPilot during that time or if it was other similar DIY solutions. Either way, I was intrigued by the idea and thought that it would be a good use for some old Raspberry Pi 3’s that are not being fully utilized at the moment.
Fast forward a few months and I was approached by Michael Lynch, the founder of TinyPilot (affiliate link) , about reviewing his product. I thought a review of a KVM over IP product would be of interest to many of my readers who manage their home networks and systems. Personally, I was pretty excited for the opportunity because I had already considered building such a device when I had the time and funding available. So I must thank Michael for providing the opportunity to geek out!
Unboxing the TinyPilot Voyager
Now for the unboxing of the TinyPilot Voyager! I know some of you enjoy unboxing videos, but since I do not currently do videos (although I have considered it), you can browse the unboxing images below. If you wish to skip the unboxing, you can jump to the next section on how to connect it all together.
The TinyPilot Voyager comes in a small package (it is using a Raspberry Pi 4, so of course it has a small footprint!).

Inside the box, there is a set of instructions on how to access the web interface or via SSH using the default credentials.

All of the parts that you will receive is in the image below. You get the TinyPilot Voyager, a USB power plug, a power/data splitter box, a USB-C cable, 2 USB to micro-USB cables, and a TinyPilot sticker.

A closer look of the TinyPilot shows the standard Raspberry Pi 4 ports as well as the additional HDMI capture device at the top of the case. You will also notice it has cutouts for ventilation. It has a small, quiet fan installed to help keep it cool.

Connecting the TinyPilot Voyager to the System to Control
To demonstrate how to connect everything together, I used a Raspberry Pi 4 in a Flirc case (affiliate link) so that I could lay it all out on the table for the connections to be visible.
As you can see, you connect a HDMI cable from the TinyPilot using the HDMI capture device above the standard RPi4 ports to the HDMI port of the remote machine to capture video and you connect the USB cable from the “Data” port of the splitter box to the remote machine to send the keyboard/mouse keystrokes and movements. The power/data splitter box is connected to the USB-C port of the TinyPilot (the standard power port for the Raspberry Pi 4). Both the remote machine and the TinyPilot are connected to the network which is shown in a simplistic way in the image below. As you can see, the connections are pretty simple. Just 2 cables plug into the remote machine and a couple of connections on the TinyPilot. One thing I did not realize is that the USB-C power port on the Raspberry Pi 4 can also be used for data.
Cabling can be a bit of a mess unless you work to keep them tidy, but it is about the same amount of cabling as connecting a single device to a standard KVM switch.

Note that the picture only shows how to connect the TinyPilot to the system you wish to control (the Raspberry Pi 4 in this example), but there will be a 3rd device which is the system you are using to administrate the Raspberry Pi 4: your PC, laptop, tablet, phone, etc. You will simply use that device to log into the TinyPilot to administrate your remote system. For simplicity, I am assuming that the system you are using to administrate your remote system is also connected to your network via wired or wireless connection.
Logging into the TinyPilot Voyager
Log into your TinyPilot by going to https://tinypilot or by the IP address assigned to the TinyPilot. When you first open the browser, you will see a standard warning for self-signed certificates. Simply click “Advanced” and allow the connection.
If you wish to get rid of the warning, you can install the TinyPilot’s certificate on your system.

If your remote system is already booted, you will see that system’s screen like a standard remote desktop session. For this screenshot, I tried one of my old Raspberry Pi 3’s that I had lying around.

If your video feed is not connected or there is no video signal for some reason, you will see the following screen:

You will notice that the user interface has an on-screen keyboard which is nice if you just want to click the buttons instead of typing or for some reason you only have a mouse plugged in. I believe the webpage is able to capture all of the keyboard inputs properly so you should not need to use the keyboard for special keystrokes. However for the “Meta” keystroke, it may be more convenient to use the on-screen keyboard because the start menu of your OS may pop up in front of your browser window. The page can still capture the keystroke even if the start menu also opens. Using the on-screen keyboard avoids that issue.
As shown in the screenshot below, any keys that you type will be displayed in the bottom corner under the keyboard (you can see that I typed “test” and then hit the “Enter” key). I thought it was a nice detail to include because you have a visual indicator of the keystrokes that are being sent to the receiving device. This feature was actually helpful to me because on one of the systems I tested, the keyboard strokes were recognized as I was typing but the remote system was not properly receiving all the keystrokes (a reboot helped resolve the issue – see details in the Anomalies section).

In the beginning of this review I mentioned being able to see the motherboard BIOS remotely… in a web browser! That is pretty nice if you need full system control remotely. Here is a screenshot of it in action:

You can also watch as the system boots up.

Still booting…

I will now highlight all of the menu options so you know what is available in TinyPilot.
System Settings
The system settings contains options for setting a password, changing the device name, uploading disk images, changing the video quality, etc.
Security
A password can be set in the “Security” menu. This is useful because if anyone has access to the TinyPilot interface, they will have the same access as standing in front of your machine which could be pretty dangerous! You will see a checkbox where you can enable a password.

Once enabled, you can enter your credentials.

Virtual Media
The virtual media feature is the most interesting one. This feature allows you to upload and mount a disk image that you may use to boot the system or it can be mounted for an existing system to access the files. If you have not uploaded any disk images, you will see an empty list. You can either upload images from your computer or a URL. It is nice that there is a URL option because you do not need to download the ISO to your system before uploading it to the TinyPilot. After all, the TinyPilot is a single board computer capable of such tasks.

When transferring a file, you will see the upload progress.

If you click the dropdown arrow, you can see options to mount, eject, or delete the disk image.

After mounting the disk image, it will be displayed as “(mounted)”.

If you reboot with the mounted image and you have USB drive booting enabled on your system, you can boot from the image and install an operating system!

The example below is booting the Ubuntu installer from the TinyPilot similar to a USB drive plugged into the system.

Updates
The “Updates” menu option will show you if any updates are available to install.

Hostname
The default hostname of the TinyPilot is “tinypilot”. You may change that to something else. This is how you can access your TinyPilot on your network if you do not wish to use the IP address (for instance, https://tinypilot).

Video Settings
The default video settings is 30 fps at 80% JPEG quality. If for some reason performance is lacking (especially if you are accessing TinyPilot remotely away from your network), you may lower these values.

Logs
You may view your system logs from the “Logs” menu option. There is a handy “Copy to Clipboard” button in case you want a copy/paste the log information.

Also, there is a “Get Shareable URL” button. It uploads a copy of the log to TinyPilot’s website with a randomly generated string in the URL. This is very convenient if you wish to share your logs with TinyPilot to help with troubleshooting or to share your logs with anyone outside your network. If for some reason you are concerned with privacy, you could always review the log information that will be sent before creating a shareable link.

Power
The “Power” menu option provides a way to shut down or restart your TinyPilot remotely without needing to log in using SSH. Those who prefer to only use the GUI should be happy to have that option available.

Actions
The main action you can perform in the “Actions” menu is take screenshots.
Paste
When you click “Paste” from the menu, it displays that you can paste using the standard “Ctrl + V” key combination. I think it would be nicer if it would simply paste the contents in the clipboard rather than displaying a message, but perhaps there is a good reason it is done this way. Perhaps it is a placeholder for a future feature?

Screenshot
The “Screenshot” menu option takes a screenshot of the remote system’s screen which is useful for writing technical guides or to show someone error message(s) on the screen for troubleshooting purposes. It does not include any other page elements from the web interface so the screenshot looks the same as taking a screenshot on the remote system.

View
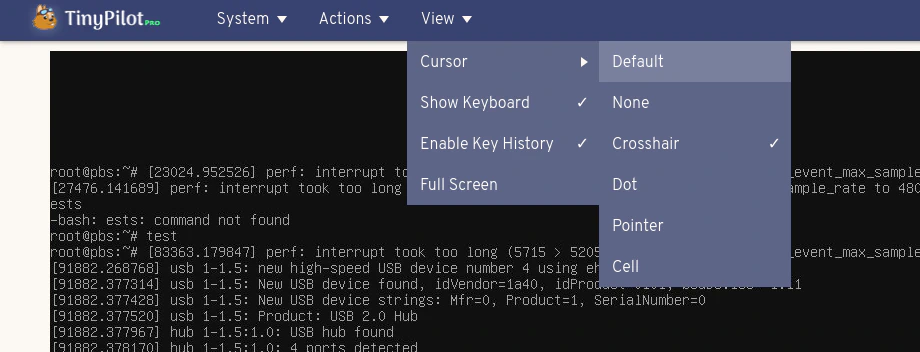
The “View” options allow you to change various screen elements on the web interface such as the mouse cursor/pointer.
Cursor
There are a number of mouse cursors you may select if you do not prefer the default crosshair cursor. The cursors can help you distinguish between your local mouse and the remote mouse since the remote mouse cursor will lag behind where you are actually pointing until you stop moving your mouse and the remote mouse cursor catches up. You can turn off the cursor if you prefer not to see both on the screen.
Show Keyboard
If you do not like the on-screen keyboard, you can turn it off by clicking the “Show Keyboard” menu option. It will uncheck the option and the keyboard will be removed.

Enable Key History
By default, whatever keys you type will be displayed for a few seconds in the bottom right corner under the on-screen keyboard. If you do not like seeing that, you can turn it off by unchecking the menu option.
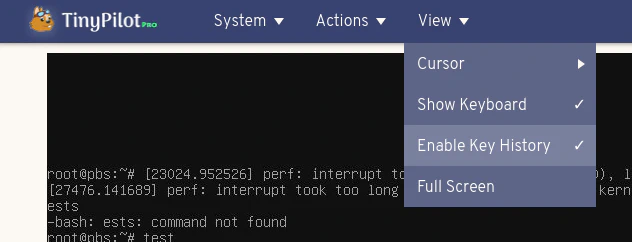
Full Screen
The “Full Screen” option is self-explanatory. You can view the remote screen in full screen mode which is nice since it makes the experience feel even more like you are sitting directly in front of the remote system.

Anomalies
What would a complete review be without discussing the issues encountered? Some of the issues may be particular to the types of devices I was using – most likely in scenarios where you may not necessary use a TinyPilot. However, I wanted to try a variety of devices to test how the TinyPilot functions. Some of the issues are currently being addressed by the TinyPilot developers as noted below.
Proxmox Backup Server
I noticed when I plugged the TinyPilot into my Proxmox Backup Server that the keyboard input was not functioning exactly right. It did not seem to be receiving the keystrokes properly. Once I rebooted the machine, the keyboard worked perfectly. I thought I would note this in case you are having issues controlling a machine that is already booted.
Old Dell Laptop
One of the systems I tried to control was my old laptop. I could not see the screen of the laptop until shortly before the Windows 10 login prompt is displayed. That meant I could not load into the BIOS settings or see any other boot screens. It is possible that it is a quirk of how my laptop handles external displays so this may not happen for other laptop models. For some laptops, you have to press special keys to enable output to an external display.
Raspberry Pi 3B+
When using TinyPilot to control a Raspberry Pi 3 with Raspberry Pi OS installed, the input lag for the mouse/keyboard was very high for some reason. I tried turning down the video quality, and it did not really help. However, I am not sure how many users would need to control a Raspberry Pi with the TinyPilot especially since the benefits would be minimal unlike other types of systems. You do not have motherboard settings to tweak or the ability to install an OS in the same way as a standard system. The usual way to install an OS for the Raspberry Pi is to use disk imaging software on another system. The only small benefit I could think of is seeing the boot up text which may be helpful for troubleshooting issues that occur during booting. However, you could not really fix the issue(s) remotely anyway if you cannot get the RPi to boot.
Blank Video Window
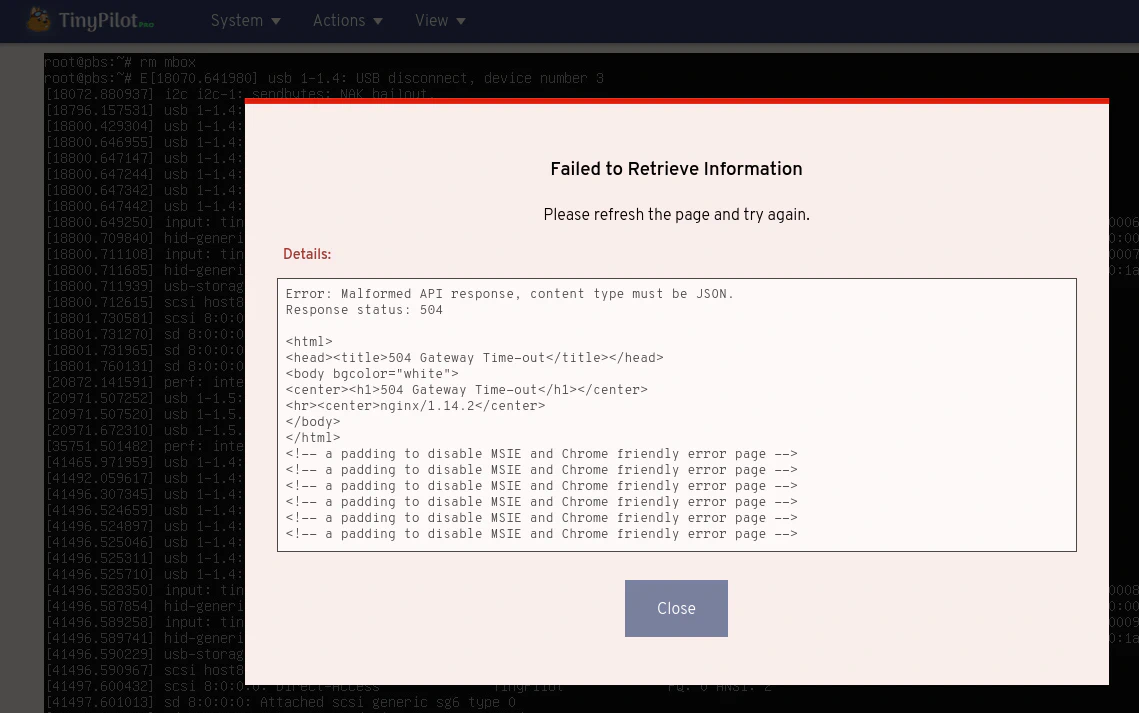
After leaving the TinyPilot page open for a while, I have noticed that the remote display portion of the page would disappear. It is not a huge issue since a simple page refresh fixes the issue. Michael, from TinyPilot, said they are working on a fix for this minor, slightly inconvenient glitch.

Fetching ISO by URL Resulted in an Error
When I tried fetching an ISO by URL from a few different Linux distros, I got an error message which seemed to cause a temporary loss of access to the web interface. After waiting a while, I seemed to be able to access the TinyPilot and the ISO was uploaded successfully. I asked Michael about this issue. He said it was a new feature which errors when encountering certain types of URLs, and they are working on a fix. Downloading directly from a URL is a convenient feature so it will be nice once it is fixed.
Where to Buy?
Since this review was released, the original TinyPilot Voyager has been retired in favor of the Voyager 2a.
You may purchase the Voyager 2a from the TinyPilotKVM website (affiliate link) .
Conclusion
KVM over IP is a very nice technology that can help facilitate the improvement of remote system administration.
Solutions such as TinyPilot have existed in enterprise environments, but they are very expensive as noted by TinyPilot’s founder. In comparison, the TinyPilot Voyager is much less expensive than the enterprise solutions.
I have enjoyed using this device on my network and use it frequently to access devices located in my server rack. The responsiveness is pretty good on the local network especially when managing servers that only have a command line interface. The very minimal delay when typing was barely noticeable.
I believe that a KVM over IP device such as the TinyPilot Voyager has its place in homelab environments, and I think it is great that there alternatives to enterprise products which do not cost thousands of dollars. The price of the TinyPilot Voyager is within the budget of those who have the means to invest in their home networks and homelab infrastructure.