How to Create a LAG with VLAN Tagging on Proxmox Server using a L2 Switch and OPNsense

Photo by Olivier Le Moal from iStock
Table of Contents
When I first decided to migrate from my Ubuntu server to Proxmox, I added a 4 port 1 Gbps NIC (affiliate link) in my Proxmox system to be used by my LXCs and VMs. The primary goal was to increase bandwidth for the services hosted on my server while allowing me to dedicate the network interface on the motherboard for Proxmox management. A secondary goal was to improve redundancy in case a network interface dies or the cable fails (redundancy may be a primary goal for you).
Note
With four 1 Gbps interfaces, you will not have a single 4 Gbps data stream but you may have multiple 1 Gbps streams which aggregate to a max of 4 Gbps.
My initial configuration of Proxmox had one bridge interface per physical interface with no VLANs configured in Proxmox. I had each physical interface on Proxmox assigned to a VLAN on my network switch. This configuration is pretty simple, but it only allowed me to use 1 VLAN per bridge. When migrating to Proxmox I did not want to take the time to learn all of the networking aspects of Proxmox. I like to take one step at a time when learning something new. I needed to get moved to Proxmox first and get comfortable with the new environment since it was a big departure from simply running an Ubuntu server (especially since I never had any prior hypervisor experience). While using 4 network interfaces individually is still better than using 1 interface for increasing throughput across multiple services/networks, this configuration was not very flexible.

You know the story goes… eventually your needs grow which forces you to learn something new in order to solve a particular issue. I have more than 4 VLANs on my network so there came a time when I wanted to host a service on Proxmox on a 5th VLAN. It is not practical for me to add a physical network interface for each new network I need to host a service since it does not scale. Also, we already have the technology to solve this problem: Link Aggregation Group (LAG) and VLAN tagging. I already knew this, of course, but I was not using making use of LAGs or VLAN tagging within Proxmox itself since I wanted to keep the initial Proxmox configuration as basic as possible until I had time to learn how.
After doing some initial research, I took the plunge. I have this irrational (or perhaps rational) fear that I am going to mess up my perfectly working server and have to spend hours and hours of troubleshooting to figure out how to fix it (or just revert it back to try again later). However, I was pleasantly surprised to find that I was able to migrate my existing network configuration over to using a LAG with VLAN tagging in less than 30 minutes! Part of that 30 minutes was spent verifying the connectivity of each LXC/VM (20+ containers/VMs). It was such a smooth process. I hope it will be smooth for you too if you are modifying your existing Proxmox server configuration. If you are starting fresh, it should be even easier since you can test as you go.
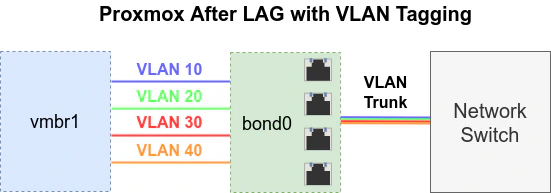
I thought I was going to have to create a “Linux bond”, a “Linux bridge”, and several “Linux VLAN"s in Proxmox as they are called in the user interface, but I found I only needed to create a bond for the LAG and a bridge which is configured to be VLAN aware. For each LXC/VM, I entered the VLAN ID on the assigned network interfaces to properly tag the network traffic. That is enough configuration in Proxmox for everything to work properly assuming you have your network switch and OPNsense configured properly. I did not need to create any “Linux VLAN"s (as they are called in the Proxmox web interface) that are associated to the bridge interface in Proxmox since I am not doing any virtual networking within Proxmox. If you are experienced with Proxmox, I suppose this paragraph is the TL;DR version of this guide!
Warning
Before you begin, make sure you are editing the network interfaces from an interface where you will not loose access to Proxmox should something go wrong. You may also use the console if you have direct access to the system if you are worried about losing remote access to your Proxmox server.
Physical Connections
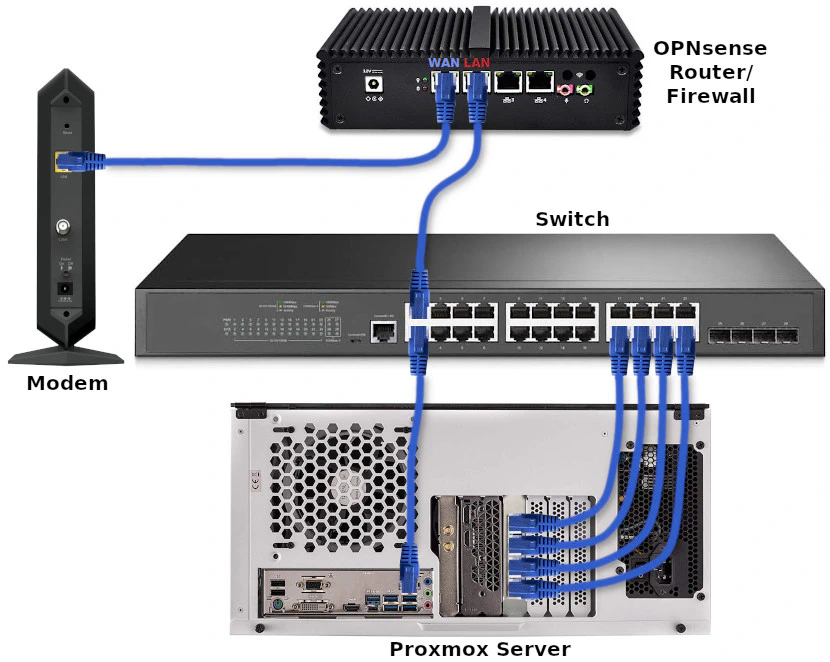
Before continuing this guide, the picture below shows the basic physical connections which are being used. Note that I am using the motherboard Ethernet interface as the management interface to configure the 4 port NIC as a LAG. This allows me to make changes to the networking on Proxmox without losing access to the server.
Create VLANs in OPNsense to use with Network Switch
You may already have VLANs configured for your network for other devices, but if you do not, a quick rundown of the process is the following:
- After your physical interfaces are assigned, go to “Interfaces > Other Types > VLAN” to add your VLAN(s).
- Click the “+” button and select the parent interface, the VLAN tag (the ID number between 1-4094), the priority, and the description of the VLAN.
- After finishing saving your VLAN(s), click “Apply”.
- Go to the “Interfaces > Assignments” page to assign the VLANs to the desired parent interface (the physical interface on your OPNsense system). Be sure to give it a description so the interface does not display as “OPT1”, for example.
- On the “Interfaces > [VLAN]” page (where “[VLAN]” is the description you used when creating the VLAN interface), click the “Enable Interface” checkbox. Click “Static IPv4” for the “IPv4 Configuration Type” and enter the “IPv4 address” for the VLAN interface such as
192.168.10.1for VLAN 10, for instance. Select “24” from the dropdown next to the IP address to indicate a/24network. You may also configure IPv6 if you desire. - Go to the “Services > DHCPv4 > [VLAN]” page to enable DHCP by clicking on the “Enable DHCP server on the VLAN interface” checkbox (substitute “VLAN” for your interface description). Enter the range such as
192.168.10.100to192.168.10.200for VLAN 10. - Finally, you will need to create at least one firewall rule for your new VLAN. Otherwise all network traffic will be blocked. Navigate to the “Firewall > Rules > VLAN” page (once again substituting “VLAN” for your interface). I recommend creating one rule to allow DNS on the VLAN interface followed by a rule which blocks all private networks while allowing all other networks (which will allow Internet access) as the minimal set of rules. You can make them more restrictive once you get everything set up properly.
For more detailed information, see my guide on creating VLANs in OPNsense.
Configure the Network Switch
In my example, I am going to assume you have a smart/managed network switch attached to the physical interface where you have your VLANs assigned in OPNsense. I will be using a managed TP-Link switch (affiliate link) as an example so you may need to refer to your switch’s documentation on how to exactly configure the LAG on your particular switch.
Configure Trunk Port that is Connected to OPNsense
If you already have your network configured for VLANs with OPNsense, you may skip this step, but for completeness I will describe the basic process.
The network switch which is connected to the OPNsense interface where you assigned your VLANs will need to have a trunk port configured to allow VLAN traffic to pass through to OPNsense. This step is extremely important because if VLAN traffic cannot reach OPNsense through your network switch, you will not be able to make use of VLANs for your LXCs/VMs in Proxmox as described in this guide. You need to have VLANs working properly in your network before you can continue further.
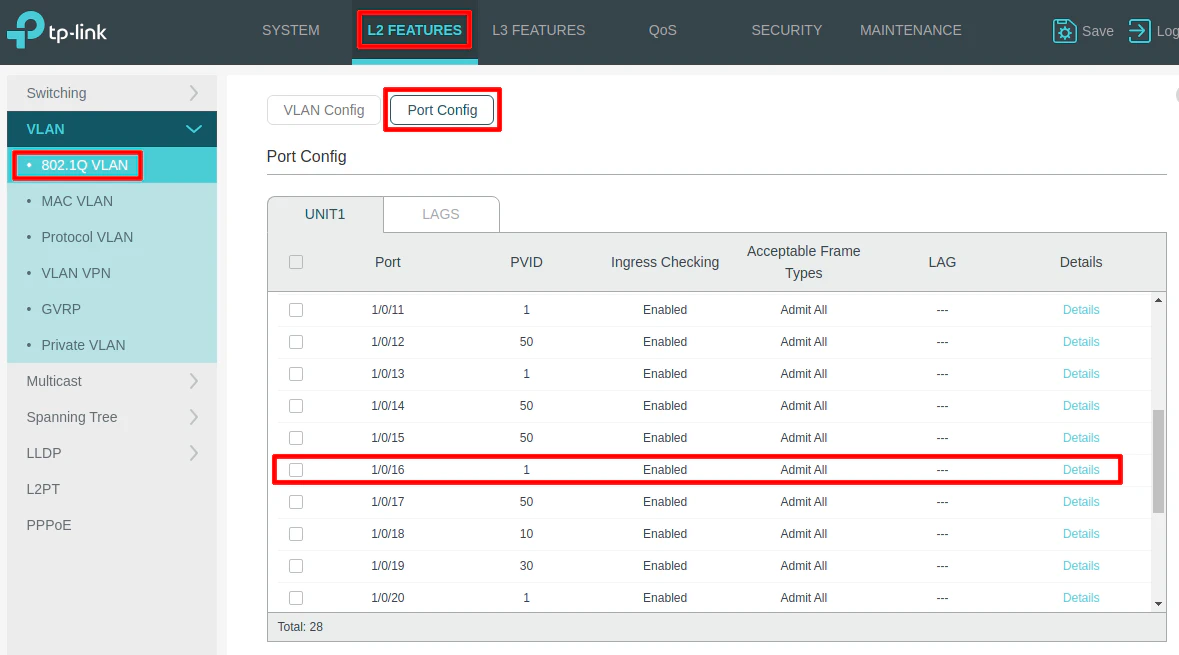
On my switch, I have my OPNsense router connected to port 16 as shown below. The PVID should be set to 1 for the trunk port rather than setting it to a specific VLAN ID like other ports when you are adding a device to a specific VLAN. On the newer TP-Link models, you can set the “Acceptable Frame Types” to Admit All (to allow both tagged and untagged traffic) or “Tagged Only” (if you want to allow the untagged VLAN 1 traffic to pass through). On older models, you had to set the “Link Type” to TRUNK. You do not have to do that extra step on the new models if you simply leave it on the default “Admit All” option.
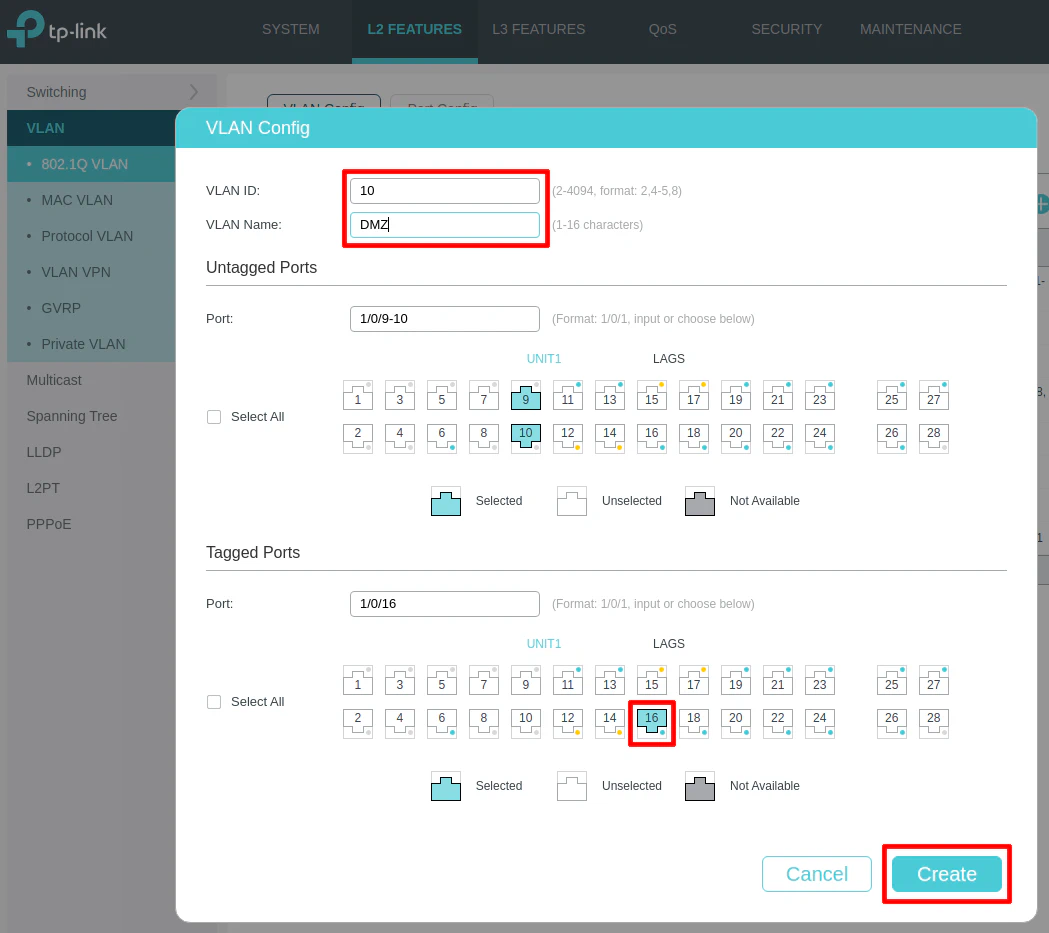
Create your desired VLANs using port 16 as the tagged interface since that will be the VLAN trunk to OPNsense. Every VLAN you create on the switch will need to have port 16 selected as tagged if you want the VLAN traffic to pass through the OPNsense interface.
In my example below, I am creating a DMZ VLAN. The VLAN ID needs to be the same ID you use in the OPNsense VLAN configuration. You may select any ports of connected devices that you want to be in the DMZ (ports 9 and 10, for example) in the “Untagged Ports” section. Repeat this process for any other VLANs you wish to create.
Create the LAG to be used by Proxmox
Once you have the VLANs set up in OPNsense and your switch configured properly, next you will need to configure the LAG to be used by Proxmox. It is ok to set up the LAG on the switch before you configure it on Proxmox because when you are using LACP, the LAG will not become active until the other end (Proxmox) has been configured with LACP.
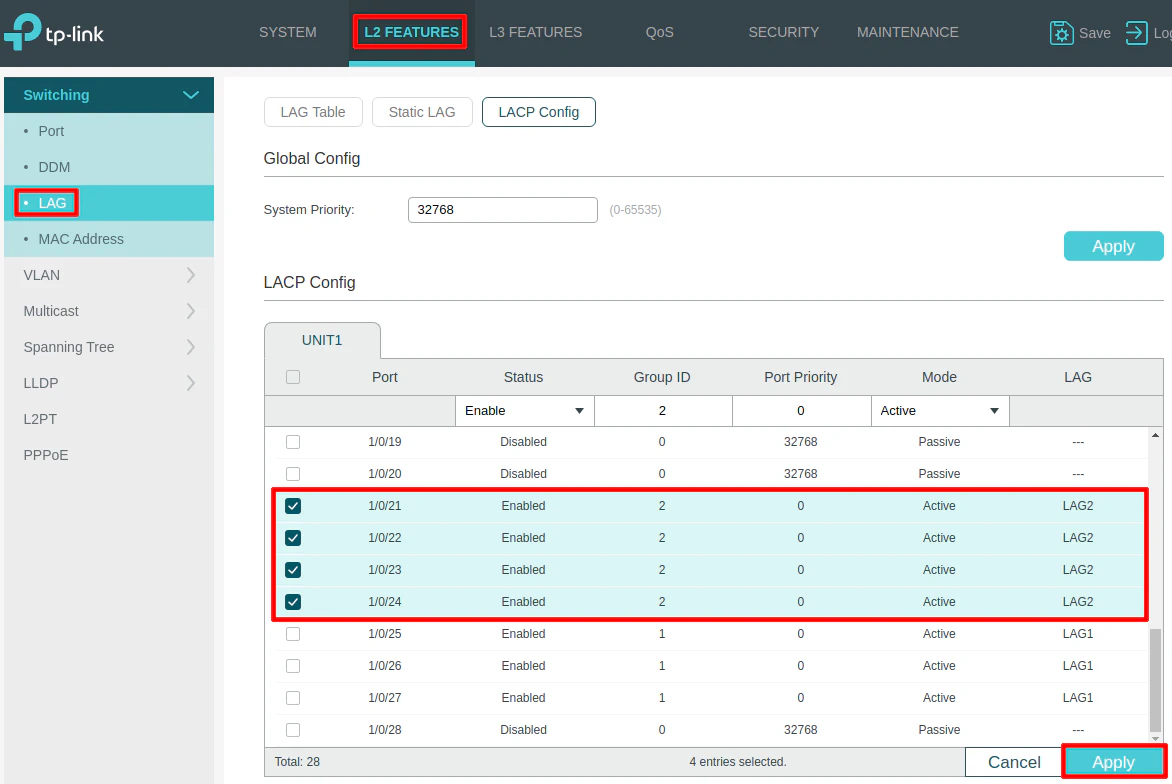
Go to the “L2 Features” page and click on “LAG” then “LACP Config”. Select all of the interfaces that are connected to your Proxmox server and set the status to Enabled to enable the LAG for those those interfaces.
The “Group ID” is the LAG number. Since I have a LAG configured already to another switch, I am setting my Proxmox LAG as LAG2, but you may use a different number.
The “Port Priority” defaults to 32768 but you can set it to a different value. Lower numbers indicate a higher priority. If you set them all to the same value, they will have the same priority. You could set them to different priorities so if one fails it will use the next highest priority. To be honest, I do not know why in this scenario the port priority would be important within a LAG because if it switches to another port when it dies or the cable goes bad, it does not matter to me which port is used as long as the rest of the LAG still functions properly. There may be valid reasons that I am not aware of.
For the “Mode”, set it to Active so that it negotiates the LAG via LACP. At least one side of your LAG needs to be set to “Active”.
Be sure to click “Apply” to create the LAG.
Note
If you click on the “LAG Table” tab after applying your changes, you will notice that the members (ports) of the LAG will not be listed yet since Proxmox has not been configured to use the LAG. Once Proxmox is configured, you should see the 4 ports show up as members of the LAG.
If you need more information on how to create a LAG on your switch, you can view my guide on how to create a LAG.
Assign the Appropriate VLANs to the LAG for Proxmox
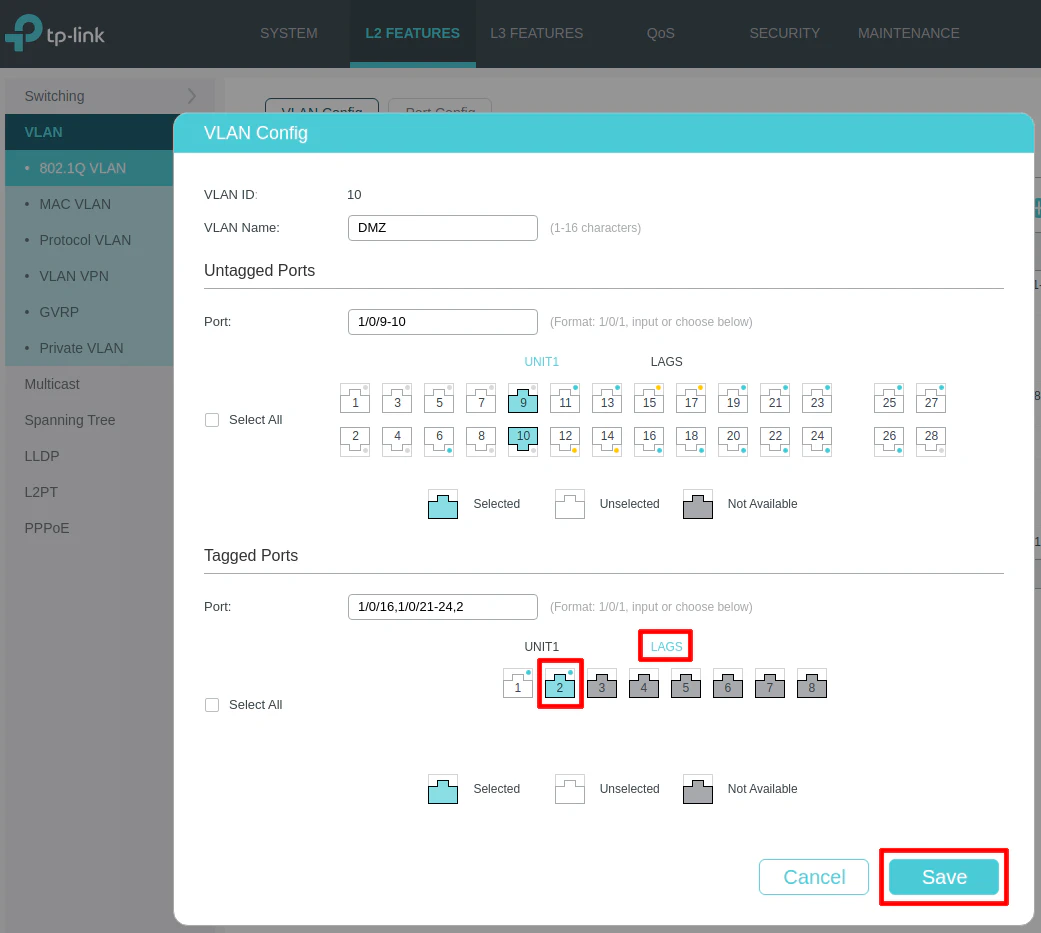
Once the LAG is configured, you need to assign VLANs to the LAG similar to how you assign VLANS to other ports/interfaces on your switch. I am assuming you have existing VLANs set up on your switch (as described earlier) so you will need to go to the “VLAN Config” page to edit your existing VLANs to now include the LAG interface that was just created. Continuing the example from earlier, I will be editing the DMZ VLAN.
The LAG interface selection for VLANs is on a separate tab within each “Untagged/Tagged Ports” section. Click the “LAGS” tab in the “Tagged Ports” section to select LAG2 to assign the DMZ VLAN to the LAG. Then click the “Save” button.
Repeat this process for each VLAN you wish to use on the Proxmox LAG.
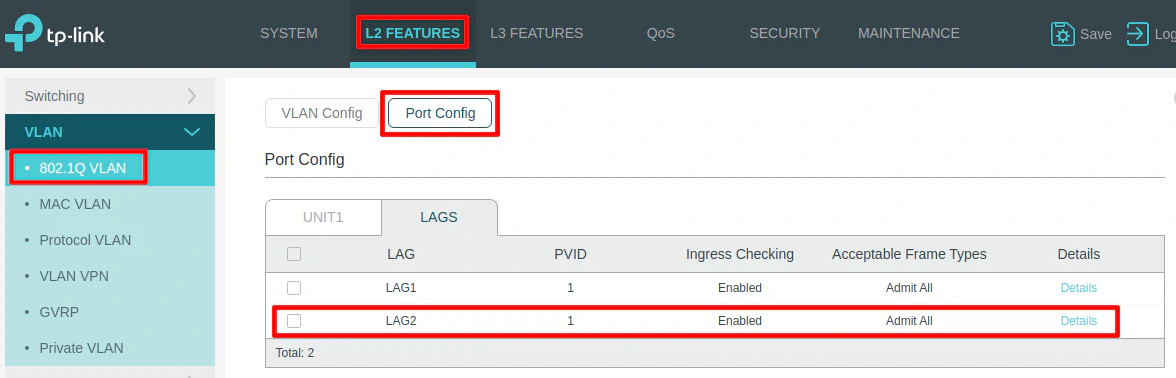
If you only want to allow tagged network traffic on the Proxmox LAG, select Tagged Only for the “Acceptable Frame Types”. Otherwise, you can allow untagged traffic (VLAN 1 in particular) by leaving it as Admit All.
Warning
Setting the “Acceptable Frame Types” to the proper value may be important for you if you use the default untagged VLAN 1 as your management VLAN. If you forget the set the VLAN ID when creating a new LXC or VM, it will be placed in your management VLAN which may be a potential security risk depending what you are running. That is why it is often recommended to use a dedicated tagged VLAN for your management VLAN instead of using the default untagged VLAN 1.
Also, there is the possibility of someone plugging into an unused Ethernet port and get access your management VLAN if you leave your used ports as untagged on VLAN 1. Granted, this is probably less of a serious issue on a home network unless you have untrusted tech savvy users connecting to your network who wish to do you harm.
Persist Changes on your Switch
Your switch may require you to click a “Save” changes button that will make the configuration persistent across reboots. Otherwise, you will lose all your changes the next time you power up your switch.
The reason switch configuration is often designed this way is to allow you to test changes on your network with less risk. If you messed something up really bad, you could simply reboot your switch to revert back to your previous configuration, which was (hopefully) functioning properly. It is important that you only persist changes only when you know everything is working correctly.
On newer TP-Link switches, you only need to click the “Save” button in the upper right hand corner of the screen to persist all of the configuration changes you have made.
Configure the Proxmox Network Interfaces
With the switch configured, it is time to configure Proxmox. To minimize downtime if you are modifying an existing Proxmox instance, you may leave your LXCs/VMs running while you make the network configuration changes because it will not take effect until you click the “Apply Configuration” in Proxmox. However, after you apply your changes, you will need to reboot each service after making changes to the network interfaces.
Warning
Please consider the consequences when proceeding with the following changes if you are modifying an existing Proxmox instance rather than starting from scratch. I was able to take such a risk because I am making this change on my home network, but if you are doing something like this in a production environment, you should exercise greater caution.
Many guides I have seen show how to manually edit the /etc/network/interfaces file directly in order to make network changes in Proxmox. If you are more comfortable with making such changes, feel free to do so, but the web interface is also very easy to use especially if you are not familiar with the syntax of Linux network interfaces. You could copy/paste the network configuration that you find in such guides, but I am going to show the web interface method of how to update the network configuration, which I think will benefit newer users to Linux/Proxmox.
If you are interested in learning more about the syntax of the /etc/network/interfaces file, you can see what the web interface generates after you change your network configuration.
Create a Linux Bond
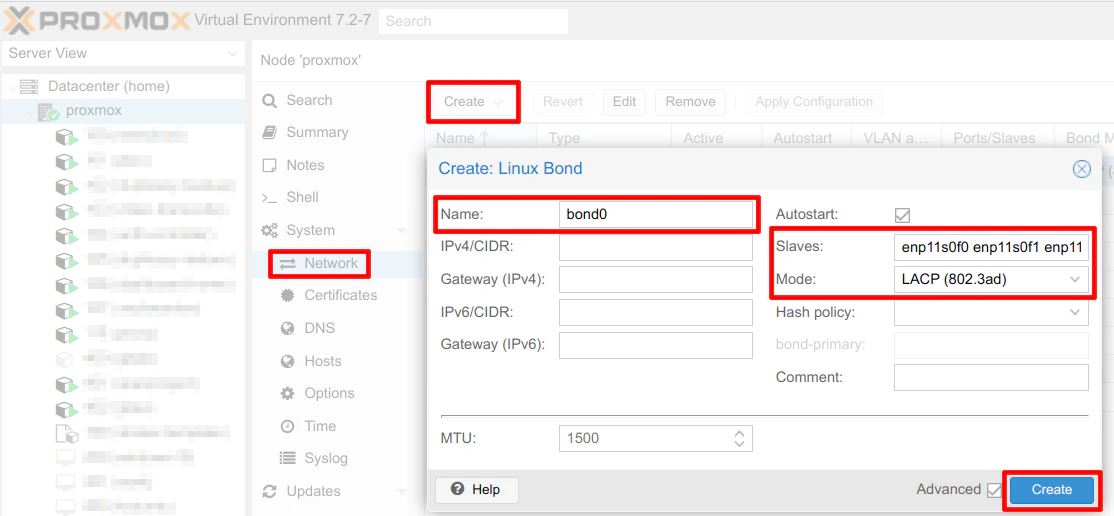
Go to your Proxmox server on the web interface and select “Network” under the “System” sidebar menu. Click on “Create” and choose “Linux Bond”. You will need to enter the “Name” of the bond interface. By default it will be bond0 if you do not have any other bonds configured.
For the “Slaves” field, you need to enter each of your network interfaces with a space in between each interface. On my system, my interfaces are automatically named enp11s0f0 through enp11s0f3 so I entered enp11s0f0 enp11s0f1 enp11s0f2 enp11s0f3 as the slave interfaces.
The only other thing you need to select is the “Mode”. Choose LACP (802.3ad) since LACP is the LAG type being used on the switch. Click the “Create” button to create the bond.
Create a Linux Bridge Using the Linux Bond
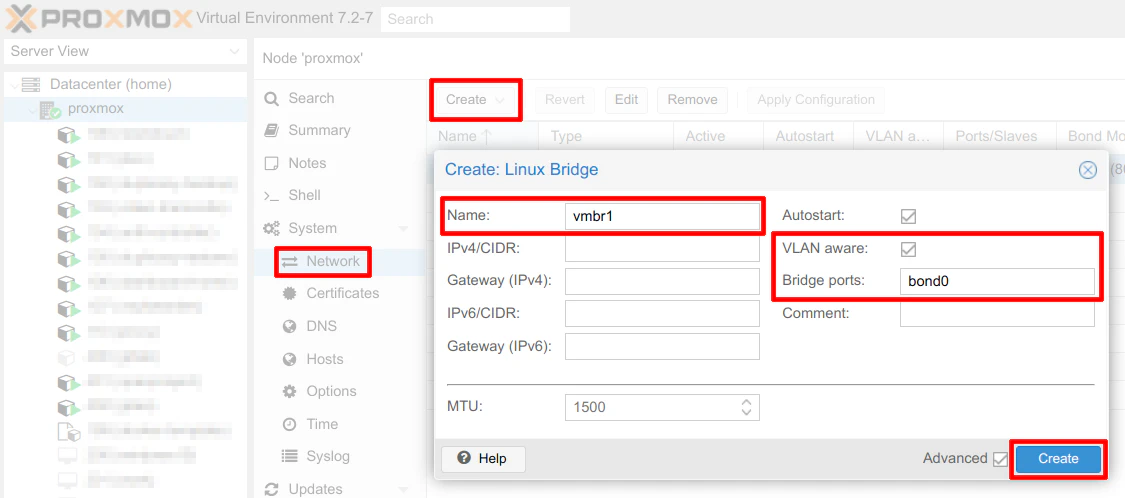
To use any of the physical interfaces in Proxmox, a bridge is needed. On the “Network” page, click “Create” so you can choose “Linux Bridge”. By default the bridge “Name” will begin with vmbr followed by the next available number. If you have a dedicated interface for managing your Proxmox like I do (since I am using the motherboard Ethernet interface) and you have not created any other bridges yet, your bridge interface may default to vmbr1 as shown in the screenshot below.
Make sure you set the interface to be “VLAN aware” by checking the box so that VLANs can be used on the bridge. You will also need to enter bond0 in the “Bridged ports” box to use the bond that you just created. Click “Create” to create the bridge.
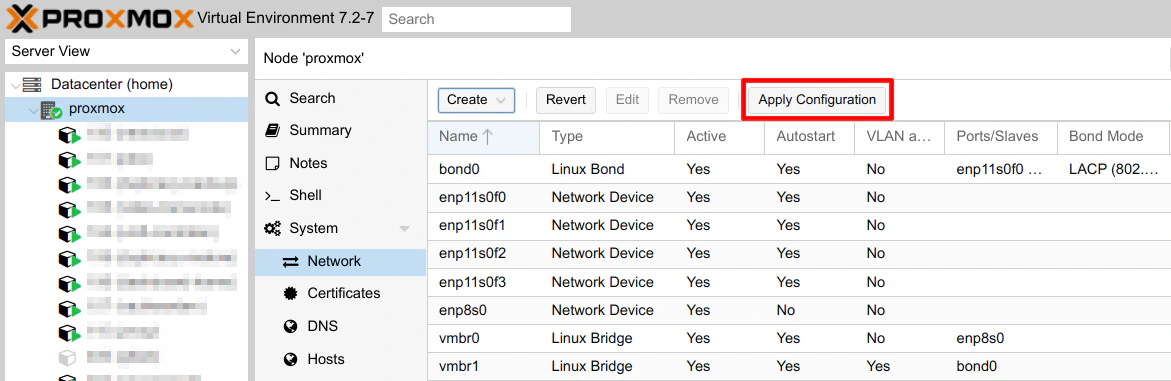
Apply Changes to Network Interface Configuration
Finally, you can make the Proxmox network changes persistent by clicking the “Apply Configuration” button. The Proxmox network interfaces will reload.
Go to your network switch’s LAG table to verify that the LAG is recognized on the switch similar to the screenshot below. The members (ports) will be listed when the LAG is configured properly. If you do not see 4 ports listed, check your physical connections to the switch. If you test the physical connections of the LAG, when you unplug one of the cables, you will see the number of ports in the LAG reduce by 1.
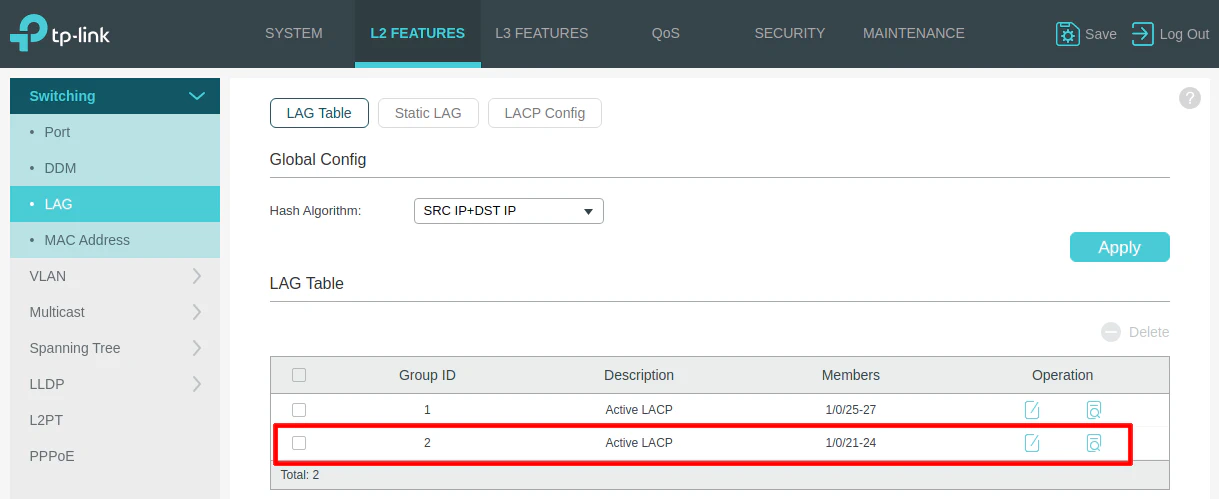
When you see that the status of the LAG is good on the switch, you know that the LAG was created successfully.
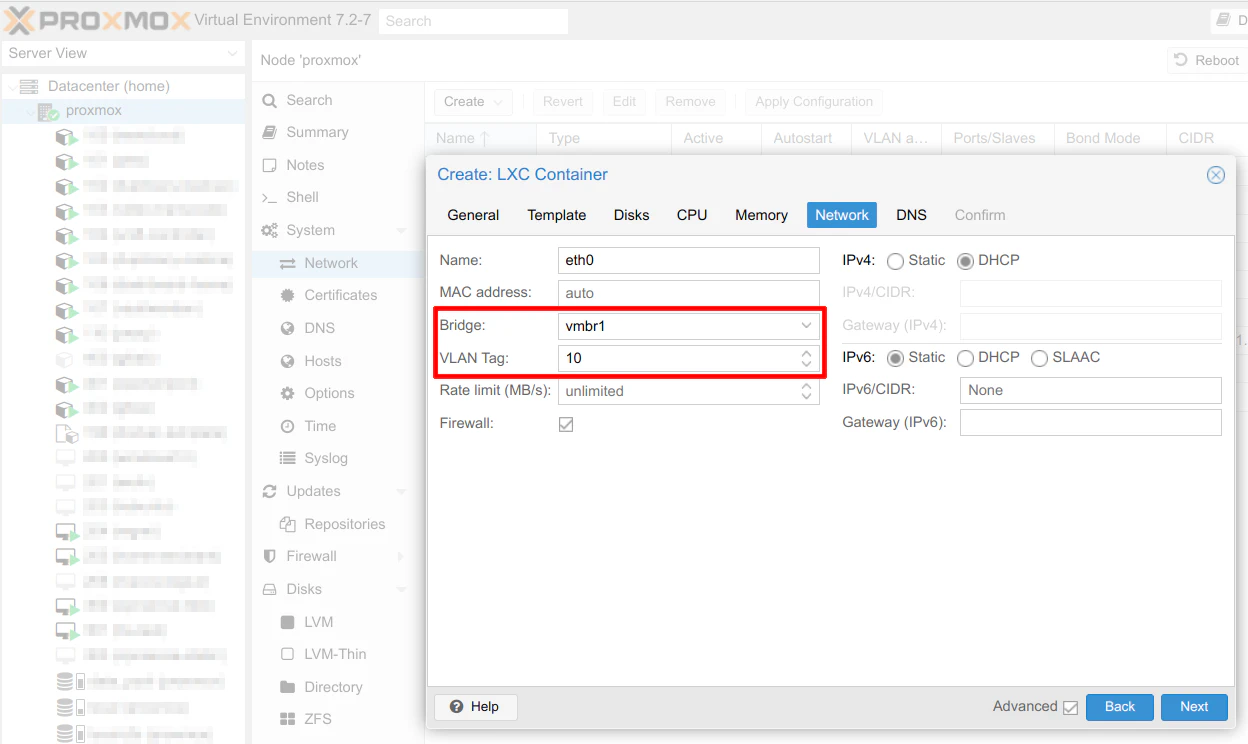
Assign LXC or VM to the Desired VLAN
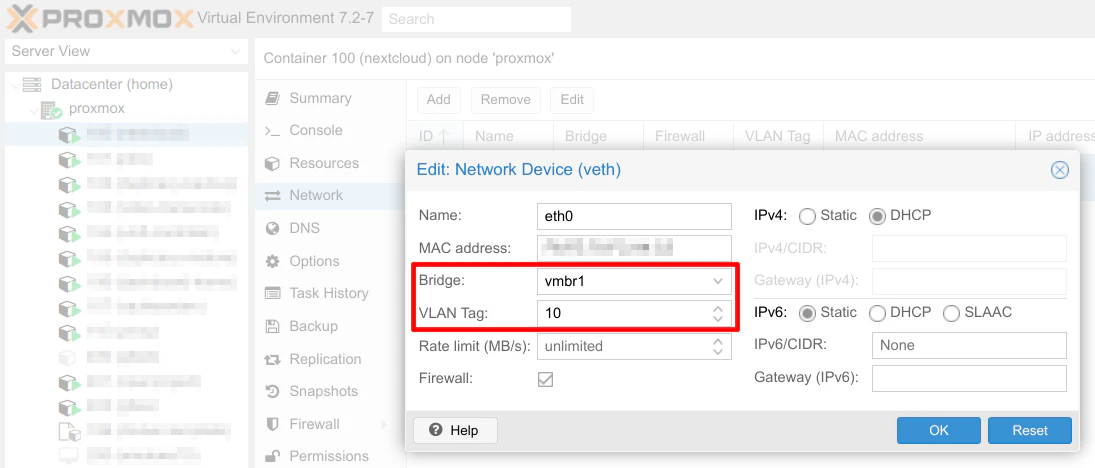
You are now ready to use the new LAG and start assigning VLANs to all your LXCs/VMs. If you are creating a new LXC/VM, you will need to select vmbr1 (or whatever you named your bridge) and enter the VLAN ID when you are walking through the steps.
Otherwise, if you have existing LXCs/VMs configured in Proxmox, you will need to change the bridge interface (if you are consolidating bridged interfaces like me) of each LXC/VM and assign the appropriate VLANs.
Repeat this process for each of your LXCs/VMs. Once you have made the changes, you need to start or restart the LXCs/VMs.
If all goes well, you should be able to obtain an IP address from the range of IP addresses you designated in OPNsense in the DHCP settings!