Migrate OPNsense to New Hardware using the Configuration Importer during Installation

Photo by FactoryTh from iStock
Table of Contents
If you have you an existing bare metal OPNsense installation and you wish to migrate to new hardware, you have the option of exporting your current configuration and importing the configuration during the installation of OPNsense on a new system.
The import process can save you a lot of time since you do not need to configure your router from scratch. However, the process may not get you 100% migrated over to your new hardware depending on the plugins you have installed as I will discuss in more detail later.
The overall process is a bit more involved than I had originally anticipated, but OPNsense in 23.7 has added some new functionality which helps if you have encrypted backups. Because of this added functionality, I have updated this guide to demonstrate the configuration import process for both unencrypted and encrypted backup files.
Note
Even though I focusing this guide on migrating physical hardware, you may follow a similar process for VMs, which may be helpful if you want to migrate from a bare metal installation to a virtual machine installation or vice versa.
Before Getting Started
There is one gotcha that I discovered when importing configuration files during the initial OPNsense installation that I will discuss before getting started because it will may save you from encountering the same issue.
If you have the root user disabled for accessing the web interface on the “System > Access > Users” page, you will need to re-enable the root user temporarily before exporting your configuration. The reason you need to have the root user enabled is because you will be prompted for the root user password that is stored in the configuration file after you restore the configuration. Otherwise, you will not be able to continue with the installation process.
After some quick experimentation, I discovered that simply removing the root user from the admins group membership (by editing the root user) is enough to prevent the root user from logging into the OPNsense web interface. You do not need to completely disable the root user to disable web interface access. Because of this fact, you should be able to leave the root user enabled while still preventing the root user from logging into the web interface, and you will not have to remember to re-enable the root user for configuration backups.
Generally speaking, it is best practice to not use the root account directly but rather a user with administrative privileges since the root account has the keys to the kingdom. That is why I prefer to disable the root user from accessing the web interface and use an alternate administrator account.
Note
Keep in mind that disabling the root user on the “System > Access > Users” page only affects access to the OPNsense web interface. You can still log into your OPNsense system via SSH if you have that option enabled on the “System > Settings > Administration” page.
If you have an unencrypted configuration backup file, you could alternatively remove the <disabled>1</disabled> line out of the configuration file under the root user section of the XML.
Unencrypted Configuration File Restoration Process
If you are using OPNsense 23.1 or earlier, you must use unencrypted configuration backups if you wish to restore the configuration during the initial OPNsense installation since that process does not support encrypted backups (you will have to use the OPNsense web interface to import encrypted backups after the installation of OPNsense). This was the original gotcha I had identified that I was not expecting and apparently for many other users according to my Twitter feed.
You also must use unencrypted configuration backups if you wish to manually modify the interfaces in the configuration XML to have a more seamless transition to your new hardware if the interface names are different. For example, migrating from a system which has Intel 1G interfaces to a system which has Intel 2.5G interfaces, the interface names will likely change from igb to ibc.
Export the Unencrypted Configuration on OPNsense
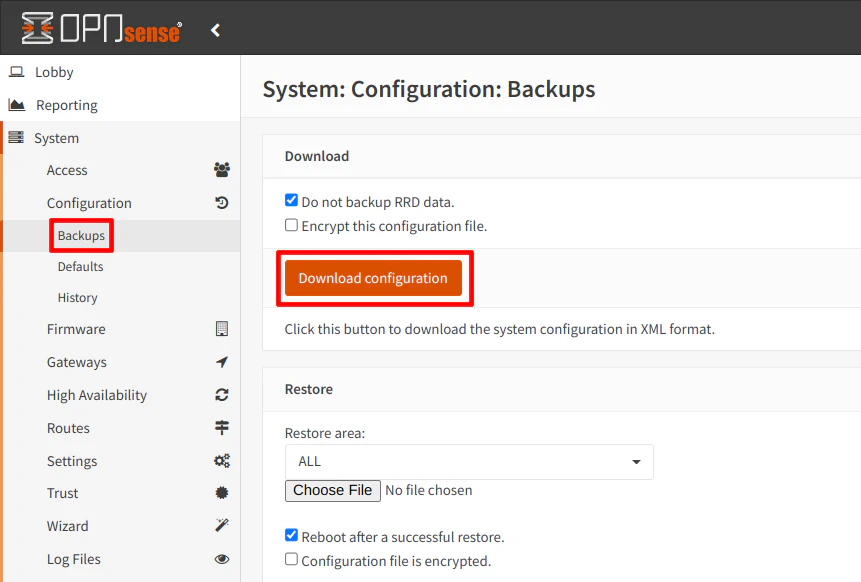
On your current OPNsense system, export the configuration by visiting the “System > Configuration > Backups” page. If you do not wish to backup the RRD data (which is the network traffic data), you can check the box. This makes your configuration file much smaller. Click “Download configuration” to save a copy of the configuration XML file.
Zenarmor users: You will need to make a separate backup of the Zenarmor configuration in order to fully restore all of the Zenarmor settings.
Determine Interface Names on Your New Hardware (if Different)
If your new hardware is using different network interfaces or the interfaces are mapped differently, you will need update the interface names in your configuration file so the configuration will work properly on your new hardware. It saves you time of having to reassign interfaces later via the console since you will not be able to log into the OPNsense web interface until you reassign your interfaces.
Sometimes the interface names are provided by the manufacturer such as with Protectli hardware, which is very convenient. Otherwise, you may have to boot up the OPNsense installer on the new hardware in order to know the exact names of interfaces (or search the web).
Edit Interface Names in the Configuration File (if Necessary)
For all the interface changes mentioned below, you should be safe to do a “find all and replace” in your favorite text editor. Be sure to skim through all the matches in your text editor to make sure nothing else is incorrectly replaced.
Find the WAN interface by searching for <wan>, which is located in the <interfaces> tag. It should be found toward the beginning of the XML file. In the <if> tag, replace the igb0 (or whatever your interface is called) to the new interface such as igc0.
<interfaces>
    <wan>
      <if>igc0</if>
      ...
    </wan>
</interfaces>
If you have VLANs and your configuration backup is older, you may need to replace the first part of the VLAN interface name because it contains the parent interface name as shown below. The newer VLAN configuration does not include the parent interface (such as vlan02) so you should not need to edit this value.
<interfaces>
    <wan>
      <if>igc1_vlan10</if>
      ...
    </wan>
</interfaces>
Note
I am not sure if it is recommended to change to the new VLAN naming convention because the old convention still seemed to work when I imported to new hardware running the latest OPNsense version. If you have trouble importing the VLANs for some reason, you could try using the new naming convention instead.
In the <vlans> tag, you will need to update all of the parent interface names in the <if> tag.
You will also need to change the VLAN interface name in the <vlanif> tag if you had to change it if you have an older configuration backup. If you have a newer backup which uses the new naming convention, you do not need to change the <vlanif> value since it should match the name in the <interfaces> section.
<vlans version="1.0.0">
    <vlan uuid="209df8f4-a6b8-48c8-8349-70819b5c1ed9">
      <if>igc1</if>
      <tag>10</tag>
      <pcp>3</pcp>
      <descr>DMZ</descr>
      <vlanif>igc1_vlan10</vlanif>
    </vlan>
    ...
</vlans>
Do not forget to save your changes before continuing. I recommend saving a new copy of the original file in case something does not work properly.
Put Configuration File on a USB Drive
Because of the UFS filesystem used by the OPNsense USB installer and the fact that the OPNsense installer expects a FAT filesystem for configuration file imports, you cannot simply copy your configuration file to the same USB drive as the OPNsense installer. Therefore, you will need to use a second USB drive formatted to FAT32 using either a MSDOS or GPT partition table.
Create a folder called conf and rename the configuration file to config.xml in order for the installer to properly import the configuration file.
Plug in both of your USB drives before booting up the OPNsense installer.
You may skip the encrypted backup section, and go to the “Import Configuration during Installation” section below to proceed since the steps are the same for both methods.
Encrypted Configuration File Restoration Process
Ideally, you should encrypt your configuration backup file since it contains sensitive information such as SSH keys, hashed passwords, etc.
As of OPNsense 23.7, encrypted backups are now supported during the initial configuration thanks to a brief discussion with the OPNsense team and the feature request I submitted on GitHub! This is great news if you prefer to import the configuration during the initial installation of OPNsense. I updated this guide to include this process since it is not even documented on OPNsense at the time of the revision of this guide.
Warning
If you are using OPNsense 23.1 or earlier, you cannot use encrypted configuration files during the initial installation of OPNsense and will have to use the OPNsense web interface after OPNsense is installed.
Export the Encrypted Configuration on OPNsense
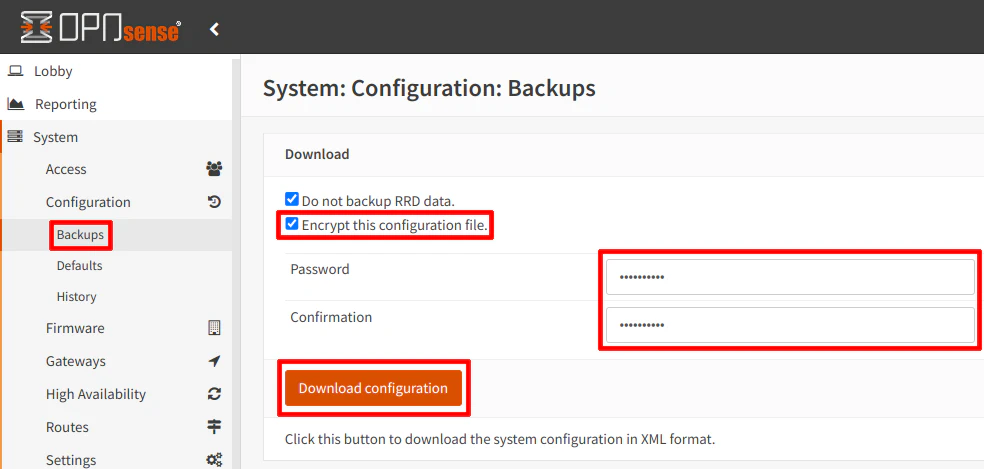
Export the configuration on the “System > Configuration > Backups” page. Be sure to check the box for “Encrypt this configuration file” as well as enter your password. I recommend using a different password than what you use to log into OPNsense (password reuse is considered a bad practice). Click “Download configuration” to save a copy of the configuration XML file.
Zenarmor users: You will need to make a separate backup of the Zenarmor configuration in order to fully restore all of the Zenarmor settings.
Interface Name Changes
Since you are using an encrypted configuration backup file, you cannot directly modify the XML to change the interface names. This is one downside to using encrypted backups.
However, you can reassign interfaces via the console after you finish the OPNsense installation by logging in as the root user and selecting menu option 1) Assign interfaces.
Put Configuration Files on a USB Drive
As mentioned in the unencrypted configuration backup section, you will need a second USB drive formatted to FAT32 using either a MSDOS or GPT partition table.
Like with the unencrypted backups, you will need to store the configuration in a folder called conf and rename the configuration file to config.xml. In addition, you need to create a file called config.secret which contains the password you used when you created your encrypted backup. The secrets file containing the password is necessary to import the encrypted configuration file.
Plug in the USB drive containing your configuration backup before booting up the OPNsense installer.
Import Configuration during Installation
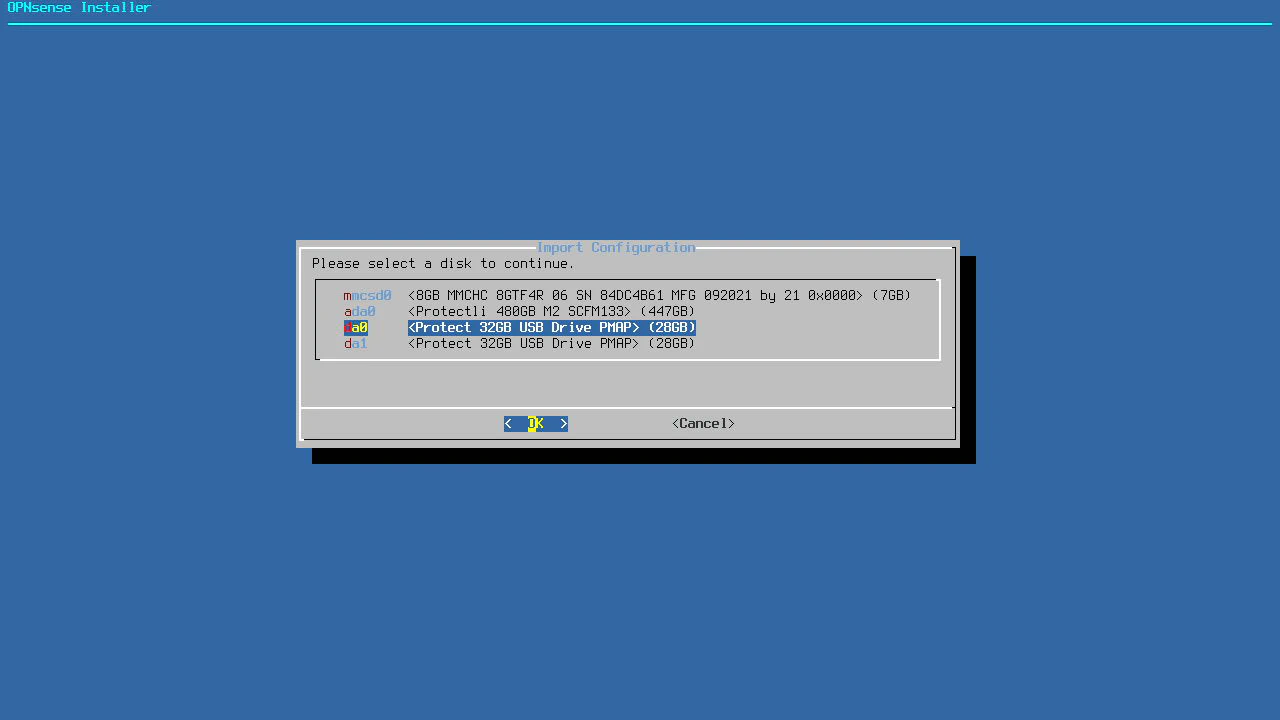
After the OPNsense logo is displayed in ASCII text, the very first prompt in the installer is if you wish to import a configuration file. Press any key to start the configuration import process. Enter the name of the disk with the configuration file. On my system, I had to enter da0 for the device. My OPNsense installer was on device da1. You may have to guess if you have two USB drives from the same vendor like I do since there is no easy way to know which one is the proper one.

Once you enter the proper device, you should see the configuration loading. You will know it is working properly when you reach the end and you see all of your interfaces displayed with their assigned IP address ranges.
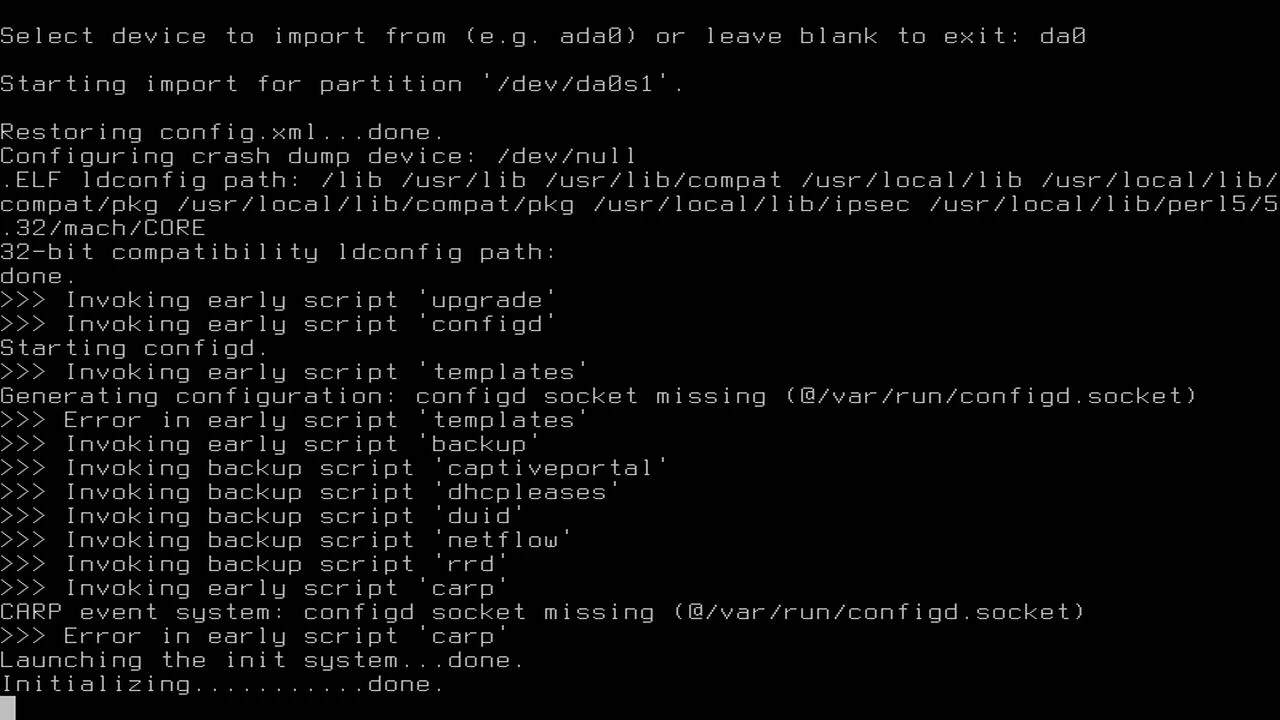
I have noticed if you do not correctly modify your configuration file, the installer will default to the default WAN/LAN interfaces. If you only see the WAN/LAN interfaces displayed you may have something wrong with your configuration (unless you only were only using those two interfaces on your old hardware).
An Alternate Boot Process (for coreboot)
Interestingly, when I tested this process on the Protectli VP2410, I was not prompted to import any configuration files or any other installation prompts during the boot process. I was simply dropped to a login prompt.
My suspicion is that the boot process behaves differently because I have the coreboot firmware installed. I will demonstrate this process in case you have a similar boot experience depending on the hardware/firmware you are using.
If you use installer as the user and opnsense as the password (which is the default for new installations), you will have the option to import the configuration before continuing with the installation.
After choosing the default keyboard layout, you will see a menu which has an option called “Import Config”. Select it and press “Enter”.
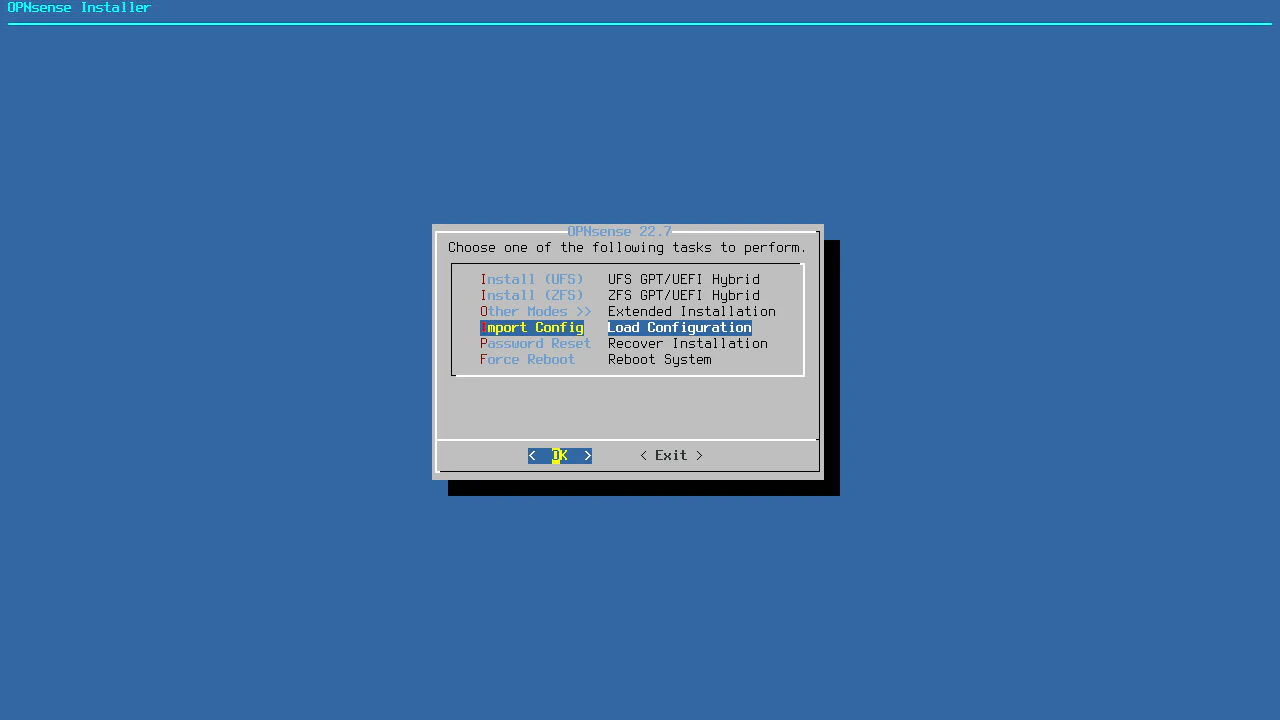
Choose the USB disk containing the configuration file. It may be something like da0 as I have mentioned earlier.
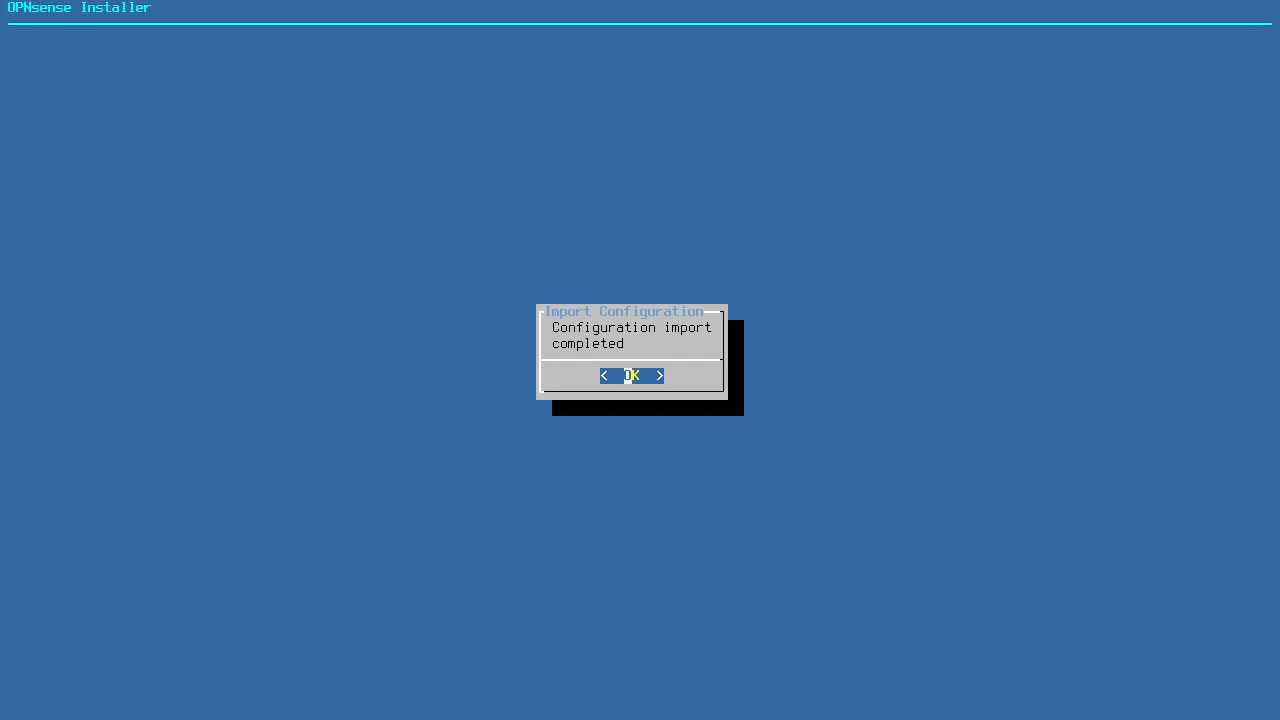
You will know if the configuration file import was successful when you see the “Configuration import completed” message. Otherwise, you will see an error message.
Continue the Usual OPNsense Installation Process
After the configuration has been imported, you will arrive at the prompt to run OPNsense in live mode or to install it to the disk. You will need to use the installer user like you normally would to install OPNsense. However, for the password, you must enter the root user password that is stored in the configuration file you imported instead of the default password of opnsense.
Tip
If you had two factor authentication enabled, you do not need to use the OTP + the password to start the installation process. You only need to use the password. As mentioned in the beginning, the password will not work if the root user is disabled.
However, once the installation is finished, you will need to start using your two factor login again because it will be enabled after installation.
At this point, you simply continue the installation process as you normally would. I am assuming if you are migrating from an older system you are familiar with the OPNsense installation process, but in case you may find the information helpful, you may refer to my OPNsense installation guide. One notable difference is that you will not need to set up the interfaces since that has been done already with the configuration file import.
Reinstall Plugins and Reconfigure Them (if Necessary)
If all goes well and everything was mapped to the new interfaces properly, you should have OPNsense nearly operational. I say ’nearly’ because you will have to reinstall all of your plugins. The plugins will show up as missing on the “System > Firmware > Plugins” page so they will be easy to identify. The settings for many of the plugins should persist from the configuration file so once you reinstall the plugins, they should work as they did before but you should verify that is true after installing the plugins.
One notable exception is Zenarmor. You will need to restore the settings from a Zenarmor backup file you generated from a previous installation.

Potential WireGuard Plugin Issue
One issue I happened to notice since I had the WireGuard VPN plugin installed in a previous OPNsense installation. If you do not have the first interface of your firewall plugged into your network before booting your OPNsense system after importing the configuration, WireGuard will show up as assigned to the first physical interface rather than to a virtual interface, which interferes with making any interface changes and may cause other issues.
I wanted to mention this as a potential issue in case you encounter a similar situation.