How to Connect to Your Home Network via WireGuard VPN Server in OPNsense

Photo by Danny144 from Pixabay
Table of Contents
WireGuard is a modern designed VPN that uses the latest cryptography for stronger security, is very lightweight, and is relatively easy to set up once you understand how it functions in OPNsense.
WireGuard is similar to a SSH server configured to use SSH keys so only devices which share their cryptographic keys with one another are able to communicate via an encrypted tunnel.
One interesting aspect about the WireGuard protocol is the fact it is designed to only respond to clients which present a valid key using UDP, which means WireGuard cannot be port scanned unlike other services. That is a great security benefit of WireGuard.
Here is a quote from the WireGuard documentation:
“We require authentication in the first handshake message sent because it does not require allocating any state on the server for potentially unauthentic messages. In fact, the server does not even respond at all to an unauthorized client; it is silent and invisible. The handshake avoids a denial of service vulnerability created by allowing any state to be created in response to packets that have not yet been authenticated.”
Devices that connect via WireGuard are referred to as “peer” devices. WireGuard uses the terminology of peers and endpoints rather than clients and servers because WireGuard behaves more like a peer to peer network. Each peer can act as both a client and a server.
Since every device connecting via WireGuard is considered a peer or endpoint, the WireGuard VPN in OPNsense is simply a peer that other WireGuard devices/peers may connect. I will refer to the WireGuard installation on OPNsense as the WireGuard server rather than a “peer” to make it more clear which device I am configuring. When I am describing various elements on the user interface, I will use the terminology of “peers” and “endpoints” to be consistent with the terminology used by WireGuard.
Please keep in mind that in this guide I am describing how to connect securely to your home network remotely via WireGuard in OPNsense and not how to connect OPNsense to an external WireGuard VPN provider such as Mullvad.
Note
If your ISP blocks all incoming connections as in the case with CGNAT, you will not be able to directly connect to your home network via WireGuard on OPNsense. You will have to consider using a Virtual Private Server (VPS) to create a VPN tunnel or some other means such as Cloudflare Tunnel in order to access services on your home network remotely.
Configure the WireGuard Server
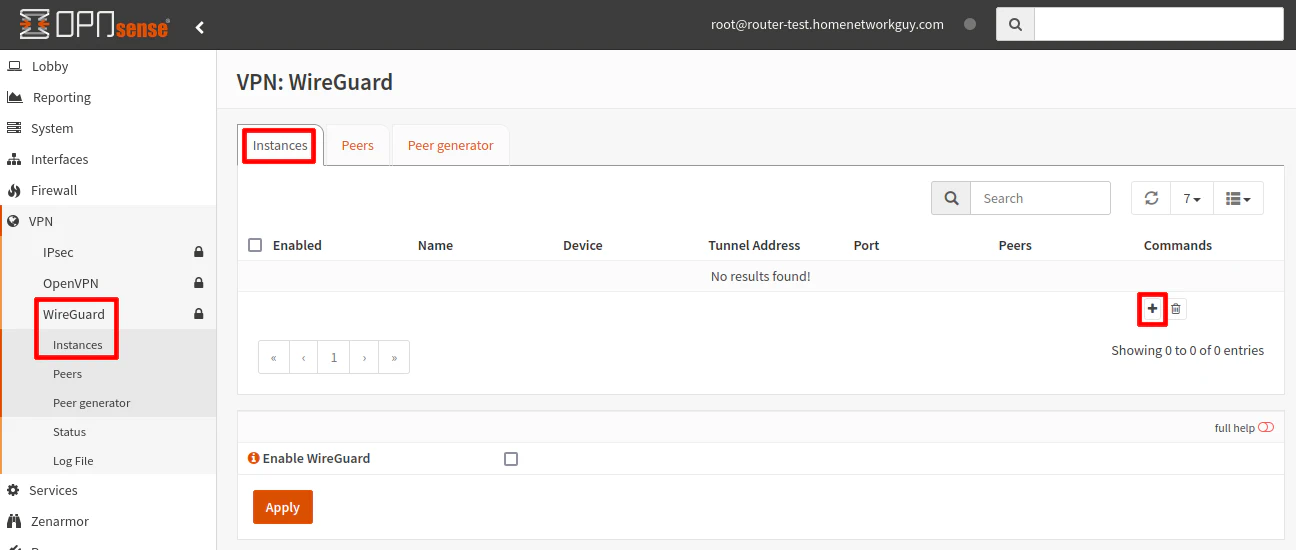
Go to the “VPN > WireGuard” page and click the “Local” tab. Click the “+” button to add a new WireGuard server.
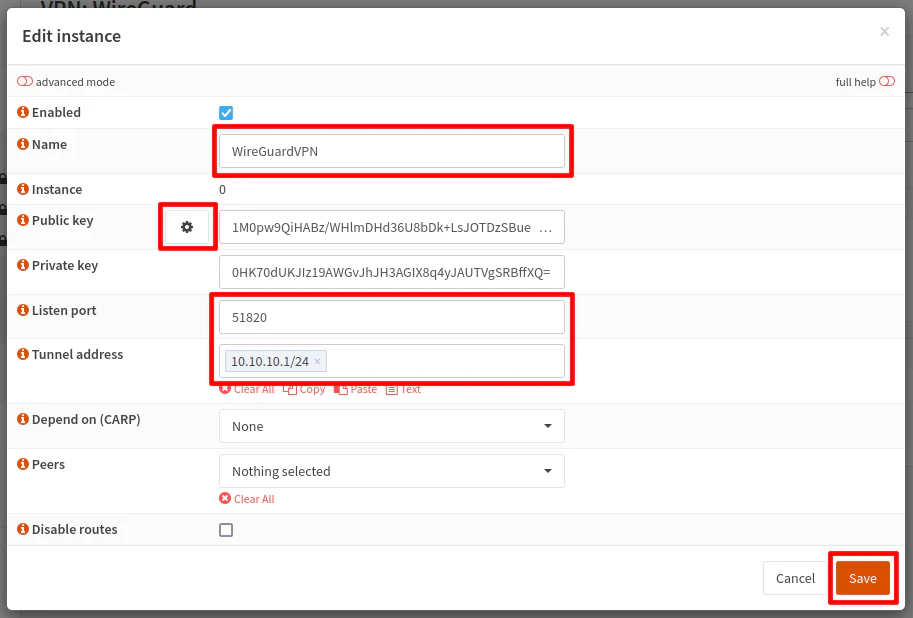
Ensure the “Enabled” checkbox is checked.
Enter the server a “Name” of your choice.
Beside the “Public key” box, click on the gear icon to automatically generate new public/private keys for the WireGuard server instance.
The default “Listen Port” for WireGuard is 51820. Even if you plan to use the default port, you must enter 51820 for the “Listen Port” because the OPNsense plugin does not automatically set the default port number.
For the “Tunnel Address”, enter a network address such as 10.10.10.1/24. The WireGuard interface address will be 10.10.10.1 and the network will fall in the 10.10.10.2-10.10.10.254 range. All of the peers/clients connecting to the server should have an IP address that falls in that range.
Warning
You should choose an address range that falls outside the range of the other networks you have set up in OPNsense for your local network(s) as well as any remote network(s) where you are connecting from.
For example, if you are connected to a network which uses 10.0.0.0/24 make sure your WireGuard network is using a different range such as 10.10.10.1/24 as described in this network. Many users choose to use more random private IP network addresses to avoid potential conflicts.
For the “Peers” dropdown, you will need to leave this blank when you first set up the WireGuard server because you do not have any peers created yet. However, it is absolutely critical you do not forget to select the peers after creating new peers later in this guide.
Click the “Save” button.
Note
If you have Unbound DNS in OPNsense set at the default behavior of being applied to “All” interfaces, the DNS server used by the WireGuard server is the WireGuard tunnel address, which in our example will be 10.10.10.1. This is essentially the same behavior as any other interface in OPNsense when Unbound DNS is enabled on the interface.
However, if you are using alternate DNS server(s) such as Pi-hole, you will need to specify those DNS servers by clicking the “advanced mode” and entering the DNS server IP address in the “DNS Server” box. You will need a firewall rule to allow access to the alternate DNS server(s).
Generate the Configuration for the New Peer
Once the WireGuard server instance created, you may begin generating peer configurations for all of the devices you wish to connect to your WireGuard VPN. Recent versions of the WireGuard functionality in OPNsense includes a peer generator, which makes it very easy to add new WireGuard peers.
Click on the “Peer generator” menu option or tab.
Ensure the proper “Instance” is selected. If you only have one WireGuard server instance configured, it will be selected by default. In my example, it is called WireGuardVPN.
Enter the “Endpoint” for the peer. The “Endpoint” is the external DNS FQDN (fully qualified domain name) which points to your public WAN IP address followed by the port number you configured for the WireGuard server. In the example below, I am using the fictitious yet realistic value of wg.homenetworkguy.com:51820. If you do not enter the “Endpoint” value, the configuration will not be valid for the WireGuard clients.
A “Name” should be entered for the peer to help identify the user/device. The example is using User1 for the “Name”.
“Public/Private keys” will be generated automatically for the new peer.
The peer generator will automatically select the next available IP address for the client “Address” such as 10.10.10.2/32, but you may enter any available IP address in the network range.
The “Allowed IPs” defaults to 0.0.0.0/0,::/0, which means all network traffic should be tunneled through the WireGuard network.
If you plan to tunnel all of the peer’s traffic through the WireGuard VPN, you should set the “DNS Servers” option to 10.10.10.1 so that it can use the WireGuard’s interface as the DNS server.
At this point, you will have a complete WireGuard peer configuration.
Do not click the checkbox button to save the peer configuration yet! You should use the QR code for mobile devices or the text in the box to the left of the QR code to configure your WireGuard clients.

Configure the WireGuard Client (iOS Example)
Before saving the WireGuard peer configuration, I will demonstrate setting up the iOS WireGuard app for iPhones as an example.
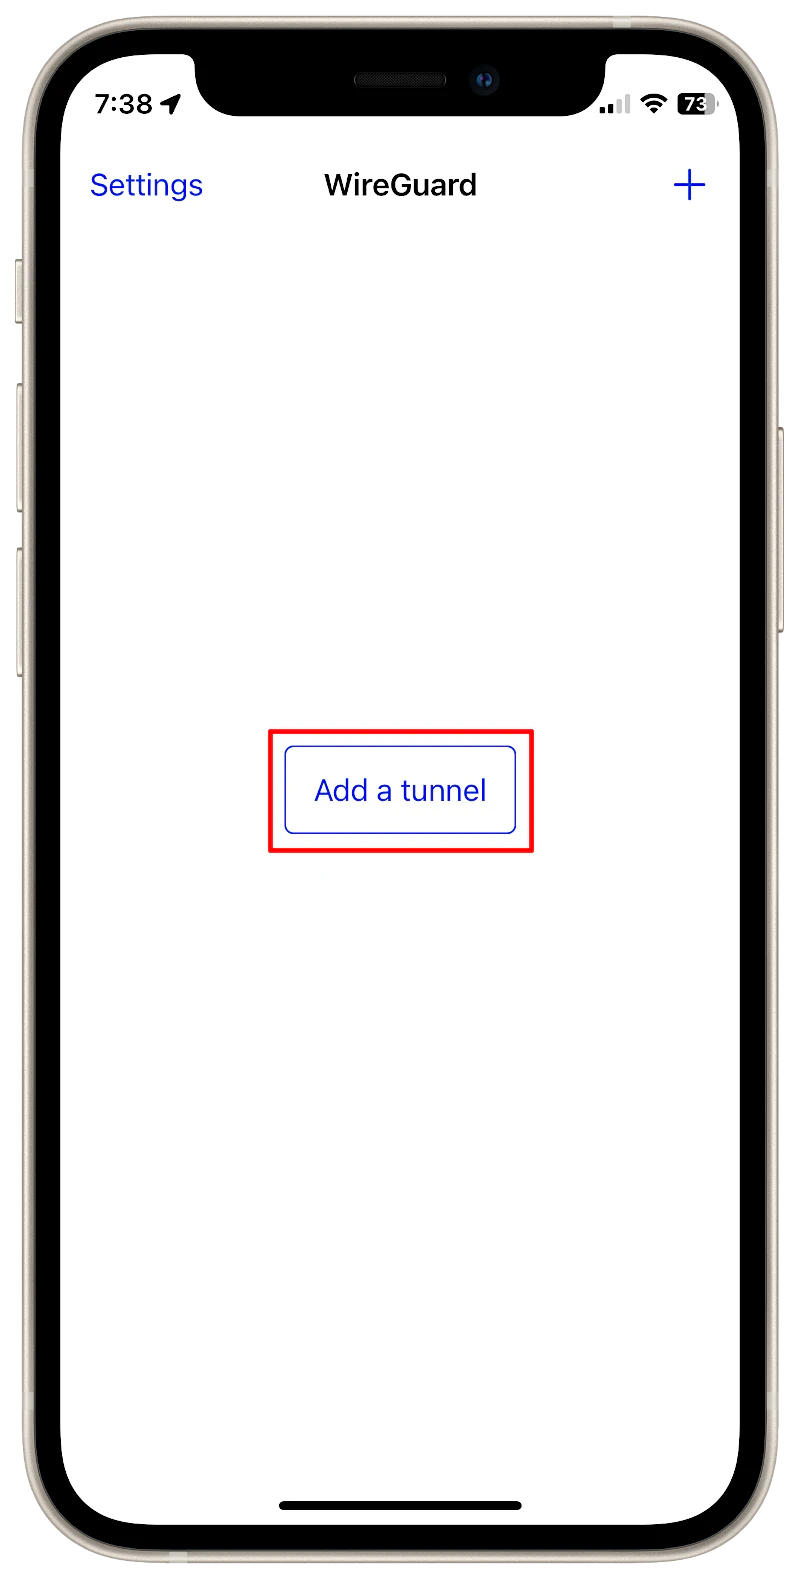
When you open the WireGuard app, click the “Add a tunnel” button.
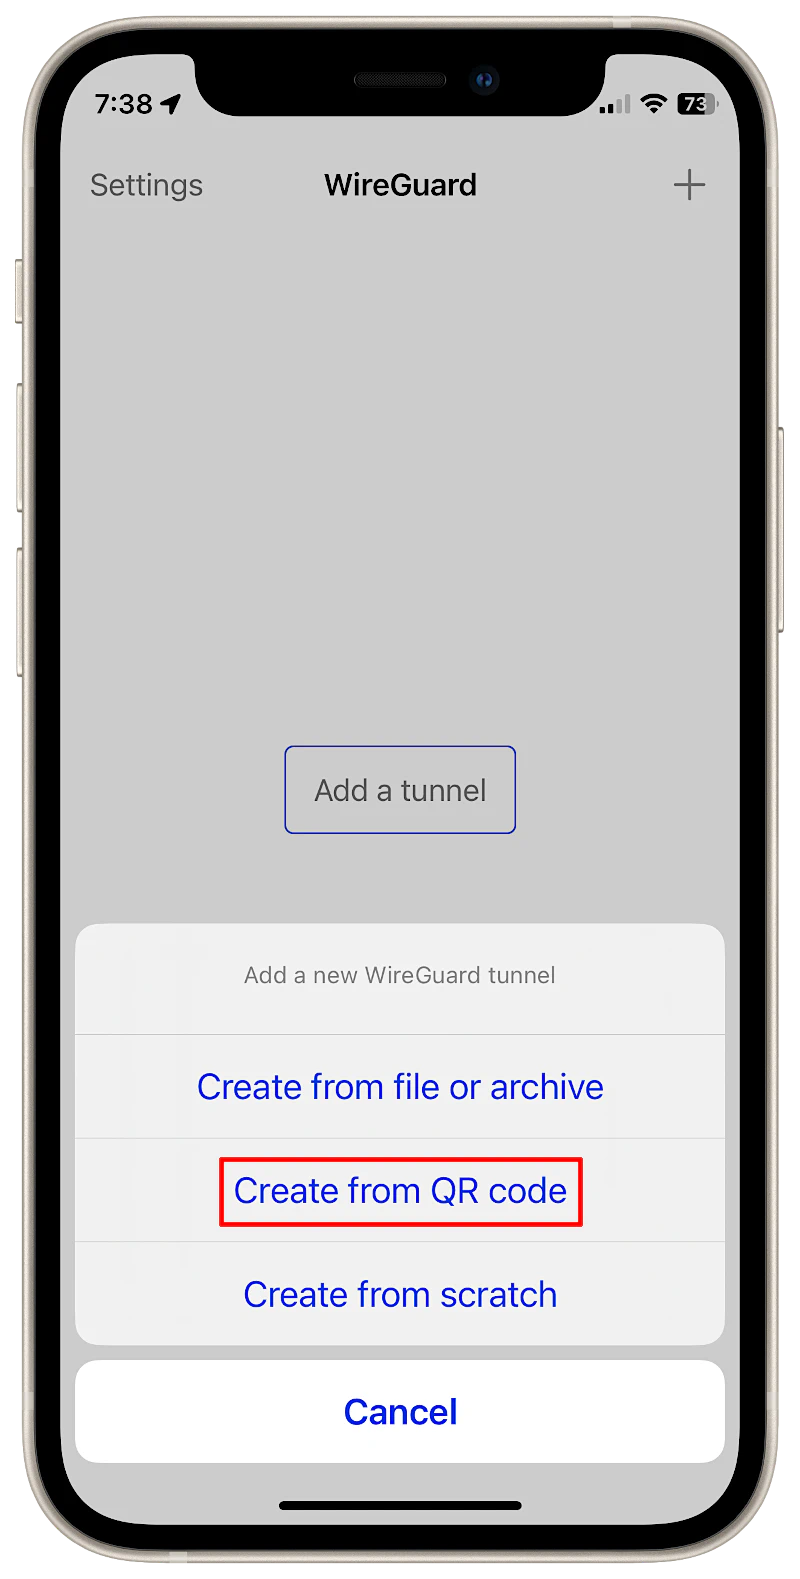
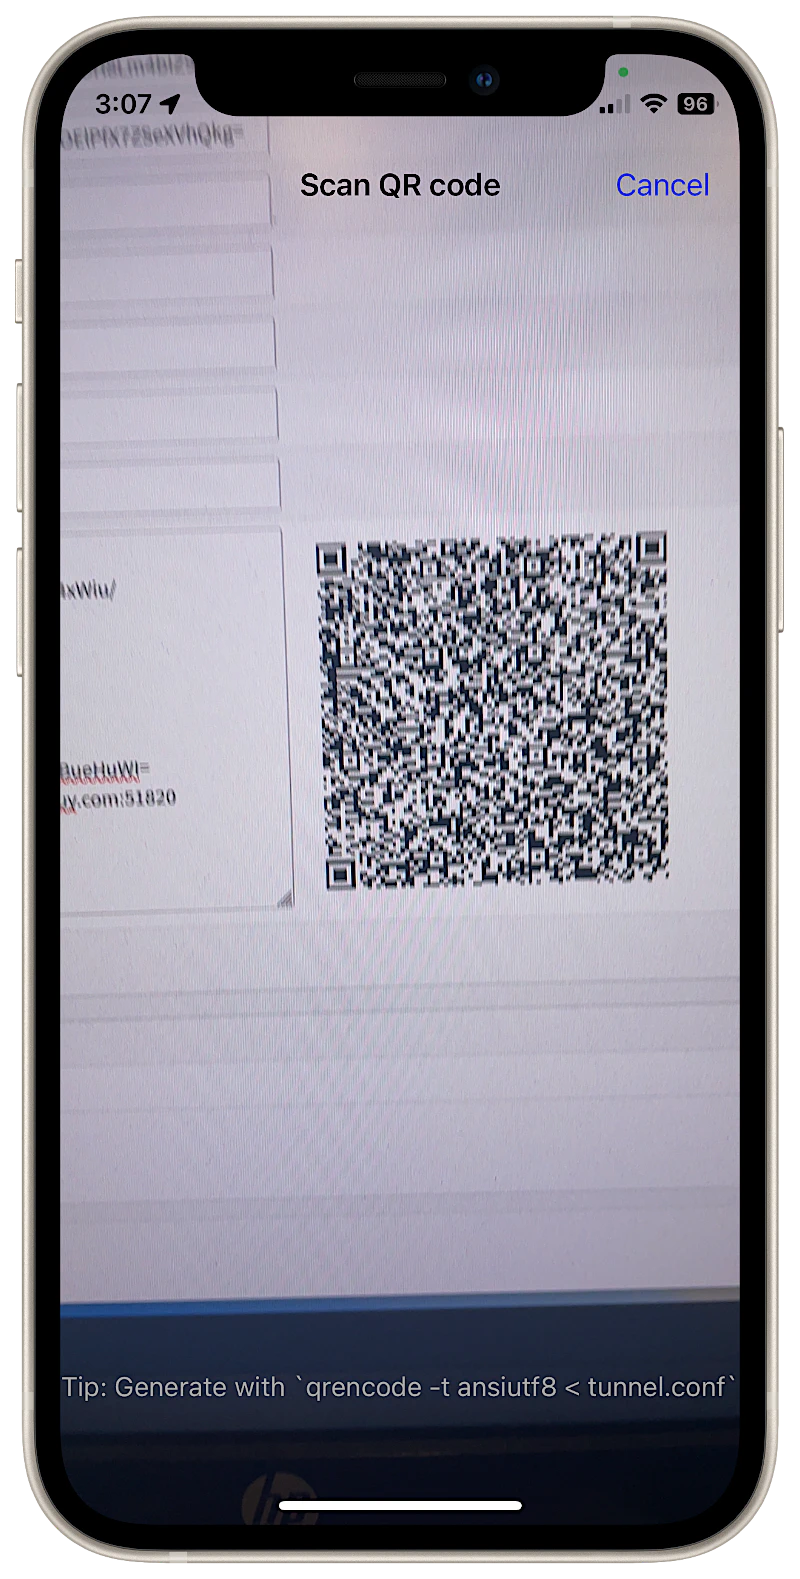
Then click “Create from QR Code” since WireGuard in OPNsense supports QR Codes.
Simply scan the QR code that is displayed on the webpage.
Enter a descriptive name for the WireGuard connection such as “Home VPN” and click “Save” when you are finished.
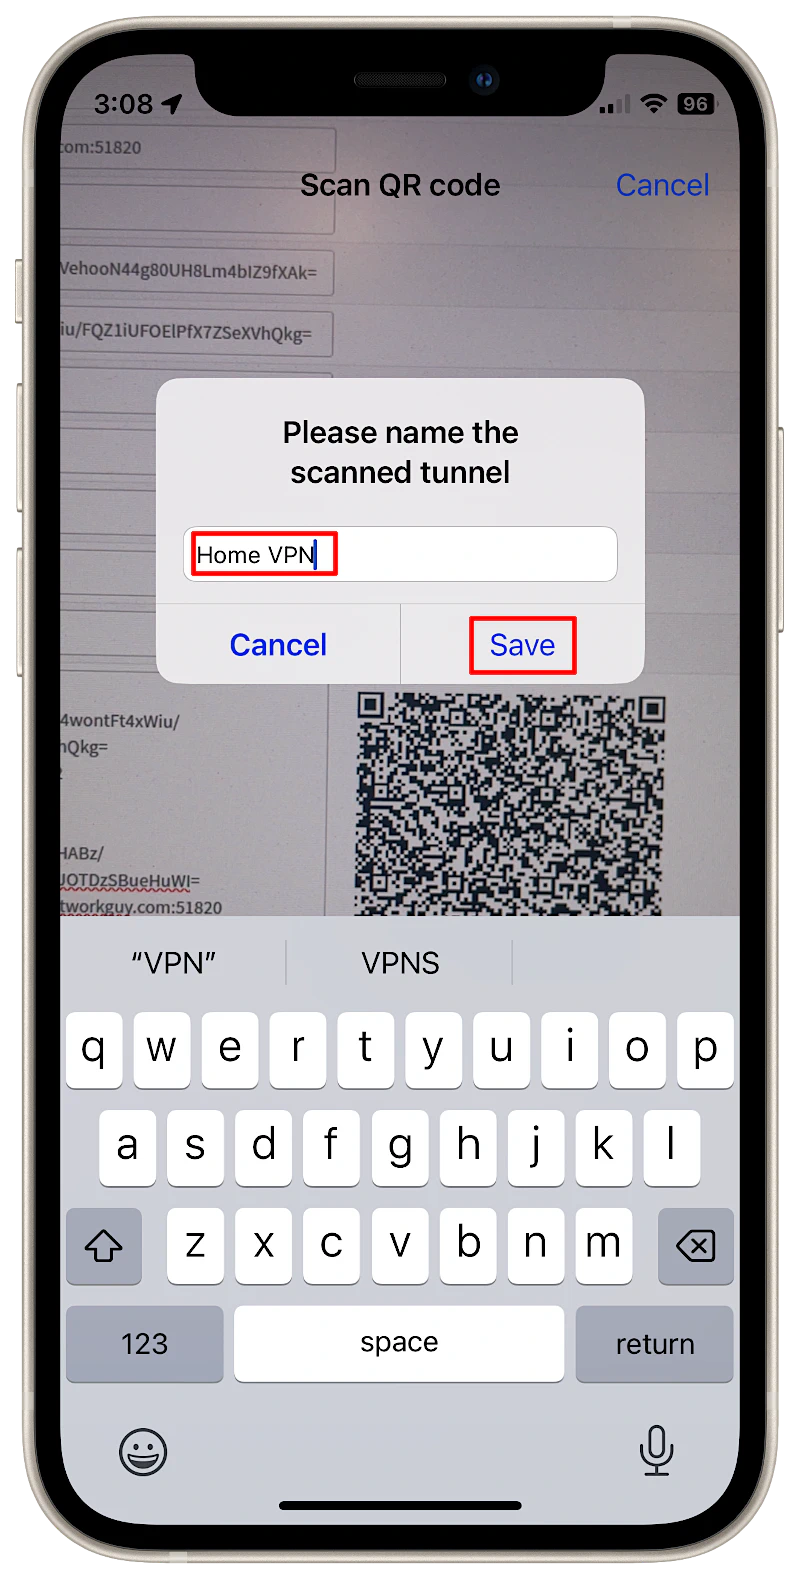
That is all you need to do to set up an iOS client via QR code! So simple compared to entering all of the values manually and copying/pasting keys, which was how it had to be done before the QR code functionality was added to OPNsense.
Save the Peer Configuration
After the WireGuard client is configured, you may now save the peer configuration by clicking the button with a checkmark.
The screen will be refreshed with the next peer’s information. This will allow you to quickly continue creating additional peers if you like, but you do not have to add more peers at this time.

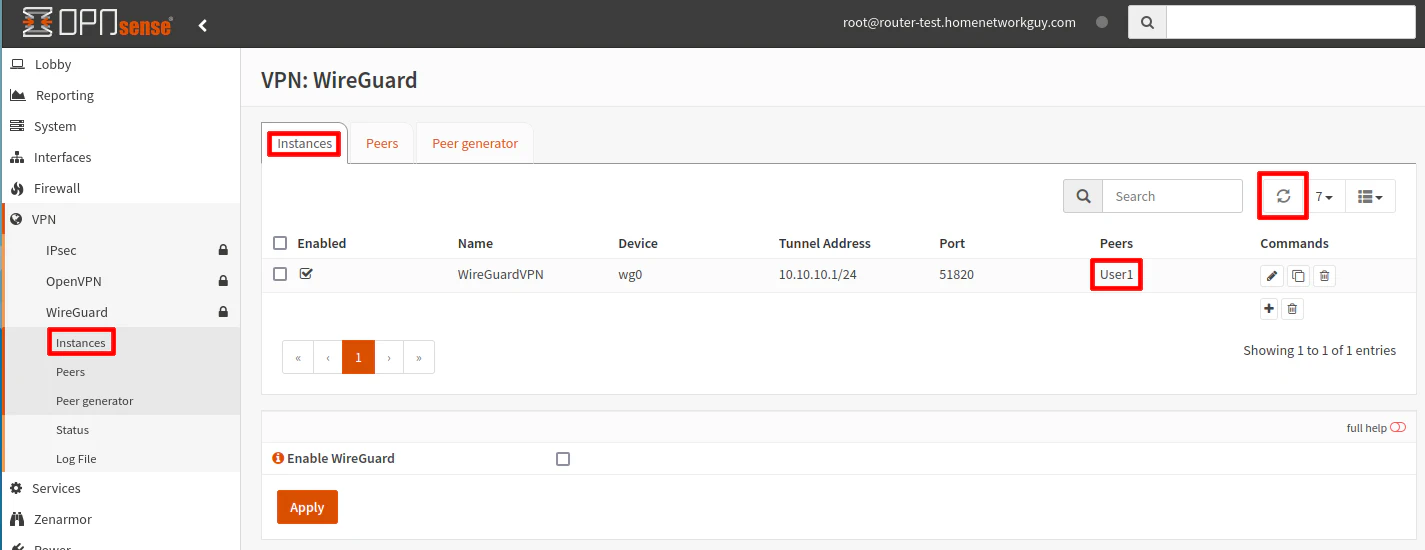
On the “VPN > WireGuard > Instances” page, you may need to click the refresh icon in order to see the newly generated peer listed on the “Instances” page.
Because you selected the “WireGuardVPN” instance, the generated peers are automatically added to the server instance. This is a welcome improvement. In the old WireGuard plugin, you had to select the peer from a dropdown box every time to you added new peers, which was a pain and very easy to overlook.
Enable the WireGuard Server
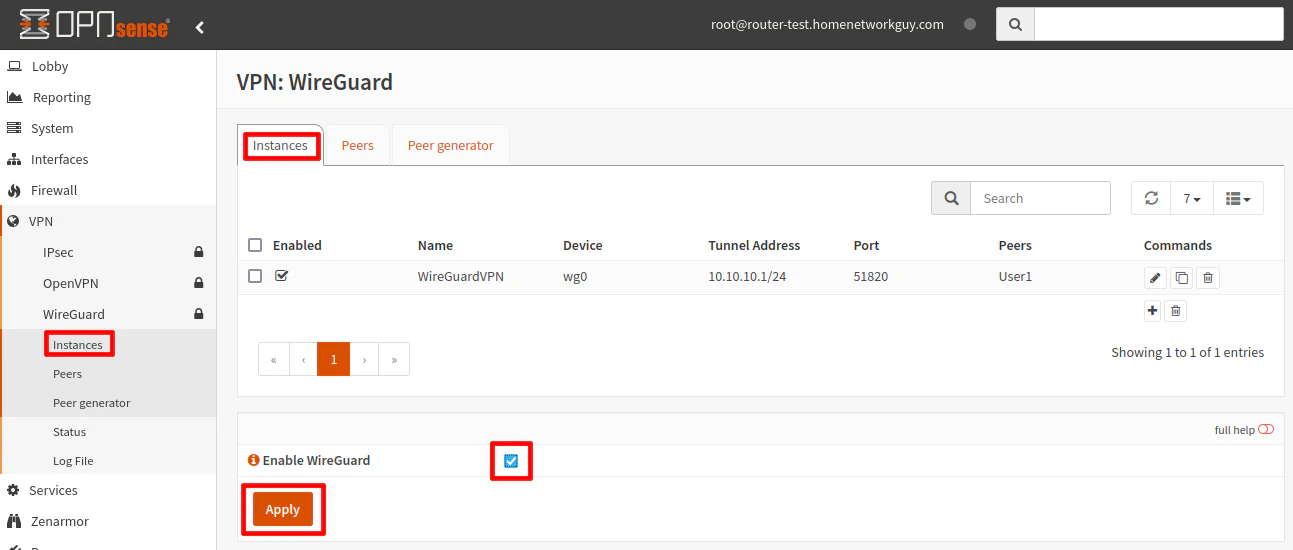
At this point, the WireGuard VPN server may be enabled since the server and one client peer has been configured.
To enable to the WireGuard server, go to the bottom of the “Instances” page and click the “Enable WireGuard” checkbox. Click the “Apply” button to save the changes.
Tip
When you add new peers or change any other configuration after enabling the WireGuard server instance, you will need to click the “Apply” button to ensure the changes take effect immediately.
Assign the WireGuard Interface
A WireGuard interface is not automatically created when the service is enabled like with OpenVPN. Technically, creating a WireGuard interface is optional, but I highly recommend it.
The benefits of creating a WireGuard interface are listed in the official OPNsense WireGuard documentation.
The greatest benefit is that it automatically creates the necessary outbound NAT rule to allow clients to access your home Internet connection (assuming you have the appropriate firewall rules in place to allow it).
To add the WireGuard interface, go to “Interfaces > Assignments”. Select the “wg0” interface (which may already be selected if it is the only interface available to be assigned).
Enter a “Description” so that the interface is easier to identify. Otherwise, it will be displayed something like “[OPT1]”. I am using “WG” in my example.
Click the “Add” button to add the interface to the list of interfaces.

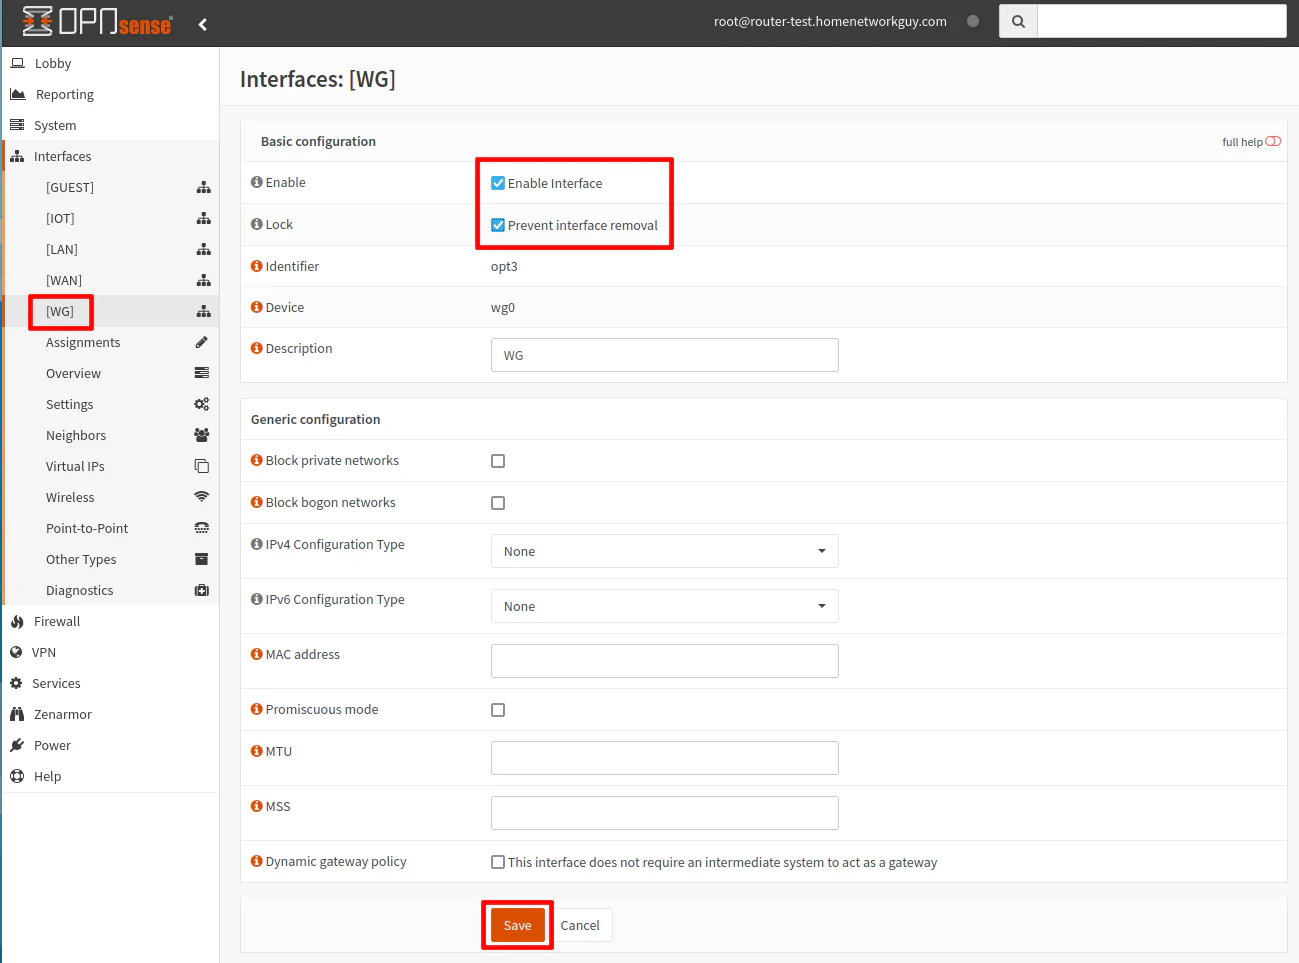
Go to the “Interfaces > [WG]” page.
Click the “Enable” and “Prevent interface removal” checkboxes.
You do not need to enter any other interface settings like you normally would do for physical interfaces because the IP address range is already specified when you created the WireGuard server instance.
Click the “Save” button to persist the changes.
Add the WAN Firewall Rule
To allow external access to the WireGuard VPN, a WAN rule needs to be created. Since the WireGuard service is running on the OPNsense system, you do not need to use a NAT port forward rule.
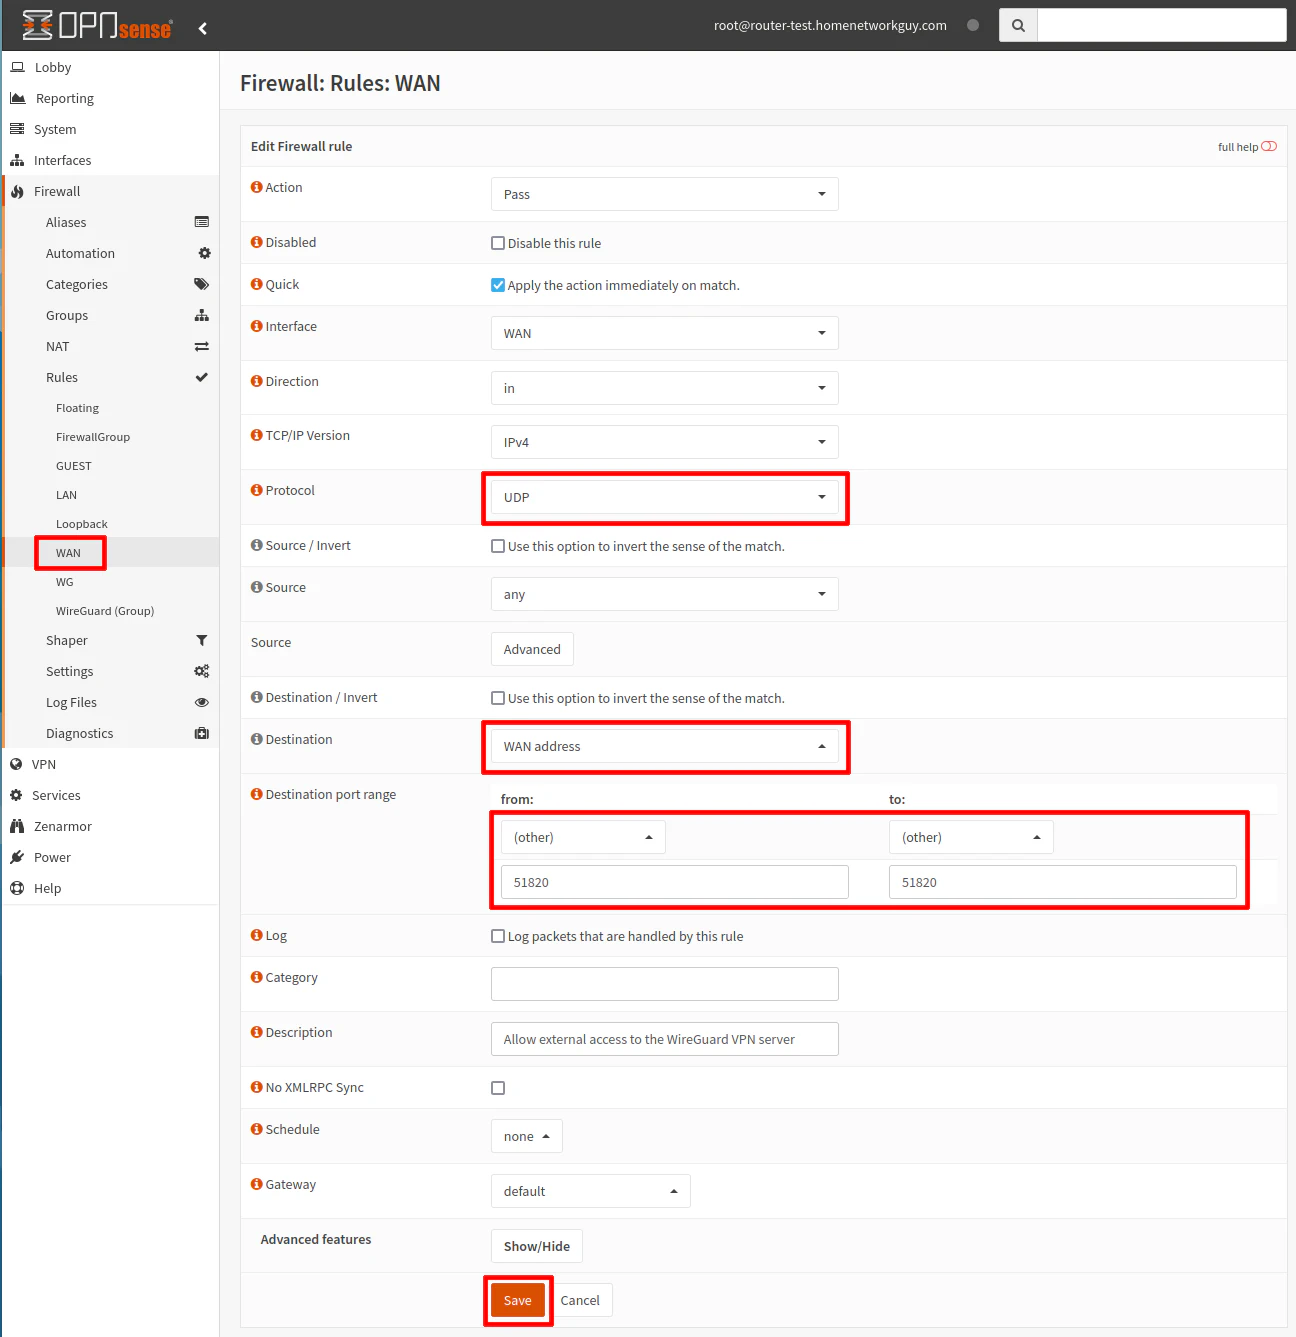
Go to the “Firewall > Rules > WAN” page. Click on the “+” button to add a new firewall rule.
Choose “Pass” for the “Action” and “UDP” as the “Protocol”.
The “Source” should be set to “any” to allow any remote host to connect. You can restrict the “Source” further if you know you are always connecting from a certain network with static IP address(es).
The “Destination” needs to be the “WAN address”, which is your external IP address.
For the “Destination port range”, select “(other)” and enter the port number you used when you created the WireGuard VPN service. In my example, I am using the default port 51820, but if you are using a different port, you need to enter it instead.
You may add a useful “Description” such as “Allow external access to the WireGuard VPN server”.
Click the “Save” button to save the new firewall rule.
Add the Outbound NAT Rule (Required if Not Creating WireGuard Interface)
If for some reason you do not want to create a WireGuard interface, you will need to manually add the outbound NAT rule. I do not recommend doing this since creating the WireGuard interface simplifies the configuration in a number of ways. For the sake of completeness, I will describe the process in hopes that it will help someone. Please skip this step if you already created a WireGuard interface!
If you are using the default “Automatic outbound NAT rule generation” option on the “Firewall > NAT > Outbound NAT” page, you will need to set it to “Hybrid outbound NAT rule generation” or “Manual outbound NAT rule generation”. The hybrid option is likely best for most home users so you do not have to manually configure the outbound NAT rules for all of your networks.
Once you enable the hybrid or manual mode, you will see a “+” button on the top right corner of the “Manual rules” section.
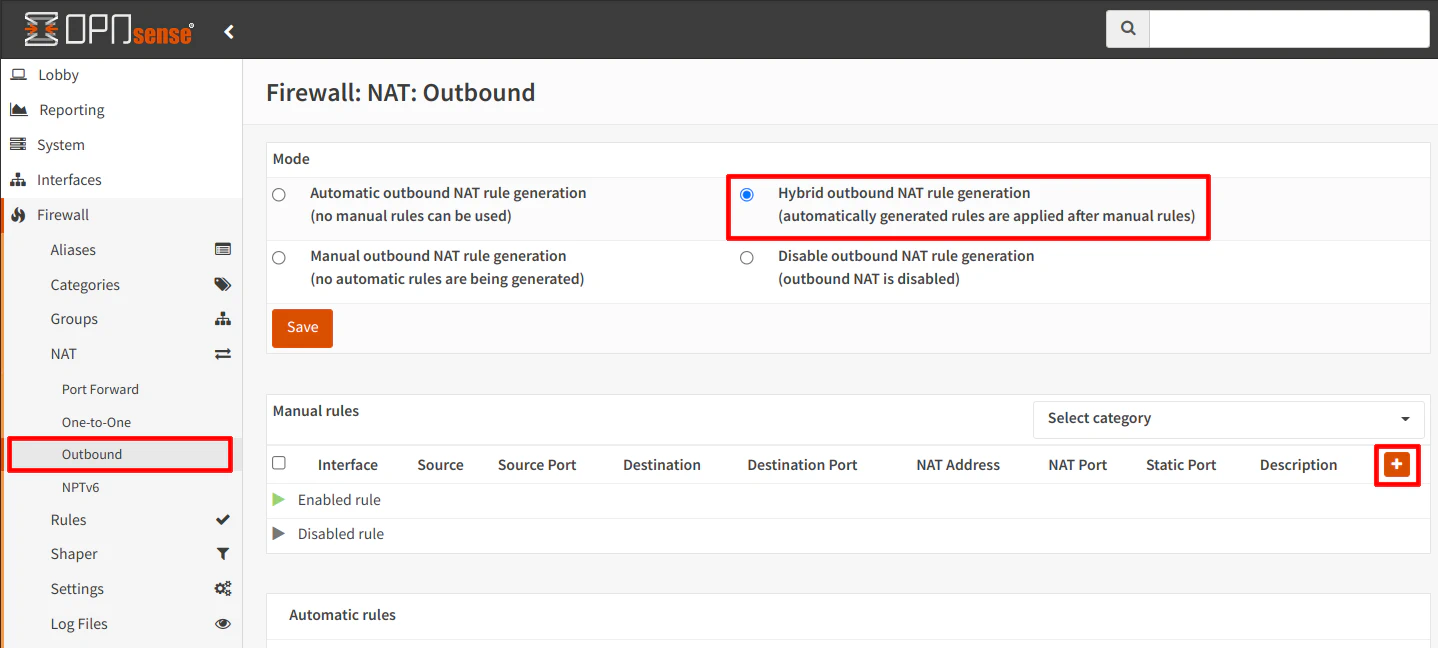
Click the “+” button to create a new outbound NAT rule.
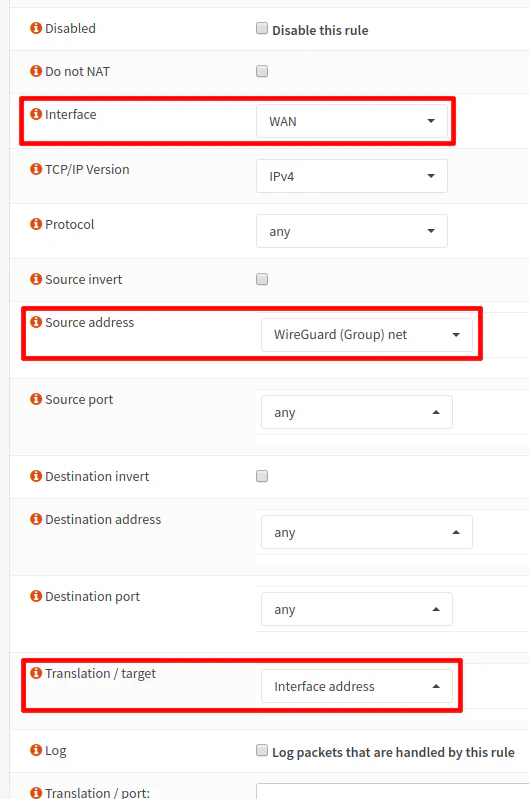
Ensure that the “Interface” is set to “WAN”.
Choose “any” for the “Protocol”.
The “Source address” should be “WireGuard (Group) net”, which is the autogenerated alias that applies to all instances of WireGuard. Since you did not create a WireGuard interface, it will be your only WireGuard alias you can select.
The “Source port” should be set to “any”.
The “Destination address” and “Destination port” should both be set to “any” to allow outgoing connections to any address.
The “Translation/target” dropdown should be set to “Interface address” to so that outgoing WireGuard traffic will be translated to the external WAN interface address (NAT translation for the WireGuard interface is the same as other interfaces that are behind NAT).
Add Firewall Rules to Access Internal Network(s)/Internet
At this point, the WireGuard VPN should be configured to allow external connections from client devices such as your phone. However, if you do not create any firewall rules, the client will not be able to access anything on your network. It is just like any other interface on your network – no firewall rules means “deny all”.
If you want to keep the rules simple, you could create an “allow all” rule that will allow the WireGuard users full access to your network, but I imagine you would want to only allow access to specific devices/services on your network and the Internet.
If you are connecting to your home network using one of your mobile devices, you may want to simply clone the same rules of the network the device is normally connected while you are at home so that you may have the same access remotely as you do at home. Of course you can choose to increase or decrease the amount of access as you see fit.
The bare minimum rules to provide network isolation is similar to other interfaces on your network: allow access to the interface address for DNS and block access to all private networks.
Go to the “Firewall > [WG]” page to add the following rules. Note that you will need to create an alias for “PrivateNetworks” as described below.
This rule allows DNS access to the WireGuard interface, which is 10.10.10.1 in my example, but you can use the built-in WG address alias if you created a WireGuard interface (it is another advantage of creating an interface for WireGuard). The first rule is necessary because the second rule would end up blocking access to the WireGuard interface since that rule blocks all private IP addresses to isolate the networks.
| Option | Value |
|---|---|
| Action | Pass |
| Interface | WG |
| TCP/IP Version | IPv4 |
| Protocol | TCP/UDP |
| Source | WG net |
| Source Port | any |
| Destination | WG address |
| Destination Port | DNS (53) |
| Description | Allow access to the WG DNS server |
The second rule blocks access to all private IP addresses while allowing access to all public IP addresses. The “Destination / Invert” option is very important to enable because it essentially means “not” so the rule below allows all traffic that is not on private networks.
| Option | Value |
|---|---|
| Action | Pass |
| Interface | WG |
| TCP/IP Version | IPv4 |
| Protocol | any |
| Source | WG net |
| Source Port | any |
| Destination / Invert | checked |
| Destination | PrivateNetworks (alias containing: 10.0.0.0/8,172.16.0.0/12,192.168.0.0/16) |
| Destination Port | any |
| Description | Allow access to Internet and block access to all local networks |
With these two rules, you will have access to your home’s Internet while connected remotely but no other access to your internal network(s). If you simply want a secure VPN for public WiFi hotspots, you do not need to add more rules.
If you wish to allow further access to devices/apps/services on your internal network(s), you will need to add rules above the second rule just as you would with any other network interface you have configured.
Since the internal network firewall rules could vary greatly depending on your specific needs, I will leave the creation of additional rules as an exercise for the reader. If you would like some guidance on creating OPNsense firewall rules, I have written about it in another guide.
I have also created a “cheat sheet” list providing several common firewall rule examples.
Connect to the WireGuard VPN
The moment of truth… you are finally ready to connect to your WireGuard VPN!
Go to your client device and click connect.
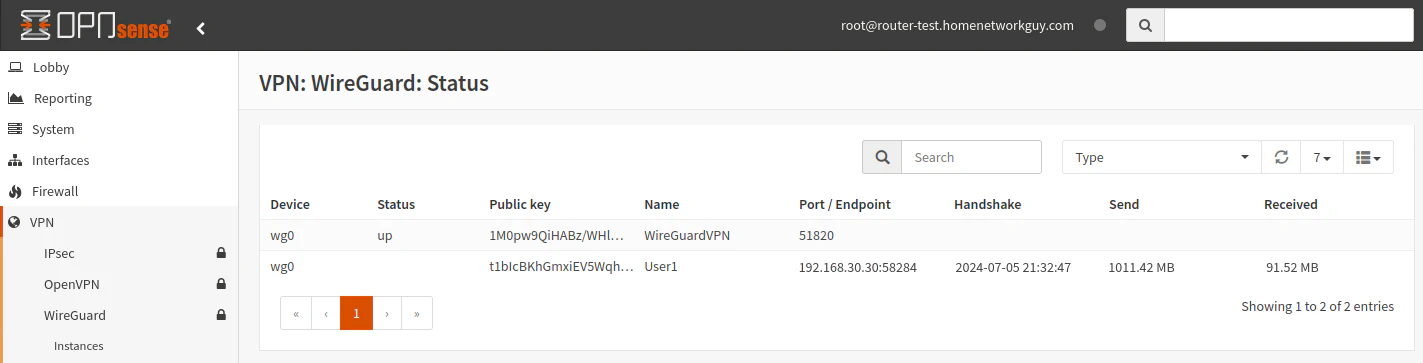
In OPNsense, go to the “VPN > WireGuard > Status” page. You should be able to see information about the connected user. You will see which peer is connected, the IP address of the connected user, how long ago the last connection occurred, and the amount of data transferred.
When a peer is not connected, the “Port/Endpoint” will simply display (none).
(Optional if not Automatic) Add ACL Entry for Unbound DNS
If you plan to use your WireGuard interface such as 10.10.10.1 in my example to provide DNS to your WireGuard clients rather than use some other DNS server on your network, it has been noted through feedback that there could be the possibility that you will need to manually add an entry to the Unbound DNS ACL (Access Control List) to allow the WireGuard interface to access your Unbound DNS server in OPNsense.
I have not personally encountered this issue, but if you are having issues with accessing your WireGuard interface DNS server (not Pi-hole, etc), you may want to check your ACL configuration by going to the “Services > Unbound DNS > Access Lists” page. Click the “Add” button to enter the WireGuard network 10.10.10.1/24 (or the IP range you are using) to the ACL.
Some users have noted that they needed to restart the Unbound DNS service before DNS functioned properly so perhaps that is all you need to do for the Unbound DNS ACL to be populated with the WireGuard network (especially if you made other DNS changes to Unbound during this process).
Conclusion
Setting up a WireGuard server in OPNsense has become more user friendly than when I first tried setting up WireGuard.
Once WireGuard became a part of the FreeBSD kernel and the OPNsense team updated the web interface, the process has become more streamlined especially for setting up mobile devices.
However, even setting up a WireGuard client on a Linux OS is easier since you can simply copy/paste the entire configuration into your WireGuard client config file.