12 Ways to Secure Access to OPNsense and Your Home Network

Photo by solarseven from iStock
Table of Contents
When you have decided as a home user to make the switch from a consumer grade router to a more advanced firewall/router such as OPNsense, you may find yourself overwhelmed at where to begin with securing your router and your network. While the default installation has some basic protections in place, there is much more that you can do to secure OPNsense and your network.
One benefit to creating such a list besides providing a good starting point for new users is that it provides a high level overview of many of the topics I have written about over the last few years. For the sake of brevity on items which require a more lengthy explanation, I added links to the appropriate guides which include the full details.
Please keep in mind that you do not have to implement every single suggestion below in order to have a secure router/network since OPNsense is already much more secure than your standard consumer based router (I have been using the same router since 2017, and yet I can still run the most up to date and secure version of OPNsense – that level of support would like never be possible with most consumer grade routers).
However, the more security measures you implement, the greater your overall security will become. Defense in depth is an effective strategy to minimize system and network compromises. The following list should not be considered an exhaustive list. I may add items to this list over time.
1. Install Software Updates
Keeping software up to date is generally rule # 1 for securing systems because the updates often contain security patches to fix vulnerabilities. OPNsense is no exception. I would argue it is likely one of the most important systems on your network to keep up to date since it is the doorway into your network and provides a lot of your overall network security. For obvious reasons, you should want your firewall to be as secure as possible.
To update OPNsense, go to the “System > Firmware > Status” page and click “Check for Updates”.

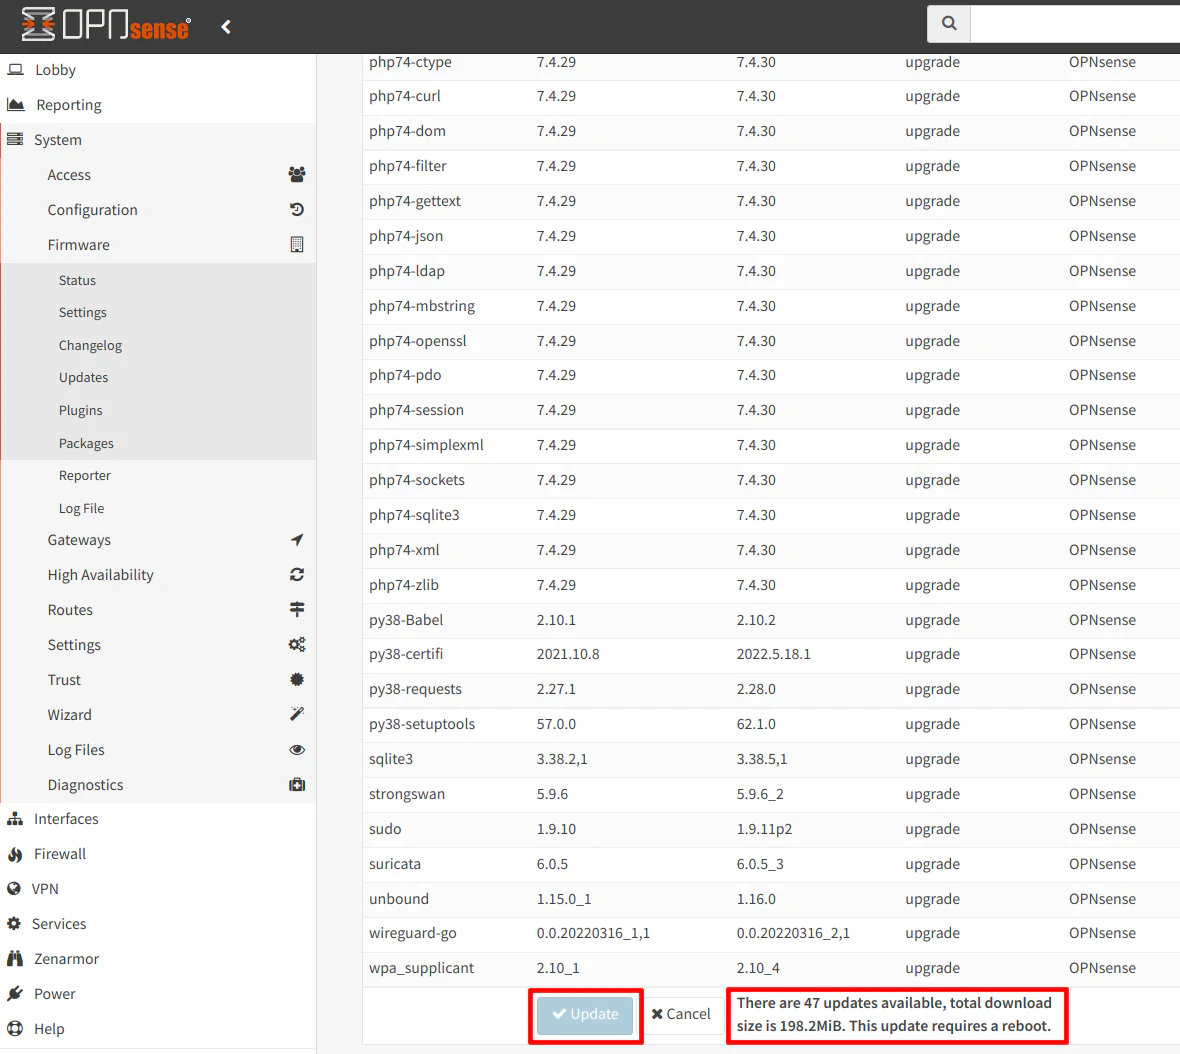
If there are any updates available, you will see a dialog box displayed with all of the information pertaining to the current update.
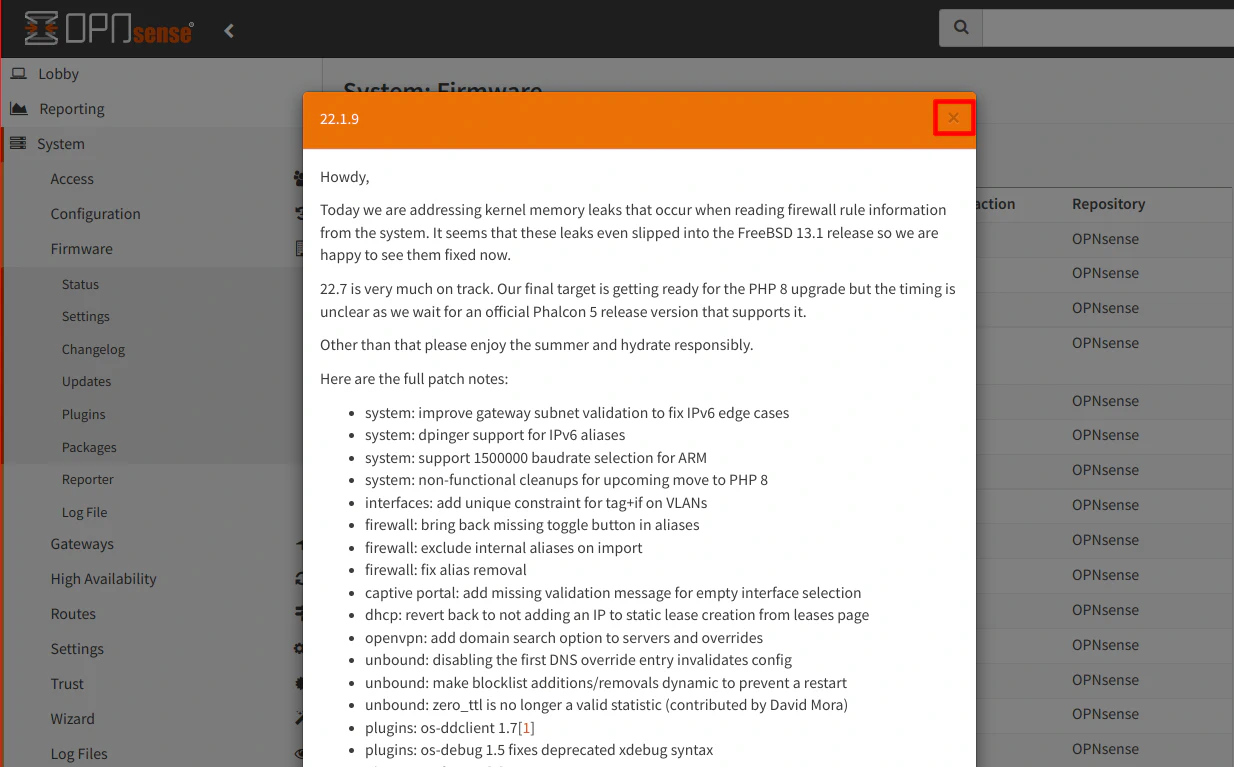
When you close the dialog box, you will see below the list of updates if a reboot is required before you perform the update. I find that information very useful because I will wait until a more convenient time to update if I know I have to reboot my router.
2. Secure the OPNsense Web Interface
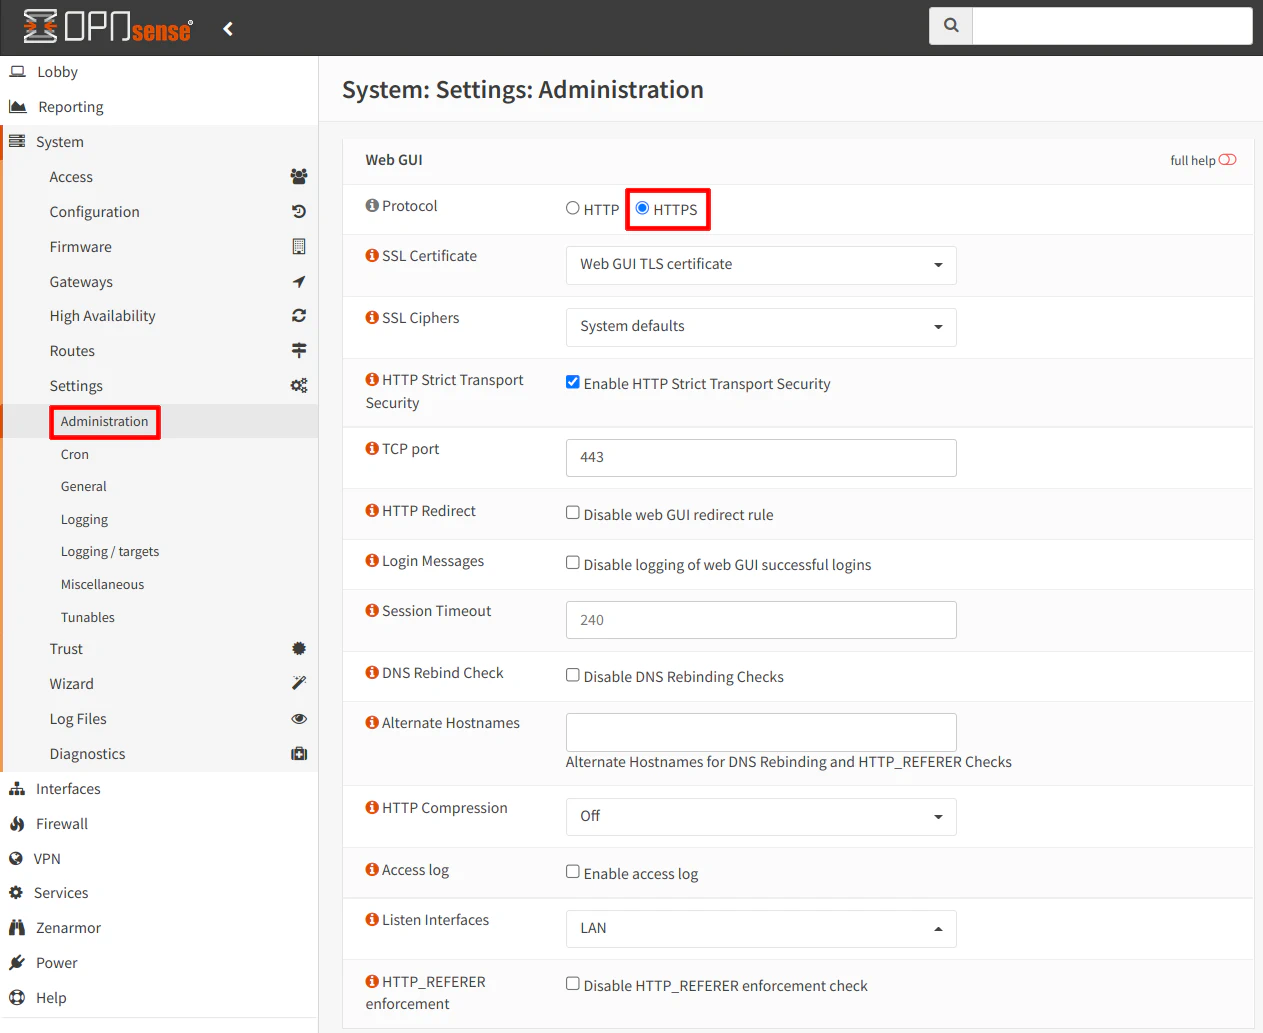
There are a few things you can do to secure the OPNsense web interface. The following four settings are all on the “System > Settings > Administration” page.
2.1 Enable HTTPS
During the installation of OPNsense, HTTPS should be enabled by default, but I am mentioning it for the sake of completeness. It is the first option on the page. A “Web GUI TLS certificate” should already be generated by OPNsense and selected.
2.2 Replace the Self-Signed Certificate with a Valid Certificate
When you install OPNsense, it generates a self-signed certificate for the web interface. Even though the web interface is not public facing, using a valid certificate offers greater security because a man-in-the-middle attack is a lot easier to perform with self-signed certificates. You will likely not even notice the difference between the self-signed certificate generated during the installation versus a malicious self-signed certificate.
Another benefit of using a valid certificate is that you do not have to click through any warning messages when accessing the web interface. To avoid the warning messages, you must use the hostname configured for OPNsense and the certificate.
I have written a guide on how to replace the existing self-signed certificate with a Let’s Encrypt certificate that you may refer to if you wish to add greater security to your web interface.

2.3 Enable HTTP Strict Transport Security
You should check the “Enable HTTP Strict Transport Security” option for some protection against certain types of attacks.

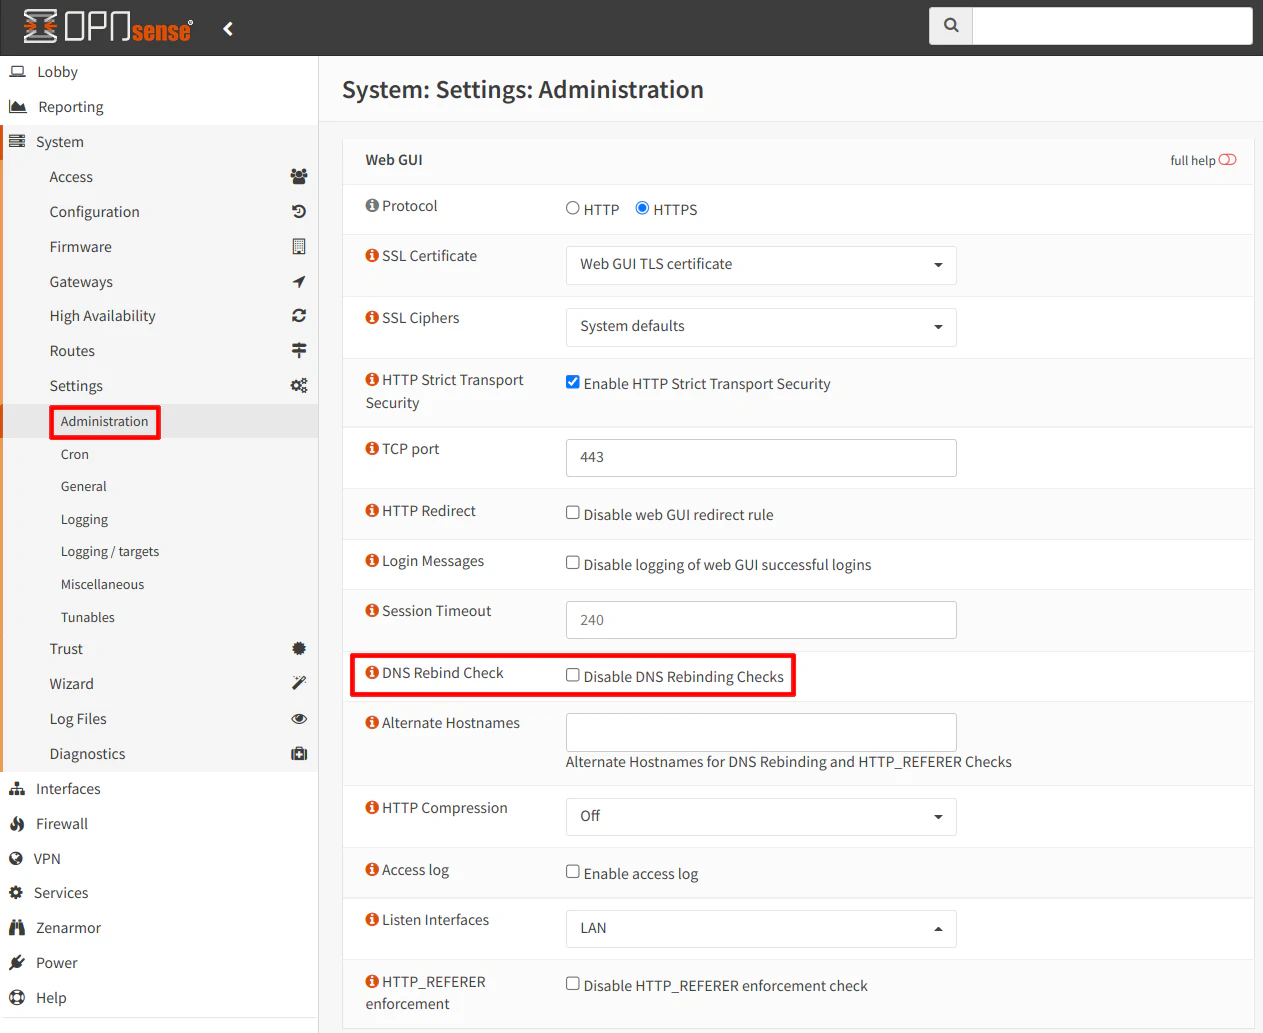
2.4 Enable DNS Rebind Protection
DNS rebind protection should be enabled by default. Enabled means the “Disable DNS Rebinding Checks” is unchecked. DNS rebind checks blocks private IP address responses for any domain that is not configured on the “System > Settings > General” page.
If you have other domains you wish to disable rebind protection because it is causing issues, you may specify them in the “Alternate Hostnames” box. It is best if you can keep rebind protection enabled unless you have a good reason to do so and you understand the risks.
2.5 Restrict Access to the Web Interface
By default, the OPNsense web interface is set to listen on all interfaces which means if you have multiple networks (physical or virtual), you can access the web interface on every interface’s IP address if the firewall rules are allowing access to the port 443 (or whatever port your web interface is listening on). For instance, if you have the default LAN with network addresses of 192.168.1.1/24 and a VLAN with network addresses of 192.168.10.1/24, you can access OPNsense on both 192.168.1.1 and 192.168.10.1 (if firewall rules allow it).
To secure access to the OPNsense web from internal networks/VLANs that are not being used as your management network, you may create firewall rule(s) to block access to the web interface port on all of the interfaces except for the interface where you wish to manage OPNsense.
Alternatively, you may create the firewall rules in such a way that web interface port is not allowed via the default deny policy (when nothing matches your allow rules, it will be denied by default). For instance, in my example rules I often describe a rule allowing access to only DNS (or NTP) ports on the network interface and a rule to allow all public IPs but not private IP addresses (which allows Internet access and isolates local networks). These two rules will effectively block access to the OPNsense web interface because there is no matching allow rule to allow access to the web interface port on the network interface.
Note
Note that the LAN interface by default has an anti-lockout rule so even if you change the default “allow all” rule to use the two rules described above to allow DNS and only public IPs, you will still have access to the OPNsense web interface on the LAN. However, on other interfaces, you would need to add a rule to allow access to OPNsense (if you are creating a management VLAN instead of using the default LAN).
2.6 Use CrowdSec to Protect the Web Interface
Out of the box, CrowdSec protects the OPNsense web UI and SSH services from brute force attacks, etc. See the CrowdSec section below for more information about CrowdSec.
3. Create New Admin User and Disable Root User
In general, using the root account should be avoided since it has unrestricted access to the entire system. Often it is recommended to create a separate admin account which has sudo privileges that may be used to perform administrative tasks. In order to do this, you must create a new admin user using the root account. Then you login as the new admin user and disable the root user. If you are not planning to use SSH, you can set the “Login shell” to /sbin/nologin.
See the Disable Logging into OPNsense as the Root User guide to see the steps in more detail.
4. Enable Multi-Factor Authentication for Admin User
To further protect access to the OPNsense web interface, you should enable multi-factor authentication for your admin user. Just like with any other account you have online, multi-factor authentication is just one more layer of defense in case your password is compromised.
If your OPNsense is not exposed to the outside world and you have it isolated to your management network, the likelihood of compromise is much lower. However, it is still a good security practice to lock things down as much as possible even within your network – essentially implementing a zero trust environment.
Since there are several steps involved with enabling multi-factor authentication, please see the How to Enable Multi-Factor Authentication in OPNsense guide for more details on how to implement it.
Note
If you enable multi-factor authentication and you are using password authentication for your SSH service, you will also need to use your auth token for logging in via SSH if you are using the same admin user which has TOTP enabled. However, if you are using SSH keys, you do not need to use the auth token.
5. Secure the SSH Service
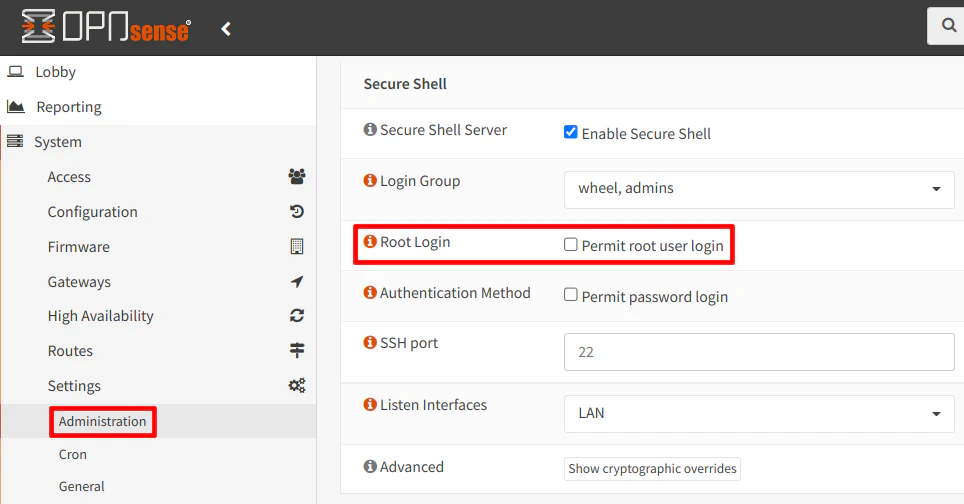
If you have the SSH service enabled (on “System > Settings > Administration” page), there are a number of changes you should make to increase the security of your SSH service.
5.1 Disable Root User Login
If you created a non-root admin account, you will want to make sure the “Permit root user login” option is unchecked to prevent the root user from logging in.
If you disable root user access for SSH, you need to ensure that your admin user has sudo privileges so that you can run commands with elevated privileges.
Scroll down the “Administration” page to the “Authentication” section to select “Ask password” for the “Sudo” option so that you will be prompted for a password when using sudo with your desired command.

5.2 Use a SSH Key
SSH services may utilize encryption keys instead of passwords to make communication more secure since a password is more easily cracked than a strong encryption key. You can even password protect your private key so even if you lose your private key, a password would have to be known or cracked.
The process for using an SSH key involves generating SSH keys on your system (if you have not already done so to login into other SSH services on your network) using one of the following OpenSSH commands. You only need to choose one depending on which encryption algorithm you prefer to use.
For RSA encryption (older, less secure):
ssh-keygen -t rsa -b 4096
For elliptic curve Ed25519 (newer, more secure):
ssh-keygen -t ed25519
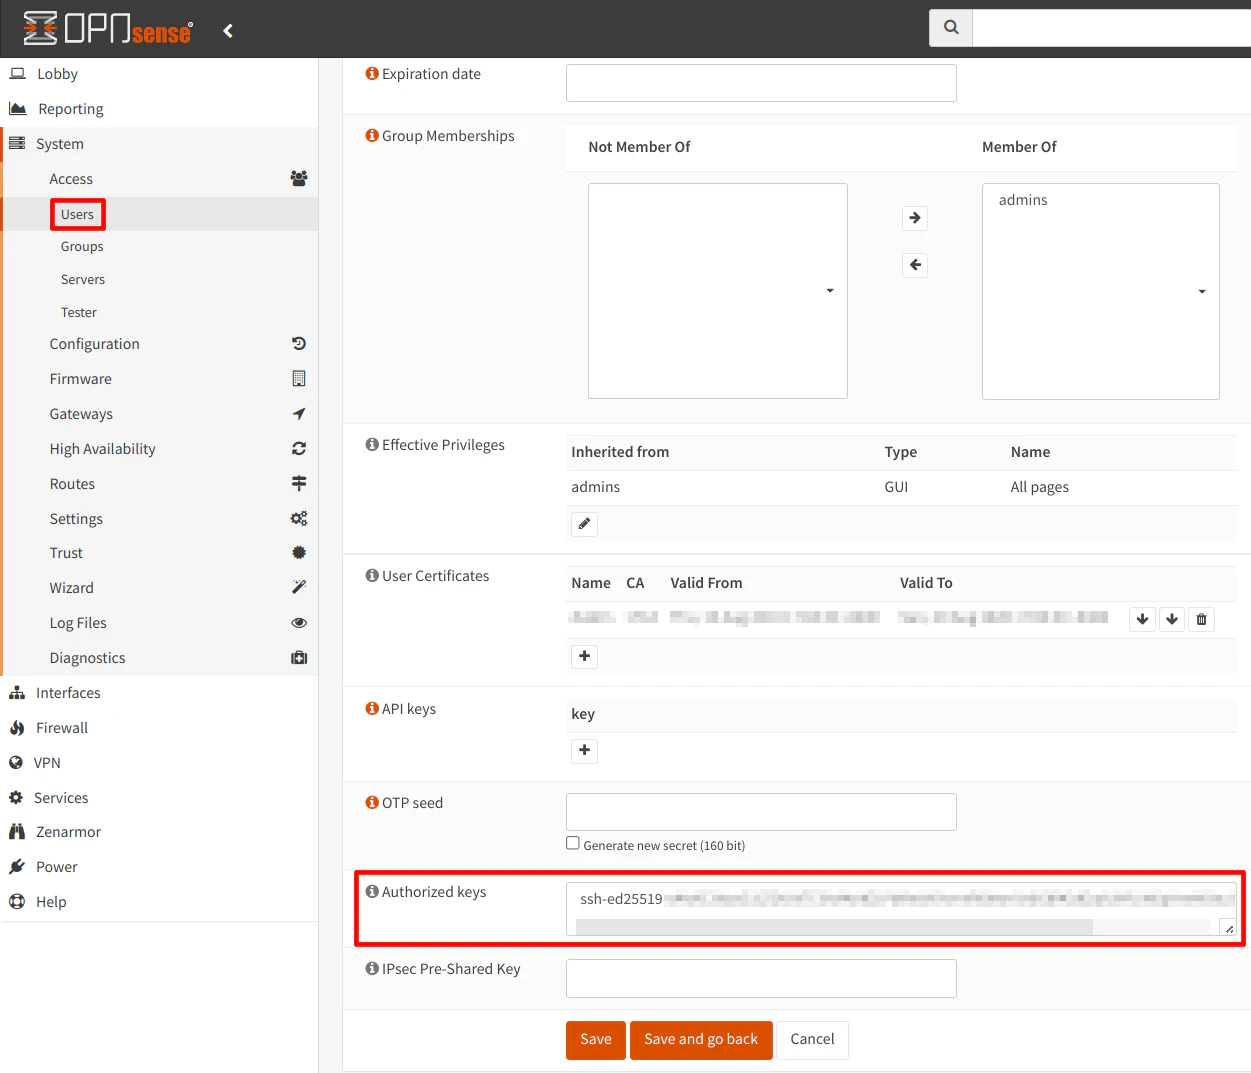
Next, copy the contents of id_rsa.pub or id_ed25519.pub depending on the algorithm you chose and paste it in the admin user’s “Authorized keys” box by going to the “System > Access > Users” page and clicking on the pencil icon for the admin user to open the edit page. Click the “Save” button to save your changes.
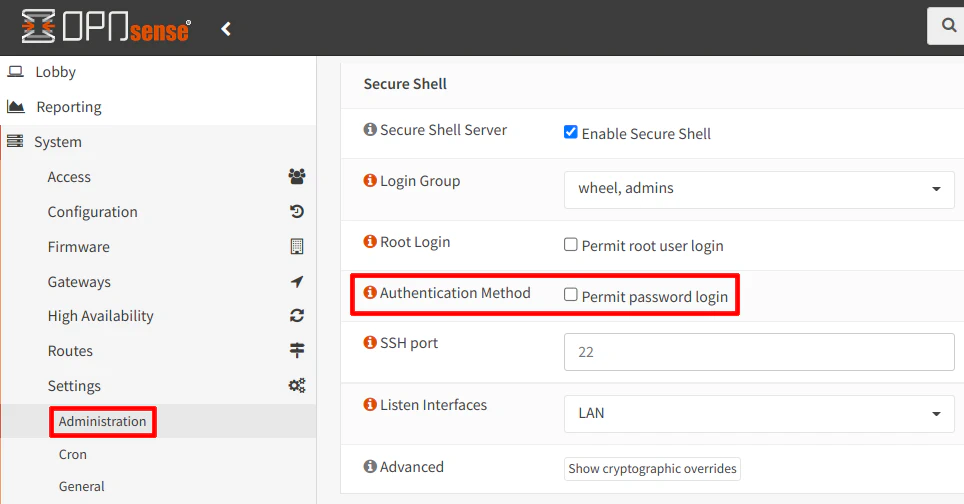
5.3 Disable Password Login
Before disabling the passwords, you should test that you can connect successfully using only the key from your SSH client. You should be prompted for the password for the private key rather than the password for your admin user account.
Once you know you can connect successfully using your SSH key, then you can disable the password login. Do not worry if you discover your key is not working because you can re-enable the password login from the web interface if you need to fix the issue.
5.4 Restrict Access to the SSH Service
As I mentioned for the web interface with restricting access to the web interface via firewall rules, you may do the same for the SSH service. I recommend restricting access to only the LAN/VLAN you are using as your management network.
5.5 Use CrowdSec to Protect the SSH Service
As mentioned in the Secure the OPNsense Web Interface section, CrowdSec protects the OPNsense web UI and SSH services from brute force attacks, etc. See the CrowdSec section below for more information about CrowdSec.
6. Create VLANs to Separate Functional Domains
A majority of home users have a flat network where every device can communicate every other device on the network, which greatly increases the security risk. Security aware home users have rightly identified this as a huge concern which should be addressed. Protecting your digital assets is becoming increasingly important as more sensitive information is being created and stored on home networks and the cloud. While you cannot be in full control of your information in the cloud, you do have control of the data which resides on your home network so it is important to do your due diligence to protect it to the best of your abilities.
Creating VLANs should not be considered a security feature, but when combined with firewall rules, they provide a convenient way to segregate various parts of your network and to add another layer of defense. When you isolate less secure devices or devices which are more exposed to the Internet, you are increasing the security of the other parts of your network by minimizing the spread of malicious activity by reducing your attack surface.
One way you may wish to segregate your network is by considering all of the functional domains you may have on your network. Grouping devices based on their function is a great way to divide up your network and increase security without greatly reducing the usability of your network. What good is a very secure network if you cannot do anything on it? This is especially true for home networks. Business and governments tend to need much tighter security than most home users since they are very large targets as compared to home users. My approach is to lock things down as tight as possible without disrupting the day to day operations on the network. I consider myself successful when my family does not notice any usability issues with the network even when behind the scenes I have several layers of security in place.
Below are some areas you may want to consider segregating based on function:
-
DMZ: Any public hosted service should be in a DMZ which does not have any access to other parts of your network or perhaps very tightly controlled access to specific server(s) on your internal network. One approach could be to host a reverse proxy in the DMZ which accesses a server in your internal network (which you could put on its own isolated network as described next). If your reverse proxy is compromised in the DMZ, it is limited to the DMZ network which protects your other internal networks.
-
APP: You could implement an APP network along with the DMZ network so that you have the reverse proxy isolated to the DMZ and your apps/services that you run on your network contained to the APP network. In a sense the APP network could be considered an internal “DMZ” while the DMZ network is the external facing network. If the DMZ is compromised and somehow it is able to reach the APP servers which are on their own network, the compromise is still contained only to the APP network. It is still not a good situation to be in, but it is likely better than the attacker having full access to your entire network. If you run apps and services on separate system containers or virtual machines, it is possible the compromise may be limited to a single app rather than the entire app server. As I mentioned before, a layered approach is best. To further minimize issues within the APP network, you can enable local firewalls on each server/container in an effort to prevent the spread between app servers.
-
IOT: Internet of Things (IoT) devices should be on their own network to limit the exposure of less secure devices on your network. IoT devices have long been known to not have the best security. You may wish to put all your media devices along with any devices which will access those devices to make it easier to stream audio/video between them. This is especially true for services which use auto discovery protocols since it can be difficult to get them to work properly across VLANs.
-
GUEST: If you have frequent visitors and you do not trust the devices they connect to your network (it could even be your parents’ or kids’ phones/tablets which may be full of whatever adware/malware junk they installed). I will sometimes put my own devices on the GUEST network if I know they no longer receive security updates such as very old iPads/iPhones since I consider them a higher security risk. Until I can eventually replace the devices, they will remain on that network.
-
VIDEO: IP security cameras could be isolated to their own network. You could even block access to the Internet for your video camera network to prevent malicious access to your home’s cameras. With the security concerns with cameras being hacked, I highly recommend you isolate your IP cameras. If you are concerned about privacy/security, do not purchase cameras which require cloud connectivity. Often you can still access your videos locally with onboard storage or via a dedicated server/NVR system.
-
SECURITY: If your home security system connects to your WiFi network, you may want to put the devices on their own network to protect them from malicious activity, which may occur on other parts of your network.
-
VPN: You could create a separate network for certain devices that you want to use an external VPN for privacy/security reasons. Some users do this to get around geographically locked media content such as on Netflix. Also, you also have the flexibility of only configuring part of your network to use the external VPN rather than your entire network.
-
WORK: Perhaps you work from home or run your own business from your home, you could isolate your work computers/network from your home network creating a WORK VLAN.
7. Firewall Rules
Security is not complete without implementing firewall rules. Firewall rules play a critical role in system and network security.
7.1 Single Interface/Flat Network
Even if you start off with a single, flat network, as you are learning OPNsense you can still implement some firewall rules on your LAN. You could restrict outgoing traffic to only allow well-known commonly used ports such as HTTP, HTTPS, and others instead of using the default “allow all” rule. However, you must have a good understanding of the requirements of every service used on your network if you plan to restrict outgoing ports.
For many home users, it likely makes sense to allow all outgoing connections due to the large number of services typically used in a home network. If you have the time and the desire to lock down your network as tight as possible, you can certainly only allow the bare minimum of outgoing traffic that your network needs to function properly with the understanding that you may have to update your rules occasionally when you use new services.
When you only have a single network, keep in mind that any device within the same network can communicate without being routed through the firewall so you cannot block traffic between two devices that are on the same network. If you wish to block two systems from communicating within the same network, you need to configure a local firewall on each system which blocks access. Even if you do not wish to restrict access between systems on the same network, I still recommend enabling a firewall on each system to further protect your devices from malicious activity.
For Linux systems, using ufw (aka Uncomplicated Firewall) which comes installed on many distros is very easy to use. I use it on all my Linux systems, virtual machines, and system containers. If you are on a system which is not hosting any services, you could simply enable the ufw firewall without creating any rules. It will block all incoming access to your system by default so that is easy protection to enable.
7.2 Multiple Interfaces/Networks
If you have more than one interface/network configured on your network whether it is physical LANs or VLANs, you will end up making much more use of firewall rules. At first you may struggle a bit to know what rules you want or need to create, but over time you may find yourself writing more rules to keep access as tight as possible while still having a functional network.
Two basic rules you may wish to start with on every interface is one rule to block access to all private networks but allow access to the Internet and another rule above that to allow access to the interface’s DNS server. If you have several networks, it is easier to block every private IP address and allow exceptions above that block rule than it is to specify all of your networks’ addresses you wish to block on each interface. It is also safer because if you add a new network you may forget to update the firewall rules in your other interfaces to block the new network. This will create holes in your rules which can be exploited.
The first rule below allows access to the current interface’s DNS server. This rule is necessary because the second rule would end up blocking access since it blocks all private IP addresses.
| Option | Value |
|---|---|
| Action | Pass |
| Interface | LAN |
| TCP/IP Version | IPv4 |
| Protocol | TCP/UDP |
| Source | LAN net |
| Source Port | any |
| Destination | LAN address |
| Destination Port | DNS (53) |
| Description | Allow access to the LAN DNS server |
The second rule blocks access to all private IP addresses but allows access to all public IP addresses. The “Destination / Invert” option is very important to enable because it essentially means “not” so the rule below allows all traffic that is not on private networks (which is all networks on the Internet). With these two rules, you will have Internet access but no access to your other internal networks.
| Option | Value |
|---|---|
| Action | Pass |
| Interface | LAN |
| TCP/IP Version | IPv4 |
| Protocol | any |
| Source | LAN net |
| Source Port | any |
| Destination / Invert | checked |
| Destination | PrivateNetworks (alias containing: 10.0.0.0/8,172.16.0.0/12,192.168.0.0/16) |
| Destination Port | any |
| Description | Allow access to Internet and block access to all local networks |
Repeat these two rules for every interface substituting the appropriate aliases for “LAN net” and “LAN address” for “DMZ net” and “DMZ address” for the DMZ interface, for instance. You can simply clone the rules to other interfaces to make the process quicker.
If you wish to allow access to other parts of the network, you can start adding rules above the last rule. The order of the rules is important. Once traffic is matched to a rule, no other rules below that rule are processed. If traffic does not match any rule, the default behavior is to deny the traffic. If you wish to have more examples of firewall rules, I created a Firewall Rules Cheat Sheet that you may be interested in viewing.
8. Use Firewall Rule Schedules to Block Services During Off Hours
Firewall rule schedules can be useful if you wish to block/“turn off” access to certain apps/services or parts of your network during certain off hours. Examples of when you may wish to set up firewall schedules include:
- When you are sleeping at night to block access to apps/services especially if they are exposed publicly and you know you will not be accessing them
- You only want your guest network to be available during certain times of the day, week, month, etc. (perhaps a rental/vacation home)
- You want to lock access to certain apps/services while you are on vacation or extended period of time away from home
- You run a small business which does not need apps/services available during the evenings or weekends
Periods of time when you are not generally monitoring your network and you do not need access to the particular service(s) are good candidates for using firewall schedules.
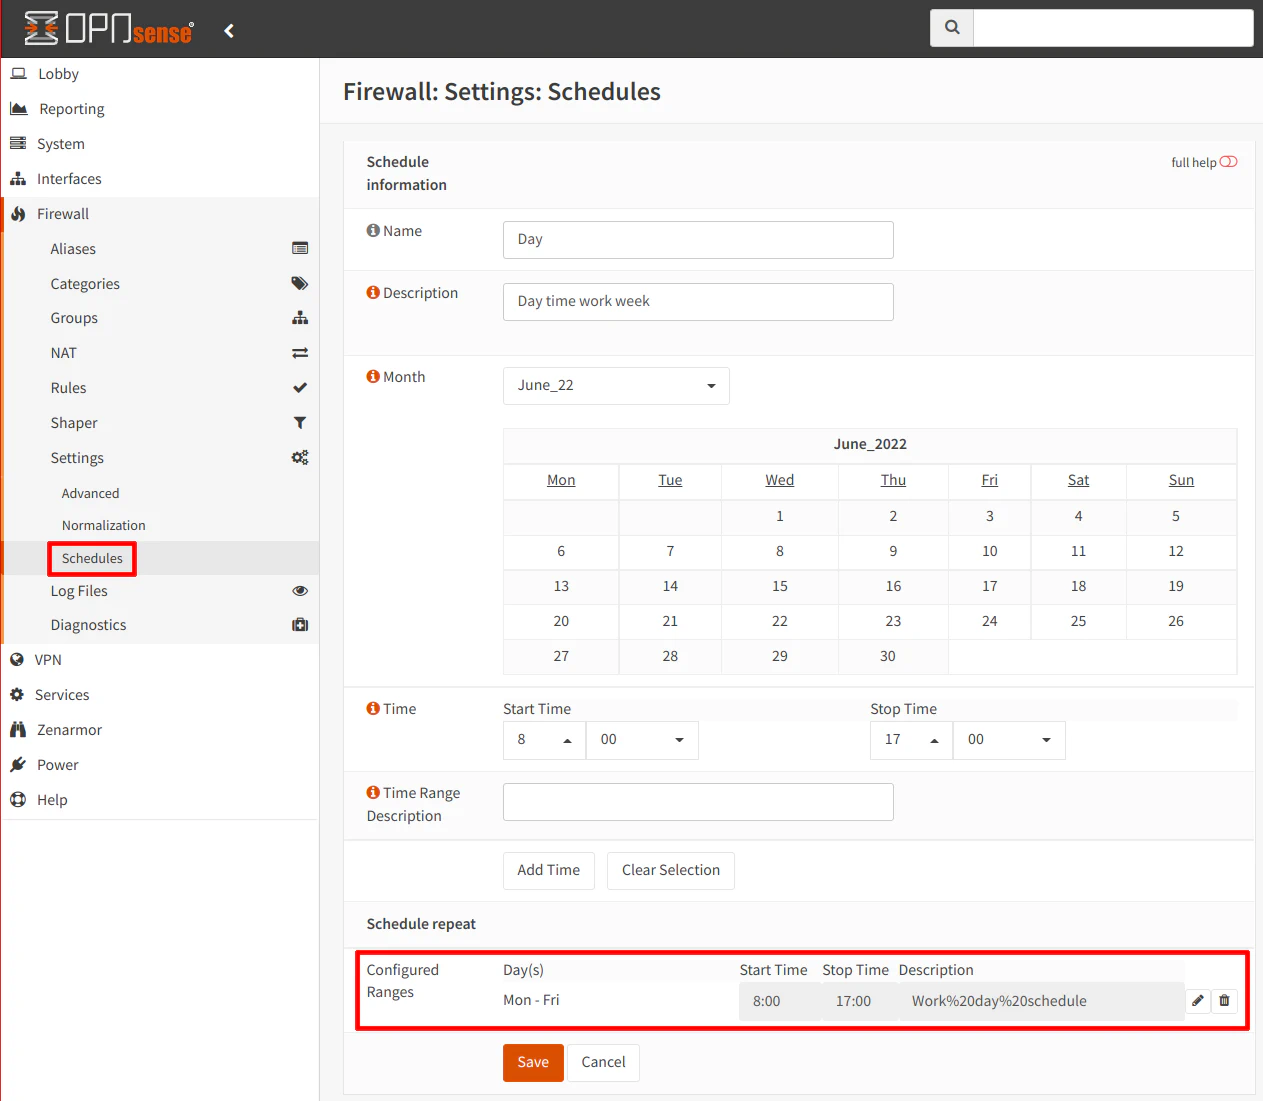
To create a schedule, go to the “Firewall > Settings > Schedules” page. Click on the “+” button to add a schedule. Each schedule defines the time when you want the rules to be active not when they should be inactive. So if you want to only allow certain apps/services during the day and blocked at night, you need to create a schedule for the daytime hours. Any time outside of those hours and the firewall rules will not be active.
One thing to note is that the interface (at the time of this writing) does not show the days of the week or the day(s) of the month which you have clicked on for your schedule so that makes it more difficult to know what you have actually selected. You will see the days you have selected after you click the “Add Time” button.
9. DNS over TLS (DoT) or DNS over HTTPS (DoH)
Normally when systems perform DNS lookups, they are unencrypted using UDP on port 53. Your DNS queries could be considered a privacy and security risk since anyone that is eavesdropping on your outgoing traffic will be able to see where you are visiting even though the rest of your communications are encrypted. There are a few ways in which you can encrypt your outgoing DNS lookups such as DNS over HTTPS (DoH) or DNS over TLS (DoT).
DoH sends DNS requests over HTTPS which may be handy in environments that are more restrictive where most outgoing ports are blocked. However, it is possible that software can use their own DoH implementation to perform DNS lookups without your knowledge. Blocking DNS over HTTPS is more difficult because it blends in with other HTTPS traffic. You either need to block access to many common public DNS servers which support DoH, which is not 100% effective or you can use TLS inspection to filter out DoH traffic, which is much more effective. The downside to TLS inspection is that it may be a security risk if not implemented securely. Implementing DoH in OPNsense requires the use of the DNSCrypt-Proxy add-on and is more complicated to configure than DoT. If you wish to implement DoH, please refer to How to Configure DNS over HTTPS (DoH) Using DNSCrypt-Proxy in OPNsense.
DoT uses its own port (853), which may be desirable if you wish to more easily monitor the DoT traffic on your network. Unbound DNS in OPNsense has DoT built-in so the configuration of DoT is much simpler than with DoH. If you wish to implement DoT, you may want to block the DoH traffic using TLS inspection to prevent devices/software from using their own DoH services (since there is the potential for malicious activity to be hidden via DoH since it blends in with other HTTPS traffic). Zenarmor, for example, has the ability to block DNS over HTTP. Please refer to How to Configure DNS over TLS (DoT) Using Unbound DNS in OPNsense if you wish to implement DoT.
Once you have configured DoH or DoT, you may wish to redirect all unencrypted DNS lookups to your local Unbound DNS server running on OPNsense so that all of your DNS traffic will be encrypted when it leaves your home network. You may accomplish this with a NAT redirect rule.
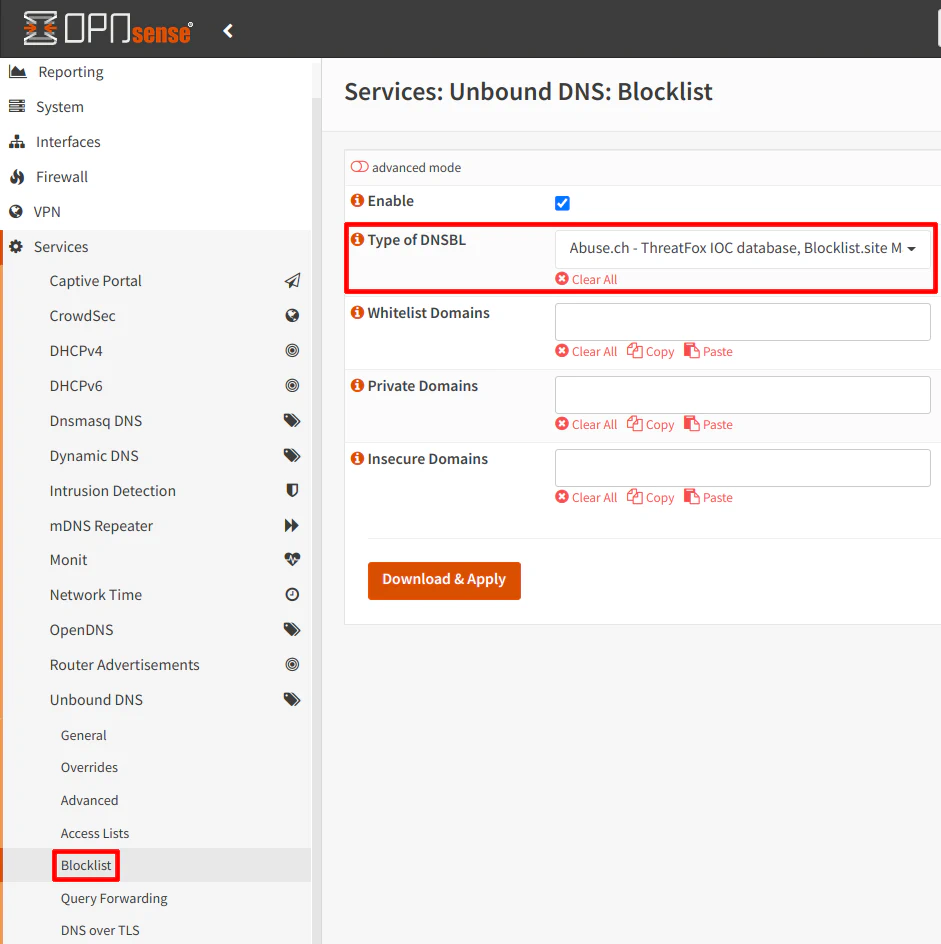
10. DNS Block Lists (DNSBL)
Many users like to use DNS block lists to block ads, trackers, and malicious domains. Blocking the domains at the DNS level on your network is one effective way to reduce a lot of unwanted traffic. Of course, there is the possibility of blocking legitimate domains, but the possibility may be worth the risk to help protect your network and reduce junk traffic. If you encounter legitimate domains which are blocked for some reason, you may whitelist them so they are no longer blocked.
Using DNSBL is similar to what Pi-hole is used for but you do not have the nice visualizations and statistics. To keep your configuration simple and contained to OPNsense, you may choose to use the built-in block lists rather than Pi-hole (but I have written about Pi-hole if you are interested in learning more).
To use the built-in DNSBL functionality provided by Unbound DNS, go to the “Services > Unbound DNS > Blocklist” page. You may select from the predefined list of blocklists or add your own URLs by clicking on the “advanced mode” toggle button. You may also whitelist domains you wish to allow, add private domains that you want to use on your network (if they are being blocked by any lists), and mark certain domains as insecure if you do not trust the security of those domains.
11. Install an Intrusion Detection/Prevention System (IDS/IPS)
Installing an Intrusion Detection System (IDS) or a Intrusion Prevention System (IPS) can help increase the security of your network. You may choose to only monitor events with IDS or to also block the events with IPS. In my opinion, IPS is more useful since it can block anything suspicious immediately, but there is always a risk of blocking something legitimate. It is a tradeoff that is worth having to provide extra security.
In this section, I will describe three different products. Each product takes a different approach so you can decide which one(s) are the best fit for you. If you have the hardware resources, you can even run them all at the same time. The only limitation currently at the time of this writing is that you cannot run Suricata (the built-in intrusion detection in OPNsense) along with Zenarmor on the same interface(s). At some point in the future, Zenarmor will allow this to happen once further development has been completed.
11.1 Suricata
Suricata is the default IDS/IPS that is included with OPNsense. Once you enable and download the rulesets, you can either alert or block rules within each ruleset. The rules you may download are 30 days or older. If you are willing to provide telemetry data, you can get access to the most up to date rulesets which will be more effective at blocking recent attacks.
Although Suricata is designed to use multiple CPU cores, if you enable a lot of rules and have a large amount of network traffic to process on higher bandwidth links, you run the risk of maxing out your CPU especially if you are using fairly modest/basic hardware.
For more information about how to set up Suricata, see the intrusion detection guide.
11.2 Zenarmor
Zenarmor (formerly known as Sensei) is a commercial 3rd party product which enables deep packet inspection and allows blocking of specific websites and apps based using policies. There is a Free Edition available which has many features that most home users would need. However, there is a Home Edition should you find yourself needing extra features such as finer control over policies (which would be useful if you want a separate policy for your kids, for instance).
If you are interested in the differences between the Free Edition and the Home Edition, please visit my review comparing those editions.
11.3 CrowdSec
CrowdSec is the newest addition to OPNsense of the options listed in this section. CrowdSec gather intelligence information from the community to generate reputation scores for IP addresses which can then be used in block lists if they are identified as malicious IPs. You can use the block lists to protect your entire network from those malicious IPs. Besides blocking malicious IPs at the network level, CrowdSec protects the OPNsense web interface and SSH interfaces from brute force attacks by default. You can even set up CrowdSec to protect other individual services on your network in a multi-server configuration.
To see how to set up CrowdSec, please visit my guide.
12. Install a VPN Server for Remote Access to Your Home Network
If you wish to access your network remotely, you should install a VPN server. Two good options are OpenVPN and WireGuard. OpenVPN is an older more mature VPN which makes use of certificates while WireGuard is newer and makes use of cryptographic keys. WireGuard has been designed to be minimal yet very secure and it offers the best performance between the two VPNs.
Setting up a VPN on your home network can also be useful when you are on a public WiFi hotspot and you simply want to have a more secure connection while away from home. You can take advantage of the security measures you put in place on your home network.
Due to the more extensive nature of setting up a VPN server and the clients, please refer to the OpenVPN and WireGuard guides that I have written for more information.